在健康碼中,主要的難點技術就是在小程式中定位、自定頂部導航。
自定義導航
在微信小程式中,預設的頂部導航不能設定圖檔背景或者是透明背景,隻能自定義導航。
在每一個頁面中引入,就是得到自己定義【個性化的】導航。
第一步:
現在app.json檔案中配置
"window": {
    "navigationStyle": "custom"
  },
"navigationStyle": "custom"
設定為使用自定義導航。
第三步:
開始定義導航
navbar.wxml:
<view class='nav-wrap'>
  <!-- 導航欄背景圖檔 -->
  <!-- <image class="backgroundimg" src="{{bg}}" bindload="imgLoaded"/> -->
  <!-- // 導航欄 中間的标題 -->
  <view class='nav-title'  style='line-height: {{height*2 + 44}}px; color:#fff'>
    {{navbarData.title}}
  </view>
</view>
navbar.js
const app = getApp()
Component({
  properties: {
    navbarData: {
      //navbarData   由父頁面傳遞的資料,變量名字自命名
      type: Object,
      value: {},
      observer: function(newVal, oldVal) {}
    }
  },
  data: {
    height: '',
    //預設值  預設顯示左上角
    navbarData: {
      showCapsule: 1
    },
    imageWidth: wx.getSystemInfoSync().windowWidth, // 背景圖檔的高度
    imageHeight: '', // 背景圖檔的長度,通過計算擷取

  },
  attached: function() {
    // 擷取是否是通過分享進入的小程式
    this.setData({
      share: app.globalData.share
    })
    // 定義導航欄的高度   友善對齊
    this.setData({
      height: app.globalData.height
    })
  },
  methods: {
    // 傳回上一頁面
    _navback() {
      wx.navigateBack()
    },
    // 計算圖檔高度
    imgLoaded(e) {
      console.log(e.detail.height)
      this.setData({
        imageHeight: e.detail.height *
          (wx.getSystemInfoSync().windowWidth / e.detail.width)
      })
    },
    tapName: function () {
      console.log(0)
    }
    //傳回到首頁
    // _backhome() {
    //   wx.switchTab({
    //     url: '/pages/index/index'
    //   })
    // }
  },
})
在app.js中擷取裝置頂部視窗的高度,會根據這個值來設定自定義導航欄的高度
//app.js
App({
  onLaunch: function(e) {
    console.log(e)
    // 展示本地存儲能力
    var logs = wx.getStorageSync('logs') || []
    logs.unshift(Date.now())
    wx.setStorageSync('logs', logs)

    // 登入
    wx.login({
      success: res => {
        // 發送 res.code 到背景換取 openId, sessionKey, unionId
      }
    })
    // 擷取使用者資訊
    wx.getSetting({
      success: res => {
        if (res.authSetting['scope.userInfo']) {
          // 已經授權,可以直接調用 getUserInfo 擷取頭像昵稱,不會彈框
          wx.getUserInfo({
            success: res => {
              // 可以将 res 發送給背景解碼出 unionId
              this.globalData.userInfo = res.userInfo

              // 由于 getUserInfo 是網絡請求,可能會在 Page.onLoad 之後才傳回
              // 是以此處加入 callback 以防止這種情況
              if (this.userInfoReadyCallback) {
                this.userInfoReadyCallback(res)
              }
            }
          })
        }
      }
    })
    wx.getSystemInfo({
      success: res => {
        console.log(res)
        this.globalData.height = res.statusBarHeight
      }
    })
  },
  globalData: {
    userInfo: null,
    height: 0 // 頂部高度
  }
})
navbar.wxss
/* navbar.wxss */

/* 頂部要固定定位   标題要居中   自定義按鈕和标題要和右邊微信原生的膠囊上下對齊 */

.nav-wrap {
  position: fixed;
  width: 100%;
  top: 0;
  background-image: linear-gradient(#2f52bc, #9198e5, #d0d9f4);
  color: #000;
  z-index: 9999999;
  overflow: hidden;
  height: 400rpx;
}

/* 背景圖 */
.backgroundimg {
  position: absolute;
  z-index: -1;
  width: 100%;
  height: 100%;
}

/* 标題要居中 */

.nav-title {
  position: absolute;
  text-align: center;
  max-width: 400rpx;
  overflow: hidden;
  text-overflow: ellipsis;
  white-space: nowrap;
  top: 0;
  left: 0;
  right: 0;
  bottom: 0;
  margin: auto;
  font-size: 36rpx;
  color: #2c2b2b;
  font-weight: 450;
}

.nav-capsule {
  display: flex;
  align-items: center;
  margin-left: 30rpx;
  width: 140rpx;
  justify-content: space-between;
  height: 100%;
}

.back-pre {
  width: 32rpx;
  height: 36rpx;
  margin-top: 4rpx;
  padding: 10rpx;
}

.nav-capsule {
  width: 36rpx;
  height: 40rpx;
  margin-top: 3rpx;
}
navbar.json:
{
  "component": true,
  "usingComponents": {}
}
在index中引入導航
index.json:
{
  "usingComponents": {
    "nav-bar": "../component/navbar/index"
  },
  "navigationBarTextStyle": "white"

}
index.js:
Page({
    data:[
        nvabarData: {
          showCapsule: 1, //是否顯示左上角圖示   1表示顯示    0表示不顯示
          title: '健康碼', //導航欄 中間的标題
          white: true, // 是就顯示白的,不是就顯示黑的。
        }
    ]
})
index.wxml:
<nav-bar navbar-data='{{nvabarData}}'></nav-bar> 以上是首頁引用的自定義導航,重新定義其他頁面的導航:
wxml:
<view class='nav-wrap'>
  <!-- 導航欄背景圖檔 -->
  <!-- <image class="backgroundimg" src="{{bg}}" bindload="imgLoaded"/> -->
  <!-- // 導航欄 中間的标題 -->
  <view class='nav-title' wx:if='{{!navbarData.white}}' style='line-height: {{height*2 + 44}}px;'>
    {{navbarData.title}}
  </view>
  <view class='nav-title' wx:else='{{!navbarData.white}}' style='line-height: {{height*2 + 44}}px; color:#fff'>
    {{navbarData.title}}
  </view>
  <view style='display: flex; justify-content: space-around;flex-direction: column'>
    <view class='nav-capsule' style='height: {{height*2 + 44}}px;'>
      <view bindtap='_navback'>
        <image src='{{backIcon}}' mode='aspectFit' class='back-pre'></image>
      </view>
    </view>
  </view>
</view>
wxss:
/* navbar.wxss */

/* 頂部要固定定位   标題要居中   自定義按鈕和标題要和右邊微信原生的膠囊上下對齊 */

.nav-wrap {
  position: fixed;
  width: 100%;
  top: 0;
  background-image: linear-gradient(#2f52bc, #9198e5, #d0d9f4);
  color: #000;
  z-index: 9999999;
  overflow: hidden;

}

/* 背景圖 */

.backgroundimg {
  position: absolute;
  z-index: -1;
  width: 100%;
  height: 100%;
}

/* 标題要居中 */

.nav-title {
  position: absolute;
  text-align: center;
  max-width: 400rpx;
  overflow: hidden;
  text-overflow: ellipsis;
  white-space: nowrap;
  top: 0;
  left: 0;
  right: 0;
  bottom: 0;
  margin: auto;
  font-size: 36rpx;
  color: #2c2b2b;
  font-weight: 450;
}

.nav-capsule {
  display: flex;
  align-items: center;
  margin-left: 30rpx;
  width: 140rpx;
  justify-content: space-between;
  height: 100%;
}

.back-pre {
  width: 32rpx;
  height: 36rpx;
  margin-top: 4rpx;
  padding: 10rpx;
}

.nav-capsule {
  width: 36rpx;
  height: 40rpx;
  margin-top: 3rpx;
}
json:
{
  "component": true,
  "usingComponents": {}
}
js:
const app = getApp()
Component({
  properties: {
    navbarData: {
      //navbarData   由父頁面傳遞的資料,變量名字自命名
      type: Object,
      value: {},
      observer: function(newVal, oldVal) {}
    }
  },
  data: {
    height: '',
    //預設值  預設顯示左上角
    navbarData: {
      showCapsule: 1
    },
    imageWidth: wx.getSystemInfoSync().windowWidth, // 背景圖檔的高度
    imageHeight: '', // 背景圖檔的長度,通過計算擷取
    backIcon: "../../img/fanhui.png",
  },
  attached: function() {
    // 擷取是否是通過分享進入的小程式
    this.setData({
      share: app.globalData.share
    })
    // 定義導航欄的高度   友善對齊
    this.setData({
      height: app.globalData.height
    })
  },
  methods: {
    // 傳回上一頁面
    _navback() {
      wx.navigateBack()
    },
    // 計算圖檔高度
    imgLoaded(e) {
      console.log(e.detail.height)
      this.setData({
        imageHeight: e.detail.height *
          (wx.getSystemInfoSync().windowWidth / e.detail.width)
      })
    },
    tapName: function() {
      console.log(0)
    }
    //傳回到首頁
    // _backhome() {
    //   wx.switchTab({
    //     url: '/pages/index/index'
    //   })
    // }
  },
})
其實可以不用定義兩個導航,隻要navbar.js判斷是否是通過分享進入小程式或者是目前頁面是否是首頁,來決定隐藏/顯示導航左上角的傳回按鈕。
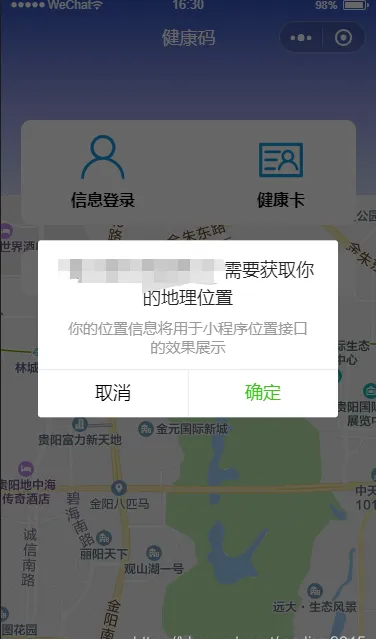
地圖定位
在監聽小程式初次渲染完成時,通過api
wx.getLocation
擷取小程式目前的經緯度,再通過經緯度在地圖給小程式進行定位。但是這個API需要使用者授權後才能擷取到,隻需要在首次打開小程式時 進行授權即可。
在app.json設定:
"permission": {
    "scope.userLocation": {
      "desc": "你的位置資訊将用于小程式位置接口的效果展示"
    }
} 
授權過後,在首頁的index.js中的
onReady
監聽頁面渲染函數中擷取小程式的經緯度:
onReady: function() {
    const that = this;
    const markers = that.data.markers;
    wx.getLocation({
      type: 'wgs84',
      success(res) {
        markers.latitude = res.latitude;
        markers.longitude = res.longitude;
        that.setData({
          latitude: res.latitude,
          longitude: res.longitude,
          markers: markers
        })
        const latitude = res.latitude
        const longitude = res.longitude
      }
    })
  },
index.js完整代碼如下:
//index.js
//擷取應用執行個體
const app = getApp()
Page({
  data: {
    markers: [{  //地圖示注的資訊
      iconPath: "../resources/location.png",
      id: 0,
      latitude: 26.64702,
      longitude: 106.63024,
      width: 50,
      height: 50
    }],
    latitude: 26.64702,
    longitude: 106.63024,
    nvabarData: {
      showCapsule: 1, //是否顯示左上角圖示   1表示顯示    0表示不顯示
      title: '健康碼', //導航欄 中間的标題
      white: true, // 是就顯示白的,不是就顯示黑的。
    },
    // 導航頭的高度
    height: app.globalData.height * 2 + 20,

    userImg: "../img/user1.png",
    cradImg: "../img/user2.png",
    clickCradimg: "../img/jilu.png",
    rightimg: "../img/rightimg.png"
  },
  onLoad: function() {},
  onReady: function() {
    const that = this;
    const markers = that.data.markers;
    wx.getLocation({
      type: 'wgs84',
      success(res) {
        console.log(res)
        markers.latitude = res.latitude;
        markers.longitude = res.longitude;
        that.setData({
          latitude: res.latitude,
          longitude: res.longitude,
          markers: markers
        })
        const latitude = res.latitude
        const longitude = res.longitude
      }
    })
  },
  login: function() {
    wx.navigateTo({
      url: '/pages/userinfo/index',
    })
  },
  card: function() {
    wx.navigateTo({
      url: '/pages/card/index',
    })
  },
  punchCard: function() {
    wx.navigateTo({
      url: '/pages/punchcard/index',
    })
  }
})
<nav-bar navbar-data='{{nvabarData}}'></nav-bar>
<map id="map" longitude="{{longitude}}" latitude="{{latitude}}" scale="14" bindcontroltap="controltap" markers="{{markers}}" show-location>
</map>
<view class="info">
<view class="login" bindtap="login">
<image src="{{userImg}}"></image>
<view>資訊登入</view>
</view>
<view class="crad" bindtap="card">
<image src="{{cradImg}}"></image>
<view>健康卡</view>
</view>
</view>
<view class="clickCrad" bindtap="punchCard">
<view class="left">
<image class="cradImg" src="{{clickCradimg}}"></image>
<view>每日健康打卡</view>
</view>
<image src="{{rightimg}}" class="rightImg"></image>
</view> #map {
width: 100%;
height: 100%;
}
.info {
position: fixed;
top: 250rpx;
padding: 30rpx 100rpx;
background: #fff;
border-radius: 10px;
display: flex;
justify-content: space-between;
font-weight: bold;
z-index: 99999999999;
left: 0;
right: 0;
margin: 0 40rpx;
}
.info image {
width: 100rpx;
height: 100rpx;
}
.login {
text-align: center;
}
.crad {
text-align: center;
}
.clickCrad {
background: #fff;
margin: 10rpx 40rpx 20rpx 40rpx;
padding: 20rpx 100rpx;
border-radius: 10px;
display: flex;
justify-content: space-between;
align-items: center;
position: fixed;
top: 500rpx;
right: 0;
left: 0;
z-index: 999999999999;
}
.left {
display: flex;
align-items: center;
}
.cradImg {
width: 50rpx;
height: 50rpx;
margin-right: 10px;
}
.rightImg {
width: 35rpx;
height: 35rpx;
} ![git ssh送出流程[圖]](data:image/gif;base64,R0lGODlhAQABAIAAAP///wAAACwAAAAAAQABAAACAkQBADs=)