一、CSS是什麼?
CSS 指層疊樣式表 (Cascading Style Sheets)
二、CSS的作用?
CSS是用來為網頁html元素設定/添加樣式,使得html網頁好看。
三、 在HTML網頁中如何使用CSS?
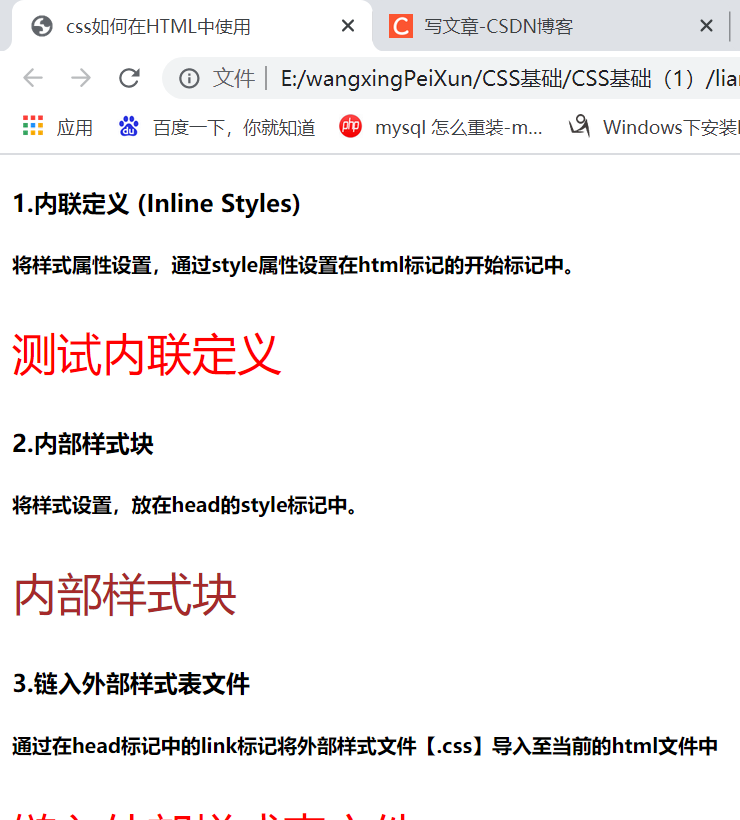
1.内聯定義 (Inline Styles)
将樣式屬性設定,通過style屬性設定在html标記的開始标記中。
格式:<html标記 style=”樣式名稱1:樣式值1;樣式名稱2:樣式值2”>顯示的内容</html标記>
2.内部樣式塊
将樣式設定,放在head的style标記中。
格式: css選擇器{
css樣式名稱:樣式值;
css樣式名稱:樣式值;
css樣式名稱:樣式值;
}
3.鍊入外部樣式表檔案 Linking to a Style Sheet
通過在head标記中的link标記将外部樣式檔案【.css】導入至目前的html檔案中
3.1建立外部樣式檔案【.css】
css選擇器{
css樣式名稱:樣式值;
css樣式名稱:樣式值;
css樣式名稱:樣式值;
} 注意字尾名是.css結尾
2.head标記中的link标記将外部樣式檔案【.css】導入
<link rel=stylesheet href="樣式檔案的路徑" target="_blank" rel="external nofollow" type="text/css">
例如:
<!DOCTYPE html>
<html>
    <head>
        <meta charset="utf-8">
        <title>css如何在HTML中使用</title>
        <style>
            #p1{
                font-size: 30px;
                color: brown;
            }
        </style>
        <link rel="stylesheet" href="test.css" target="_blank" rel="external nofollow" >
    </head>
    <body>
        <h4>1.内聯定義 (Inline Styles)</h4>
        <h5>将樣式屬性設定,通過style屬性設定在html标記的開始标記中。</h5>
        <p style="color: red;font-size: 30px;">測試内聯定義</p>
        <h4>2.内部樣式塊</h4>
        <h5>将樣式設定,放在head的style标記中。</h5>
        <p id="p1">内部樣式塊</p>
        <h4>3.鍊入外部樣式表檔案</h4>
        <h5>通過在head标記中的link标記将外部樣式檔案【.css】導入至目前的html檔案中</h5>
        <p class="p1">鍊入外部樣式表檔案</p>
    </body>
</html>
四、CSS文法
我們發現在内部樣式塊,鍊入外部樣式表的方式中,編寫css樣式的操作格式是相同
格式: css選擇器{
css樣式名稱:樣式值;
css樣式名稱:樣式值;
css樣式名稱:樣式值;
}
上面編寫css樣式的操作格式有2部分組成
1.css選擇器具體樣式設定--->鍵值對
2.【css樣式名稱:取值】

CSS基礎__1
例如:
#p1-------css選擇器
{font-size: 30px;color: blue; }-----具體樣式設定,多個樣式屬性設定之間使用”;”分割。
 #p1{
                font-size: 30px;
                color: blue;
            }
五、CSS選擇器
css選擇器就是選中需要設定樣式的html元素。
css中提供的選擇器很多。我們學習幾個常用的選擇器。
1.元素選擇器
例如:
<!DOCTYPE html>
<html>
    <head>
        <meta charset="utf-8">
        <title>元素選擇器</title>
        <style>
            p{
                font-size: 30px;
                color:springgreen;
            }
        </style>
    </head>
    <body>
        <h4>1.元素選擇器---根據html元素名稱得到需要設定樣式的html元素</h4>
        <p>測試元素選擇器</p>
        <p>如果有多個名稱相同的元素,全部被選中,作用同一種樣式</p>
    </body>
</html>
2.id選擇器
例如:
<!DOCTYPE html>
<html>
    <head>
        <meta charset="utf-8">
        <title>id選擇器</title>
        <style>
            #p1{
                font-size: 30px;
                color: springgreen;
            }
        </style>
    </head>
    <body>
        <h4>id選擇器---根據html元素的id屬性值得到需要設定樣式的html元素</h4>
        <p id="p1">測試id選擇器</p>
        <p>如果有多個名稱相同的元素,全部被選中,作用同一種樣式</p>
    </body>
</html>
3.class(類)選擇器
例如:
<!DOCTYPE html>
<html>
    <head>
        <meta charset="utf-8">
        <title>class選擇器</title>
        <style>
            .p1{
                font-size: 30px;
                color: springgreen;
            }
        </style>
    </head>
    <body>
        <h4>class選擇器---根據html元素的class屬性值得到需要設定樣式的html元素</h4>
        <p class="p1">測試class選擇器</p>
        <p>如果有多個名稱相同的元素,全部被選中,作用同一種樣式</p>
    </body>
</html>
注意:選擇器優先級: id > class > 元素
4.包含選擇器
<!DOCTYPE html>
<html>
    <head>
        <meta charset="utf-8">
        <title>包含選擇器</title>
        <style>
            #div1{
                width: 300px;
                height: 250px;
                background-color: springgreen;
            }
            #div2{
                width: 300px;
                height: 100px;
                background-color: red;
            }
            #div1 p{
                font-size: 30px;
                color: royalblue;
            }

        </style>
    </head>
    <body>
        <h4>包含選擇器--得到父元素中所有子元素,包括子子元素.</h4>
        <div id="div1">
            <div id="div2">
                <p>測試包含選擇器</p>
                </div>
        </div>
            <p>非div中的p元素</p>
    </body>
</html>
5.子元素選擇器
<!DOCTYPE html>
<html>
    <head>
        <meta charset="utf-8">
        <title>子元素選擇器</title>
        <style>
            #div1{
                width: 300px;
                height: 100px;
                background-color: springgreen;
            }
            #div2{
                width: 300px;
                height: 50px;
                background-color: red;
            }
           #div2 > p{
                font-size: 30px;
                color: royalblue;
           }

        </style>
    </head>
    <body>
        <h4>子元素選擇器--選中目前父元素的直接子元素,不包括子子元素</h4>
        <div id="div1">
            <div id="div2">
                <p>測試子元素選擇器</p>
                </div>
        </div>
            <p>非div中的p元素</p>
    </body>
</html>
6.屬性選擇器
例如:
<!DOCTYPE html>
<html>
    <head>
        <meta charset="utf-8">
        <title>屬性選擇器</title>
        <style>
            /* 選擇a标簽中的target屬性 */
            a[target]{
                font-size: 30px;
                color: seagreen;
            }
            /* 選擇a标簽中href屬性是test2.html屬性的 */
            a[href='test2.html']{
                font-size: 40px;
                color: red;
            }
            /* 得到a标簽彙總href屬性是test3.htnl和target屬性是_self的 */
            a[href='test3.html'][target='_self']{
                font-size: 30px;
                color: saddlebrown;
            }
        </style>
    </head>
    <body>
        <h4>屬性選擇器--根據html元素的屬性,得到需要設定css的html元素</h4>
        <a href="test1.html" target="_blank" rel="external nofollow"  target="_blank" rel="external nofollow" >打開test1.html檔案</a><br>
        <a href="test2.html" target="_blank" rel="external nofollow"  target="_blank" rel="external nofollow"  target="_blank" rel="external nofollow"  target="_blank">打開test2.html檔案</test></a><br>
        <a href="test3.html" target="_blank" rel="external nofollow"  target="_blank" rel="external nofollow"  target="_blank" rel="external nofollow"  target="_self">打開test3.html檔案</a>
    </body>
</html>
7.選擇器分組
例如:
<!DOCTYPE html>
<html>
    <head>
        <meta charset="utf-8">
        <title>選擇器分組</title>
        <style>
           div{
               width: 350px;
               height: 200px;
               background-color: yellow;
           }
           #p1,#d1 h3,.p1>span{
                font-size: 30px;
                color: turquoise;
           }
        </style>
    </head>
    <body>
        <h4>選擇器分組--得到同一個html檔案中不同位置的元素,作用同一種樣式</h4>
        <p id="p1">開始p元素</p>
        <div id="d1">
            <h3>包含在div中的标題标記</h3>
        </div>
        <p class="p1">div元素後面的<span>p元素</span></p>
    </body>
</html>
注意:選擇器在使用時候都是混合使用,可以讓我們很快得到自己需要控制的元素。
六、CSS僞類
| :link | a:link | 選擇所有未通路連結 |
| :visited | a:visited | 選擇所有通路過的連結 |
| :active | a:active | 選擇正在活動連結 |
| :hover | a:hover | 把滑鼠放在連結上的狀态 |
| :focus | input:focus | 選擇元素輸入後具有焦點 |
例如:
<!DOCTYPE html>
<html>
    <head>
        <meta charset="utf-8">
        <title>css僞類</title>
        <style>
          a:link{
              color: black;
              font-size: 20px;
          }
        a[href="test2.html" target="_blank" rel="external nofollow"  target="_blank" rel="external nofollow"  target="_blank" rel="external nofollow" ]:active{
             color: red;
             font-size: 30px;
         }
        a[href="test3.html" target="_blank" rel="external nofollow"  target="_blank" rel="external nofollow"  target="_blank" rel="external nofollow" ]:hover{
            color: yellow;
            font-size: 35px;
        }
        a[href="test4.html" target="_blank" rel="external nofollow"  target="_blank" rel="external nofollow" ]:visited{
            color: green;
            font-size: 40px;
        }
        </style>
    </head>
    <body>
        <h4>CSS僞類是用來添加一些選擇器的特殊效果</h4>
        <h5>:link   a:link  選擇所有未通路連結</h5>
        <a href="test1.html" target="_blank" rel="external nofollow"  target="_blank" rel="external nofollow"  target="_blank">測試CSS 僞類</a>
        <h5>:active  a:active    選擇正在活動連結</h5>
        <a href="test2.html" target="_blank" rel="external nofollow"  target="_blank" rel="external nofollow"  target="_blank" rel="external nofollow"  target="_blank">測試CSS 僞類</a>
        <h5>:hover  a:hover 把滑鼠放在連結上的狀态</h5>
        <a href="test3.html" target="_blank" rel="external nofollow"  target="_blank" rel="external nofollow"  target="_blank" rel="external nofollow" >測試CSS 僞類</a>
        <h5>:visited  a:visited 選擇過後的連結狀态</h5>
        <a href="test4.html" target="_blank" rel="external nofollow"  target="_blank" rel="external nofollow" >測試CSS 僞類</a>
        <h5>:focus  input:focus 選擇元素輸入後具有焦點</h5>
    </body>
</html>
七、具體樣式設定
1.css背景設定
background-color:顔色單詞/顔色碼 定義了元素的背景顔色
background-image:url('圖檔路徑')描述了元素的背景圖像,預設水準垂直方向平鋪
background-repeat:設定背景圖像水準或垂直平鋪
repeat-x:水準平鋪
repeat-y:垂直平鋪
repeat:水準垂直平鋪
no-repeat:不平鋪
background-attachment: 設定背景圖像是否固定或者随着頁面的其餘部分滾動。
scroll 背景圖檔随着頁面的滾動而滾動,這是預設的。
fixed 背景圖檔不會随着頁面的滾動而滾動。
local 背景圖檔會随着元素内容的滾動而滾動。
例如:
<!DOCTYPE html>
<html>
    <head>
        <meta charset="utf-8">
        <title>背景設定</title>
        <style>
            body{
                /*background-color: hotpink;*/
                background-image: url("imgs/avatar04.png");
                background-repeat: no-repeat;
                background-attachment: local;
                background-position: center center;
            }
        </style>
    </head>
    <body>
        <h1>background-color:顔色單詞/顔色碼 定義了元素的顔色</h1>
        <h1>background-image:url("圖檔路徑") 描述了元素的背景圖檔,預設水準垂直方向平鋪</h1>
            <h2>background-repeat:設定背景圖像水準或者垂直平鋪</h2>
            <h2>repeat-x:水準平鋪</h2>
            <h2>repeat-y:垂直平鋪</h2>
            <h2>norepeat:不平鋪</h2>
        <h1>background-attachment:設定背景圖像是否固定或者随着其餘網頁滾動</h1>
            <h2>scroll 背景圖像随着頁面的滾動而滾動</h2>
            <h2>fixed 背景圖像不會随着頁面的滾動而滾動</h2>
            <h2>local 背景圖像會随着元素内容滾動</h2>
        <h1>background-position:屬性設定背景圖像的起始位置</h1>
            <h2>left top/left center/ left bottom/right top/right center/ right bottom/center top/ center center/center bottom</h2>

    </body>
</html>
2.css文本屬性設定
color:顔色單詞/顔色碼---設定文字的顔色
text-align:left/center/right ---設定文本的水準對齊方式[居中或右對齊或左對齊]
text-decoration:overline/line-through/underline/none---設定或删除文本的裝飾
text-transform:uppercase/lowercase/capitalize---用來指定在一個文本中的大寫和小寫字母,可設定大寫或小寫字母,或每個單詞的首字母大寫。
text-indent:數字px----指定文本的第一行的縮進
letter-spacing:數字px----設定字元間距
line-height:數字px----設定行高
vertical-align:top/middle/bottom----設定一個元素的垂直對齊方式
word-spacing:數字px----增加或減少字與字之間的空白
text-shadow:水準 垂直 模糊 顔色----設定文字陰影
例如:
<!DOCTYPE html>
<html>
    <head>
        <meta charset="utf-8">
        <title>文本屬性設定</title>
        <style>
            #p1{
                color: lawngreen;
            }
            #p2{
               text-align: center;
            }
            #p3{
                text-decoration:underline;
            }
            #p4{
                text-transform: capitalize;
            }
            .p2{
                text-indent: 20px;
                letter-spacing: 5px;
                line-height: 30px;
                word-spacing: 30px;
            }
            tr > td{
                vertical-align: bottom;
            }
            #p5{
                text-shadow: 3px 2px 2px blue;
            }
        </style>
    </head>
    <body>
        <p id="p1">color:顔色單詞/顔色碼 設定文字的顔色</p>
        <p id="p2">text-align:center/left/right 設定文本的水準對齊方式【居中或右對齊或左對齊】</p>
        <p id="p3">text-decoration:overline/line-through/underline/none 設定或删除文本的修飾</p>
        <p id="p4">text-transform:uppercase(大寫)/lowercase(小寫)/capitalize(首字母大寫) 用來指定在一個文本中的大寫和小寫字母,可設定大寫或小寫字母,或每個單詞的手字母大寫</p>

        <p class="p2">
            text-indent:指定文本的第一行的縮進<br>
            letter-spacing:設定字元間距<br>
            line-height:設定字型行距<br>
            word-spacing:增加或減少字與字之間的空白<br>
            hello wangxing
        </p>
        <table >
            <tr style="height: 80px;">
                <td>vertical-align:top/middle/bottom----設定一個元素的垂直對齊方式</td>
            </tr>
        </table>
        <p id="p5">text-shadow:水準 垂直 模糊 顔色----設定文字陰影</p>
    </body>
</html>