簡介
說明
本文介紹Vue如何整合SVG圖示。
前端圖示的發展
從上到下是從古至今的順序
- 使用img實作
- 一個頁面的請求資源中圖檔 img 占了大部分
- image sprite(雪碧圖)
- 将多個圖檔合成一個圖檔,然後利用 css 的 background-position 定位顯示不同的 icon 圖示
- 是為了優化方案1而提出的。
- 維護困難。每新增一個圖示,都需要改動原始圖檔,還可能影響到前面定位好的圖檔。
- font庫
- 優點:使用友善
- 缺點:找起來不友善,定制化很差,Icon不好看
- iconfont
- 阿裡做的
- 圖示數量多,有幾百個公司的開源圖示庫,有各式各樣的小圖示,支援自定義建立圖示庫。
SVG的好處
可以輕松地按比例放大和縮小圖示。SVG圖示是矢量圖,具有優于位圖圖形的優點,即按比例放大或縮小時它們仍然看起來不錯。而位圖圖形在按比例放大時趨于像素化,而在按比例縮小時會失去品質(像素)。
1.建立Vue項目
見:@vue/cli4--使用圖形化界面建立項目--方法/執行個體_IT利刃出鞘的部落格
2.安裝svg-sprite-loader
npm install svg-sprite-loader -D 3.配置svg-sprite-loader
1.建立存放svg圖示的目錄
在項目 src 目錄下建立 src/icons/svg 目錄(存放 svg 圖示檔案)。
2.建立svg檔案的入口檔案
在 src/icons 下建立 icons 目錄的入口檔案 index.js ,負責svg檔案的加載
import Vue from 'vue'
import SvgIcon from '@/components/SvgIcon'
Vue.component('svg-icon', SvgIcon)

/**
 * require.context 的參數說明
 * './svg' 代表要查找的檔案路徑
 * false 代表是否查找子目錄
 * /\.svg$/ 代表要比對檔案的正則
 *
 */
const svg = require.context('./svg', false, /\.svg$/)
const requireAll = (requireContext) =>
  requireContext.keys().map(requireContext)
requireAll(svg)
3.配置vue.config.js
在vue.config.js中添加如下配置:
'use strict'

const path = require('path')
const resolve = dir => path.join(__dirname, dir)

module.exports = {
  chainWebpack (config) {
    // 配置 svg-sprite-loader
    config.module
      .rule('svg')
      .exclude.add(resolve('src/icons'))
      .end()
    config.module
      .rule('icons')
      .test(/\.svg$/)
      .include.add(resolve('src/icons'))
      .end()
      .use('svg-sprite-loader')
      .loader('svg-sprite-loader')
      .options({
        symbolId: 'icon-[name]'
      })
      .end()
  }
}
4.建立圖示元件:SvgIcon.vue
在src/components下建立SvgIcon.vue
(或者:在src/components下建立SvgIcon檔案夾,在裡邊建立index.vue)
内容如下:
<template>
  <svg className="svg-icon" aria-hidden="true">
    <use :xlink:href="iconName"/>
  </svg>
</template>
<style>
.svg-icon {
  width: 1.5em;
  height: 1.5em;
}
</style>
<script>
export default {
  props: {
    iconClass: {
      type: String,
      required: true
    }
  },
  computed: {
    iconName () {
      return `#icon-${this.iconClass}`
    }
  }
}
</script>
5.使用SvgIcon元件
1.全局引入icons
在 main.js 入口檔案中 全局引入 icons:
import './icons' 2.下載下傳svg檔案
去 iconfont 圖示網站下載下傳個svg圖示。
将下載下傳的 svg 圖示放置到 src/icons/svg 目錄下。這裡我下載下傳的是一個搜尋圖示。
3.在元件中引入svg圖示
建立components/Parent.vue
<template>
  <div>
    <div>
      這是Parent。
    </div>
    <svg-icon icon-class="search"></svg-icon>
  </div>
</template>

<script>
export default {
  name: 'Parent'
}
</script>

<style scoped>

</style>
修改router/index.js
import Vue from 'vue'
import VueRouter from 'vue-router'
import Parent from '../components/Parent'
Vue.use(VueRouter)
const routes = [
{
path: '/',
name: 'Parent',
component: Parent
}
]
const router = new VueRouter({
routes
})
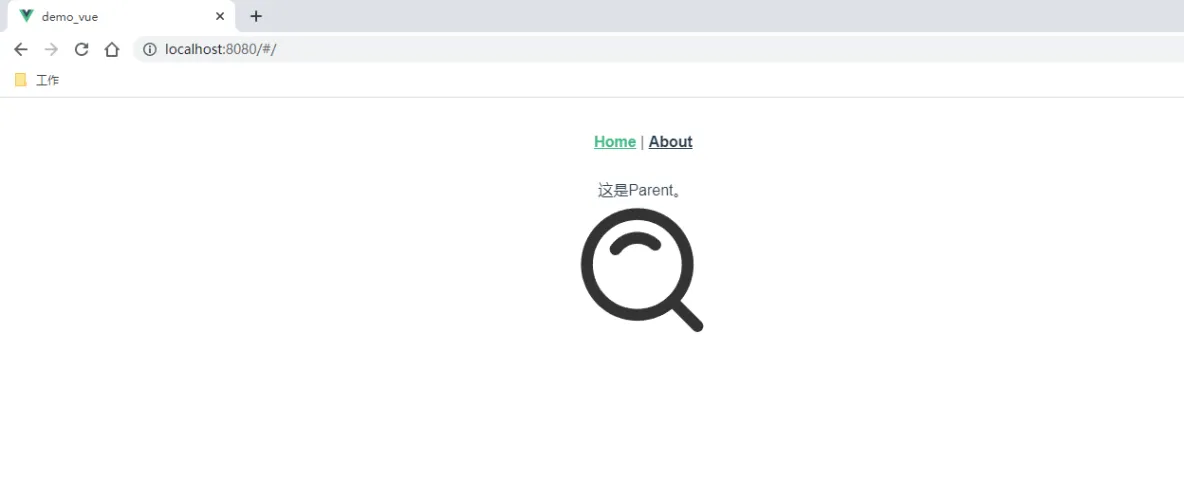
export default router 6.測試
通路:http://localhost:8080/#/
結果:
7.壓縮svg圖示(非必須)
我們從iconfont下載下傳的svg圖示已經比較精簡了,但裡邊還是有些無用資訊(比如注釋)。而且,如果svg圖示是從設計那裡拿到的,可能會不夠精簡,這時可以使用svgo來進行壓縮。
見:SVGO--使用/執行個體_IT利刃出鞘的部落格
其他網址
SVG 使用教程:如何在 Vue 中使用 SVG icon 圖示系統 - 卡拉雲
![nodejs微信開發---授權登入+擷取使用者資訊微信網頁授權[圖]](data:image/gif;base64,R0lGODlhAQABAIAAAP///wAAACwAAAAAAQABAAACAkQBADs=)