一、事件監聽涉及到三個類對象
1、EventSource(事件源)事件發生的場所
2、Event(事件):事件封裝界面元件上面發生的特定事件
3、EventListener(事件監聽器):負責監聽事件源發生的事件
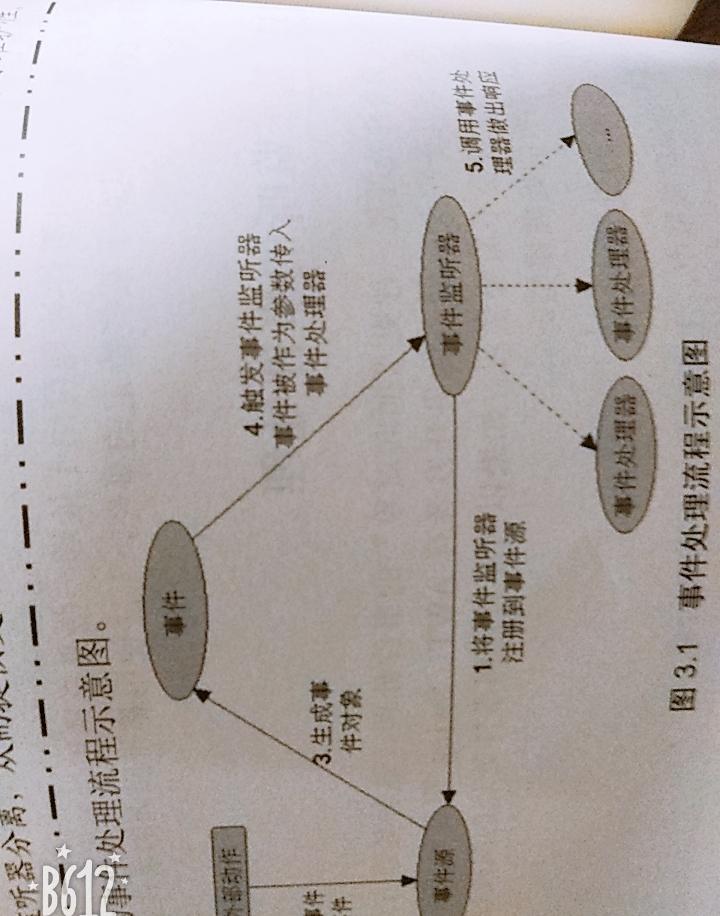
二、監聽器就是程式中的MyClickListenner類,監聽器類必須要程式員自己實作,關鍵在于實作處理。通常事件監聽器必須實作的監聽接口有:
1、View.OnClickListener: 單擊事件的監聽器必須實作的接口
2、View.OnCreateContextMenuListener: 建立上下文菜單事件的事件監聽器必須要實作的的接口
3、View.onFocusChangeListener: 焦點改變事件監聽器必須實作的接口
4、View.OnkeyListener: 按鍵事件監聽器必須要實作的接口
5、View.OnLongClickListener: 長按事件監聽器必須實作的接口
6、View.OnTouchListener: 觸摸事件監聽器必須實作的接口
三、注冊監聽器,隻需要調用事件源的 setXxxListener(XxxListener)方法就可以了。也可以在xml中用Android:onClick屬性指定監聽
四、基于回調事件處理
GUI提供一些事件的處理回調方法,以View為例
1、boolean onKeyDown(int keyCode ,keyEvent event): 當使用者在該元件上按下一個鍵,觸發該方法
2、boolean onKeyLongPress(int keyCode,KeyEvent evnt): 當使用者在元件上長按鍵時觸發該方法
3、boolean onKeyShortcut(int keyCode,KeyEvent evnt): 當使用者在元件上快捷鍵事件時,觸發該方法
4、boolean onKeyUp(int keyCode,KeyEvent evnt): 當使用者在元件上松開按鍵事件時,觸發該方法
5、boolean onTouchEvent(MotionEvent event): 當使用者觸摸觸摸屏時,觸發該方法
6、boolean onTrackballEvent(MotionEvent event): 當使用者觸發軌迹球事件時,觸發該方法
5、總的來說事件發生時,首先觸發的是綁定在元件上的監聽器,其次才觸發該元件上面的回調方法,最後才是傳播到該元件所在的Activity上。
在一些情況下,基于回調事件處理機制會更好地提高程式地内聚性
6、通過回調方法實作跟随手指地小球(重寫boolean onTouchEvent(MotionEvent event))
1、自定一個DrawView,繼承View
public class DrawView extends View {
    public float currentX=40;
    public float currentY=50;
   Paint paint=new Paint();//建立畫筆

    public DrawView(Context context) {
        super(context);
    }

    public DrawView(Context context, @Nullable AttributeSet attrs) {
        super(context, attrs);
    }

    //重寫onDraw
    public void onDraw(Canvas canvas){
        super.onDraw(canvas);
        paint.setColor(Color.RED);
        canvas.drawCircle(currentX,currentY,20,paint);
    }

    //重寫onTouchEvent(MotionEvent event) 當發生觸摸屏事件的時候發生

    public boolean onTouchEvent(MotionEvent event){
        currentX=event.getX();  //擷取觸摸事件的x
        currentY=event.getY();  //擷取觸摸事件的y
        //通知目前的元件重化自己
        invalidate();
        return true;
    }
}
二、有兩種用法
1.1、可直接在xml中使用
<?xml version="1.0" encoding="utf-8"?>
<LinearLayout
    xmlns:android="http://schemas.android.com/apk/res/android"
    android:layout_width="match_parent"
    android:layout_height="match_parent"
    android:orientation="horizontal">

    <com.example.asus.summary.view.DrawView
        android:layout_width="wrap_content"
        android:layout_height="wrap_content" />

</LinearLayout>
1.2、Activity
public class DrawActivity extends AppCompatActivity {

    protected void onCreate(Bundle saveInstanceSate) {
        super.onCreate(saveInstanceSate);

      setContentView(R.layout.draw_activity);

    }
}
2、Activity
public class DrawActivity extends AppCompatActivity {

    protected void onCreate(Bundle saveInstanceSate) {
        super.onCreate(saveInstanceSate);
        LinearLayout linearLayout=new LinearLayout(this);  //線性布局管理器
        DrawView drawView=new DrawView(this);      //自定義view
        drawView.setMinimumHeight(300);
        drawView.setMinimumWidth(500);
        linearLayout.addView(drawView);    //布局容器中加入自定義view
        setContentView(linearLayout);     //設定布局
    }
}
