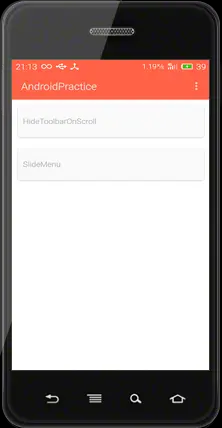
-
代碼未行,效果先上

Flyme4.2 Android4.4.4上運作效果
-
如何實作
在 KITKAT 之後,Android Window支援了一些新的屬性,其中有兩個是這樣的 .
正如它們的變量名的意思,使用這兩個屬性,可以使得狀态欄和導航欄變為透明,導航欄指的就是Android下方的三大按鍵,當然隻使用第一個屬性也可以達到今天所要完成的效果。下面的示例代碼将使狀态欄和導航欄變得透明WindowManager.LayoutParams.FLAG_TRANSLUCENT_STATUS WindowManager.LayoutParams.FLAG_TRANSLUCENT_NAVIGATION@Override protected void onCreate(Bundle savedInstanceState) { super.onCreate(savedInstanceState); initWindow(); }
直接運作之後,狀态欄直接透明了,但是并不是我們想要的效果,狀态欄原本應該占有的位置沒了。@TargetApi() private void initWindow(){ if (Build.VERSION.SDK_INT >= Build.VERSION_CODES.KITKAT){ getWindow().addFlags(WindowManager.LayoutParams.FLAG_TRANSLUCENT_STATUS); getWindow().addFlags(WindowManager.LayoutParams.FLAG_TRANSLUCENT_NAVIGATION); }Android KITKAT 以上實作沉浸式狀态欄 Flyme4.2 Android4.4.4上運作效果
這個問題也很好解決,在 style theme 添加
之後我們再運作,卻又發現,狀态欄的位置出來了,但是。。。
Flyme4.2 Android4.4.4上運作效果
實際上,狀态欄已經透明了,隻是狀态欄底下沒有顔色呀!
Google 了之後在 Github 找到了一個開源項目 SystemBarTint ,代碼就變成下面這個樣子:
private SystemBarTintManager tintManager;
   @TargetApi()
   private void initWindow(){
        if (Build.VERSION.SDK_INT >= Build.VERSION_CODES.KITKAT){
            getWindow().addFlags(WindowManager.LayoutParams.FLAG_TRANSLUCENT_STATUS);
            getWindow().addFlags(WindowManager.LayoutParams.FLAG_TRANSLUCENT_NAVIGATION);
            tintManager = new SystemBarTintManager(this);
            tintManager.setStatusBarTintColor(getColor(R.color.app_main_color));
            tintManager.setStatusBarTintEnabled(true);
        }
    }
運作之後,發現運作效果跟第一張圖一樣,達到我們想要的效果了。
跟蹤進去檢視 SystemBarTint 的源代碼,會發現 SystemBarTintManager 的構造方法裡面除了擷取 ActionBar 的高度等等這些配置之外,還有一個重要的方法 setupStatusBarView
@TargetApi()
    public SystemBarTintManager(Activity activity) {
        Window win = activity.getWindow();
        ViewGroup decorViewGroup = (ViewGroup) win.getDecorView();
        if (Build.VERSION.SDK_INT >= Build.VERSION_CODES.KITKAT) {
        //省去部分代碼...
        if (mStatusBarAvailable) {
            setupStatusBarView(activity, decorViewGroup);
        }
        if (mNavBarAvailable) {
            setupNavBarView(activity, decorViewGroup);
        }
    }
于是接着檢視 setupStatusBarView 的代碼
private void setupStatusBarView(Context context, ViewGroup decorViewGroup) {
        mStatusBarTintView = new View(context);
        LayoutParams params = new LayoutParams(LayoutParams.MATCH_PARENT, mConfig.getStatusBarHeight());
        params.gravity = Gravity.TOP;
        if (mNavBarAvailable && !mConfig.isNavigationAtBottom()) {
            params.rightMargin = mConfig.getNavigationBarWidth();
        }
        mStatusBarTintView.setLayoutParams(params);
        mStatusBarTintView.setBackgroundColor(DEFAULT_TINT_COLOR);
        mStatusBarTintView.setVisibility(View.GONE);
        decorViewGroup.addView(mStatusBarTintView);
    }
可以發現這個開源項目能夠解決我們的問題的原因在這,就是往 DecorView 加入一個 View, 而在代碼中我們将這個 View 的背景設定成 ActionBar 一樣的顔色,是以就達到了沉浸式的效果。到這裡,基本也就分析完成了。
-
源代碼
附上源代碼位址: Github 源代碼 .
項目是我最近剛建不久的,主要放了一些 Android 方面的練習,最近更新了RecycleView滾動時隐藏Toolbar和狀态欄,類似pocket 和 滑動菜單欄,支援設定左右滑動呼出