問題
vue-quill-editor是我們再使用vue架構的時候常用的一個富文本編輯器,在進行富文本編輯的時候,我們往往要插入一些圖檔,vue-quill-editor預設的處理方式是直接将圖檔轉成base64編碼,這樣的結果是整個富文本的html片段十分備援,通常來講,每個伺服器端接收的post的資料大小都是有限制的,這樣的話有可能導緻送出失敗,或者是使用者體驗很差,資料要傳遞很久才全部傳送到伺服器。
是以,在富文本編輯的過程中,對于圖檔的處理,我們更合理的做法是将圖檔上傳到伺服器,再将圖檔連結插入到富文本中,以達到最優的體驗。
分析
查閱網上的資料,我感覺提供的方案都不是特别友好,網上搜尋的基本都是這一個方法:配合element-ui實作上傳圖檔到七牛雲
坦白講,上面這2個方法都很特别,也的确有效果,但是我個人還是覺得不完美,第一個方法寫得太麻煩,第二個方法有點投機取巧。
結合上面兩種方法以及官方的文檔,我這裡提供一個新的改造思路給大家參考。
引入element-ui
和第一種方法類似,為了更好的控制上傳的圖檔,我這裡也是引用了element-ui的上傳圖檔元件
<template>
    <div>
        <!-- 圖檔上傳元件輔助-->
        <el-upload
                class="avatar-uploader"
                action="serverUrl"
                name="img"
                :headers="header"
                :show-file-list="false"
                :on-success="uploadSuccess"
                :on-error="uploadError"
                :before-upload="beforeUpload">
        </el-upload>
    </div>
</template>
<script>
    export default {
        data() {
            return {
                serverUrl: '',  // 這裡寫你要上傳的圖檔伺服器位址token
            }
        },
        methods: {
            // 上傳圖檔前
            beforeUpload(res, file) {},
            // 上傳圖檔成功
            uploadSuccess(res, file) {},
            // 上傳圖檔失敗
            uploadError(res, file) {}
        }
    }
</script>
這裡要使用element-ui主要有2個好處
- 可以對圖檔上傳前,圖檔上傳成功,圖檔上傳失敗等情況進行操作,也就是代碼中的
:on-success="uploadSuccess"  //  圖檔上傳成功
  :on-error="uploadError"  // 圖檔上傳失敗
  :before-upload="beforeUpload"  // 圖檔上傳前
- 使用element-ui的v-loading顯示loading動畫
引入vue-quill-editor
這裡對于如何安裝和引入vue-quill-editor和就不多做陳述了,不清楚的同學自己Google下哈。
在代碼中寫入vue-quill-editor後如下
<template>
    <div>
        <!-- 圖檔上傳元件輔助-->
        <el-upload
                class="avatar-uploader"
                action="serverUrl"
                name="img"
                :show-file-list="false"
                :on-success="uploadSuccess"
                :on-error="uploadError"
                :before-upload="beforeUpload">
        </el-upload>
        <!--富文本編輯器元件-->
       <el-row v-loading="uillUpdateImg">
        <quill-editor
                v-model="detailContent"
                ref="myQuillEditor"
                :options="editorOption"
                @change="onEditorChange($event)"
                @ready="onEditorReady($event)"
        >
        </quill-editor>
       </el-row>
    </div>
</template>
<script>
    export default {
        data() {
            return {
                quillUpdateImg: false, // 根據圖檔上傳狀态來确定是否顯示loading動畫,剛開始是false,不顯示
                detailContent: '', // 富文本内容
                editorOption: {}  // 富文本編輯器配置
            }
        },
        methods: {
            // 上傳圖檔前
            beforeUpload(res, file) {},
            // 上傳圖檔成功
            uploadSuccess(res, file) {},
            // 上傳圖檔失敗
            uploadError(res, file) {}
        }
    }
</script>
這裡可以看到我們用一個<el-row>包裹我們的富文本元件,是為了使用loading動畫,就是v-loading這個設定
重寫點選圖檔按鈕事件
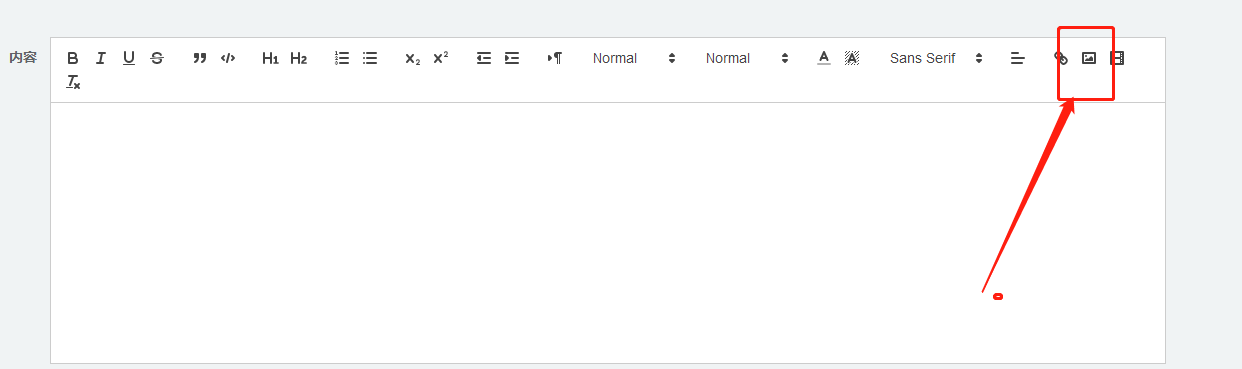
從下圖可以看到,預設的配置中,整個工具欄具備了所有的功能,自然也包括紅框中的圖檔上傳功能了。
那麼接下來我們要怎麼去重寫這個按鈕的事件呢。
很簡單,我們需要在editorOption配置中這麼寫
export default {
data() {
            return {
            quillUpdateImg: false, // 根據圖檔上傳狀态來确定是否顯示loading動畫,剛開始是false,不顯示
                serverUrl: '',  // 這裡寫你要上傳的圖檔伺服器位址
                header: {token: sessionStorage.token},  // 有的圖檔伺服器要求請求頭需要有token之類的參數,寫在這裡
                detailContent: '', // 富文本内容
                editorOption: {
                    placeholder: '',
                    theme: 'snow',  // or 'bubble'
                    modules: {
                        toolbar: {
                            container: toolbarOptions,  // 工具欄
                            handlers: {
                                'image': function (value) {
                                    if (value) {
                                        document.querySelector('#quill-upload input').click()
                                    } else {
                                        this.quill.format('image', false);
                                    }
                                }
                            }
                        }
                    }
                }
            }
        }
}
配置中的handlers是用來定義自定義程式的,然而我們配置完後會懵逼地發現,整個富文本編輯器的工具欄的圖檔上傳等按鈕都不見了 隻保留了幾個基本的富文本功能。
這個是因為添加自定義處理程式将覆寫預設的工具欄和主題行為
是以我們要再自行配置下我們需要的工具欄,所有功能的配置如下,大家可以按需配置
<script>
// 工具欄配置
const toolbarOptions = [
  ['bold', 'italic', 'underline', 'strike'],        // toggled buttons
  ['blockquote', 'code-block'],

  [{'header': 1}, {'header': 2}],               // custom button values
  [{'list': 'ordered'}, {'list': 'bullet'}],
  [{'script': 'sub'}, {'script': 'super'}],      // superscript/subscript
  [{'indent': '-1'}, {'indent': '+1'}],          // outdent/indent
  [{'direction': 'rtl'}],                         // text direction

  [{'size': ['small', false, 'large', 'huge']}],  // custom dropdown
  [{'header': [1, 2, 3, 4, 5, 6, false]}],

  [{'color': []}, {'background': []}],          // dropdown with defaults from theme
  [{'font': []}],
  [{'align': []}],
  ['link', 'image', 'video'],
  ['clean']                                         // remove formatting button
]

export default {
data() {
 return {
editorOption: {
          placeholder: '',
          theme: 'snow',  // or 'bubble'
          modules: {
            toolbar: {
              container: toolbarOptions,  // 工具欄
              handlers: {
                'image': function (value) {
                  if (value) {
                    alert(1)
                  } else {
                    this.quill.format('image', false);
                  }
                }
              }
            }
          }
        }
    }
 }
}

</script>
由于這裡的工具欄配置列舉了所有,看起來很長一堆,我建議大家可以寫在單獨一個檔案,然後再引入,美觀一點
自定義按鈕事件打開上傳圖檔
經過上面的配置,大家點選一下圖檔,可以看出彈出了個1,說明我們的自定義事件生效了,那麼接下來,大家的思路是不是就很清晰啦?
我們需要在handlers裡面繼續完善我們的圖檔點選事件。
- 第一步,點選按鈕選擇本地圖檔
handlers: {
           'image': function (value) {
             if (value) {
             // 觸發input框選擇圖檔檔案
                document.querySelector('.avatar-uploader input').click()
               } else {
                this.quill.format('image', false);
              }
           }
        }
在這裡我們的自定義事件就結束了,接下來圖檔上傳成功或者失敗都由
:on-success="uploadSuccess"  //  圖檔上傳成功
  :on-error="uploadError"  // 圖檔上傳失敗
  :before-upload="beforeUpload"  // 圖檔上傳前
這三個函數來處理
// 富文本圖檔上傳前
            beforeUpload() {
                // 顯示loading動畫
                this.quillUpdateImg = true
            },

            uploadSuccess(res, file) {
                // res為圖檔伺服器傳回的資料
                // 擷取富文本元件執行個體
                let quill = this.$refs.myQuillEditor.quill
                // 如果上傳成功
                if (res.code === '200' && res.info !== null) {
                    // 擷取光标所在位置
                    let length = quill.getSelection().index;
                    // 插入圖檔  res.info為伺服器傳回的圖檔位址
                    quill.insertEmbed(length, 'image', res.info)
                    // 調整光标到最後
                    quill.setSelection(length + 1)
                } else {
                    this.$message.error('圖檔插入失敗')
                }
                // loading動畫消失
                this.quillUpdateImg = false
            },

            // 富文本圖檔上傳失敗
            uploadError() {
                // loading動畫消失
                this.quillUpdateImg = false
                this.$message.error('圖檔插入失敗')
            }
好了,本文就講到這,目前運作良好,整個文章的代碼比較多,但是實際上需要去深入了解的地方很少,我們隻是簡單重定義了圖檔按鈕的觸發事件。
![怎樣使用SpringMVC控制頁面[圖]](data:image/gif;base64,R0lGODlhAQABAIAAAP///wAAACwAAAAAAQABAAACAkQBADs=)