啊啊啊啊啊啊啊啊啊啊啊啊啊啊啊啊啊啊啊啊啊啊啊啊啊啊啊啊啊啊啊啊啊啊啊啊啊啊啊啊啊啊啊啊啊啊啊啊啊啊啊啊啊啊啊啊啊啊啊啊啊啊啊啊啊
直接 pip install opencv-python
參考:官方教程:https://docs.opencv.org/master/d7/d9f/tutorial_linux_install.html
Ubuntu14.04 OpenCV編譯安裝:http://blog.csdn.net/honyniu/article/details/46390097
Ubuntu 17.04系統下源碼編譯安裝opencv的步驟詳解:http://www.jb51.net/article/121882.htm
The followingsteps have been tested for Ubuntu 10.04 but should work with other distros aswell.
Required Packages
- GCC 4.4.x or later
- CMake 2.8.7 or higher
- Git
- GTK+2.x or higher, including headers (libgtk2.0-dev)
- pkg-config
- Python 2.6 or later and Numpy 1.5 or later with developer packages (python-dev, python-numpy)
- ffmpeg or libav development packages: libavcodec-dev, libavformat-dev, libswscale-dev
- [optional] libtbb2 libtbb-dev
- [optional] libdc1394 2.x
- [optional] libjpeg-dev, libpng-dev, libtiff-dev, libjasper-dev, libdc1394-22-dev
- [optional] CUDA Toolkit 6.5 or higher
The packages canbe installed using a terminal and the following commands or by using SynapticManager:
[compiler] sudo apt-get installbuild-essential
[required] sudo apt-get install cmake gitlibgtk2.0-dev pkg-config libavcodec-dev libavformat-dev libswscale-dev
[optional] sudo apt-get install python-devpython-numpy libtbb2 libtbb-dev libjpeg-dev libpng-dev libtiff-devlibjasper-dev libdc1394-22-dev
檢查numpy是否安裝成功
Getting OpenCV Source Code
You can use thelatest stable OpenCV version or you can grab the latest snapshot from our Git repository.
Getting the Latest Stable OpenCV Version
- Go to our downloads page.
- Download the source archive and unpack it.
Getting the Cutting-edge OpenCV from the GitRepository
Launch Git clientand clone OpenCVrepository. If you need modules from OpenCV contrib repository thenclone it as well.
For example
cd ~/<my_working_directory>
git clone https://github.com/opencv/opencv.git
git clonehttps://github.com/opencv/opencv_contrib.git
Building OpenCV from Source Using CMake
- Create a temporary directory, which we denote as <cmake_build_dir>, where you want to put the generated Makefiles, project files as well the object files and output binaries and enter there.
For example
cd ~/opencv
mkdir build
cd build
- Configuring. Run cmake [<some optional parameters>] <path to the OpenCV source directory>
For example
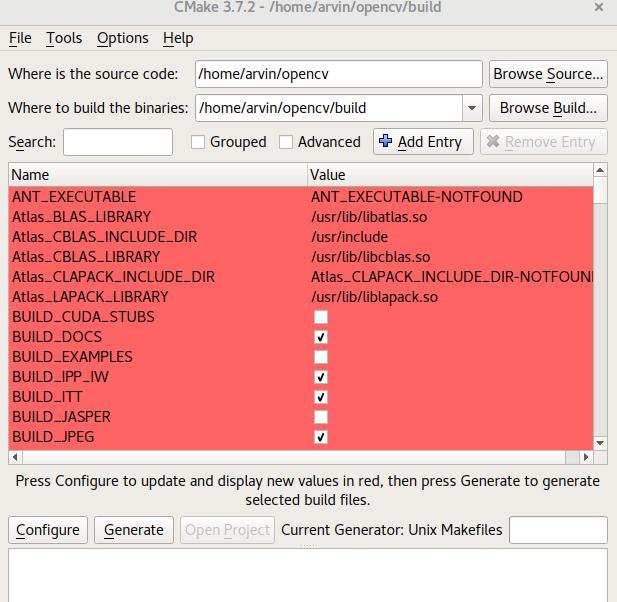
cmake-gui..
出現下面的界面,更改設定,
然後在 Whereis the source code中添加opencv 的目錄路徑,在where to build the binaries中添加剛才建立的build目錄
然後點選下面的Configure,選擇 UnixMakefiles,然後選擇default ...。點選OK,進而處理 opencv目錄下的CMakeLists.txt。并且在Build 目錄下生成CMakeCache.txt及Makefile 等相關檔案。
Configure配置結束後,将會出現類似以下配置界面
以下是需要修改的部分
- CMAKE_BUILD_TYPE 修改為 RELEASE
2. OPENCV_EXTRA_MODULES_PATH設為 opencv_contrib中的 modules 目錄的路徑(比如,/home/arvin/opencv_contrib/modules)
3. 在 BUILD_EXAMPLES的複選框裡打勾
4. 在INSTALL_C_EXAMPLES的複選框裡打勾
5. 在INSTALL_PYTHON_EXAMPLES的複選框裡打勾
6. 在 WITH_FFMPEG的複選框裡打勾
7. 在 WITH_GTK的複選框裡打勾
8. 在 WITH_V4L的複選框裡打勾
9. 在 WITH_TIFF的複選框裡打勾
10. 在 WITH_PNG 的複選框裡打勾
11. 在 WITH_JPEG 的複選框裡打勾
12. 在 WITH_JASPER 的複選框裡打勾
13. 取消 WITH_CUDA 的複選框裡的勾
14. 取消 WITH_CUFFT 的複選框裡的勾
然後點選Configure,應用剛才的修改并且将修改内容更新至 build目錄下的 CMakeCache.txt中。然後點選 Generate,更新 Makefile。
Build. From builddirectory execute make, it is recommended to do this in severalthreads
For example
make -j7 # runs 7 jobs in parallel
Toinstall libraries, execute the following command from build directory
sudo make install
環境變量
安裝成功後還需要設定opencv的環境變量
打開檔案
sudo gedit /etc/profile##個人比較喜歡把環境變量放在/etc/profile裡面,'~/.bashrc'一樣
· 1
在檔案最後添加
export PKG_CONFIG_PATH=$PKG_CONFIG_PATH:/usr/local/lib/pkgconfig
· 1
執行下列指令, 使環境變量立即生效
source /etc/profile
· 1
lib庫路徑
打開檔案
sudo gedit /etc/ld.so.conf.d/opencv.conf
· 1
一般是建立檔案,opencv的庫一般安裝在’/usr/local/lib’檔案夾下,在檔案内添加
/usr/local/lib
· 1
執行下列指令使之立刻生效
sudo ldconfig
測試環境是否配置成功
# 在指令行打開你的python解釋器,輸入以下指令
import cv2
cv2.__version__
# 若看到類似以下輸出,則表示配置成功
'3.4.0-dev'
python3.5不行,怎麼配置?
如果将預設的python先改成python3.5,再安裝opencv,是不是opencv就裝在python3.5裡了呢?
![關于sudo apt-get update 更新軟體源的選擇[圖]](data:image/gif;base64,R0lGODlhAQABAIAAAP///wAAACwAAAAAAQABAAACAkQBADs=)