上一篇簡單的說了一下spi相關的東西, 接下來我們準備開動,本篇博文主要集中在一些術語,使用規範的約定和使用方式
設計思路
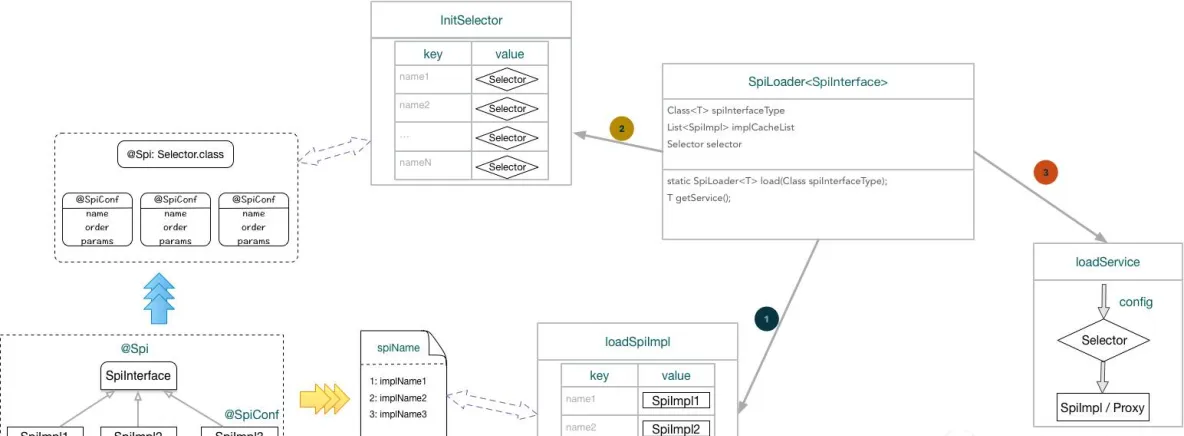
下圖圍繞
SpiLoader
為中心,描述了三個主要的流程:
- load所有的spi實作
- 初始化選擇器 selector
- 擷取spi實作類 (or一個實作類代理)
基礎類說明
主要介紹一下架構中涉及到的接口和注解,并指出需要注意的點
1. Selector
Selector
為了最大程度的支援業務方對spi實作類的選擇,我們定義了一個選擇器的概念,用于擷取spi實作類
接口定義如下:
public interface ISelector<T> {
    <K> K selector(Map<String, SpiImplWrapper<K>> map, T conf) throws NoSpiMatchException;
}
public interface ISelector<T> {
    <K> K selector(Map<String, SpiImplWrapper<K>> map, T conf) throws NoSpiMatchException;
}
結合上面的接口定義,我們可以考慮下,選擇器應該如何工作?
- 根據傳入的條件,從所有的實作類中,找到一個最比對的實作類傳回
- 如果查不到,則抛一個異常
NoSpiMatchException
是以傳入的參數會是兩個, 一個是所有的實作類清單
map
(至于上面為什麼用map,後續分析),一個是用于判斷的輸入條件
conf
架構中會提供兩種基本的選擇器實作,
-
DefaultSelector
-
ParamsSelector
@SpiConf
params
conf
自定義實作
自定義實作比較簡單,實作上面的接口即可
2. Spi
Spi
要求所有的spi接口,都必須有這個注解;
定義如下
主要是有一個參數,用于指定是選擇器類型,定義spi接口的預設選擇器,
@Target(ElementType.TYPE)
@Retention(RetentionPolicy.RUNTIME)
@Documented
public @interface Spi {
    Class<? extends ISelector> selector() default DefaultSelector.class;
}
@Target(ElementType.TYPE)
@Retention(RetentionPolicy.RUNTIME)
@Documented
public @interface Spi {
    Class<? extends ISelector> selector() default DefaultSelector.class;
}
說明
在上一篇《SPI架構實作之旅一》中,使用jdk的spi方式中,并沒有使用注解依然可以正常工作,我們這裡定義這個注解且要求必需有,出于下面幾個考慮
- 醒目,告訴開發者,這個接口是聲明的spi接口, 使用的時候注意下
- 加入選擇器參數,友善使用者擴充自己的選擇方式
3. SpiAdaptive
SpiAdaptive
對需要自适應的場景,為了滿足一個spi接口,應用多重不同的選擇器場景,可以加上這個注解; 如果不加這個注解,則表示采用預設的選擇器來自适應
接口說明
/**
 * SPI 自适應注解, 表示該方法會用到spi實作
 * <p/>
 * Created by yihui on 2017/5/24.
 */
@Documented@Retention(RetentionPolicy.RUNTIME)
@Target({ElementType.METHOD})
public @interface SpiAdaptive {
    Class<? extends ISelector> selector() default DefaultSelector.class;
}
/**
 * SPI 自适應注解, 表示該方法會用到spi實作
 * <p/>
 * Created by yihui on 2017/5/24.
 */
@Documented@Retention(RetentionPolicy.RUNTIME)
@Target({ElementType.METHOD})
public @interface SpiAdaptive {
    Class<? extends ISelector> selector() default DefaultSelector.class;
}
說明
這個注解内容和 @Spi 基本上一模一樣,唯一的差別是一個放在類上,一個放在方法上,那麼為什麼這麼考慮?
-
@Spi
-
@SpiAdaptive
如下面的這個例子,print方法和 echo方法其實是等價的,都是采用
DefaultSelector
來确認具體的實作類;而
write
和
pp
方法則是采用
ParamsSelector
選擇器;
/**
 * Created by yihui on 2017/5/25.
 */
@Spi
public interface ICode {
    void print(String name, String contet);

    @SpiAdaptive
    void echo(String name, String content);

    @SpiAdaptive(selector = ParamsSelector.class)
    void write(Context context, String content);

    @SpiAdaptive(selector = ParamsSelector.class)
    void pp(Context context, String content);
}
4. SpiConf
SpiConf
這個主鍵主要是用在實作類上(或實作類的方法上),裡面存儲一些選擇條件,通常是和 Selector
定義如下
定義了三個字段:
- name 唯一辨別,用于
DefaultSelector
- params 參數條件, 用于
ParamsSelector
- order : 優先級, 主要是為了解決多個實作類都滿足選擇條件時, 應該選擇哪一個 (談到這裡就有個想法, 通過一個參數,來選擇是否讓滿足條件的全部傳回)
@Documented@Retention(RetentionPolicy.RUNTIME)
@Target({ElementType.TYPE, ElementType.METHOD})
public @interface SpiConf {    /**     * 唯一辨別     *     * @return     */
    String name() default "";    /**     * 參數過濾, 單獨一個元素,表示參數必須包含; 用英文分号,左邊為參數名,右邊為參數值,表示參數的值必須是右邊的     * <p/>     * 形如  {"a", "a:12", "b:TAG"}     *     * @return     */
    String[] params() default {};    /**     * 排序, 越小優先級越高     *     * @return     */
    int order() default -1;
}
說明
SpiConf
注解可以修飾類,也可以修飾方法,是以當一個實作類中,類和方法都有這個注解時, 怎麼處理 ?
以下面的這個測試類進行說明
/**
 * Created by yihui on 2017/5/25.
 */@SpiConf(params = "code", order = 1)
public class ConsoleCode implements ICode {
    @Override
    public void print(String name, String contet) {
        System.out.println("console print:--->" + contet);
    }

        /**     * 顯示指定了name, 是以可以直接通過 consoleEcho 來确定調用本實作方法     * @param name     * @param content     */
    @Override
    @SpiConf(name = "consoleEcho")    public void echo(String name, String content) {
        System.out.println("console echo:---->" + content);
    }

           /**     * 實際的優先級取 方法 和類上的最高優先級, 實際為1;     * `ParamsSelector`選擇器時, 執行該方法的條件等同于  `{"code", "type:console"}`     * @param context     * @param content     */
    @Override
    @SpiConf(params = {"type:console"}, order = 3)    public void write(Context context, String content) {
        System.out.println("console write:---->" + content);
    }
}
在設計中,遵循下面幾個原則:
- 類上的
SpiConf
- 方法上有
SpiConf
- 方法注解聲明name時,兩個會同時生效,即想調用上面的echo方法, 通過傳入
ConsoleCode
consoleEcho
- 方法注解未聲明name時,隻能通過類注解上定義的name(or預設的類名)來選擇
- order,取最高優先級,如上面的
write
- params: 取并集,即要求類上 + 方法上的條件都滿足
SPI加載器
spi加載器的主要業務邏輯集中在 SpiLoader
從上面的簡述,基本上可以看出這個類劃分為三個功能點, 下面将逐一說明,本篇博文主要集中在邏輯的設計層,至于優化(如懶加載,緩存優化等) 放置下一篇博文單獨叙述
1. 加載spi實作類
這一塊比較簡單,我們直接利用了jdk的 ServiceLoader
具體的代碼業務邏輯非常簡單,大緻流程如下
if (null == spiInterfaceType) {
 throw new IllegalArgumentException("common cannot be null...");
 }

 if (!spiInterfaceType.isInterface()) {
  throw new IllegalArgumentException("common class:" + spiInterfaceType + " must be interface!");
 }

 if (!withSpiAnnotation(spiInterfaceType)) {
  throw new IllegalArgumentException("common class:" + spiInterfaceType + " must have the annotation of @Spi");
}

ServiceLoader<T> serviceLoader = ServiceLoader.load(spiInterfaceType);for(T spiImpl: serviceLoader) {
// xxx

}
 if (null == spiInterfaceType) {
 throw new IllegalArgumentException("common cannot be null...");
 }

 if (!spiInterfaceType.isInterface()) {
  throw new IllegalArgumentException("common class:" + spiInterfaceType + " must be interface!");
 }

 if (!withSpiAnnotation(spiInterfaceType)) {
  throw new IllegalArgumentException("common class:" + spiInterfaceType + " must have the annotation of @Spi");
}

ServiceLoader<T> serviceLoader = ServiceLoader.load(spiInterfaceType);for(T spiImpl: serviceLoader) {
// xxx

}
注意
- 因為使用了jdk的标準,是以每定義一個spi接口,必須在
META_INF.services
- 每個spi接口,要求必須有
@Spi
- Spi接口必須是
interface
拓展
雖然這裡直接使用了spi的規範,我們其實完全可以自己定義标準的,隻要能将這個接口的所有實作類找到, 怎麼實作都可以由你定義
如使用spring架構後,可以考慮通過
applicationContext.getBeansOfAnnotaion(xxx )
來擷取所有的特定注解的bean,這樣就可以不需要自己建立一個檔案,來存儲spi接口和其實作類的映射關系了
建構spi實作的關系表
上面擷取了spi實作類,顯然我們的目标并不局限于簡單的擷取實作類,在擷取實作類之後,還需要解析其中的
@SpiConf
注解資訊,用于表示要選擇這個實作,必須滿足什麼樣的條件
SpiImplWrapper
: spi實作類,以及定義的各種條件的封裝類
注解的解析過程流程如下:
- name: 注解定義時,采用定義的值; 否則采用簡單類名 (是以一個系統中不允許兩個實作類同名的情況)
- order: 優先級, 注解定義時,采用定義的值;未定義時采用預設;
- params: 參數限制條件, 會取類上和方法上的并集(原則上要求類上的限制和方法上的限制不能沖突)
List<SpiImplWrapper<T>> spiServiceList = new ArrayList<>();// 解析注解
spiConf = t.getClass().getAnnotation(SpiConf.class);
Map<String, String> map;
if (spiConf == null) { // 沒有添加注解時, 采用預設的方案
implName = t.getClass().getSimpleName();
implOrder = SpiImplWrapper.DEFAULT_ORDER;
// 參數選擇器時, 要求spi實作類必須有 @SpiConf 注解, 否則選擇器無法擷取校驗條件參數
if (currentSelector.getSelector() instanceof ParamsSelector) {
throw new IllegalStateException("spiImpl must contain annotation @SpiConf!");
}
map = Collections.emptyMap();
} else {
implName = spiConf.name();
if (StringUtils.isBlank(implName)) {
implName = t.getClass().getSimpleName();
}
implOrder = spiConf.order() < 0 ? SpiImplWrapper.DEFAULT_ORDER : spiConf.order();
map = parseParms(spiConf.params());
}
// 添加一個類級别的封裝類
spiServiceList.add(new SpiImplWrapper<>(t, implOrder, implName, map));
// ------------
// 解析參數的方法private Map<String, String> parseParms(String[] params) {
if (params.length == 0) {
return Collections.emptyMap();
}
Map<String, String> map = new HashMap<>(params.length);
String[] strs;
for (String param : params) {
strs = StringUtils.split(param, ":");
if (strs.length >= 2) {
map.put(strs[0].trim(), strs[1].trim());
} else if (strs.length == 1) {
map.put(strs[0].trim(), null);
}
}
return map;
}
List<SpiImplWrapper<T>> spiServiceList = new ArrayList<>();// 解析注解
spiConf = t.getClass().getAnnotation(SpiConf.class);
Map<String, String> map;
if (spiConf == null) { // 沒有添加注解時, 采用預設的方案
implName = t.getClass().getSimpleName();
implOrder = SpiImplWrapper.DEFAULT_ORDER;
// 參數選擇器時, 要求spi實作類必須有 @SpiConf 注解, 否則選擇器無法擷取校驗條件參數
if (currentSelector.getSelector() instanceof ParamsSelector) {
throw new IllegalStateException("spiImpl must contain annotation @SpiConf!");
}
map = Collections.emptyMap();
} else {
implName = spiConf.name();
if (StringUtils.isBlank(implName)) {
implName = t.getClass().getSimpleName();
}
implOrder = spiConf.order() < 0 ? SpiImplWrapper.DEFAULT_ORDER : spiConf.order();
map = parseParms(spiConf.params());
}
// 添加一個類級别的封裝類
spiServiceList.add(new SpiImplWrapper<>(t, implOrder, implName, map));
// ------------
// 解析參數的方法private Map<String, String> parseParms(String[] params) {
if (params.length == 0) {
return Collections.emptyMap();
}
Map<String, String> map = new HashMap<>(params.length);
String[] strs;
for (String param : params) {
strs = StringUtils.split(param, ":");
if (strs.length >= 2) {
map.put(strs[0].trim(), strs[1].trim());
} else if (strs.length == 1) {
map.put(strs[0].trim(), null);
}
}
return map;
} 2. 初始化選擇器
我們的選擇器會區分為兩類,一個是類上定義的選擇器, 一個是方法上定義的選擇器; 在自适應的使用方式中,方法上定義的優先級 > 類上定義
簡單來講,初始化選擇器,就是掃一遍SPI接口中的注解,執行個體化選擇器後,緩存住對應的結果, 實作如下
/**
* 選擇器, 根據條件, 選擇具體的 SpiImpl;
*/private SelectorWrapper currentSelector;/**
* 自适應時, 方法對應的選擇器
*/private Map<String, SelectorWrapper> currentMethodSelector;/** * 每一個 SpiLoader 中, 每種類型的選擇器, 隻儲存一個執行個體 * 是以可以在選擇器中, 如{@link ParamsSelector} 對spiImplMap進行處理并緩存結果 */private ConcurrentHashMap<Class, SelectorWrapper> selectorInstanceCacheMap = new ConcurrentHashMap<>();private void initSelector() {
   Spi ano = spiInterfaceType.getAnnotation(Spi.class);   if (ano == null) {
       currentSelector = initSelector(DefaultSelector.class);
   } else {
       currentSelector = initSelector(ano.selector());
   }


   Method[] methods = this.spiInterfaceType.getMethods();
   currentMethodSelector = new ConcurrentHashMap<>();
   SelectorWrapper temp;   for (Method method : methods) {       if (!method.isAnnotationPresent(SpiAdaptive.class)) {           continue;
       }

       temp = initSelector(method.getAnnotation(SpiAdaptive.class).selector());       if (temp == null) {           continue;
       }

       currentMethodSelector.put(method.getName(), temp);
   }
}private SelectorWrapper initSelector(Class<? extends ISelector> clz) {   // 優先從選擇器緩存中擷取類型對應的選擇器
   if (selectorInstanceCacheMap.containsKey(clz)) {       return selectorInstanceCacheMap.get(clz);
   }   try {
       ISelector selector = clz.newInstance();       Class paramClz = null;

       Type[] types = clz.getGenericInterfaces();       for (Type t : types) {           if (t instanceof ParameterizedType) {
               paramClz = (Class) ((ParameterizedType) t).getActualTypeArguments()[0];               break;
           }
       }

       Assert.check(paramClz != null);
       SelectorWrapper wrapper = new SelectorWrapper(selector, paramClz);
       selectorInstanceCacheMap.putIfAbsent(clz, wrapper);       return wrapper;
   } catch (Exception e) {       throw new IllegalArgumentException("illegal selector defined! yous:" + clz);
   }
}
 /**
* 選擇器, 根據條件, 選擇具體的 SpiImpl;
*/private SelectorWrapper currentSelector;/**
* 自适應時, 方法對應的選擇器
*/private Map<String, SelectorWrapper> currentMethodSelector;/** * 每一個 SpiLoader 中, 每種類型的選擇器, 隻儲存一個執行個體 * 是以可以在選擇器中, 如{@link ParamsSelector} 對spiImplMap進行處理并緩存結果 */private ConcurrentHashMap<Class, SelectorWrapper> selectorInstanceCacheMap = new ConcurrentHashMap<>();private void initSelector() {
   Spi ano = spiInterfaceType.getAnnotation(Spi.class);   if (ano == null) {
       currentSelector = initSelector(DefaultSelector.class);
   } else {
       currentSelector = initSelector(ano.selector());
   }


   Method[] methods = this.spiInterfaceType.getMethods();
   currentMethodSelector = new ConcurrentHashMap<>();
   SelectorWrapper temp;   for (Method method : methods) {       if (!method.isAnnotationPresent(SpiAdaptive.class)) {           continue;
       }

       temp = initSelector(method.getAnnotation(SpiAdaptive.class).selector());       if (temp == null) {           continue;
       }

       currentMethodSelector.put(method.getName(), temp);
   }
}private SelectorWrapper initSelector(Class<? extends ISelector> clz) {   // 優先從選擇器緩存中擷取類型對應的選擇器
   if (selectorInstanceCacheMap.containsKey(clz)) {       return selectorInstanceCacheMap.get(clz);
   }   try {
       ISelector selector = clz.newInstance();       Class paramClz = null;

       Type[] types = clz.getGenericInterfaces();       for (Type t : types) {           if (t instanceof ParameterizedType) {
               paramClz = (Class) ((ParameterizedType) t).getActualTypeArguments()[0];               break;
           }
       }

       Assert.check(paramClz != null);
       SelectorWrapper wrapper = new SelectorWrapper(selector, paramClz);
       selectorInstanceCacheMap.putIfAbsent(clz, wrapper);       return wrapper;
   } catch (Exception e) {       throw new IllegalArgumentException("illegal selector defined! yous:" + clz);
   }
}
說明
-
SeectorWrapper
選擇器封裝類
這裡我們在擷取選擇器時,特意定義了一個封裝類,其中包含具體的選擇器對象,以及所比對的參數類型,是以可以在下一步通過選擇器擷取實作類時,保證傳入的參數類型合法
-
private SelectorWrapper initSelector(Class<? extends ISelector> clz)
具體的執行個體化選擇器的方法
從實作來看,優先從選擇器緩存中擷取選擇器對象,這樣的目的是保證一個spi接口,每種類型的選擇器隻有一個執行個體;是以在自定義選擇器中,你完全可以做一些選擇判斷的緩存邏輯,如
ParamsSelector
-
currentSelector
currentMethodSelector
selectorInstanceCacheMap
currentSelector:   對應的是類選擇器,每個SPI接口必然會有一個,作為打底的選擇器 currentMethodSelector:  方法選擇器映射關系表,key為方法名,value為該方法對應的選擇器; 是以spi接口中,不支援重載 selectorInstanceCacheMap: spi接口所有定義的選擇器映射關系表,key為選擇器類型,value是執行個體;用于保障每個spi接口中選擇器隻會有一個執行個體
 currentSelector:   對應的是類選擇器,每個SPI接口必然會有一個,作為打底的選擇器 currentMethodSelector:  方法選擇器映射關系表,key為方法名,value為該方法對應的選擇器; 是以spi接口中,不支援重載 selectorInstanceCacheMap: spi接口所有定義的選擇器映射關系表,key為選擇器類型,value是執行個體;用于保障每個spi接口中選擇器隻會有一個執行個體
3. 擷取實作類
對使用者而言,最關注的就是這個接口,這裡會傳回我們需要的實作類(or代理);内部的邏輯也比較清楚,首先确定選擇器,然後通過選擇器便利所有的實作類,把滿足條件的傳回即可
從上面的描述可以看到,主要分為兩步
- 擷取選擇器
- 根據選擇器,周遊所有的實作類,找出比對的傳回
擷取選擇器
初始化選擇器之後,我們會有
currentSelector
,
currentMethodSelector
兩個緩存
- 靜态确定spi實作時,直接用
currentSelector
- 動态适配時, 根據方法名在
currentMethodSelector
@SpiAdaptive
currentMethodSelector
// 動态适配時,擷取方法對應對應的selector實作邏輯SelectorWrapper selector = currentMethodSelector.get(methodName);if (selector == null) { // 自适應方法上未定義選擇器, 則預設繼承類的
  selector = currentSelector;
  currentMethodSelector.putIfAbsent(methodName, selector);
}if (!selector.getConditionType().isAssignableFrom(conf.getClass())) { // 選擇器類型校驗
  if (!(conf instanceof String)) {      throw new IllegalArgumentException("conf spiInterfaceType should be sub class of [" + currentSelector.getConditionType() + "] but yours:" + conf.getClass());
  } // 參數不比對時,且傳入的參數為String類型, 則嘗試使用預設選擇器進行相容(不建議在實作時,出現這種場景)
  selector = DEFAULT_SELECTOR;
}
選擇實作類
這個的主要邏輯就是周遊所有的實作類,判斷是否滿足選擇器的條件,将第一個找到的傳回即可,所有的業務邏輯都在
ISelector
中實作,如下面給出的預設選擇器,根據name來擷取實作類
/**
 * 預設的根據name 擷取具體的實作類
 * <p/>
 * Created by yihui on 2017/5/24.
 */public class DefaultSelector implements ISelector<String> {    @Override
    public <K> K selector(Map<String, SpiImplWrapper<K>> map, String name) throws NoSpiMatchException {        if (StringUtils.isBlank(name)) {            throw new IllegalArgumentException("spiName should not be empty!");
        }        if (map == null || map.size() == 0) {            throw new IllegalArgumentException("no impl spi!");
        }        if (!map.containsKey(name)) {            throw new NoSpiMatchException("no spiImpl match the name you choose! your choose is: " + name);
        }        return map.get(name).getSpiImpl();
    }

}
流程說明
上面主要就各個點單獨的進行了說明,看起來可能比較分散,看完之後可能沒有一個清晰的流程,這裡就整個實作的流程順一遍,主要從使用者的角度出發,當定義了一個SPI接口後,到擷取spi實作的過程中,上面的這些步驟是怎樣串在一起的
流程圖
先拿簡單的靜态擷取SPI實作流程說明(動态的其實差不多,具體的差異下一篇說明),先看下這種用法的使用姿勢
@Spipublic interface IPrint {    void print(String str);
}public class FilePrint implements IPrint {    @Override
    public void print(String str) {
        System.out.println("file print: " + str);
    }
}public class ConsolePrint implements IPrint {    @Override
    public void print(String str) {
        System.out.println("console print: " + str);
    }
}@Testpublic void testPrint() throws NoSpiMatchException {
   SpiLoader<IPrint> spiLoader = SpiLoader.load(IPrint.class);
   IPrint print = spiLoader.getService("ConsolePrint");
   print.print("console---->");
}
@Spipublic interface IPrint {    void print(String str);
}public class FilePrint implements IPrint {    @Override
    public void print(String str) {
        System.out.println("file print: " + str);
    }
}public class ConsolePrint implements IPrint {    @Override
    public void print(String str) {
        System.out.println("console print: " + str);
    }
}@Testpublic void testPrint() throws NoSpiMatchException {
   SpiLoader<IPrint> spiLoader = SpiLoader.load(IPrint.class);
   IPrint print = spiLoader.getService("ConsolePrint");
   print.print("console---->");
} SpiLoader<IPrint> spiLoader = SpiLoader.load(IPrint.class);
SpiLoader<IPrint> spiLoader = SpiLoader.load(IPrint.class);
這行代碼觸發的action 主要是初始化所有的選擇器, 如下圖
- 首先從緩存中查
- 是否已經初始化過了有則直接傳回;
- 緩存中沒有,則進入new一個新的對象出來
- 解析類上注解
@Spi
currentSelector
- 解析所有方法的注解
@SpiAdaptive
currentMethodSelector
- 塞入緩存,并傳回

IPrint print = spiLoader.getService("ConsolePrint");
IPrint print = spiLoader.getService("ConsolePrint");
根據name擷取實作類,具體流程如下
- 判斷是否加載過所有實作類
spiImplClassCacheMap
- 沒有加載,則重新加載所有的實作類
- 通過jdk的
ServiceLoader.load()
- 周遊實作類,根據
@SpiConf
SpiImplWrapper
- 儲存封裝的
SpiImplWrapper
- 執行
currentSelector.select()
其他
- SPI架構實作之旅一:背景介紹
- SPI架構實作之旅二:整體設計
- SPI架構實作之旅三:實作說明
- SPI架構實作之旅四:使用測試