文章目錄
- 預備知識
- 導入
-
- Step1、從Looper.prepare()開始
- Step2、new Handler()
- Step3、Looper.loop()
-
- 一、從loop方法入口看大流程
- 二、最核心的MessageQueue的next方法
- 三、無限循環中阻塞的細節
- 四、補充問題
- Step4、handler.sendMessage()
- Step5、Looper.quit()
- Step Extra、MessageQueue postSyncBarrier
- 總結
預備知識
- Java的ThreadLocal,儲存線程的“私有”資料,這個不貼參考連結了,比較easy;
- Linux的epoll機制,底層真正的消息處理機制,沒有消息的時候阻塞不消耗cpu資源,非常複雜但是也非常有趣,參考:https://blog.csdn.net/shenya1314/article/details/73691088;
- 享元模式——Message複用,模闆模式——hanlder的handleMessage方法;
- 單連結清單,隊列等一些基礎的資料結構,不過這裡的隊列本質還是個連結清單(Java庫裡的隊列底層也是個連結清單),為什麼是連結清單大家可以想一想。
導入
我們在子線程中使用handler的時候一般是這樣的流程:
//初始化
new Thread(new Runnable() {
    Looper.prepare();
    Handler handler = new Handler() {
        @Override
        handleMessage(Message msg) {
            //do something
        }
    };
    Looper.loop();
}).start();

//發送消息
handler.sendMessage(Message.obtain());
補充一個大家都知道的就是主線程裡不需要寫Looper那兩行代碼,是因為ActivityThread的main方法裡幫我們做了。具體可以去看代碼,這裡就不貼了。下面按照這個代碼的流程來分析。重點都在代碼注釋裡,關注中文的部分。
Step1、從Looper.prepare()開始
public static void prepare() {
    prepare(true);
}

//最終都會調用這個方法
private static void prepare(boolean quitAllowed) {
    if (sThreadLocal.get() != null) {
        throw new RuntimeException("Only one Looper may be created per thread");
    }
    //把目前線程關聯的Looper丢進ThreadLocal
    sThreadLocal.set(new Looper(quitAllowed));
}

public static Looper myLooper() {
    return sThreadLocal.get();
}

public static void prepareMainLooper() {
    prepare(false);
    synchronized (Looper.class) {
        if (sMainLooper != null) {
            throw new IllegalStateException("The main Looper has already been prepared.");
        }
        sMainLooper = myLooper();
    }
}
Step2、new Handler()
//常用方式1
public Handler() {
    this(null, false);
}

public Handler(@Nullable Callback callback, boolean async) {
    ...省略

    //不傳looper時預設擷取目前線程的looper,是以子線程中如果不先調用Looper.prepare()就會報錯
    mLooper = Looper.myLooper();
    if (mLooper == null) {
        throw new RuntimeException(
            "Can't create handler inside thread " + Thread.currentThread()
                    + " that has not called Looper.prepare()");
    }
    mQueue = mLooper.mQueue;
    mCallback = callback;
    mAsynchronous = async;
}

//常用方式2
public Handler(@NonNull Looper looper) {
    this(looper, null, false);
}

public Handler(@NonNull Looper looper, @Nullable Callback callback, boolean async) {
    mLooper = looper;
    mQueue = looper.mQueue;
    mCallback = callback;
    mAsynchronous = async;
}
Step3、Looper.loop()
一、從loop方法入口看大流程
- Looper的loop方法主要為以下三步:
- 調用MessageQueued的next方法取出一條消息,沒有就阻塞,阻塞原理參考後面MessageQueue的原理;
- 有消息時取出消息中的target并回調dispatchMessage方法
- 消息處理完成後回收,Message中有個連結清單作為消息的緩存,防止消息大量被new浪費記憶體。
public static void loop() {
    final Looper me = myLooper();
    if (me == null) {
        throw new RuntimeException("No Looper; Looper.prepare() wasn't called on this thread.");
    }
    final MessageQueue queue = me.mQueue;

   	...省略

    //核心關注死循環的部分
    for (;;) {

        //最核心的代碼,從MessageQueue中循環取出消息,無消息是阻塞在這裡
        Message msg = queue.next(); // might block
        if (msg == null) {
            // No message indicates that the message queue is quitting.
            return;
        }

        ...省略
        try {
            //取出Message中的target對象也就是hanlder,回調其dispatchMessage方法,step4中會分析
            msg.target.dispatchMessage(msg);
            if (observer != null) {
                observer.messageDispatched(token, msg);
            }
            dispatchEnd = needEndTime ? SystemClock.uptimeMillis() : 0;
        } catch (Exception exception) {
            ...省略
        } finally {
            ...省略
        }
        ...省略

        //回收消息到連結清單中,具體參考Message中的源碼
        msg.recycleUnchecked();
    }
}
二、最核心的MessageQueue的next方法
next方法的流程都寫在注釋裡了,可以直接看,這裡主要關心一個問題:主線程的死循環一直運作是不是特别消耗CPU資源呢? 其實不然,這裡就涉及到Linux pipe/epoll機制,簡單說就是在主線程的MessageQueue沒有消息時,便阻塞在loop的queue.next()中的nativePollOnce()方法裡,此時主線程會釋放CPU資源進入休眠狀态,直到下個消息到達或者有事務發生,通過往pipe管道寫端寫入資料來喚醒主線程工作。這裡采用的epoll機制,是一種IO多路複用機制,可以同時監控多個描述符,當某個描述符就緒(讀或寫就緒),則立刻通知相應程式進行讀或寫操作,本質同步I/O,即讀寫是阻塞的。 是以說,主線程很多時候都是處于休眠狀态,并不會消耗大量CPU資源。
Message next()

    .....//省略
    int pendingIdleHandlerCount = -1; // -1 only during first iteration
    // 1.如果nextPollTimeoutMillis=-1,一直阻塞不會逾時。
    // 2.如果nextPollTimeoutMillis=0,不會阻塞,立即傳回。
    // 3.如果nextPollTimeoutMillis>0,最長阻塞nextPollTimeoutMillis毫秒(逾時)
    //   如果期間有程式喚醒會立即傳回。
    int nextPollTimeoutMillis = 0;
    for (;;) {
        if (nextPollTimeoutMillis != 0) {
            Binder.flushPendingCommands();
        }
        //阻塞的核心方法,核心實作在native層,後面會講
        nativePollOnce(ptr, nextPollTimeoutMillis);
        synchronized (this) {
            //擷取系統開機到現在的時間
            final long now = SystemClock.uptimeMillis();
            Message prevMsg = null;
            Message msg = mMessages; //目前連結清單的頭結點
            //如果target==null,那麼它就是屏障,需要循環周遊,一直往後找到第一個異步的消息
            if (msg != null && msg.target == null) {
            // Stalled by a barrier.  Find the next asynchronous message in the queue.
                do {
                    prevMsg = msg;
                    msg = msg.next;
                } while (msg != null && !msg.isAsynchronous());
            }
            if (msg != null) {
                //如果有消息需要處理,先判斷時間有沒有到,如果沒到的話設定一下阻塞時間,
                //場景如常用的postDelay
                if (now < msg.when) {
                   //計算出離執行時間還有多久指派給nextPollTimeoutMillis,
                   //表示nativePollOnce方法要等待nextPollTimeoutMillis時長後傳回
                    nextPollTimeoutMillis = (int) Math.min(msg.when - now, Integer.MAX_VALUE);
                } else {
                    // 擷取到消息
                    mBlocked = false;
                   //連結清單操作,擷取msg并且删除該節點
                    if (prevMsg != null)
                        prevMsg.next = msg.next;
                    } else {
                        mMessages = msg.next;
                    }
                    msg.next = null;
                    msg.markInUse();
                    //傳回拿到的消息
                    return msg;
                }
            } else {
                //沒有消息,nextPollTimeoutMillis複位
                nextPollTimeoutMillis = -1;
            }
            .....//省略

}
三、無限循環中阻塞的細節
這裡再簡單看下nativePollOnce方法的細節
static void android_os_MessageQueue_nativePollOnce(JNIEnv* env, jobject obj,
        jlong ptr, jint timeoutMillis) {
     //将java層傳進來的mPtr再轉換成對應的指針
    NativeMessageQueue* nativeMessageQueue = reinterpret_cast<NativeMessageQueue*>(ptr);
    nativeMessageQueue->pollOnce(env, obj, timeoutMillis);
}
void NativeMessageQueue::pollOnce(JNIEnv* env, jobject pollObj, int timeoutMillis) {
    mPollEnv = env;
    mPollObj = pollObj;
    mLooper->pollOnce(timeoutMillis);
    mPollObj = NULL;
    mPollEnv = NULL;

    if (mExceptionObj) {
        env->Throw(mExceptionObj);
        env->DeleteLocalRef(mExceptionObj);
        mExceptionObj = NULL;
    }
}
最終會調用到native中的Looper的pollOnce方法
int Looper::pollOnce(int timeoutMillis, int* outFd, int* outEvents, void** outData) {
    int result = 0;
    for (;;) {
        while (mResponseIndex < mResponses.size()) {
            const Response& response = mResponses.itemAt(mResponseIndex++);
            int ident = response.request.ident;
            if (ident >= 0) {
                int fd = response.request.fd;
                int events = response.events;
                void* data = response.request.data;
#if DEBUG_POLL_AND_WAKE
                ALOGD("%p ~ pollOnce - returning signalled identifier %d: "
                        "fd=%d, events=0x%x, data=%p",
                        this, ident, fd, events, data);
#endif
                if (outFd != NULL) *outFd = fd;
                if (outEvents != NULL) *outEvents = events;
                if (outData != NULL) *outData = data;
                return ident;
            }
        }

        if (result != 0) {
#if DEBUG_POLL_AND_WAKE
            ALOGD("%p ~ pollOnce - returning result %d", this, result);
#endif
            if (outFd != NULL) *outFd = 0;
            if (outEvents != NULL) *outEvents = 0;
            if (outData != NULL) *outData = NULL;
            return result;
        }

        result = pollInner(timeoutMillis);
    }
}
最終來到pollInner方法,這個方法非常複雜,但阻塞的核心就一個epoll_wait方法。
pollInner分為五步:
1是計算wait時間,
2是進行wait等待,
3是對wait傳回值的判斷,
4也是對wait傳回值的判斷但是是對事件觸發傳回的判斷,
5是處理Looper和wait的事件。
//阻塞等待事件發生
int epoll_wait ( int epfd, struct epoll_event* events, int maxevents, int timeout );
epfd:create建立的epoll描述符
events:存放事件的數組
maxevents:最大可存放的事件個數,數組events的大小
timeout:逾時時間,為0時立即傳回,為-1時一直阻塞,否則等待timeout時間後傳回

int epoll_create ( int size );//建立一個epoll監聽
//對事件進行操作
int epoll_ctl ( int epfd, int op, int fd, struct epoll_event *event );
epfd:epoll描述符,由create建立的
op:具體操作
EPOLL_CTL_ADD:往事件表中注冊fd上的事件
EPOLL_CTL_MOD:修改fd上的注冊事件
EPOLL_CTL_DEL:删除fd上的注冊事件
fd:要注冊觀察的檔案描述符,可以是具體的檔案,socket,管道等
event:具體要檢測的事件
EPOLLIN:有資料流入,即檔案非空
EPOLLOUT:有資料可以寫入,即檔案非滿
epoll是Linux核心為處理大批量檔案描述符而作了改進的poll,是Linux下多路複用IO接口select/poll的增強版本,它能顯著提高程式在大量并發連接配接中隻有少量活躍的情況下的系統CPU使用率。簡單點說或者說根據本文意圖來解釋的話就是:epoll是linux下的方法,會阻塞線程直到有事件通知。
那麼這裡就要簡單說明一下epoll了,首先epoll會監聽一些檔案描述符,然後給這些檔案描述添加一些事件,這樣當線程通路的時候就會阻塞,然後待這些檔案描述符發生添加的事件的時候就會喚醒。
更詳細的可以看:https://blog.csdn.net/zip_tts/article/details/86097136
四、補充問題
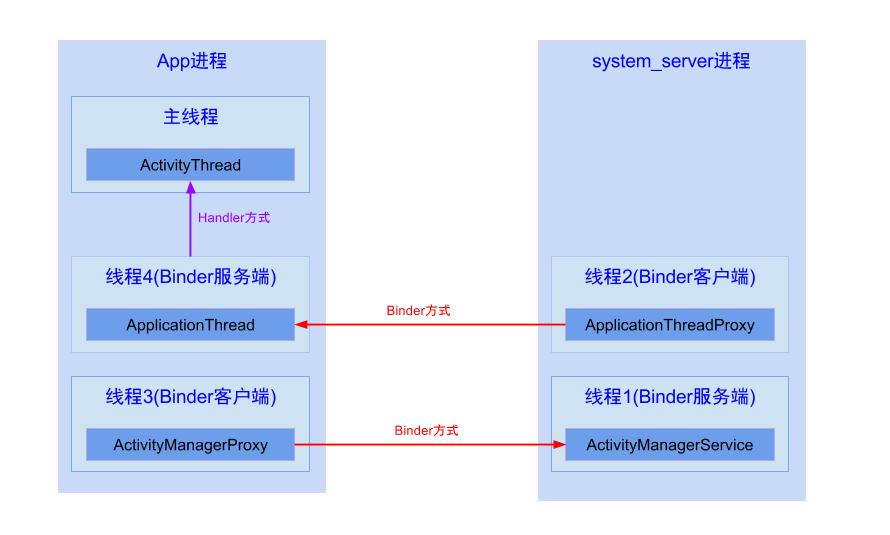
Activity的生命周期是怎麼實作在死循環體外能夠執行起來的?
ActivityThread的内部類H繼承于Handler,通過handler消息機制,簡單說Handler機制用于同一個程序的線程間通信。
Activity的生命周期都是依靠主線程的Looper.loop,當收到不同Message時則采用相應措施:
在H.handleMessage(msg)方法中,根據接收到不同的msg,執行相應的生命周期。
比如收到msg=H.LAUNCH_ACTIVITY,則調用ActivityThread.handleLaunchActivity()方法,最終會通過反射機制,建立Activity執行個體,然後再執行Activity.onCreate()等方法;
再比如收到msg=H.PAUSE_ACTIVITY,則調用ActivityThread.handlePauseActivity()方法,最終會執行Activity.onPause()等方法。 上述過程,我隻挑核心邏輯講,真正該過程遠比這複雜。
主線程的消息又是哪來的呢?當然是App程序中的其他線程通過Handler發送給主線程,例如:
Step4、handler.sendMessage()
好了,花那麼多篇幅分析Looper和MessageQueue是怎麼運作的,下面handler要來真正使用這套體系了。從我們最常用的sendMessage開始,最終都會調用到enqueueMessage方法中。
public final boolean sendMessage(@NonNull Message msg) {
   return sendMessageDelayed(msg, 0);
}
public final boolean sendMessageDelayed(@NonNull Message msg, long delayMillis) {
    if (delayMillis < 0) {
        delayMillis = 0;
    }
    return sendMessageAtTime(msg, SystemClock.uptimeMillis() + delayMillis);
}
public boolean sendMessageAtTime(@NonNull Message msg, long uptimeMillis) {
    MessageQueue queue = mQueue;
    if (queue == null) {
        RuntimeException e = new RuntimeException(
                this + " sendMessageAtTime() called with no mQueue");
        Log.w("Looper", e.getMessage(), e);
        return false;
    }
    return enqueueMessage(queue, msg, uptimeMillis);
}
private boolean enqueueMessage(@NonNull MessageQueue queue, @NonNull Message msg,
        long uptimeMillis) {
    //enqueue的時候,預設給message都加上了target
    msg.target = this;
    msg.workSourceUid = ThreadLocalWorkSource.getUid();

    if (mAsynchronous) {
        msg.setAsynchronous(true);
    }
    return queue.enqueueMessage(msg, uptimeMillis);
}
boolean enqueueMessage(Message msg, long when) {
    if (msg.target == null) {
        throw new IllegalArgumentException("Message must have a target.");
    }
    if (msg.isInUse()) {
        throw new IllegalStateException(msg + " This message is already in use.");
    }

    synchronized (this) {
        if (mQuitting) {
            IllegalStateException e = new IllegalStateException(
                    msg.target + " sending message to a Handler on a dead thread");
            Log.w(TAG, e.getMessage(), e);
            msg.recycle();
            return false;
        }

        msg.markInUse();
        msg.when = when;
        Message p = mMessages;
        boolean needWake;
        if (p == null || when == 0 || when < p.when) {
            // New head, wake up the event queue if blocked.
            //此處是将msg插入到連結清單頭,因為p == null說明目前連結清單為空或者目前消息的when最小
            msg.next = p;
            mMessages = msg;
            needWake = mBlocked;
        } else {
            // Inserted within the middle of the queue.  Usually we don't have to wake
            // up the event queue unless there is a barrier at the head of the queue
            // and the message is the earliest asynchronous message in the queue.
            //prev指向前一個節點,p指向後一個節點,最終把消息插入到連結清單尾部
            needWake = mBlocked && p.target == null && msg.isAsynchronous();
            Message prev;
            for (;;) {
                prev = p;
                p = p.next;
                if (p == null || when < p.when) {
                    break;
                }
                if (needWake && p.isAsynchronous()) {
                    needWake = false;
                }
            }
            msg.next = p; // invariant: p == prev.next
            prev.next = msg;
        }

        // We can assume mPtr != 0 because mQuitting is false.
        if (needWake) {
            nativeWake(mPtr);
        }
    }
    return true;
}
核心代碼的含義都在注釋裡,就是一個基礎的連結清單入隊操作,出隊操作在前面next方法中已經分析過了,這裡不再贅述。下面看出隊後的那行還沒分析的代碼:
前面已經知道,target就是handler,是以hanlder裡看下源碼
if (msg.callback != null) {
    handleCallback(msg);
} else {
    if (mCallback != null) {
        if (mCallback.handleMessage(msg)) {
            return;
        }
    }
    handleMessage(msg);
}
這裡的優先級很清晰,先看msg自己有沒有callback,再看handler的mCallback有沒有,都沒有就回調我們最常用的複寫的handler的handleMessage方法。非常明确的模闆模式。
最後看下前面說的在一次Looper.loop循環的最後,Message防止浪費記憶體的代碼:
void recycleUnchecked() {
    // Mark the message as in use while it remains in the recycled object pool.
    // Clear out all other details.
    flags = FLAG_IN_USE;
    what = 0;
    arg1 = 0;
    arg2 = 0;
    obj = null;
    replyTo = null;
    sendingUid = UID_NONE;
    workSourceUid = UID_NONE;
    when = 0;
    target = null;
    callback = null;
    data = null;

    synchronized (sPoolSync) {
        if (sPoolSize < MAX_POOL_SIZE) {
            next = sPool;
            sPool = this;
            sPoolSize++;
        }
    }
}
把目前的msg中的資料全部reset後放到連結清單頭上,那什麼時候取的呢?
/**
 * Return a new Message instance from the global pool. Allows us to
 * avoid allocating new objects in many cases.
 */
public static Message obtain() {
    synchronized (sPoolSync) {
        if (sPool != null) {
            Message m = sPool;
            sPool = m.next;
            m.next = null;
            m.flags = 0; // clear in-use flag
            sPoolSize--;
            return m;
        }
    }
    return new Message();
}

/** Constructor (but the preferred way to get a Message is to call {@link #obtain() Message.obtain()}).
*/
public Message() {
}
看官方注釋寫的很清楚了,其實就是個連結清單的頭的出隊操作,是以官方不建議大家直接new Message()而是使用obtain方法。
Step5、Looper.quit()
一般隻在子線程中使用handler時使用,主線程調用會直接抛異常的。
public void quit() {
    mQueue.quit(false);
}
最終還是調用messageQueue的quit方法
void quit(boolean safe) {
	//Looper.prepareMainLoop()方法這裡會把mQuitAllowed設定為false,是以主線程調用quit一定會直接崩潰
    if (!mQuitAllowed) {
        throw new IllegalStateException("Main thread not allowed to quit.");
    }

    synchronized (this) {
        if (mQuitting) {
            return;
        }
        mQuitting = true;

        if (safe) {
            removeAllFutureMessagesLocked();
        } else {
            removeAllMessagesLocked();
        }

        // We can assume mPtr != 0 because mQuitting was previously false.
        nativeWake(mPtr);
    }
}
quit方法的執行一共分成5步:
第1步:判斷是否允許退出,因為在構造MessageQueue對象的時候傳入了一個boolean參數,來表示該MessageQueue是否允許退出。而這個boolean參數在Looper裡面設定,Loooper.prepare()方法裡面是true,在Looper.prepareMainLooper()是false,由此可見我們知道:主線程的MessageQueue是不能退出。其他工作線程的MessageQueue是可以退出的。
第2步:加上同步鎖
第3步:主要防止重複退出,加入一個mQuitting變量表示是否退出
第4步:如果該方法的變量safe為true,則删除以目前時間為分界線,删除未來的所有消息,如果該方法的變量safe為false,則删除目前消息隊列的所有消息。
第5步:調用nativeWake函數,以觸發nativePollOnce函數,結束等待。
Step Extra、MessageQueue postSyncBarrier
前面的分析我們知道了,隊列的順序基本取決于when的先後,有時候某些消息需要高優處理,就要使用Barrier機制。
private int postSyncBarrier(long when) {
    // Enqueue a new sync barrier token.
    // We don't need to wake the queue because the purpose of a barrier is to stall it.
    synchronized (this) {
        final int token = mNextBarrierToken++;
        final Message msg = Message.obtain();
        msg.markInUse();
        msg.when = when;
        msg.arg1 = token;

        Message prev = null;
        Message p = mMessages;
        if (when != 0) {
            while (p != null && p.when <= when) {
                prev = p;
                p = p.next;
            }
        }
        if (prev != null) { // invariant: p == prev.next
            msg.next = p;
            prev.next = msg;
        } else {
            msg.next = p;
            mMessages = msg;
        }
        return token;
    }
}
postSyncBarrier方法就是用來插入一個屏障到消息隊列的,分析如下:
1、屏障消息和普通消息的差別在于屏障沒有tartget,普通消息有target是因為它需要将消息分發給對應的target,而屏障不需要被分發,它就是用來擋住普通消息來保證異步消息優先處理的。
2、屏障和普通消息一樣可以根據時間來插入到消息隊列中的适當位置,并且隻會擋住它後面的同步消息的分發。
3、postSyncBarrier傳回一個int類型的數值,通過這個數值可以撤銷屏障。
4、postSyncBarrier方法是私有的,如果我們想調用它就得使用反射。
5、插入普通消息會喚醒消息隊列,但是插入屏障不會。
下面看下next裡對barrier消息的處理:
if (msg != null && msg.target == null) {
    // Stalled by a barrier.  Find the next asynchronous message in the queue.
    do {
        prevMsg = msg;
        msg = msg.next;
    } while (msg != null && !msg.isAsynchronous());
}
很明顯,next方法中在發現屏障之後,會過濾掉屏障之後的所有同步消息,優先去處理後面的異步消息,在移除之前會一直隻處理異步消息,不會處理同步消息。
總結
貼一張時序圖來結尾吧。

其實隻要涉及到作業系統界面,基本都是這套玩法,比如iOS的runloop,學有餘力的同學可以看看這篇:
https://blog.ibireme.com/2015/05/18/runloop/
還沒學夠的,再去看浏覽器的eventLoop~
https://segmentfault.com/a/1190000018181334