Spring Boot學習筆記
- Spring Boot工作原了解析
-
- 自動配置源碼解析
-
- 解析@SpringBootApplication
-
- @SpringBootConfiguration
- @ComponentScan
- @EnableXxx
- 解析@EnableAutoConfiguration
-
- @Import
- @AutoConfigurationPackage
- application.yml的加載
-
- 啟動方法run()跟蹤
- 準備運作環境
- 讓監聽器監聽環境準備過程
- 釋出環境準備事件
- 觸發監聽器
- 加載配置檔案
- Spring Boot與Redis的整合
- MyBatis與Spring Boot的整合
- 自定義Starter
-
- 自定義 wrap-spring-boot-starter
- starter測試 09-wrapper-starter
Spring Boot工作原了解析
自動配置源碼解析
- 使用 Spring Boot 開發較之以前的基于 xml 配置式的開發,要簡捷友善快速的多。而這完全得益于 Spring Boot 的自動配置。下面就通過源碼閱讀方式來分析自動配置的運作原理。
解析@SpringBootApplication
- 打開啟動類的 @SpringBootApplication 注解源碼,發現@SpringBootApplication 注解其實就是一個組合注解。
@Target(ElementType.TYPE)
@Retention(RetentionPolicy.RUNTIME)
@Documented
@Inherited
@SpringBootConfiguration
@EnableAutoConfiguration
@ComponentScan(excludeFilters = {
		@Filter(type = FilterType.CUSTOM, classes = TypeExcludeFilter.class),
		@Filter(type = FilterType.CUSTOM,
				classes = AutoConfigurationExcludeFilter.class) })
public @interface SpringBootApplication { //...略 }
元注解:前四個是專門(即隻能)用于對注解進行注解的,稱為元注解。
@SpringBootConfiguration
- 檢視 @SpringBootConfiguration 注解的源碼可知,該注解與 @Configuration 注解功能相同,僅表示目前類為一個 JavaConfig 類,其就是為 Spring Boot 建立的一個注解。
@Target(ElementType.TYPE)
@Retention(RetentionPolicy.RUNTIME)
@Documented
@Configuration
public @interface SpringBootConfiguration {

}
@ComponentScan
- @ComponentScan 用于指定目前應用所要掃描的包。注意,其僅僅是指定包,而并沒有掃描這些包,更沒有裝配其中的類,這個真正掃描并裝配這些類是 @EnableAutoConfiguration 完成的。
@Retention(RetentionPolicy.RUNTIME)
@Target(ElementType.TYPE)
@Documented
@Repeatable(ComponentScans.class)
public @interface ComponentScan {
/**
* Alias for {@link #basePackages}.
* <p>Allows for more concise annotation declarations if no other attributes
* are needed — for example, {@code @ComponentScan("org.my.pkg")}
* instead of {@code @ComponentScan(basePackages = "org.my.pkg")}.
*/
@AliasFor("basePackages")
String[] value() default {};
// ...略
Filter[] includeFilters() default {};
Filter[] excludeFilters() default {};
// ...略
}
- 這個注解有三個重要屬性:
- basePackages:用于指定要掃描的元件包,若沒有指定則掃描目前注解所标的類所在的包及其子孫包。
- includeFilters:用于進一步縮小要掃描的基本包中的類,通過指定過濾器的方式進行縮小範圍。
- excludeFilters:用于過濾掉那些不适合做元件的類。
@EnableXxx
- @EnableXxx 注解一般用于開啟某一項功能,是為了簡化配置代碼的引入。其是組合注解,一般情況下 @EnableXxx 注解中都會組合一個@Import 注解,而該@Import 注解用于導入指定的類,而被導入的類一般為配置類。其導入配置類的方式常見的有三種:
- 一、直接引入配置類:@Import 中指定的類一般為 Configuration 結尾,且該類上會注解@Configuration,表示目前類為 JavaConfig 類。例如:@EnableScheduling
@Target(ElementType.TYPE)
@Retention(RetentionPolicy.RUNTIME)
@Import(SchedulingConfiguration.class)
@Documented
public @interface EnableScheduling {

}

@Configuration
@Role(BeanDefinition.ROLE_INFRASTRUCTURE)
public class SchedulingConfiguration {

	@Bean(name = TaskManagementConfigUtils.SCHEDULED_ANNOTATION_PROCESSOR_BEAN_NAME)
	@Role(BeanDefinition.ROLE_INFRASTRUCTURE)
	public ScheduledAnnotationBeanPostProcessor scheduledAnnotationProcessor() {
		return new ScheduledAnnotationBeanPostProcessor();
	}

}
- 二、根據條件選擇配置類:@Import 中指定的類一般以 ConfigurationSelector 結尾,且該類實作了 ImportSelector 接口,表示目前類會根據條件選擇不同的配置類導入。例如:@EnableCaching
@Target(ElementType.TYPE)
@Retention(RetentionPolicy.RUNTIME)
@Documented
@Import(CachingConfigurationSelector.class)
public @interface EnableCaching { // ...略 }

public class CachingConfigurationSelector extends AdviceModeImportSelector<EnableCaching> {
	// ...略
	@Override
	public String[] selectImports(AdviceMode adviceMode) {
		switch (adviceMode) {
			case PROXY:
				return getProxyImports();
			case ASPECTJ:
				return getAspectJImports();
			default:
				return null;
		}
	}
	// ...略
}

public abstract class AdviceModeImportSelector<A extends Annotation> implements ImportSelector {
	// ...略
}
- 三、動态注冊Bean:@Import 中指定的類一般以 Registrar 結尾,且該類實作了 ImportBeanDefinitionRegistrar 接口,用于表示在代碼運作時若使用了到該配置類,則系統會自動将其導入。例如:@EnableAspectJAutoProxy
@Target(ElementType.TYPE)
@Retention(RetentionPolicy.RUNTIME)
@Documented
@Import(AspectJAutoProxyRegistrar.class)
public @interface EnableAspectJAutoProxy {
	boolean proxyTargetClass() default false;
	boolean exposeProxy() default false;
}

class AspectJAutoProxyRegistrar implements ImportBeanDefinitionRegistrar {

	/**
	 * Register, escalate, and configure the AspectJ auto proxy creator based on the value
	 * of the @{@link EnableAspectJAutoProxy#proxyTargetClass()} attribute on the importing
	 * {@code @Configuration} class.
	 */
	@Override
	public void registerBeanDefinitions(
			AnnotationMetadata importingClassMetadata, BeanDefinitionRegistry registry) {

		AopConfigUtils.registerAspectJAnnotationAutoProxyCreatorIfNecessary(registry);

		AnnotationAttributes enableAspectJAutoProxy =
				AnnotationConfigUtils.attributesFor(importingClassMetadata, EnableAspectJAutoProxy.class);
		if (enableAspectJAutoProxy != null) {
			if (enableAspectJAutoProxy.getBoolean("proxyTargetClass")) {
				AopConfigUtils.forceAutoProxyCreatorToUseClassProxying(registry);
			}
			if (enableAspectJAutoProxy.getBoolean("exposeProxy")) {
				AopConfigUtils.forceAutoProxyCreatorToExposeProxy(registry);
			}
		}
	}

}
解析@EnableAutoConfiguration
@Target(ElementType.TYPE)
@Retention(RetentionPolicy.RUNTIME)
@Documented
@Inherited
@AutoConfigurationPackage
@Import(AutoConfigurationImportSelector.class)
public @interface EnableAutoConfiguration {

	String ENABLED_OVERRIDE_PROPERTY = "spring.boot.enableautoconfiguration";

	/**
	 * Exclude specific auto-configuration classes such that they will never be applied.
	 * @return the classes to exclude
	 */
	Class<?>[] exclude() default {};

	/**
	 * Exclude specific auto-configuration class names such that they will never be
	 * applied.
	 * @return the class names to exclude
	 * @since 1.3.0
	 */
	String[] excludeName() default {};
}
- 該注解用于完成自動配置,是 Spring Boot 的核心注解,是一個組合注解。所謂自動配置是指,将使用者自定義的類及架構本身用到的類進行裝配。其中最重要的注解有兩個:
- @AutoConfigurationPackage:用于導入并裝配使用者自定義類,即自動掃描包中的類。
- @Import:用于導入并裝配架構本身的類。
@Import
- 該注解用于導入指定的類。其參數 AutoConfigurationImportSelector 類,該類用于導入自動配置的類。
public class AutoConfigurationImportSelector
		implements DeferredImportSelector, BeanClassLoaderAware, ResourceLoaderAware,
		BeanFactoryAware, EnvironmentAware, Ordered {
	// ...略
	/**
	 * Return the auto-configuration class names that should be considered.
	 */
	protected List<String> getCandidateConfigurations(AnnotationMetadata metadata,
			AnnotationAttributes attributes) {
		List<String> configurations = SpringFactoriesLoader.loadFactoryNames(
				getSpringFactoriesLoaderFactoryClass(), getBeanClassLoader());
		// ....
		return configurations;
	}
}
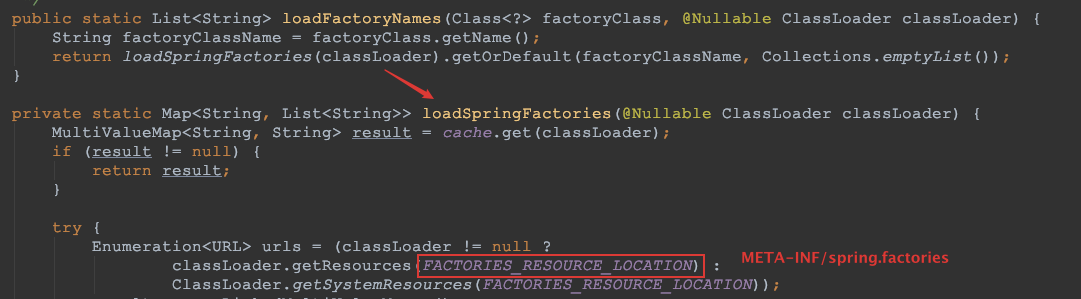
- 這樣我們就找到自動配置的核心檔案 spring.factories:

- Debug啟動一個SpringBoot工程,斷點跟蹤一下:
@AutoConfigurationPackage
- 再打開@AutoConfigurationPackage 的源碼,其也包含一個@Import 注解。
@Target(ElementType.TYPE)
@Retention(RetentionPolicy.RUNTIME)
@Documented
@Inherited
@Import(AutoConfigurationPackages.Registrar.class)
public @interface AutoConfigurationPackage {

}
- 這個注解是要将 AutoConfigurationPackages 類的内部靜态類 Registrar 導入。從前面的學習可知,其是一個動态注冊 Bean。
application.yml的加載
- application.yml 檔案對于 Spring Boot 來說是核心配置檔案,至關重要,那麼該檔案是如何加載到記憶體的呢?需要從啟動類的 run()方法開始跟蹤。
啟動方法run()跟蹤
@SpringBootApplication
public class PrimaryApplication {
    public static void main(String[] args) {
        SpringApplication.run(PrimaryApplication.class, args);
    }
}
// ↓↓↓↓↓
// SpringApplication
	public static ConfigurableApplicationContext run(Class<?> primarySource,
			String... args) {
		return run(new Class<?>[] { primarySource }, args);
	}
// ↓↓↓↓↓
	public static ConfigurableApplicationContext run(Class<?>[] primarySources,
			String[] args) {
		return new SpringApplication(primarySources).run(args);
	}
準備運作環境
// SpringApplication
public ConfigurableApplicationContext run(String... args) {
	StopWatch stopWatch = new StopWatch();
	stopWatch.start();
	ConfigurableApplicationContext context = null;
	Collection<SpringBootExceptionReporter> exceptionReporters = new ArrayList<>();
	configureHeadlessProperty();
	SpringApplicationRunListeners listeners = getRunListeners(args);
	listeners.starting();
	try {
		ApplicationArguments applicationArguments = new DefaultApplicationArguments(
				args);
		// 準備運作環境
		ConfigurableEnvironment environment = prepareEnvironment(listeners,
				applicationArguments);
		configureIgnoreBeanInfo(environment);
		Banner printedBanner = printBanner(environment);
		context = createApplicationContext();
		exceptionReporters = getSpringFactoriesInstances(
				SpringBootExceptionReporter.class,
				new Class[] { ConfigurableApplicationContext.class }, context);
		prepareContext(context, environment, listeners, applicationArguments,
				printedBanner);
		refreshContext(context);
		afterRefresh(context, applicationArguments);
		stopWatch.stop();
		if (this.logStartupInfo) {
			new StartupInfoLogger(this.mainApplicationClass)
					.logStarted(getApplicationLog(), stopWatch);
		}
		listeners.started(context);
		callRunners(context, applicationArguments);
	}
	catch (Throwable ex) {
		handleRunFailure(context, ex, exceptionReporters, listeners);
		throw new IllegalStateException(ex);
	}

	try {
		listeners.running(context);
	}
	catch (Throwable ex) {
		handleRunFailure(context, ex, exceptionReporters, null);
		throw new IllegalStateException(ex);
	}
	return context;
}
讓監聽器監聽環境準備過程
// SpringApplication
private ConfigurableEnvironment prepareEnvironment(
		SpringApplicationRunListeners listeners,
		ApplicationArguments applicationArguments) {
	// Create and configure the environment
	ConfigurableEnvironment environment = getOrCreateEnvironment();
	configureEnvironment(environment, applicationArguments.getSourceArgs());
	// 讓監聽器監聽環境準備過程
	listeners.environmentPrepared(environment);
	bindToSpringApplication(environment);
	if (!this.isCustomEnvironment) {
		environment = new EnvironmentConverter(getClassLoader())
				.convertEnvironmentIfNecessary(environment, deduceEnvironmentClass());
	}
	ConfigurationPropertySources.attach(environment);
	return environment;
}
// ↓↓↓↓↓
// SpringApplicationRunListeners
	public void environmentPrepared(ConfigurableEnvironment environment) {
		for (SpringApplicationRunListener listener : this.listeners) {
			listener.environmentPrepared(environment);
		}
	}
釋出環境準備事件
// EventPublishingRunListener
	@Override
	public void environmentPrepared(ConfigurableEnvironment environment) {
		this.initialMulticaster.multicastEvent(new ApplicationEnvironmentPreparedEvent(
				this.application, this.args, environment));
	}
// ↓↓↓↓↓
// SimpleApplicationEventMulticaster
	@Override
	public void multicastEvent(ApplicationEvent event) {
		multicastEvent(event, resolveDefaultEventType(event));
	}
觸發監聽器
// SimpleApplicationEventMulticaster
	@Override
	public void multicastEvent(final ApplicationEvent event, @Nullable ResolvableType eventType) {
		ResolvableType type = (eventType != null ? eventType : resolveDefaultEventType(event));
		for (final ApplicationListener<?> listener : getApplicationListeners(event, type)) {
			Executor executor = getTaskExecutor();
			if (executor != null) {
				// 觸發監聽器
				executor.execute(() -> invokeListener(listener, event));
			}
			else {
				invokeListener(listener, event);
			}
		}
	}
// ↓↓↓↓↓
	protected void invokeListener(ApplicationListener<?> listener, ApplicationEvent event) {
		ErrorHandler errorHandler = getErrorHandler();
		if (errorHandler != null) {
			try {
				doInvokeListener(listener, event);
			}
			catch (Throwable err) {
				errorHandler.handleError(err);
			}
		}
		else {
			doInvokeListener(listener, event);
		}
	}
加載配置檔案
- ConfigFileApplicationListener 配置檔案的監聽器加載配置檔案:
- 繼續跟蹤 load 方法:可以檢視到其要選擇加載的配置檔案的擴充名是 properties 或 yml
- 其中,properties 屬性檔案和yaml檔案預設支援的檔案字尾名可以檢視源碼得知:
- 接下來繼續分析源碼 loadForFileExtension 這個方法:
- Debug 斷點看一下:配置檔案最終被加載封裝成一 List<PropertySource<?>>
Spring Boot與Redis的整合
- 在 spring.factories 中有一個 RedisAutoConfiguration 類,通過前面的分析我們知道,該類一定會被 Spring 容器自動裝配。但是自動裝配了就可以讀取到 Spring Boot 配置檔案中 Redis 相關的配置資訊了?這個類與 Spring Boot 配置檔案是怎麼建立的聯系?
- 我們知道,若要使代碼可以操作 Redis,就需要擷取到 RedisTemplate,并通過 RedisTemplate 擷取到 Redis 操作對象 RedisOperations。沒有 RedisTemplate 對象,沒有 RedisOperations 接口,是無法操作 Redis 的。
- 檢視 RedisAutoConfiguration 這個類的源碼:加載了 Redis 配置、并建立了 RedisTemplate 對象。
@Configuration
@ConditionalOnClass(RedisOperations.class)
@EnableConfigurationProperties(RedisProperties.class)
@Import({ LettuceConnectionConfiguration.class, JedisConnectionConfiguration.class })
public class RedisAutoConfiguration {

	@Bean
	@ConditionalOnMissingBean(name = "redisTemplate")
	public RedisTemplate<Object, Object> redisTemplate(
			RedisConnectionFactory redisConnectionFactory) throws UnknownHostException {
		RedisTemplate<Object, Object> template = new RedisTemplate<>();
		template.setConnectionFactory(redisConnectionFactory);
		return template;
	}

	@Bean
	@ConditionalOnMissingBean
	public StringRedisTemplate stringRedisTemplate(
			RedisConnectionFactory redisConnectionFactory) throws UnknownHostException {
		StringRedisTemplate template = new StringRedisTemplate();
		template.setConnectionFactory(redisConnectionFactory);
		return template;
	}

}
MyBatis與Spring Boot的整合
- 我們發現在 spring-boot-autoconfigure 中的 spring.factories 檔案中并沒有像 Redis 那樣類似的 xxxAutoConfiguration 類的配置,是以我們隻能去分析 mybatis-spring-boot-starter 依賴。而該依賴又依賴于 mybatis-spring-boot-autoconfigurigure。其 META-INF 中有 spring.factories 檔案,打開這個檔案我們找到了 Mybatis 的自動配置類。
org.springframework.boot.autoconfigure.EnableAutoConfiguration=\
org.mybatis.spring.boot.autoconfigure.MybatisAutoConfiguration

@org.springframework.context.annotation.Configuration
@ConditionalOnClass({ SqlSessionFactory.class, SqlSessionFactoryBean.class })
@ConditionalOnBean(DataSource.class)
@EnableConfigurationProperties(MybatisProperties.class)
@AutoConfigureAfter(DataSourceAutoConfiguration.class)
public class MybatisAutoConfiguration { // ...略 }
- 這個自動配置類依賴兩個工廠 Bean:SqlSessionFactory 和 SqlSessionFactoryBean,還依賴 DataSource 對象,加載 MyBatis 配置 MybatisProperties。這個類中包含兩個@Bean 方法用于建立相應的 Bean:
自定義Starter
- 如果我們自己的某項功能代碼也想将其應用到 Spring Boot 中,為 Spring Boot 項目提供相應支援,需要怎樣實作呢?同樣,我們需要定義自己的 Starter。
自定義 wrap-spring-boot-starter
- starter 工程的命名規範:Spring 官方定義的 starter 通常命名遵循的格式為 spring-boot-starter-{name},例如 spring-boot-starter-web。Spring 官方建議,非官方 starter 命名應遵循 {name}-spring-boot-starter 的格式,例如,dubbo-spring-boot-starter。
- 下面我們自定義一個自己的 Starter,實作的功能是:為使用者提供的字元串添加前辍與後辍,而前辍與後辍定義在 yml 或 properties 配置檔案中。例如,使用者輸入的字元串為 China,application.yml 配置檔案中配置的前辍為$$$,後辍為+++,則最終生成的字元串為 $$$China+++。
- 建立一個 Spring Boot 工程,命名為 wrap-spring-boot-starter。
- 定義一個 Wrapper 類,核心功能在這個類中完成的。該類中的成員變量可以随意命名,但一般與在 Spring Boot 中使用的屬性名同名。
@AllArgsConstructor
public class Wrapper {
    private String prefix;
    private String suffix;

    /**
     * 目前starter的核心功能實作方法
     */
    public String wrap(String word) {
        return prefix + word + suffix;
    }
}
- 定義配置屬性封裝類:指定目前類用于封裝來自于 Spring Boot 核心配置檔案中的以 wrapper.service 開頭的 prefix 與 surfix 屬性值。
// 該類的對象是由系統自動建立,是以無需将其将給 Spring 容器管理
@Data
@ConfigurationProperties("wrapper.service")
public class WrapperProperties {
    /**
     * 對應配置檔案中的wrapper.service.prefix屬性
     */
    private String prefix;
    /**
     * 對應配置檔案中的wrapper.service.suffix屬性
     */
    private String suffix;
}
- 定義自動配置類:這裡再增加一個開關配置
wrapper.service.enable
@Configuration
// 自由目前路徑下存在SomeService類時,才會啟用目前的JavaConfig配置類
@ConditionalOnClass(Wrapper.class)
// 指定配置檔案中指定屬性的封裝類
@EnableConfigurationProperties(WrapperProperties.class)
public class WrapperAutoConfiguration {
    @Resource
    private WrapperProperties properties;

    /**
     * 以下兩個方法的順序不能颠倒
     */
    @Bean
    @ConditionalOnProperty(name = "wrapper.service.enable", havingValue = "true", matchIfMissing = true)
    public Wrapper wrapper() {
        return new Wrapper(properties.getPrefix(), properties.getSuffix());
    }

    @Bean
    @ConditionalOnMissingBean
    public Wrapper defaultWrapper() {
        return new Wrapper("", "");
    }
}
- 在 resources/META-INF 目錄下建立一個名為 spring.factories 的檔案。檔案中内容:鍵是固定的,為 EnableAutoConfiguration 類的全限定性類名,而值則為我們自定義的自動配置類。
org.springframework.boot.autoconfigure.EnableAutoConfiguration=com.yw.springboot.example.config.WrapperAutoConfiguration
starter測試 09-wrapper-starter
- 建立一個 Spring Boot 工程,命名為 09-wrapper-starter,添加依賴:
<!--自定義Starter依賴-->
<dependency>
  <groupId>com.yw.springboot.example</groupId>
  <artifactId>wrap-spring-boot-starter</artifactId>
  <version>1.0</version>
</dependency>
- 定義 application.yml 檔案:自定義 Starter 中的屬性在配置檔案中也是有自動提示功能的。
wrapper:
  service:
    # 設定開關狀态,預設true開啟
    enable: true
    # 指定字首
    prefix: $$$
    # 指定字尾
    suffix: +++
- 定義控制器類:
@RestController
public class WrapController {
    /**
     * byType方式的自動注入
     */
    @Resource
    private Wrapper wrapper;

    @RequestMapping("/wrap/{param}")
    public String wrap(@PathVariable("param") String param) {
        return wrapper.wrap(param);
    }
}
- 啟動項目,測試接口:http://localhost:8080/wrap/test。