相信接觸Android久一點的朋友對于LayoutInflater一定不會陌生,都會知道它主要是用于加載布局的。而剛接觸Android的朋友可能對LayoutInflater不怎麼熟悉,因為加載布局的任務通常都是在Activity中調用setContentView()方法來完成的。其實setContentView()方法的内部也是使用LayoutInflater來加載布局的,隻不過這部分源碼是internal的,看不到而已。那麼今天我們就來把LayoutInflater的工作流程仔細地剖析一遍,也許還能解決掉某些困擾你心頭多年的疑惑。
先來看一下LayoutInflater的基本用法吧,它的用法非常簡單,首先需要擷取到LayoutInflater的執行個體,有兩種方法可以擷取到。
第一種寫法如下:
LayoutInflater layoutInflater = LayoutInflater.from(context);
另外一種寫法,效果都是一樣的:
LayoutInflater layoutInflater = (LayoutInflater) context
.getSystemService(Context.LAYOUT_INFLATER_SERVICE);
得到了LayoutInflater的執行個體之後就可以 調用它的inflate()方法來加載布局了,如下所示:
layoutInflater.inflate(resourceId, root);
注:inflate()方法一般接收兩個參數,第一個參數就是要加載的布局id,第二個參數是指給該布局的外部再嵌套一層父布局,如果不需要就直接傳null。這樣就成功成功建立了一個布局的執行個體,之後再将它添加到指定的位置就可以顯示出來了。 下面我們就通過一個非常簡單的小例子,來更加直覺地看一下LayoutInflater的用法。比如目前有一個項目,其中MainActivity對應的布局檔案叫做activity_main.xml,代碼如下所示:
<LinearLayout xmlns:android="http://schemas.android.com/apk/res/android"
android:id="@+id/main_layout"
 android:layout_width="match_parent"
 android:layout_height="match_parent" >

</LinearLayout>
注:這個布局檔案的内容非常簡單,隻有一個空的LinearLayout,裡面什麼控件都沒有,是以界面上應該不會顯示任何東西。
接下來我們再定義一個布局檔案,給它取名為button_layout.xml,代碼如下所示:
<span style="background-color: rgb(255, 255, 255);">01.<Button xmlns:android="http://schemas.android.com/apk/res/android"
android:layout_width="wrap_content"
 android:layout_height="wrap_content"
 android:text="Button" >

</Button>
</span>
現在要通過LayoutInflater來将button_layout這個布局添加到activity_main.xml檔案的LinearLayout中。需修改MainActivity中的代碼,如下所示:
public class MainActivity extends Activity {

  private LinearLayout mainLayout;

 @Override
  protected void onCreate(Bundle savedInstanceState) {
  super.onCreate(savedInstanceState);
   setContentView(R.layout.activity_main);
   mainLayout = (LinearLayout) findViewById(R.id.main_layout);
   LayoutInflater layoutInflater = LayoutInflater.from(this);
  View buttonLayout = layoutInflater.inflate(R.layout.button_layout, null);
  mainLayout.addView(buttonLayout);
 }

}
結論:可以看到,這裡先是擷取到了LayoutInflater的執行個體,然後調用它的inflate()方法來加載button_layout這個布局,最後調用LinearLayout的addView()方法将它添加到LinearLayout中。
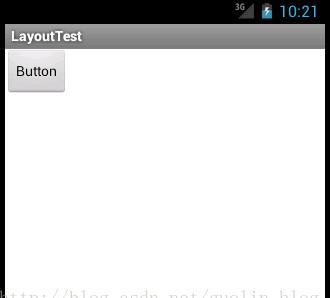
Button在界面上顯示出來了!說明我們确實是借助LayoutInflater成功将button_layout這個布局添加到LinearLayout中了。LayoutInflater技術廣泛應用于需要動态添加View的時候,比如在ScrollView和ListView中,經常都可以看到LayoutInflater的身影。
Layoutflater原理分析:
當然,僅僅隻是介紹了如何使用LayoutInflater顯然是遠遠無法滿足大家的求知欲的,知其然也要知其是以然,接下來我們就從源碼的角度上看一看LayoutInflater到底是如何工作的。
不論使用的哪個inflate()方法的重載,最終都會輾轉調用到LayoutInflater的如下代碼中:
public View inflate(XmlPullParser parser, ViewGroup root, boolean attachToRoot) {
    synchronized (mConstructorArgs) {
        final AttributeSet attrs = Xml.asAttributeSet(parser);
        mConstructorArgs[0] = mContext;
        View result = root;
        try {
            int type;
            while ((type = parser.next()) != XmlPullParser.START_TAG &&
                    type != XmlPullParser.END_DOCUMENT) {
            }
            if (type != XmlPullParser.START_TAG) {
                throw new InflateException(parser.getPositionDescription()
                        + ": No start tag found!");
           }
            final String name = parser.getName();
            if (TAG_MERGE.equals(name)) {
                if (root == null || !attachToRoot) {
                    throw new InflateException("merge can be used only with a valid "
                           + "ViewGroup root and attachToRoot=true");
               }
               rInflate(parser, root, attrs);
           } else {
                View temp = createViewFromTag(name, attrs);
                ViewGroup.LayoutParams params = null;
                if (root != null) {
                   params = root.generateLayoutParams(attrs);
                    if (!attachToRoot) {
                        temp.setLayoutParams(params);
                    }
                }
                rInflate(parser, temp, attrs);
                if (root != null && attachToRoot) {
                   root.addView(temp, params);
                }
                if (root == null || !attachToRoot) {
                    result = temp;
                }
            }
        } catch (XmlPullParserException e) {
            InflateException ex = new InflateException(e.getMessage());
            ex.initCause(e);
            throw ex;
        } catch (IOException e) {
            InflateException ex = new InflateException(
                    parser.getPositionDescription()
                    + ": " + e.getMessage());
            ex.initCause(e);
            throw ex;
        }
        return result;
    }
}
解析:從這裡我們就可以清楚地看出,LayoutInflater其實就是使用Android提供的pull解析方式來解析布局檔案的。不熟悉pull解析方式的朋友可以點選我的上一篇文章“android pull 解析xml檔案”,這裡我們注意看下第23行,調用了createViewFromTag()這個方法,并把節點名和參數傳了進去。看到這個方法名,我們就應該能猜到,它是用于根據節點名來建立View對象的。确實如此,在createViewFromTag()方法的内部又會去調用createView()方法,然後使用反射的方式建立出View的執行個體并傳回。
當然,這裡隻是建立出了一個根布局的執行個體而已,接下來會在第31行調用rInflate()方法來循環周遊這個根布局下的子元素,代碼如下所示:
private void rInflate(XmlPullParser parser, View parent, final AttributeSet attrs)
        throws XmlPullParserException, IOException {
    final int depth = parser.getDepth();
    int type;
    while (((type = parser.next()) != XmlPullParser.END_TAG ||
            parser.getDepth() > depth) && type != XmlPullParser.END_DOCUMENT) {
        if (type != XmlPullParser.START_TAG) {
            continue;
        }
        final String name = parser.getName();
        if (TAG_REQUEST_FOCUS.equals(name)) {
            parseRequestFocus(parser, parent);
        } else if (TAG_INCLUDE.equals(name)) {
            if (parser.getDepth() == 0) {
                throw new InflateException("<include /> cannot be the root element");
            }
            parseInclude(parser, parent, attrs);
        } else if (TAG_MERGE.equals(name)) {
            throw new InflateException("<merge /> must be the root element");
       } else {
            final View view = createViewFromTag(name, attrs);
            final ViewGroup viewGroup = (ViewGroup) parent;
            final ViewGroup.LayoutParams params = viewGroup.generateLayoutParams(attrs);
            rInflate(parser, view, attrs);
            viewGroup.addView(view, params);
        }
    }
    parent.onFinishInflate();
}
解析:可以看到,在第21行同樣是createViewFromTag()方法來建立View的執行個體,然後還會在第24行遞歸調用rInflate()方法來查找這個View下的子元素,每次遞歸完成後則将這個View添加到父布局當中。
這樣的話,把整個布局檔案都解析完成後就形成了一個完整的DOM結構,最終會把最頂層的根布局傳回,至此inflate()過程全部結束。
比較細心的朋友也許會注意到,inflate()方法還有個接收三個參數的方法重載,結構如下:
inflate(int resource, ViewGroup root, boolean attachToRoot)
第三個參數attachToRoot又是什麼意思呢?其實如果你仔細去閱讀上面的源碼應該可以自己分析出答案,這裡我先将結論說一下吧,感興趣的朋友可以再閱讀一下源碼,校驗我的結論是否正确。
1. 如果root為null,attachToRoot将失去作用,設定任何值都沒有意義。
2. 如果root不為null,attachToRoot設為true,則會給加載的布局檔案的指定一個父布局,即root。
3. 如果root不為null,attachToRoot設為false,則會将布局檔案最外層的所有layout屬性進行設定,當該view被添加到父view當中時,這些layout屬性會自動生效。
4. 在不設定attachToRoot參數的情況下,如果root不為null,attachToRoot參數預設為true。
好了,現在對LayoutInflater的工作原理和流程也搞清楚了。
雜談:
這個例子中的按鈕看起來有點小,想要調大一些?那簡單的呀,修改button_layout.xml中的代碼,如下所示:
<Button xmlns:android="http://schemas.android.com/apk/res/android"
    android:layout_width="300dp"
    android:layout_height="80dp"
    android:text="Button" >

</Button>
這裡我們将按鈕的寬度改成300dp,高度改成80dp,這樣夠大了吧?現在重新運作一下程式來觀察效果。咦?怎麼按鈕還是原來的大小,沒有任何變化!是不是按鈕仍然不夠大,再改大一點呢?還是沒有用!
解析:其實這裡不管你将Button的layout_width和layout_height的值修改成多少,都不會有任何效果的,因為這兩個值現在已經完全失去了作用。平時我們經常使用layout_width和layout_height來設定View的大小,并且一直都能正常工作,就好像這兩個屬性确實是用于設定View的大小的。而實際上則不然,它們其實是用于設定View在布局中的大小的,也就是說,首先View必須存在于一個布局中,之後如果将layout_width設定成match_parent表示讓View的寬度填充滿布局,如果設定成wrap_content表示讓View的寬度剛好可以包含其内容,如果設定成具體的數值則View的寬度會變成相應的數值。這也是為什麼這兩個屬性叫作layout_width和layout_height,而不是width和height。
再來看一下我們的button_layout.xml吧,很明顯Button這個控件目前不存在于任何布局當中,是以layout_width和layout_height這兩個屬性理所當然沒有任何作用。那麼怎樣修改才能讓按鈕的大小改變呢?解決方法其實有很多種,最簡單的方式就是在Button的外面再嵌套一層布局,如下所示:
<RelativeLayout xmlns:android="http://schemas.android.com/apk/res/android"
    android:layout_width="match_parent"
    android:layout_height="match_parent" >

    <Button
        android:layout_width="300dp"
        android:layout_height="80dp"
        android:text="Button" >
    </Button>

</RelativeLayout>
結論:這裡我們又加入了一個RelativeLayout,此時的Button存在與RelativeLayout之中,layout_width和layout_height屬性也就有作用了。當然,處于最外層的RelativeLayout,它的layout_width和layout_height則會失去作用。現在重新運作一下程式,結果如下圖所示:

OK!按鈕的終于可以變大了。
看到這裡,也許有些朋友心中會有一個巨大的疑惑。不對呀!平時在Activity中指定布局檔案的時候,最外層的那個布局指定大小是生效的呀。确實,這主要是因為,在setContentView()方法中,Android會自動在布局檔案的最外層再嵌套一個FrameLayout,是以layout_width和layout_height屬性才會有效果。那麼我們來證明一下吧,修改MainActivity中的代碼,如下所示:
public class MainActivity extends Activity {

    private LinearLayout mainLayout;

    @Override
    protected void onCreate(Bundle savedInstanceState) {
        super.onCreate(savedInstanceState);
        setContentView(R.layout.activity_main);
        mainLayout = (LinearLayout) findViewById(R.id.main_layout);
        ViewParent viewParent = mainLayout.getParent();
        Log.d("TAG", "the parent of mainLayout is " + viewParent);
    }

}
可以看到,這裡通過findViewById()方法,拿到了activity_main布局中最外層的LinearLayout對象,然後調用它的getParent()方法擷取它的父布局,再通過Log列印出來。現在重新運作一下程式,結果如下圖所示:
非常正确!LinearLayout的父布局确實是一個FrameLayout,而這個FrameLayout就是由系統自動幫我們添加上的。
說到這裡,雖然setContentView()方法大家都會用,但實際上Android界面顯示的原理要比我們所看到的東西複雜得多。任何一個Activity中顯示的界面其實主要都由兩部分組成,标題欄和内容布局。标題欄就是在很多界面頂部顯示的那部分内容,比如剛剛我們的那個例子當中就有标題欄,可以在代碼中控制讓它是否顯示。而内容布局就是一個FrameLayout,這個布局的id叫作content,我們調用setContentView()方法時所傳入的布局其實就是放到這個FrameLayout中的,這也是為什麼這個方法名叫作setContentView(),而不是叫setView()。
最後再附上一張Activity視窗的組成圖吧,以便于大家更加直覺地了解:
OK,暫時講到這裡。