深入了解HashMap和CurrentHashMap
前言
Map 這樣的
Key Value
在軟體開發中是非常經典的結構,常用于在記憶體中存放資料。
本篇主要想讨論 ConcurrentHashMap 這樣一個并發容器,在正式開始之前我覺得有必要談談 HashMap,沒有它就不會有後面的 ConcurrentHashMap。
HashMap
衆所周知 HashMap 底層是基于
數組 + 連結清單
組成的,不過在 jdk1.7 和 1.8 中具體實作稍有不同。
Base 1.7
1.7 中的資料結構圖:
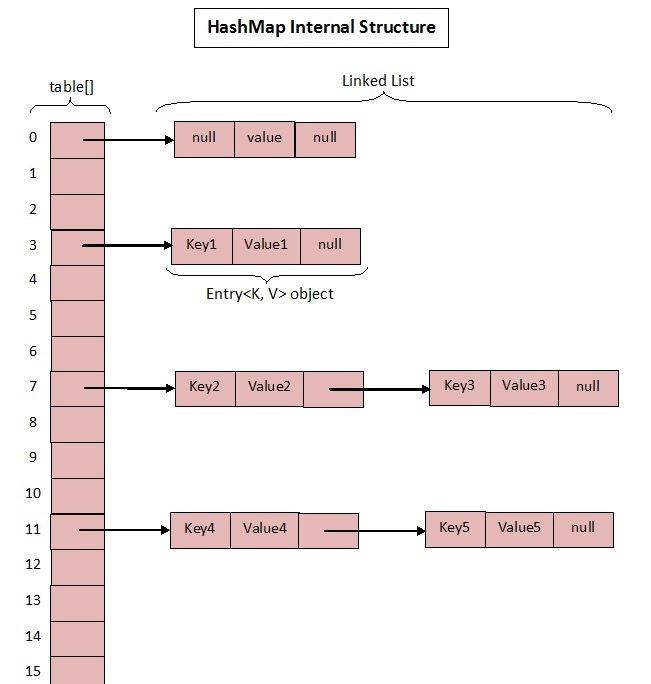
先來看看 1.7 中的實作。

這是 HashMap 中比較核心的幾個成員變量;看看分别是什麼意思?
- 初始化桶大小,因為底層是數組,是以這是數組預設的大小。
- 桶最大值。
- 預設的負載因子(0.75)
-
table
-
Map
- 桶大小,可在初始化時顯式指定。
- 負載因子,可在初始化時顯式指定。
重點解釋下負載因子:
由于給定的 HashMap 的容量大小是固定的,比如預設初始化:
1     public HashMap() {
 2         this(DEFAULT_INITIAL_CAPACITY, DEFAULT_LOAD_FACTOR);
 3     }
 4
 5     public HashMap(int initialCapacity, float loadFactor) {
 6         if (initialCapacity < 0)
 7             throw new IllegalArgumentException("Illegal initial capacity: " +
 8                                                initialCapacity);
 9         if (initialCapacity > MAXIMUM_CAPACITY)
10             initialCapacity = MAXIMUM_CAPACITY;
11         if (loadFactor <= 0 || Float.isNaN(loadFactor))
12             throw new IllegalArgumentException("Illegal load factor: " +
13                                                loadFactor);
14
15         this.loadFactor = loadFactor;
16         threshold = initialCapacity;
17         init();
18 } 給定的預設容量為 16,負載因子為 0.75。Map 在使用過程中不斷的往裡面存放資料,當數量達到了
16 * 0.75 = 12
就需要将目前 16 的容量進行擴容,而擴容這個過程涉及到 rehash、複制資料等操作,是以非常消耗性能。
是以通常建議能提前預估 HashMap 的大小最好,盡量的減少擴容帶來的性能損耗。
根據代碼可以看到其實真正存放資料的是
transient Entry<K,V>[] table = (Entry<K,V>[]) EMPTY_TABLE; 這個數組,那麼它又是如何定義的呢?
Entry 是 HashMap 中的一個内部類,從他的成員變量很容易看出:
- key 就是寫入時的鍵。
- value 自然就是值。
- 開始的時候就提到 HashMap 是由數組和連結清單組成,是以這個 next 就是用于實作連結清單結構。
- hash 存放的是目前 key 的 hashcode。
知曉了基本結構,那來看看其中重要的寫入、擷取函數:
put 方法
public V put(K key, V value) {
        if (table == EMPTY_TABLE) {
            inflateTable(threshold);
        }
        if (key == null)
            return putForNullKey(value);
        int hash = hash(key);
        int i = indexFor(hash, table.length);
        for (Entry<K,V> e = table[i]; e != null; e = e.next) {
            Object k;
            if (e.hash == hash && ((k = e.key) == key || key.equals(k))) {
                V oldValue = e.value;
                e.value = value;
                e.recordAccess(this);
                return oldValue;
            }
        }

        modCount++;
        addEntry(hash, key, value, i);
        return null;
} - 判斷目前數組是否需要初始化。
- 如果 key 為空,則 put 一個空值進去。
- 根據 key 計算出 hashcode。
- 根據計算出的 hashcode 定位出所在桶。
- 如果桶是一個連結清單則需要周遊判斷裡面的 hashcode、key 是否和傳入 key 相等,如果相等則進行覆寫,并傳回原來的值。
- 如果桶是空的,說明目前位置沒有資料存入;新增一個 Entry 對象寫入目前位置。
void addEntry(int hash, K key, V value, int bucketIndex) {
        if ((size >= threshold) && (null != table[bucketIndex])) {
            resize(2 * table.length);
            hash = (null != key) ? hash(key) : 0;
            bucketIndex = indexFor(hash, table.length);
        }

        createEntry(hash, key, value, bucketIndex);
    }

    void createEntry(int hash, K key, V value, int bucketIndex) {
        Entry<K,V> e = table[bucketIndex];
        table[bucketIndex] = new Entry<>(hash, key, value, e);
        size++;
} 當調用 addEntry 寫入 Entry 時需要判斷是否需要擴容。
如果需要就進行兩倍擴充,并将目前的 key 重新 hash 并定位。
而在
createEntry
中會将目前位置的桶傳入到建立的桶中,如果目前桶有值就會在位置形成連結清單。
get 方法
再來看看 get 函數:
public V get(Object key) {
        if (key == null)
            return getForNullKey();
        Entry<K,V> entry = getEntry(key);

        return null == entry ? null : entry.getValue();
    }

    final Entry<K,V> getEntry(Object key) {
        if (size == 0) {
            return null;
        }

        int hash = (key == null) ? 0 : hash(key);
        for (Entry<K,V> e = table[indexFor(hash, table.length)];
             e != null;
             e = e.next) {
            Object k;
            if (e.hash == hash &&
                ((k = e.key) == key || (key != null && key.equals(k))))
                return e;
        }
        return null;
} - 首先也是根據 key 計算出 hashcode,然後定位到具體的桶中。
- 判斷該位置是否為連結清單。
- 不是連結清單就根據
key、key 的 hashcode
- 為連結清單則需要周遊直到 key 及 hashcode 相等時候就傳回值。
- 啥都沒取到就直接傳回 null 。
Base 1.8
不知道 1.7 的實作大家看出需要優化的點沒有?
其實一個很明顯的地方就是:
當 Hash 沖突嚴重時,在桶上形成的連結清單會變的越來越長,這樣在查詢時的效率就會越來越低;時間複雜度為 O(N)
是以 1.8 中重點優化了這個查詢效率。
1.8 HashMap 結構圖:
先來看看幾個核心的成員變量:
1     static final int DEFAULT_INITIAL_CAPACITY = 1 << 4; // aka 16
 2
 3     /**
 4      * The maximum capacity, used if a higher value is implicitly specified
 5      * by either of the constructors with arguments.
 6      * MUST be a power of two <= 1<<30.
 7      */
 8     static final int MAXIMUM_CAPACITY = 1 << 30;
 9
10     /**
11      * The load factor used when none specified in constructor.
12      */
13     static final float DEFAULT_LOAD_FACTOR = 0.75f;
14
15     static final int TREEIFY_THRESHOLD = 8;
16
17     transient Node<K,V>[] table;
18
19     /**
20      * Holds cached entrySet(). Note that AbstractMap fields are used
21      * for keySet() and values().
22      */
23     transient Set<Map.Entry<K,V>> entrySet;
24
25     /**
26      * The number of key-value mappings contained in this map.
27      */
28 transient int size; 和 1.7 大體上都差不多,還是有幾個重要的差別:
-
TREEIFY_THRESHOLD
- HashEntry 修改為 Node。
Node 的核心組成其實也是和 1.7 中的 HashEntry 一樣,存放的都是
key value hashcode next
等資料。
再來看看核心方法。
put 方法
看似要比 1.7 的複雜,我們一步步拆解:
- 判斷目前桶是否為空,空的就需要初始化(resize 中會判斷是否進行初始化)。
- 根據目前 key 的 hashcode 定位到具體的桶中并判斷是否為空,為空表明沒有 Hash 沖突就直接在目前位置建立一個新桶即可。
- 如果目前桶有值( Hash 沖突),那麼就要比較目前桶中的
key、key 的 hashcode
e
- 如果目前桶為紅黑樹,那就要按照紅黑樹的方式寫入資料。
- 如果是個連結清單,就需要将目前的 key、value 封裝成一個新節點寫入到目前桶的後面(形成連結清單)。
- 接着判斷目前連結清單的大小是否大于預設的門檻值,大于時就要轉換為紅黑樹。
- 如果在周遊過程中找到 key 相同時直接退出周遊。
- 如果
e != null
- 最後判斷是否需要進行擴容。
get 方法
1     public V get(Object key) {
 2         Node<K,V> e;
 3         return (e = getNode(hash(key), key)) == null ? null : e.value;
 4     }
 5
 6     final Node<K,V> getNode(int hash, Object key) {
 7         Node<K,V>[] tab; Node<K,V> first, e; int n; K k;
 8         if ((tab = table) != null && (n = tab.length) > 0 &&
 9             (first = tab[(n - 1) & hash]) != null) {
10             if (first.hash == hash && // always check first node
11                 ((k = first.key) == key || (key != null && key.equals(k))))
12                 return first;
13             if ((e = first.next) != null) {
14                 if (first instanceof TreeNode)
15                     return ((TreeNode<K,V>)first).getTreeNode(hash, key);
16                 do {
17                     if (e.hash == hash &&
18                         ((k = e.key) == key || (key != null && key.equals(k))))
19                         return e;
20                 } while ((e = e.next) != null);
21             }
22         }
23         return null;
24 } get 方法看起來就要簡單許多了。
- 首先将 key hash 之後取得所定位的桶。
- 如果桶為空則直接傳回 null 。
- 否則判斷桶的第一個位置(有可能是連結清單、紅黑樹)的 key 是否為查詢的 key,是就直接傳回 value。
- 如果第一個不比對,則判斷它的下一個是紅黑樹還是連結清單。
- 紅黑樹就按照樹的查找方式傳回值。
- 不然就按照連結清單的方式周遊比對傳回值。
從這兩個核心方法(get/put)可以看出 1.8 中對大連結清單做了優化,修改為紅黑樹之後查詢效率直接提高到了
O(logn)
。
但是 HashMap 原有的問題也都存在,比如在并發場景下使用時容易出現死循環。
1 final HashMap<String, String> map = new HashMap<String, String>();
2 for (int i = 0; i < 1000; i++) {
3     new Thread(new Runnable() {
4         @Override
5         public void run() {
6             map.put(UUID.randomUUID().toString(), "");
7         }
8     }).start();
9 } 但是為什麼呢?簡單分析下。
看過上文的還記得在 HashMap 擴容的時候會調用
resize()
方法,就是這裡的并發操作容易在一個桶上形成環形連結清單;這樣當擷取一個不存在的 key 時,計算出的 index 正好是環形連結清單的下标就會出現死循環。
如下圖:
周遊方式
還有一個值得注意的是 HashMap 的周遊方式,通常有以下幾種:
1 Iterator<Map.Entry<String, Integer>> entryIterator = map.entrySet().iterator();
 2         while (entryIterator.hasNext()) {
 3             Map.Entry<String, Integer> next = entryIterator.next();
 4             System.out.println("key=" + next.getKey() + " value=" + next.getValue());
 5         }
 6
 7 Iterator<String> iterator = map.keySet().iterator();
 8         while (iterator.hasNext()){
 9             String key = iterator.next();
10             System.out.println("key=" + key + " value=" + map.get(key));
11
12 } 強烈建議
使用第一種 EntrySet 進行周遊。
第一種可以把 key value 同時取出,第二種還得需要通過 key 取一次 value,效率較低。
簡單總結下 HashMap:無論是 1.7 還是 1.8 其實都能看出 JDK 沒有對它做任何的同步操作,是以并發會出問題,甚至出現死循環導緻系統不可用。
是以 JDK 推出了專項專用的 ConcurrentHashMap ,該類位于
java.util.concurrent
包下,專門用于解決并發問題。
堅持看到這裡的朋友算是已經把 ConcurrentHashMap 的基礎已經打牢了,下面正式開始分析。
ConcurrentHashMap
ConcurrentHashMap 同樣也分為 1.7 、1.8 版,兩者在實作上略有不同。
Base 1.7
先來看看 1.7 的實作,下面是他的結構圖:
如圖所示,是由 Segment 數組、HashEntry 組成,和 HashMap 一樣,仍然是數組加連結清單。
它的核心成員變量:
1  /**
2      * Segment 數組,存放資料時首先需要定位到具體的 Segment 中。
3      */
4     final Segment<K,V>[] segments;
5
6     transient Set<K> keySet;
7 transient Set<Map.Entry<K,V>> entrySet; Segment 是 ConcurrentHashMap 的一個内部類,主要的組成如下:
1     static final class Segment<K,V> extends ReentrantLock implements Serializable {
 2
 3         private static final long serialVersionUID = 2249069246763182397L;
 4
 5         // 和 HashMap 中的 HashEntry 作用一樣,真正存放資料的桶
 6         transient volatile HashEntry<K,V>[] table;
 7
 8         transient int count;
 9
10         transient int modCount;
11
12         transient int threshold;
13
14         final float loadFactor;
15
16 } 看看其中 HashEntry 的組成:
和 HashMap 非常類似,唯一的差別就是其中的核心資料如 value ,以及連結清單都是 volatile 修飾的,保證了擷取時的可見性。
原理上來說:ConcurrentHashMap 采用了分段鎖技術,其中 Segment 繼承于 ReentrantLock。不會像 HashTable 那樣不管是 put 還是 get 操作都需要做同步處理,理論上 ConcurrentHashMap 支援 CurrencyLevel (Segment 數組數量)的線程并發。每當一個線程占用鎖通路一個 Segment 時,不會影響到其他的 Segment。
下面也來看看核心的
put get
方法。
put 方法
1     public V put(K key, V value) {
 2         Segment<K,V> s;
 3         if (value == null)
 4             throw new NullPointerException();
 5         int hash = hash(key);
 6         int j = (hash >>> segmentShift) & segmentMask;
 7         if ((s = (Segment<K,V>)UNSAFE.getObject          // nonvolatile; recheck
 8              (segments, (j << SSHIFT) + SBASE)) == null) //  in ensureSegment
 9             s = ensureSegment(j);
10         return s.put(key, hash, value, false);
11 } 首先是通過 key 定位到 Segment,之後在對應的 Segment 中進行具體的 put。
1         final V put(K key, int hash, V value, boolean onlyIfAbsent) {
 2             HashEntry<K,V> node = tryLock() ? null :
 3                 scanAndLockForPut(key, hash, value);
 4             V oldValue;
 5             try {
 6                 HashEntry<K,V>[] tab = table;
 7                 int index = (tab.length - 1) & hash;
 8                 HashEntry<K,V> first = entryAt(tab, index);
 9                 for (HashEntry<K,V> e = first;;) {
10                     if (e != null) {
11                         K k;
12                         if ((k = e.key) == key ||
13                             (e.hash == hash && key.equals(k))) {
14                             oldValue = e.value;
15                             if (!onlyIfAbsent) {
16                                 e.value = value;
17                                 ++modCount;
18                             }
19                             break;
20                         }
21                         e = e.next;
22                     }
23                     else {
24                         if (node != null)
25                             node.setNext(first);
26                         else
27                             node = new HashEntry<K,V>(hash, key, value, first);
28                         int c = count + 1;
29                         if (c > threshold && tab.length < MAXIMUM_CAPACITY)
30                             rehash(node);
31                         else
32                             setEntryAt(tab, index, node);
33                         ++modCount;
34                         count = c;
35                         oldValue = null;
36                         break;
37                     }
38                 }
39             } finally {
40                 unlock();
41             }
42             return oldValue;
43 } 雖然 HashEntry 中的 value 是用 volatile 關鍵詞修飾的,但是并不能保證并發的原子性,是以 put 操作時仍然需要加鎖處理。
首先第一步的時候會嘗試擷取鎖,如果擷取失敗肯定就有其他線程存在競争,則利用
scanAndLockForPut()
自旋擷取鎖。
- 嘗試自旋擷取鎖。
- 如果重試的次數達到了
MAX_SCAN_RETRIES
再結合圖看看 put 的流程。
- 将目前 Segment 中的 table 通過 key 的 hashcode 定位到 HashEntry。
- 周遊該 HashEntry,如果不為空則判斷傳入的 key 和目前周遊的 key 是否相等,相等則覆寫舊的 value。
- 不為空則需要建立一個 HashEntry 并加入到 Segment 中,同時會先判斷是否需要擴容。
- 最後會解除在 1 中所擷取目前 Segment 的鎖。
get 方法
1     public V get(Object key) {
 2         Segment<K,V> s; // manually integrate access methods to reduce overhead
 3         HashEntry<K,V>[] tab;
 4         int h = hash(key);
 5         long u = (((h >>> segmentShift) & segmentMask) << SSHIFT) + SBASE;
 6         if ((s = (Segment<K,V>)UNSAFE.getObjectVolatile(segments, u)) != null &&
 7             (tab = s.table) != null) {
 8             for (HashEntry<K,V> e = (HashEntry<K,V>) UNSAFE.getObjectVolatile
 9                      (tab, ((long)(((tab.length - 1) & h)) << TSHIFT) + TBASE);
10                  e != null; e = e.next) {
11                 K k;
12                 if ((k = e.key) == key || (e.hash == h && key.equals(k)))
13                     return e.value;
14             }
15         }
16         return null;
17 } get 邏輯比較簡單:
隻需要将 Key 通過 Hash 之後定位到具體的 Segment ,再通過一次 Hash 定位到具體的元素上。
由于 HashEntry 中的 value 屬性是用 volatile 關鍵詞修飾的,保證了記憶體可見性,是以每次擷取時都是最新值。
ConcurrentHashMap 的 get 方法是非常高效的,因為整個過程都不需要加鎖。
Base 1.8
1.7 已經解決了并發問題,并且能支援 N 個 Segment 這麼多次數的并發,但依然存在 HashMap 在 1.7 版本中的問題。
那就是查詢周遊連結清單效率太低。
是以 1.8 做了一些資料結構上的調整。
首先來看下底層的組成結構:
看起來是不是和 1.8 HashMap 結構類似?
其中抛棄了原有的 Segment 分段鎖,而采用了
CAS + synchronized
來保證并發安全性。
也将 1.7 中存放資料的 HashEntry 改為 Node,但作用都是相同的。
其中的
val next
都用了 volatile 修飾,保證了可見性。
put 方法
重點來看看 put 函數:
- 根據 key 計算出 hashcode 。
- 判斷是否需要進行初始化。
-
f
- 如果目前位置的
hashcode == MOVED == -1
- 如果都不滿足,則利用 synchronized 鎖寫入資料。
- 如果數量大于
TREEIFY_THRESHOLD
get 方法
- 根據計算出來的 hashcode 尋址,如果就在桶上那麼直接傳回值。
- 如果是紅黑樹那就按照樹的方式擷取值。
- 就不滿足那就按照連結清單的方式周遊擷取值。
1.8 在 1.7 的資料結構上做了大的改動,采用紅黑樹之後可以保證查詢效率( O(logn)
總結
看完了整個 HashMap 和 ConcurrentHashMap 在 1.7 和 1.8 中不同的實作方式相信大家對他們的了解應該會更加到位。
其實這塊也是面試的重點内容,通常的套路是:
- 談談你了解的 HashMap,講講其中的 get put 過程。
- 1.8 做了什麼優化?
- 是線程安全的嘛?
- 不安全會導緻哪些問題?
- 如何解決?有沒有線程安全的并發容器?
- ConcurrentHashMap 是如何實作的? 1.7、1.8 實作有何不同?為什麼這麼做?
這一串問題相信大家仔細看完都能怼回面試官。
除了面試會問到之外平時的應用其實也蠻多,像之前談到的 Guava 中 Cache 的實作就是利用 ConcurrentHashMap 的思想。
同時也能學習 JDK 作者大牛們的優化思路以及并發解決方案。