【GiantPandaCV導語】這裡主要是走讀了一下TVM的Codegen流程,從Relay的前端一直梳理到了Graph節點的記憶體配置設定,Relay IR到TIR節點的轉換,TIR圖節點的Schedule優化以及Lower function發生在哪裡。這篇文章隻是關注了調用鍊,一些具體的操作比如Schedule的優化,IR到TIR節點的轉化以及Lower Function沒有具體解釋,後面會結合更多執行個體去嘗試了解。
0x0. 介紹
這篇文章主要是來介紹一下TVM的CodeGen流程。TVM自動代碼生成的接口是
tvm.build
和
tvm.relay.build
,
tvm.build
是用來做算子的代碼生成,而
tvm.relay.build
是用來做relay計算圖的自動代碼生成(這裡代碼生成已經包含了編譯流程)。接下來我們就從這兩個函數講起,一直到TVM的Codegen的具體實作。閱讀這篇文章之前建議先了解一下TVM的編譯流程,即看一下【從零開始學深度學習編譯器】六,TVM的編譯流程詳解 這篇文章。
0x1. 如何檢視生成的代碼
對于Relay要檢視生成的代碼示例如下:
from tvm import relay
from tvm.relay import testing
import tvm

# Resnet18 workload
resnet18_mod, resnet18_params = relay.testing.resnet.get_workload(num_layers=18)


with relay.build_config(opt_level=0):
    graph, lib, params = relay.build_module.build(resnet18_mod, "llvm", params=resnet18_params)

# print relay ir
print(resnet18_mod.astext(show_meta_data=False))

# print source code
print(lib.get_source())
複制
TVM給運作時Module提供了
get_source
來檢視生成的代碼,同時通過IRModule的
astext
函數可以檢視ir中間描述。由于這裡産生的的是指定裝置(CPU)上的可運作的機器碼,不具有可讀性,就不貼了。
我們可以基于算子的自動代碼生成例子來直覺的感受TVM生成的代碼是什麼樣子,因為在
tvm.build
接口中,
target
可以設定為
c
,即生成C語言代碼。例子如下:
import tvm
from tvm import te

M = 1024
K = 1024
N = 1024

# Algorithm
k = te.reduce_axis((0, K), 'k')
A = te.placeholder((M, K), name='A')
B = te.placeholder((K, N), name='B')
C = te.compute(
           (M, N),
           lambda x, y: te.sum(A[x, k] * B[k, y], axis=k),
           name='C')

# Default schedule
s = te.create_schedule(C.op)
ir_m = tvm.lower(s, [A, B, C], simple_mode=True,name='mmult')
rt_m = tvm.build(ir_m, [A, B, C], target='c', name='mmult')

# print tir
print("tir:\n", ir_m.astext(show_meta_data=False))
# print source code
print("source code:\n",rt_m.get_source())
複制
生成的TIR和Source Code如下:
tir:
 #[version = "0.0.5"]
primfn(A_1: handle, B_1: handle, C_1: handle) -> ()
  attr = {"global_symbol": "mmult", "tir.noalias": True}
  buffers = {C: Buffer(C_2: Pointer(float32), float32, [1024, 1024], []),
             B: Buffer(B_2: Pointer(float32), float32, [1024, 1024], []),
             A: Buffer(A_2: Pointer(float32), float32, [1024, 1024], [])}
  buffer_map = {A_1: A, B_1: B, C_1: C} {
  for (x: int32, 0, 1024) {
    for (y: int32, 0, 1024) {
      C_2[((x*1024) + y)] = 0f32
      for (k: int32, 0, 1024) {
        C_2[((x*1024) + y)] = ((float32*)C_2[((x*1024) + y)] + ((float32*)A_2[((x*1024) + k)]*(float32*)B_2[((k*1024) + y)]))
      }
    }
  }
}

/* For debugging purposes the metadata section has been omitted.
 * If you would like to see the full metadata section you can set the
 * option to `True` when invoking `astext`.
 */
source code:
 // tvm target: c -keys=cpu -link-params=0
#define TVM_EXPORTS
#include "tvm/runtime/c_runtime_api.h"
#include "tvm/runtime/c_backend_api.h"
#include <math.h>
void* __tvm_module_ctx = NULL;
#ifdef __cplusplus
extern "C"
#endif
TVM_DLL int32_t mmult(void* args, void* arg_type_ids, int32_t num_args, void* out_ret_value, void* out_ret_tcode, void* resource_handle) {
  void* arg0 = (((TVMValue*)args)[0].v_handle);
  int32_t arg0_code = ((int32_t*)arg_type_ids)[(0)];
  void* arg1 = (((TVMValue*)args)[1].v_handle);
  int32_t arg1_code = ((int32_t*)arg_type_ids)[(1)];
  void* arg2 = (((TVMValue*)args)[2].v_handle);
  int32_t arg2_code = ((int32_t*)arg_type_ids)[(2)];
  void* A = (((DLTensor*)arg0)[0].data);
  void* arg0_shape = (((DLTensor*)arg0)[0].shape);
  void* arg0_strides = (((DLTensor*)arg0)[0].strides);
  int32_t dev_id = (((DLTensor*)arg0)[0].device.device_id);
  void* B = (((DLTensor*)arg1)[0].data);
  void* arg1_shape = (((DLTensor*)arg1)[0].shape);
  void* arg1_strides = (((DLTensor*)arg1)[0].strides);
  void* C = (((DLTensor*)arg2)[0].data);
  void* arg2_shape = (((DLTensor*)arg2)[0].shape);
  void* arg2_strides = (((DLTensor*)arg2)[0].strides);
  if (!(arg0_strides == NULL)) {
  }
  if (!(arg1_strides == NULL)) {
  }
  if (!(arg2_strides == NULL)) {
  }
  for (int32_t x = 0; x < 1024; ++x) {
    for (int32_t y = 0; y < 1024; ++y) {
      ((float*)C)[(((x * 1024) + y))] = 0.000000e+00f;
      for (int32_t k = 0; k < 1024; ++k) {
        ((float*)C)[(((x * 1024) + y))] = (((float*)C)[(((x * 1024) + y))] + (((float*)A)[(((x * 1024) + k))] * ((float*)B)[(((k * 1024) + y))]));
      }
    }
  }
  return 0;
}
複制
直覺的了解了一下TVM的代碼生成接口(
tvm.build
和
tvm.relay.build
)之後,我們可以借助
https://zhuanlan.zhihu.com/p/139089239
這篇文章中總結的TVM的代碼生成過程的流程圖來更好的了解。
原文中的介紹是:
tvm代碼生成接口上是IRModule到運作時module的轉換,它完成tir或者relay ir到目标target代碼的編譯,例如c或者llvm IR等。下面的流程圖描述整個代碼的編譯流程,深色表示C++代碼,淺色表示python代碼。算子編譯時會首先進行tir的優化,分離出host和device部分,之後會調用注冊的target.build.target函數進行編譯。relay圖編譯相比算子稍微複雜一點,核心代碼采用C++開發。它會通過relayBuildModule.Optimize進行relay圖優化,之後針對module中的每個lower_funcs進行編譯,合成最終的運作時module,其後部分的編譯流程和算子編譯相似。
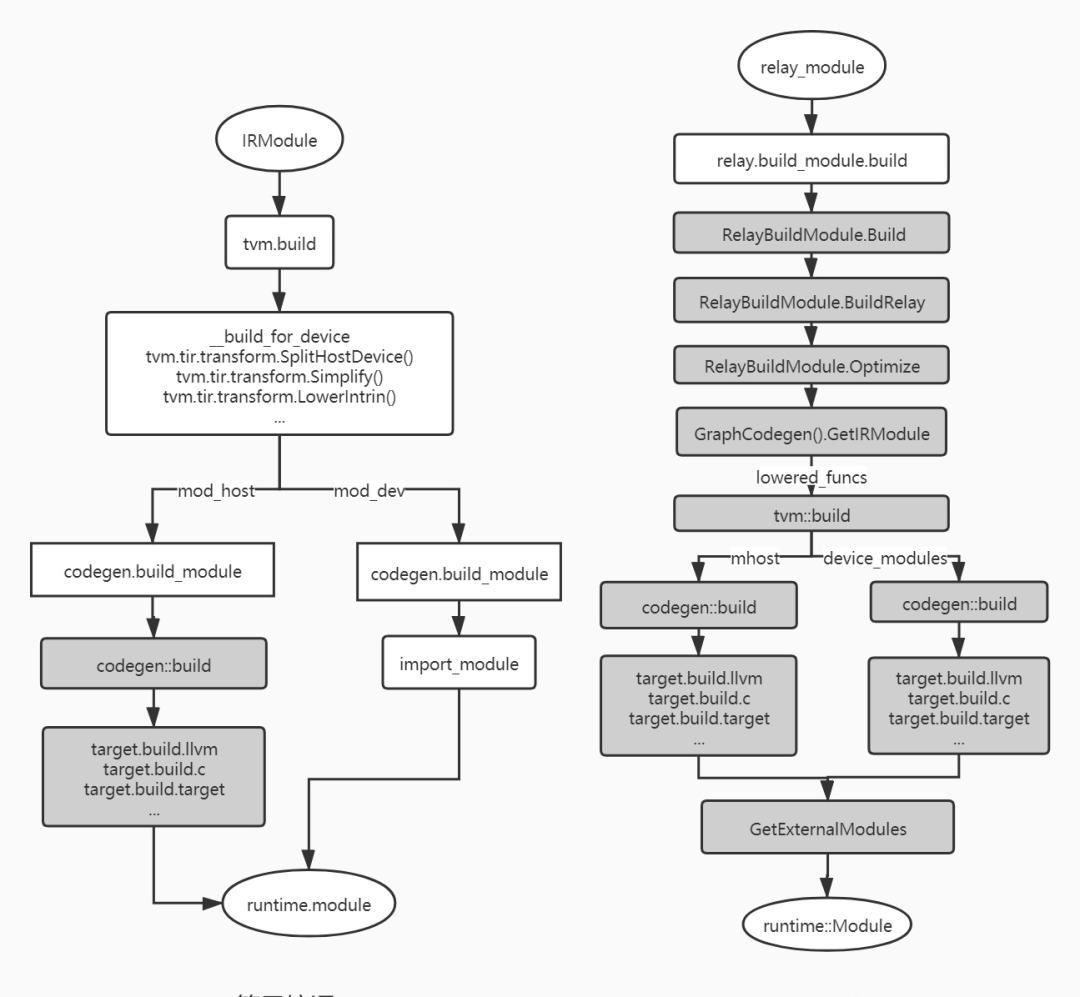
注意一點,右圖中的relay.build_module.build在本文對應的就是tvm.relay.build
看上面的個流程圖可以直覺了解一下TVM Codegen的流程,這裡以Relay為例子,在TVM的代碼中簡單的來對應一下。在上面的右圖中展示了Relay Graph的完整編譯流程,其中GraphCodeGen之前的部分我們已經在【從零開始學深度學習編譯器】六,TVM的編譯流程詳解 講過了,這裡直接從建立GraphCodegen執行個體(
graph_codegen_ = std::unique_ptr<GraphCodegen>(new GraphCodegen());
)開始來梳理一下GraphCodegen的流程。這部分的代碼如下:
void BuildRelay(IRModule relay_module,
                  const std::unordered_map<std::string, tvm::runtime::NDArray>& params) {
    Target target_host = GetTargetHost();
    // If no target_host has been set, we choose a default one, which is
    // llvm if "codegen.LLVMModuleCreate" is accessible.
    const runtime::PackedFunc* pf = runtime::Registry::Get("codegen.LLVMModuleCreate");
    if (!target_host.defined()) target_host = (pf != nullptr) ? Target("llvm") : Target("stackvm");

    // Update all the targets in the targets_ TargetsMap
    CheckAndUpdateHostConsistency(&targets_, &target_host);

    // Relay IRModule -> IRModule optimizations.
    relay_module = Optimize(relay_module, targets_, params);
    // Get the updated function.
    auto func = Downcast<Function>(relay_module->Lookup("main"));

    // Generate code for the updated function.
    graph_codegen_ = std::unique_ptr<GraphCodegen>(new GraphCodegen());
    graph_codegen_->Init(nullptr, targets_);
    graph_codegen_->Codegen(func);

    ret_.graph_json = graph_codegen_->GetJSON();
    ret_.params = graph_codegen_->GetParams();

    auto lowered_funcs = graph_codegen_->GetIRModule();

    // Generate a placeholder function that attaches linked params as its arguments.
    if (target_host->GetAttr<Bool>("link-params").value_or(Bool(false))) {
      CHECK(pf != nullptr) << "Unable to link-params with no target_host and no llvm codegen.";
      auto param_ids = graph_codegen_->GetParamIds();
      auto link_params = Map<String, tir::LinkedParam>();
      for (auto param : ret_.params) {
        link_params.Set(param.first, tir::LinkedParam(param_ids[param.first], param.second));
      }

      Map<String, ObjectRef> dict;
      dict.Set(tvm::tir::attr::kLinkedParams, link_params);
      dict.Set(tvm::attr::kGlobalSymbol, String(::tvm::runtime::symbol::tvm_lookup_linked_param));
      DictAttrs attrs{dict};
      auto prim = tir::PrimFunc(Array<tir::Var>(), tir::SeqStmt(Array<tir::Stmt>()), VoidType(),
                                Map<tir::Var, tir::Buffer>(), attrs);
      if (lowered_funcs.find(target_host->str()) == lowered_funcs.end()) {
        lowered_funcs.Set(target_host->str(), IRModule(Map<GlobalVar, BaseFunc>({})));
      }
      lowered_funcs[target_host->str()]->Add(
          GlobalVar(::tvm::runtime::symbol::tvm_lookup_linked_param), prim);
    }

    // When there is no lowered_funcs due to reasons such as optimization.
    if (lowered_funcs.size() == 0) {
      if (target_host.defined() && target_host->kind->name == "llvm") {
        // If we can decide the target is LLVM, we then create an empty LLVM module.
        ret_.mod = (*pf)(target_host->str(), "empty_module");
      } else {
        // If we cannot decide the target is LLVM, we create an empty CSourceModule.
        // The code content is initialized with ";" to prevent complaining
        // from CSourceModuleNode::SaveToFile.
        ret_.mod = tvm::codegen::CSourceModuleCreate(";", "", Array<String>{});
      }
    } else {
      ret_.mod = tvm::build(lowered_funcs, target_host_);
    }

    auto ext_mods = graph_codegen_->GetExternalModules();
    ret_.mod = tvm::codegen::CreateMetadataModule(ret_.params, ret_.mod, ext_mods, GetTargetHost());
  }
複制
首先這裡建立了一個
GraphCodegen
對象,其中
GraphCodegen
這個結構體的定義在
tvm/src/relay/backend/build_module.cc
中的
struct GraphCodegen
部分,它封裝了
tvm/src/relay/backend/graph_executor_codegen.cc
中
GraphExecutorCodegenModule
的幾個和Codegen有關的函數,如
init
,
codegen
,
get_graph_json
,
get_external_modules
等等。例如初始化函數
init
的實作如下:
class GraphExecutorCodegenModule : public runtime::ModuleNode {
 public:
  GraphExecutorCodegenModule() {}
  virtual PackedFunc GetFunction(const std::string& name, const ObjectPtr<Object>& sptr_to_self) {
    if (name == "init") {
      return PackedFunc([sptr_to_self, this](TVMArgs args, TVMRetValue* rv) {
        ICHECK_EQ(args.num_args, 2) << "The expected of arguments are: "
                                    << "runtime::Module mod and Map<int, Target> targets";
        void* mod = args[0];
        Map<Integer, tvm::Target> tmp = args[1];
        TargetsMap targets;
        for (const auto& it : tmp) {
          auto dev_type = it.first.as<tir::IntImmNode>();
          ICHECK(dev_type);
          targets[dev_type->value] = it.second;
        }
        codegen_ = std::make_shared<GraphExecutorCodegen>(reinterpret_cast<runtime::Module*>(mod),
                                                          targets);
      });
    }
   ... 省略
  const char* type_key() const final { return "RelayGraphExecutorCodegenModule"; }

 private:
  std::shared_ptr<GraphExecutorCodegen> codegen_;
  LoweredOutput output_;
};
複制
這個初始化函數就是通過
mod
和
target
生成了一個
GraphExecutorCodegen
對象,
GraphExecutorCodegen
這個類的定義如下(省略版):
/*! \brief Code generator for graph executor */
class GraphExecutorCodegen : public backend::MemoizedExprTranslator<std::vector<GraphNodeRef>> {
 public:
  // 初始化的時候準備好了
  GraphExecutorCodegen(runtime::Module* mod, const TargetsMap& targets) : mod_(mod) {
    compile_engine_ = CompileEngine::Global();
    targets_ = targets;
  }

  LoweredOutput Codegen(relay::Function func) {
    ...
  }
複制
這個構造函數裡面的
compile_engine_ = CompileEngine::Global();
建立了一個編譯器執行個體,用于後面的代碼生成任務,target則指定了目标裝置。
/*! \brief cache entry used in compile engine */
class CompileEngine : public ObjectRef {
 public:
  CompileEngine() {}
  explicit CompileEngine(ObjectPtr<Object> n) : ObjectRef(n) {}
  CompileEngineNode* operator->() { return static_cast<CompileEngineNode*>(get_mutable()); }
  using ContainerType = CompileEngineNode;
  /*! \brief The global compile engine. */
  TVM_DLL static CompileEngine& Global();
};
複制
接下來,我們再回到
GraphExecutorCodegenModule
類,看一下
codegen
這部分具體的調用邏輯:
else if (name == "codegen") {
      return PackedFunc([sptr_to_self, this](TVMArgs args, TVMRetValue* rv) {
        Function func = args[0];
        this->output_ = this->codegen_->Codegen(func);
      });
    }
複制
這裡的Func是經過了一系列Pass優化之後的Relay Func,
this->output_ = this->codegen_->Codegen(func);
這裡就調用了Graph Codegen的核心實作函數,我們在下一節講。
0x2. Graph CodeGen 記憶體申請
現在讓我們來認識一下
GraphExecutorCodegen
這個類的核心函數
LoweredOutput Codegen(relay::Function func)
,這個函數實作了記憶體的配置設定,Relay IR節點到TIR節點的轉換,TIR圖節點的排程優化。我們再對照一下這個函數的代碼來講解:
LoweredOutput Codegen(relay::Function func) {
    auto pf = GetPackedFunc("relay.backend.GraphPlanMemory");
    storage_device_map_ = (*pf)(func);
    // First we convert all the parameters into input nodes.
    for (auto param : func->params) {
      auto node_ptr = GraphInputNode::make_node_ptr(param->name_hint(), GraphAttrs());
      var_map_[param.get()] = AddNode(node_ptr, param);
    }
    heads_ = VisitExpr(func->body);
    std::ostringstream os;
    dmlc::JSONWriter writer(&os);
    GetJSON(&writer);
    LoweredOutput ret;
    ret.graph_json = os.str();
    ret.params = std::unordered_map<std::string, std::pair<int, const tvm::runtime::NDArray>>();
    for (auto param : params_) {
      ret.params.emplace(std::make_pair(
          param.first,
          std::make_pair(static_cast<int>(param_storage_ids_[param.first]), param.second)));
    }
複制
Graph Codegen的第一步是記憶體申請,即下面兩行代碼做的事:
auto pf = GetPackedFunc("relay.backend.GraphPlanMemory");
    storage_device_map_ = (*pf)(func);
複制
然後跟進到
GraphPlanMemory
的定義,在
tvm/src/relay/backend/graph_plan_memory.cc
中定義如下:
Map<Expr, Array<IntegerArray> > GraphPlanMemory(const Function& func) {
  return StorageAllocator().Plan(func);
}
複制
這裡主要和
StorageAllocator
和
StorageAllocaInit
兩個類的實作相關,
StorageAllocaInit
是用來建立封裝記憶體申請資訊的TokenMap,收集不同算子的裝置資訊。
StorageAllocaInit
的
GetInitTokenMap
構造函數是用來周遊
func
的節點,獲得每個節點的裝置屬性。
GetInitTokenMap
構造函數的實作如下:
/*! \return The internal token map */
  std::unordered_map<const ExprNode*, std::vector<StorageToken*> > GetInitTokenMap(
      const Function& func) {
    node_device_map_ = CollectDeviceInfo(func);
    this->Run(func);
    return std::move(token_map_);
  }
複制
首先調用了
CollectDeviceInfo
這個函數來擷取
func
中每個節點的裝置屬性,它具體是怎麼做的呢?我們可以從
tvm/src/relay/transforms/device_annotation.cc
這裡的注釋了解到這個思路:
/*
 * \brief Return device allocation map based on the post order traversed graph.
 * For the following program:
 * .. code-block:: python
 *     x = relay.var("x")
 *     y = relay.var("y")
 *     add = relay.add(x, y)
 *     sqrt = relay.sqrt(add)
 *     log = relay.log(add)
 *     subtract = relay.subtract(sqrt, log)
 *     exp = relay.exp(subtract)
 *
 * Suppose we have annotated add, sqrt, and log with device 1, 2, and 3,
 * respectively. The fallback/default device is 4. After Rewriting the
 * program, we can have the following graph, where each copy op has both
 * source and destination device type denoting which device the data should be
 * copied from and to.
 *
 *         x     y
 *          \   /
 *          add/1
 *          /   \
 *       copy1  copy2
 *         |     |
 *      sqrt/2 log/3
 *         |     |
 *       copy3 copy4
 *          \   /
 *        subtract
 *            |
 *           exp
 *
 * To Get the device mapping of each expression, we need to propagate the
 * device information from the copy ops. This can be done in two passes.
 *  -Pass 1: Propagating the source device type to ops in a bottom-up way to the
 *           ancestors until encountering another copy op. For example, this way
 *           provides add, x, and y device types from the copy operator, `copy1`.
 *  -Pass 2: Propagating the destination device type of "the last" copy op to the
 *           remain nodes. For instance, this offers `subtract` and `exp` the
 *           same device type as `copy3`.
 */
複制
這裡解釋一下這個例子,add,sqrt,log節點被标注為1,2,3号裝置,那麼可以用兩種方式來推斷其它節點裝置号。
- 從一個copy節點由下而上周遊一直到遇到下一個copy,比如可以推斷出add,x,y節點的裝置号和copy1一樣;
- 從最後一個copy節點向下周遊,那麼可以推斷出substract,exp裝置号和copy3一樣。
可以看到要擷取
func
中每個節點的device資訊主要是通過
copy
算子來進行推斷,因為
copy
算子可以實作不同裝置間的資料交換,這個和深度學習架構中的
to
類似。是以
copy
之後連接配接的算子就和這個
copy
算子具有相同的device資訊。其實這裡擷取節點的device 資訊也是一種Pass。在算法實作上繼承了不少Pass Infra的東西,這裡是通過從copy算子向前和向後周遊的方式來推斷非copy節點的裝置資訊。具體的代碼實作是:
static Map<Expr, Integer> GetDeviceMap(const Expr& expr) {
    DeviceInfo device_info;
    device_info.post_visitor_ = PostDfsOrderVisitor();
    device_info.post_visitor_.Visit(expr);
    if (device_info.post_visitor_.num_device_copy_ops_ > 0) {
      device_info.PropagateDeviceId();
      return device_info.device_map_;
    } else {
      return Map<Expr, Integer>();
    }
  }
複制
這裡首先運作了
PostDfsOrderVisitor
深度優先周遊來更新
std::unordered_map<const ExprNode*, int> device_tag_;
這個map,這個map會記錄該節點是否存在相連的copy節點,為之後通過copy來推斷節點裝置資訊使用。在深度優先周遊的過程中記錄了copy節點的數量
num_device_copy_ops_
,當copy節點的數量大于0時執行
PropagateDeviceId
,
void PropagateDeviceId() {
    int out_dev_type = post_visitor_.out_dev_type_;
    for (auto& it : post_visitor_.device_tag_) {
      if (it.second != -1) {
        device_map_.Set(GetRef<Expr>(it.first), it.second);
      } else {
        device_map_.Set(GetRef<Expr>(it.first), out_dev_type);
      }
    }
  }
複制
通過這個函數,我們就可以獲得copy之後節點的裝置資訊,收集完節點的裝置資訊之後傳回
device_info.device_map_
,用于建立TokenMap。其中TokenMap中包含了節點的
ttype
,
device_type
的資訊。具體實作如下,注意這個
CreateToken
函數是
StorageAllocaInit
這個類重載的基類
StorageAllocaBaseVisitor
的
CreateToken
虛函數。它隻處理了節點的
ttype
,
device_type
資訊。
void CreateToken(const ExprNode* op, bool can_realloc) final {
    ICHECK(!token_map_.count(op));
    std::vector<StorageToken*> tokens;
    int device_type =
        node_device_map_.count(GetRef<Expr>(op)) ? node_device_map_[GetRef<Expr>(op)]->value : 0;
    if (const auto* tuple_type = op->checked_type().as<TupleTypeNode>()) {
      for (Type t : tuple_type->fields) {
        const auto* ttype = t.as<TensorTypeNode>();
        ICHECK(ttype);
        StorageToken* token = arena_->make<StorageToken>();
        token->ttype = ttype;
        token->device_type = device_type;
        tokens.push_back(token);
      }
    } else {
      const auto* ttype = op->checked_type().as<TensorTypeNode>();
      ICHECK(ttype);
      StorageToken* token = arena_->make<StorageToken>();
      token->ttype = ttype;
      token->device_type = device_type;
      tokens.push_back(token);
    }
    token_map_[op] = tokens;
  }
複制
到這裡,TokenMap的初始化完成。TokenMap初始化完成後會傳回一個StorageToken清單,裡面建立了Expr對應的Token,并對引用情況進行了計數,會記錄各個OP的
ttype
。其中
ttype
對應OP的
checked_type_
屬性。可以簡單了解
checked_type_
是OP的部分屬性集合,包含shape,資料類型等(對應上面代碼中的
if (const auto* tuple_type = op->checked_type().as<TupleTypeNode>())
部分)。
接着,
StorageAllocator
類本身還要執行自己的
CreateToken
函數,這個函數給每個節點配置設定記憶體。TVM通過複用記憶體來優化記憶體申請。具體可以分成兩種情況。
當
can_realloc
為真時,可以複用記憶體,調用Request函數來重新計算tok大小,然後将其
push_back
到tokens清單中。
// override create token by getting token as prototype requirements.
  void CreateToken(const ExprNode* op, bool can_realloc) final {
    ICHECK(!token_map_.count(op));
    auto it = prototype_.find(op);
    ICHECK(it != prototype_.end());
    std::vector<StorageToken*> tokens;
    for (StorageToken* tok : it->second) {
      if (can_realloc) {
        tokens.push_back(Request(tok));
      } else {
        // Allocate a new token,
        StorageToken* allocated_tok = Alloc(tok, GetMemorySize(tok));
        allocated_tok->device_type = tok->device_type;
        // ensure it never get de-allocated.
        allocated_tok->ref_counter += 1;
        tokens.push_back(allocated_tok);
      }
    }
    token_map_[op] = tokens;
  }
複制
這個
prototype_
是TokenMap建立時得到的
ExprNode
和
std::vector<StorageToken*>
的映射表。在
StorageAllocaInit
中隻有CallNode 建立Token時,
can_realloc
會設定為True。然後我們先看一下
can_realloc
為False的時候的分支處理,主要是通過
StorageToken* allocated_tok = Alloc(tok, GetMemorySize(tok));
這個函數來生成新的StorageToken。
GetMemorySize
這個函數實作了Token的占用記憶體容量計算,代碼實作如下:
size_t GetMemorySize(StorageToken* prototype) {
    const TensorTypeNode* ttype = prototype->ttype;
    ICHECK(ttype != nullptr);
    size_t size = 1;
    for (IndexExpr dim : ttype->shape) {
      const int64_t* pval = tir::as_const_int(dim);
      ICHECK(pval != nullptr) << "Cannot allocate memory symbolic tensor shape " << ttype->shape;
      ICHECK_GE(*pval, 0) << "Cannot allocate memory for tensor with negative shape" << *pval;
      size *= static_cast<size_t>(pval[0]);
    }
    size *= DivRoundUp(ttype->dtype.bits() * ttype->dtype.lanes(), 8);
    return size;
  }
複制
這個函數先計算出元素個數,然後計算元素占用的空間(8位元組對齊)。接着看Alloc的實作:
StorageToken* Alloc(StorageToken* prototype, size_t size) {
    prototype->max_bytes = size;
    prototype->storage_id = static_cast<int64_t>(data_.size());
    data_.push_back(prototype);
    return prototype;
  }
複制
可以看到Alloc函數,會将申請空間大小放入
max_bytes
字段。同時StorageToken中還有一個
data_
來記錄經過處理後的StorageToken。Alloc完成之後還要更新StorageToken中的
ref_counter
字段,防止再次對目前這個Token申請記憶體。
接着來看一下
can_realloc
為True的分支,這裡執行的是
Request
函數,這裡會使用一個
std::multimap<size_t, StorageToken*> free_;
,預設為空的map。通過下面的函數插入元素到這個map,目前這裡是在CallNode中調用的,因為隻有CallNode才會将
can_realloc
設定為True。
// The call map
  void VisitExpr_(const CallNode* op) final {
    std::vector<StorageToken*> args;
    // for each input, visit argument token.
    for (Expr arg : op->args) {
      for (StorageToken* tok : GetToken(arg)) {
        args.push_back(tok);
      }
    }
    // create token for the call node.
    CreateToken(op, true);
    // check if there is orphaned output that can be released immediately.
    for (StorageToken* tok : token_map_.at(op)) {
      CheckForRelease(tok);
    }
    for (StorageToken* tok : args) {
      tok->ref_counter -= 1;
      CheckForRelease(tok);
    }
  }
複制
這個函數的最後一個for loop會對
ref_counter
進行減法操作,如果這個标志變量
ref_counter
被減到0了,那麼就會将
StorageToken
加入
free_
清單中。然後我們具體看一下
Request
函數的實作:
StorageToken* Request(StorageToken* prototype) {
    // calculate the size;
    size_t size = GetMemorySize(prototype);
    // search memory block in [size / match_range_, size * match_range_)
    if (match_range_ == 0) {
      return this->Alloc(prototype, size);
    }
    auto begin = free_.lower_bound(size / match_range_);
    auto mid = free_.lower_bound(size);
    auto end = free_.upper_bound(size * match_range_);
    // search for memory blocks larger than requested
    for (auto it = mid; it != end; ++it) {
      StorageToken* tok = it->second;
      if (tok->device_type != prototype->device_type) continue;
      ICHECK_EQ(tok->ref_counter, 0);
      // Use exect matching strategy
      tok->max_bytes = std::max(size, tok->max_bytes);
      tok->ref_counter = prototype->ref_counter;
      // find a exact match, erase from map and return
      free_.erase(it);
      return tok;
    }
    // then search for memory blocks smaller than requested space
    for (auto it = mid; it != begin;) {
      --it;
      StorageToken* tok = it->second;
      if (tok->device_type != prototype->device_type) continue;
      ICHECK_EQ(tok->ref_counter, 0);
      // Use exect matching strategy
      tok->max_bytes = std::max(size, tok->max_bytes);
      tok->ref_counter = prototype->ref_counter;
      // erase from map and return
      free_.erase(it);
      return tok;
    }
    // cannot find anything return a new one.
    return this->Alloc(prototype, size);
  }
複制
這裡預設
match_range_
等于16,先搜尋
free_
清單中,
size
大于請求的StorageToken。如果沒有大于Request大小的空閑塊則反着找到最大的一塊空閑的記憶體。個人了解這裡的TokenMap處理流程就是将TokenMap建立的StorageToken複用,實作記憶體申請優化。最終傳回一個
data_
清單記錄需要申請的StorageToken。
執行完Token的處理之後,我們再回頭到0x2節開頭的
auto pf = GetPackedFunc("relay.backend.GraphPlanMemory"); storage_device_map_ = (*pf)(func);
,這樣整個GraphCodegen的記憶體申請流程就梳理清楚了。再回顧一下
GraphPlanMemory
的
Plan
函數的實作,從
Map<Expr, Array<IntegerArray> > smap;
這行開始到結束,主要做了資料Copy,可以看到Plan函數最後會傳回一個Expr和一個數組的映射表。數組裡存放了
data_
對應的StorageToken索引和對應的裝置type。最終在
LoweredOutput Codegen(relay::Function func)
的開頭部分使用
storage_device_map_
記錄記憶體申請的結果。
// Run storage allocation for a function.
  Map<Expr, Array<IntegerArray> > Plan(const Function& func) {
    prototype_ = StorageAllocaInit(&arena_).GetInitTokenMap(func);
    this->Run(func);

    // The value of smap contains two integer arrays where the first array
    // contains the planned storage ids and the second holds the device types.
    Map<Expr, Array<IntegerArray> > smap;
    int num_annotated_nodes = 0;
    int num_nodes = 0;

    for (const auto& kv : token_map_) {
      std::vector<Integer> storage_ids;
      std::vector<Integer> device_types;
      for (StorageToken* tok : kv.second) {
        if (tok->device_type) {
          num_annotated_nodes++;
        }
        num_nodes++;
        storage_ids.push_back(tok->storage_id);
        device_types.push_back(tok->device_type);
      }
      smap.Set(GetRef<Expr>(kv.first), Array<IntegerArray>({storage_ids, device_types}));
    }
    // Either all or none of the nodes should be annotated.
    if (num_annotated_nodes != 0 && num_annotated_nodes != num_nodes) {
      LOG(FATAL) << num_annotated_nodes << " out of " << num_nodes
                 << "expressions are assigned with virtual device types. Either all "
                    "or none of the expressions are expected to be annotated.";
    }
    return smap;
  }
複制
0x3. Graph Codegen
在獲得Relay Func中節點的記憶體申請結果之後,接着來看一下Graph Codegen,即
LoweredOutput Codegen(relay::Function func)
這個函數剩下的部分。首先是将IR的參數轉換成輸入節點:
// First we convert all the parameters into input nodes.
 for (auto param : func->params) {
   auto node_ptr = GraphInputNode::make_node_ptr(param->name_hint(), GraphAttrs());
   var_map_[param.get()] = AddNode(node_ptr, param);
 }
複制
這裡首先建立了一個
GraphInputNode
對象,這個對象繼承自
GraphNode
對象,而
GraphNode
的定義如下,有name,num_outputs等節點屬性:
/*! \brief Base Node class */
class GraphNode {
 public:
  GraphNode() {}
  virtual void Save(dmlc::JSONWriter* writer) const {}
  virtual void Load(dmlc::JSONReader* reader) {}
  virtual GraphNodeType Type() const { return kGraphNop; }
  virtual ~GraphNode() {}

 public:
  int num_outputs_{1};
  std::string name_;
  GraphAttrs attrs_;
};
複制
其中
GraphAttrs attrs_;
的定義是
using GraphAttrs = std::unordered_map<std::string, dmlc::any>;
。
然後周遊func的parameters,parameters轉換為GraphInputNode。具體操作流程是先為每個parameters建立了一個GraphInputNode節點,再調用
make_node_ptr
函數申請一塊記憶體,最後通過AddNode函數将parameters轉換為GraphInputNode并加入到節點清單
nodes_
中。
static std::shared_ptr<GraphNode> make_node_ptr(const std::string& name,
                                                  const GraphAttrs& attrs) {
    auto ptr = std::make_shared<GraphInputNode>(name, attrs);
    return std::dynamic_pointer_cast<GraphNode>(ptr);
  }
複制
nodes_
的定義為:
std::vector<GraphObjectPtr> nodes_;
,它是
GraphExecutorCodegen
這個類的成員變量。
AddNode
主要是在給node(這裡說的node是GraphInputNode)設定
attrs_
屬性。具體包含:
- 記憶體申請時配置設定的StorageToken的id,對應
node->attrs_["storage_id"]
- 記錄node的device類型,這個參數在StorageToken計算過程中确定,對應
node->attrs_["device_index"]
- 記錄node的
shape
dtype
_ShapeToJSON
DType2String
最後,AddNode傳回了一個node的引用并将其添加到
var_map_
中,
var_map_
的定義為:
std::unordered_map<const Object*, std::vector<GraphNodeRef>> var_map_;
。至此,就完成了将Relay Func的參數轉換成了GraphInputNode。
接下來是節點周遊,使用
std::vector<GraphNodeRef> heads_;
來記錄Graph節點。這裡是通過調用
VisitExpr
函數來完成func的周遊的,在周遊的時候會将func轉換成graphNode。對于varNode來說,因為它已經被記錄在了
var_map_
中,是以
VarNode
的
VisitExpr_
函數實作就是直接傳回引用。ConstantNode會轉換為GraphInputNode,TupleNode會傳回每個字段的graphNode。在周遊節點過程中,會将graphNode都添加到
nodes_
中。特别關注一下CallNode的
VisitExpr_
,先截取前半部分代碼:
Expr expr = GetRef<Expr>(op);
    Function func;
    if (op->op.as<OpNode>()) {
      LOG(FATAL) << "Operators should be transformed away; try applying"
                 << "the fuse_ops transformation to the expression.";
    } else if (op->op.as<GlobalVarNode>()) {
      LOG(FATAL) << "Not implemented";
    } else if (op->op.as<FunctionNode>()) {
      func = GetRef<Function>(op->op.as<FunctionNode>());
    } else {
      LOG(FATAL) << "TVM runtime does not support calls to " << op->op->GetTypeKey();
    }
    if (!func->HasNonzeroAttr(attr::kPrimitive)) {
      LOG(FATAL) << "TVM only support calls to primitive functions "
                 << "(i.e functions composed of fusable operator invocations)";
    }
複制
這裡可以看到CallNode走到編譯,隻支援OP是FunctionNode類型的,并且必須是經過融合的。我們之前講過TVM的算符融合,裡面也有提到這一點并針對這一點做了保護。算符融合中對FunctionNode做保護的代碼如下:
Expr MakeNewFunction(GraphPartitioner::Group* group, Type ret_type, Expr body) {
    // If the function has no call, it is not a primitive function.
    struct HasCallVisitor : ExprVisitor {
      bool has_call = false;
      void VisitExpr_(const CallNode* op) final { has_call = true; }
    } visitor;
    visitor(body);
    const GroupInfo& ginfo = ginfo_[group];
    auto func = Function(ginfo.params, body, ret_type, {});
    func = WithAttr(std::move(func), attr::kPrimitive, tvm::Integer(visitor.has_call));
    return Call(func, ginfo.arguments, Attrs());
  }
複制
在這之後,就是CallNode的function生成部分了:
auto pf0 = GetPackedFunc("relay.backend._make_CCacheKey");
auto pf1 = GetPackedFunc("relay.backend._CompileEngineLower");
Target target;
// Handle external function
if (func->GetAttr<String>(attr::kCompiler).defined()) {
target = Target("ext_dev");
CCacheKey key = (*pf0)(func, target);
CachedFunc ext_func = (*pf1)(compile_engine_, key);
ICHECK(ext_func.defined()) << "External function is not defined.";
UpdateConstants(func, ¶ms_);
return GraphAddCallNode(op, ext_func->func_name, ext_func->func_name);
}
複制
function生成時會走兩個分支,一個是外部Function的codegen,一個是通用的Function的codegen。這裡具體是通過
func
的
attr::kCompiler
來判定是否是外部
codegen
。
首先看對外部Function的處理,這裡的
relay.backend._make_CCacheKey
和
relay.backend._CompileEngineLower
的定義如下。他們都實作在
tvm/src/relay/backend/compile_engine.cc
檔案中。
CCacheKey::CCacheKey(Function source_func, Target target) {
  auto n = make_object<CCacheKeyNode>();
  n->source_func = std::move(source_func);
  n->target = std::move(target);
  data_ = std::move(n);
}

CachedFunc Lower(const CCacheKey& key) { return LowerInternal(key)->cached_func; }
複制
這裡首先建立一個
CCacheKey
類型作為
_CompileEngineLower
函數的參數傳入。
_CompileEngineLower
函數的實作在
tvm/src/relay/backend/compile_engine.cc
中。調用鍊為Lower->LowerInternal(key)->cached_func,在LowerInternal的實作中對應的代碼段為:
// No need to lower external functions for now. We will invoke the external
    // codegen tool once and lower all functions together.
    if (key->source_func->GetAttr<String>(attr::kCompiler).defined()) {
      auto cache_node = make_object<CachedFuncNode>();
      const auto name_node = key->source_func->GetAttr<String>(tvm::attr::kGlobalSymbol);
      ICHECK(name_node.defined()) << "External function has not been attached a name yet.";
      cache_node->func_name = std::string(name_node.value());
      cache_node->target = Target("ext_dev");
      cache_node->funcs->Add(GlobalVar(cache_node->func_name), key->source_func);
      value->cached_func = CachedFunc(cache_node);
      return value;
    }
複制
如果是外部Function的Codegen,定義了一個cache_node,并将其封裝成CachedFunc并傳回。然後再通過GraphAddCallNode将器加入到
nodes_
中。在GraphAddCallNode中還執行了對op->args的深度優先周遊。
std::vector<GraphNodeRef> GraphAddCallNode(const CallNode* op, const std::string& op_name,
                                             const std::string& func_name) {
    std::vector<GraphNodeRef> inputs;
    for (auto arg : op->args) {
      auto res = VisitExpr(arg);
      for (auto nr : res) {
        inputs.push_back(nr);
      }
    }
    auto node = GraphOpNode::make_node_ptr(op_name, GraphAttrs(), func_name, inputs, GraphAttrs());
    return AddNode(node, GetRef<Expr>(op));
  }
複制
這樣通過VisterExpr的周遊,就将各個節點轉化成了對應的GraphNode并加入到了
nodes_
清單中。
接着看一下記憶體Function的Codegen,這裡省掉了target的判斷部分簡化程式:
CCacheKey key = (*pf0)(func, target);
    CachedFunc lowered_func = (*pf1)(compile_engine_, key);
    if (!lowered_funcs_.count(target->str())) {
      lowered_funcs_[target->str()] = IRModule(Map<GlobalVar, BaseFunc>({}));
    }
    lowered_funcs_[target->str()]->Update(lowered_func->funcs);
    return GraphAddCallNode(op, _GetUniqueName(lowered_func->func_name), lowered_func->func_name);
複制
也是通過相同的pf0和pf1函數。CcacheKey的建立過程一樣,但是在lowerInternal中處理過程不一樣,内部Function的處理在LowerInternal函數的實作代碼中對應了:
// Enforce use the target.
    With<Target> target_scope(key->target);

    ICHECK(!value->cached_func.defined());
    auto cfunc = CreateSchedule(key->source_func, key->target);
    auto cache_node = make_object<CachedFuncNode>(*(cfunc.operator->()));

    // Skip lowering for device copy node.
    const Expr body = (key->source_func)->body;
    if (const CallNode* call_node = body.as<CallNode>()) {
      if (call_node->attrs.as<DeviceCopyAttrs>()) {
        value->cached_func = CachedFunc(cache_node);
        return value;
      }
    }

    cache_node->func_name = GetUniqueName(cache_node->func_name);
    // NOTE: array will copy on write.
    Array<te::Tensor> all_args = cache_node->inputs;
    for (te::Tensor arg : cache_node->outputs) {
      all_args.push_back(arg);
    }
    // lower the function
    if (const auto* f = runtime::Registry::Get("relay.backend.lower")) {
      cache_node->funcs = (*f)(cfunc->schedule, all_args, cache_node->func_name, key->source_func);
    } else {
      using tvm::transform::PassContext;
      With<PassContext> fresh_pass_ctx_scope(PassContext::Create());

      std::unordered_map<te::Tensor, tir::Buffer> binds;
      cache_node->funcs = tvm::lower(cfunc->schedule, all_args, cache_node->func_name, binds);
    }
    value->cached_func = CachedFunc(cache_node);
    return value;
複制
TVM算子遵循排程和計算分離的法則,這裡先看一下
CreateSchedule
的定義:
CachedFunc CreateSchedule(const Function& source_func, const Target& target) {
    return ScheduleGetter(target).Create(source_func);
  }
複制
這裡定義了一個ScheduleGetter來擷取指定target的schedule。這個Create函數會完成IR到TIR節點的轉化以及對Schedule的優化。這個函數非常複雜,能力有限,暫時讀不進去了。在Creat函數中還有一個Lower function的生成過程,具體調用了
runtime::Registry::Get("relay.backend.lower"))
這個函數來執行操作。
0x4. 總結
讀到這裡這篇文章就可以結束了,這裡主要是走讀了一下TVM的Codegen流程,從Relay的前端一直梳理到了Graph節點的記憶體配置設定,Relay IR到TIR節點的轉換,TIR圖節點的Schedule優化以及Lower function發生在哪裡。這篇文章隻是關注了調用鍊,一些具體的操作比如Schedule的優化,IR到TIR節點的轉化以及Lower Function沒有進一步讀下去。
0x6. 參考
- https://zhuanlan.zhihu.com/p/165236267
- https://zhuanlan.zhihu.com/p/339566528