周末剛過,對于禮拜一可能大家的心情還沉浸在周末那種放松的那種狀态下。我也是。出于無聊,随便翻看了一下之前寫過的一個商城類項目,來這裡和大家分享其中的一個小功能,就當是練練手,進入工作狀态。
在這裡聲明一下,由于本人屬于一個典型的懶程式員,文字叙述也不是很好。能寫部落格已經是極限了,哈哈。是以以後我的部落格習慣都是先看效果圖然後在看具體代碼和實作。(因為我實在不想用文字去叙述一個功能效果)好了,手指已經很累了,打這麼字确實很不容易,小時候作文經常挨老師批評,上圖吧
。
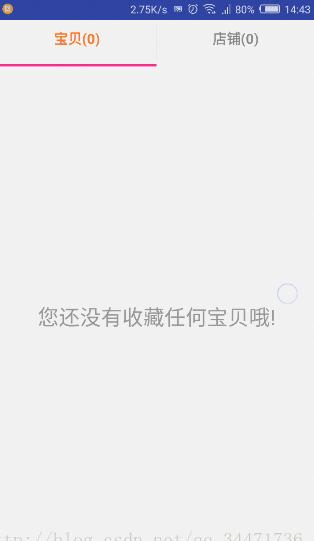
相信大家看到了,這種類似的需求在開放中還是很常見的,其實實作的方式也很多,今天我們來學習一下它是如何實作的。
首先梳理一下,用到的知識點,ViewPager,Fragment,BitmapFactory,Matrix
具體的不再詳細介紹了,代碼裡面注釋寫的比較詳細。
- 首先我們先建立兩個fragment。分别作為 寶貝,店鋪的布局界面
package achoice.com.taba;

import android.os.Bundle;
import android.support.annotation.Nullable;
import android.support.v4.app.Fragment;
import android.view.LayoutInflater;
import android.view.View;
import android.view.ViewGroup;

/**
 * 作者:${NanFeiLong}
 * 日期 2016/12/9 17:26
 * 寶貝對應的fragment
 */

public class BaoBeiFragment extends Fragment {
    @Nullable
    @Override
    public View onCreateView(LayoutInflater inflater, @Nullable ViewGroup container, @Nullable Bundle savedInstanceState) {
        View view = inflater.inflate(R.layout.baobei,container,false);
        return view;
    }


}
- 對應的layout檔案baobei.xml
<?xml version="1.0" encoding="utf-8"?>
<LinearLayout xmlns:android="http://schemas.android.com/apk/res/android"
              android:layout_width="match_parent"
              android:layout_height="match_parent"
              android:gravity="center">

    <TextView
        android:layout_width="wrap_content"
        android:layout_height="wrap_content"
        android:layout_weight="1"
        android:gravity="center"
        android:textSize="24dp"
        android:padding="15dp"
        android:textColor="#969696"
        android:text="您還沒有收藏任何寶貝哦!"/>
</LinearLayout>
店鋪的Fragment和布局檔案也類似。因為兩個基本相同,這裡就不用給出了,有興趣的可以下載下傳源碼。
- 下來是MainActivity,這裡我們讓其繼承自FragmentActivity點選事件和滑動事件都用實作接口的方式去實作監聽
package achoice.com.taba;

import android.graphics.Bitmap;
import android.graphics.BitmapFactory;
import android.graphics.Matrix;
import android.support.v4.app.FragmentActivity;
import android.support.v4.view.ViewPager;
import android.os.Bundle;
import android.util.DisplayMetrics;
import android.view.View;
import android.widget.ImageView;
import android.widget.TextView;

public class MainActivity extends FragmentActivity implements View.OnClickListener, ViewPager.OnPageChangeListener {
    // ViewPager擴充卡
    private ViewPager mViewPager;
    private FragmentAdapter mFragmentAdapter = null;
    private int tabWidth;
    private DisplayMetrics mDisplayMetrics = new DisplayMetrics();
    //圖檔選擇條
    private ImageView mivBottom_line;
    // 寶貝
    private TextView mtvBaoBei;
    // 店鋪
    private TextView mtvStore;


    @Override
    protected void onCreate(Bundle savedInstanceState) {
        super.onCreate(savedInstanceState);
        setContentView(R.layout.activity_main);
        mViewPager = (ViewPager) findViewById(R.id.viewpager);
        mivBottom_line = (ImageView) findViewById(R.id.img_tabLine);
        mtvBaoBei = (TextView) findViewById(R.id.tv_baobei);
        mtvStore = (TextView) findViewById(R.id.tv_store);
        mtvBaoBei.setTextColor(getResources().getColor(R.color.checked_textcolor));
        //圖檔選擇條
        initData();
        mFragmentAdapter = new FragmentAdapter(getSupportFragmentManager());
        mViewPager.setAdapter(mFragmentAdapter);
        mtvBaoBei.setOnClickListener(this);
        mtvStore.setOnClickListener(this);
        mViewPager.setOnPageChangeListener(this);

    }

    /**
     * 配置圖檔選擇條
     */
    private void initData() {
        getWindowManager().getDefaultDisplay().getMetrics(mDisplayMetrics);
        tabWidth = mDisplayMetrics.widthPixels / ;
        Bitmap bitmap = BitmapFactory.decodeResource(getResources(), R.drawable.bottom_line);
        // 設定圖檔選擇條的寬高
        Bitmap bitmap1 = Bitmap.createBitmap(bitmap, , , tabWidth, );
        mivBottom_line.setImageBitmap(bitmap1);
    }

    /**
     * 點選監聽
     *
     * @param view
     */
    @Override
    public void onClick(View view) {
        switch (view.getId()) {
            // 寶貝
            case R.id.tv_baobei: {
                TextTab();
                mtvBaoBei.setTextColor(getResources().getColor(R.color.checked_textcolor));
                mViewPager.setCurrentItem();
            }
            break;
            // 店鋪
            case R.id.tv_store: {
                TextTab();
                mtvStore.setTextColor(getResources().getColor(R.color.checked_textcolor));
                mViewPager.setCurrentItem();
            }
            break;
            default:
                break;
        }
    }

    /**
     * 正在滑動時
     * @param position
     * @param positionOffset 目前頁面偏移的百分比[0,1)
     * @param positionOffsetPixels 目前頁面偏移的像素位置
     */
    @Override
    public void onPageScrolled(int position, float positionOffset, int positionOffsetPixels) {
        // Matrix建立一個矩形
        Matrix matrix = new Matrix();
        switch (position) {
            case :
                // 使用setTranslate直接位置
                matrix.setTranslate(, );
                break;
            case :
                matrix.setTranslate(tabWidth, );
                break;
        }
        // 在滑動的過程中,計算出圖檔選擇條的動态滑動距離
        //這裡用了"後乘"positionOffset[0,1)
        float miters = (tabWidth) * positionOffset;
        // 使用postTranslate動态追加滑動距離
        matrix.postTranslate(miters, );
        mivBottom_line.setImageMatrix(matrix);
    }

    /**
     * 滑動完畢時
     * @param position  滑動完畢時 停留在的頁面
     */
    @Override
    public void onPageSelected(int position) {
        switch (position) {
            case : {
                TextTab();
                mtvBaoBei.setTextColor(getResources().getColor(R.color.checked_textcolor));
                mViewPager.setCurrentItem();
            }
            break;
            case : {
                TextTab();
                mtvStore.setTextColor(getResources().getColor(R.color.checked_textcolor));
                mViewPager.setCurrentItem();
            }
            break;
            default:
                break;
        }
    }


    @Override
    public void onPageScrollStateChanged(int state) {

    }


    /**
     * 文字全部重置為預設狀态
     */
    private void TextTab() {
        mtvBaoBei.setTextColor(getResources().getColor(R.color.default_color));
        mtvStore.setTextColor(getResources().getColor(R.color.default_color));
    }


}
這裡大概說一下,viewpager的滑動和fragment的切換,這些沒什麼說的,關鍵點比較繞的是下面的圖檔選擇滑動條的處理。
-
首先
我們對圖檔寬高進行适配,這裡高度我們在xml中設定了,寬度占用手機螢幕的1/2。
調用
tabWidth = mDisplayMetrics.widthPixels / 2;
-
然後
我們在重寫的onPageScrolled(當滑動進行時)方法中調用Matrix 繪制一個矩形。在調用matrix.setTranslate(tabWidth, 0);方法實作圖檔滑動條位置。其實就是通過計算平移距離來實作确定位置的。對于動态中圖檔滑動條的位置,我們來分析這幾行代碼
float miters = (tabWidth) * positionOffset;
        // 使用postTranslate動态追加滑動距離
        matrix.postTranslate(miters, );
        mivBottom_line.setImageMatrix(matrix);
positionOffset參數為viewpager在滑動時的偏移量取值[0,1),tabWidth圖檔滑動條的寬度,這裡也就是螢幕的1/2。這樣我們就能得到圖檔滑動時的動态”寬度”了。
得到動态”寬度”後,然後在調用Matrix的postTranslate(float dx, float dy)方法。這個方法的叫做”後乘”,可能大家對這個比較陌生,其實我剛開始看到後也是了解不了,

不過沒關系,這裡我給大家推薦一篇文章Android之Matrix的用法 。其實就是每次的平移完成後狀态保持然後繼續下一次平移得到最後一次的平移位置。比如說第一次平移到(0.5,0)位置,停止下來,第二次平移到(0.6,0)位置停止下來,那麼最後我們看到的結果是顯示停留在(0.6,0)位置的圖檔的。
3.最後
我們還寫了一個TextTab()方法。其作用就是每當點選頁籤或者滑動頁面時候,都先把頁籤文字都設定成位選中顔色狀态,然後根據position在設定其選中狀态時候對應的頁籤顔色和狀态。
/**
     * 文字全部重置為預設狀态
     */
    private void TextTab() {
        mtvBaoBei.setTextColor(getResources().getColor(R.color.default_color));
        mtvStore.setTextColor(getResources().getColor(R.color.default_color));
    }
- 布局檔案activity_main.xml
<?xml version="1.0" encoding="utf-8"?>
<LinearLayout
    xmlns:android="http://schemas.android.com/apk/res/android"
    xmlns:tools="http://schemas.android.com/tools"
    android:id="@+id/activity_main"
    android:layout_width="match_parent"
    android:layout_height="match_parent"
    android:background="#f1f1f1"
    android:orientation="vertical"
    tools:context="achoice.com.taba.MainActivity">

    <LinearLayout
        android:id="@+id/llyout_my_coupon_sort"
        android:layout_width="match_parent"
        android:layout_height="50dp"
        android:orientation="horizontal">

        <TextView
            android:id="@+id/tv_baobei"
            android:layout_width="0dp"
            android:layout_height="wrap_content"
            android:layout_weight="1"
            android:background="#f8f8f8"
            android:paddingTop="10dp"
            android:paddingBottom="15dp"
            android:gravity="center"
            android:text="寶貝(0)"
            android:textStyle="bold"
            android:textSize="16sp"/>

        <View
            android:layout_width="1dp"
            android:layout_height="match_parent"
            android:layout_marginBottom="5dp"
            android:layout_marginTop="5dp"
            android:background="#d7d7d7"/>

        <TextView
            android:id="@+id/tv_store"
            android:layout_width="0dp"
            android:layout_height="wrap_content"
            android:layout_weight="1"
            android:background="#f8f8f8"
            android:paddingTop="10dp"
            android:paddingBottom="15dp"
            android:gravity="center"
            android:textStyle="bold"
            android:text="店鋪(0)"
            android:textSize="16sp"/>
    </LinearLayout>

    <ImageView
        android:id="@+id/img_tabLine"
        android:layout_width="match_parent"
        android:layout_height="3dp"
        android:contentDescription="@null"
        android:scaleType="matrix"/>

    <View
        android:layout_width="match_parent"
        android:layout_height="0.3dp"
        android:layout_marginBottom="5dp"
        android:background="#d7d7d7"/>

    <android.support.v4.view.ViewPager
        android:id="@+id/viewpager"
        android:layout_width="match_parent"
        android:layout_height="match_parent"/>


</LinearLayout>
- 還有colors.xml
<?xml version="1.0" encoding="utf-8"?>
<resources>
    <color name="colorPrimary">#3F51B5</color>
    <color name="colorPrimaryDark">#303F9F</color>
    <color name="colorAccent">#FF4081</color>


    <color name="textcolor_mine_normal">#666666</color>
    <color name="checked_textcolor">#f56a30</color>
    <color name="default_color">#898787</color>
</resources>
好了,就說到這裡,項目已經上傳,有興趣的可以下載下傳源碼