1-環境概述
此手冊主要介紹Veritas NetBackup軟體在AWS上對SAP DB2備份功能的實作,部署過程以及政策配置和資料恢複。
2-系統架構
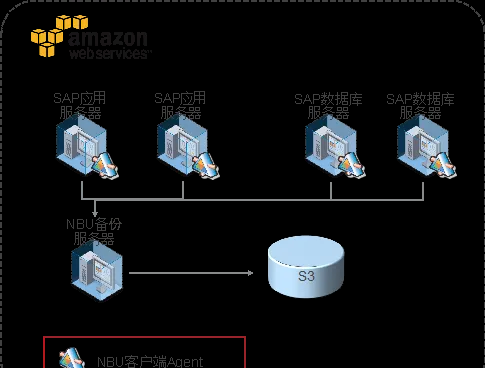
本次測試環境清單:
| 主機名 | 用途 | EC2資源 | OS/應用部署 | IP位址 |
| SRC105200 | NBU備份伺服器 | 2vCPU/4GMem/300G系統盤,1塊網卡 | Rhel7 | xxxx |
| sc1dx3 | SAP DB2用戶端 | 2vCPU/4GMem/300G系統盤,1塊網卡 | RHEL6.8 /SAP | xxxx |
| 個人PC | NBUConsole | Windows7 |
3-部署前準備
伺服器準備:
部署前需要提前準備好1台NBU RHEL7版本的Master伺服器以及1台SAP DB2伺服器,1台Windows作業系統的管理平台。
生産系統需要按照如下配置準備NBU Master主機:
| 屬性 | 需求 |
| 作業系統 | RHEL6.x RHEL7.x SuSE 11.x SuSE 12 .x Windows 2008 Windows 2008 R2 Windows 2012 Windows 2012 R2 |
| 架構 | X86_64 |
| 部署位置 | 主AZ,單機部署 |
| CPU核數 | 4 |
| 記憶體 | 16GB |
| 磁盤空間 | 系統100GB,資料磁盤300GB |
| 網卡 | 1塊 |
| IP位址 | 能夠通過TCP/IP連接配接業務主機 |
NBU伺服器需要打開的端口如下:
| 源主機 | 目的主機 | TCP/UDP | 端口 |
| 業務主機 | NBU主機 | TCP | 1556/13724 |
| NBU主機 | 業務主機 | TCP | 1556/13724 |
S3需要如下權限:
S3:CreateBucket
S3:ListAllMyBuckets
S3:ListBucket
S3:GetBucketLocation
S3:GetObject的
S3:PutObject
S3:DeleteObject的
S3:PutObjectTagging
S3:PutLifecycleConfiguration
S3: GetLifecycleConfiguration
S3:PutObjectTagging
賬号:需要提供每台伺服器的管理賬号以及添加root權限。
4-NBU部署配置
4.1-安裝NBU Master 伺服器
建立使用者:
mkdir -p /usr/openv/wmc
groupadd nbwebgrp
useradd -g nbwebgrp -c 'NetBackup Web Services account' -d /usr/openv/wmc nbwebsvc
安裝NBU master server之前需要根據KB的要求調整OS核心的參數。如果不調整在安裝NBU的時候也會提示您,比如:
1-最大同步信号量調整,重新開機生效。
echo "kernel.sem=300 307200 32 1024">> /etc/sysctl.conf
sysctl -p
2-加大OS最大打開檔案數量,添加4行,重新開機生效。
vim /etc/security/limits.conf
* hard core unlimited
* soft core unlimited
* hard nofile 32768
* soft nofile 32768
3-檢視SWAP記憶體和核心參數,如果作業系統已有SWAP記憶體可以忽略此步驟
free -m 增加SWAP的記憶體大小到1GB
dd if=/dev/zero of=/home/swap bs=1024 count=1024000
mkswap /home/swap
swapon /home/swap
free -m
Master伺服器安裝:
-
When the following message appears press Enter to continue:
Veritas Installation Script
Copyright 1993 - 2016 Veritas Corporation, All Rights Reserved.
Installing NetBackup Server Software
Please review the VERITAS SOFTWARE LICENSE AGREEMENT located on
the installation media before proceeding. The agreement includes
details on the NetBackup Product Improvement Program.
For NetBackup installation and upgrade information specific to your
platform and to find out if your installed EEBs or hot fixes are
contained in this release, check out the Veritas Services and
Operations Readiness Tools (SORT) Installation and Upgrade Checklist
and Hot fix and EEB Release Auditor, respectively
Do you wish to continue? [y,n] (y)
-
When the following message appears press Enter to continue:
Is this host a master server? [y/n] (y)
-
If you need to perform a disaster recovery of your master server, select Y when prompted. Press Enter for the default N.
Do you want to do a disaster recovery on this master server? [y/n] (n)
The disaster recovery process requires additional steps and information that is not covered in this manual. More information is available.
Veritas NetBackup Troubleshooting Guide
- For the NetBackup installation location, enter the appropriate platform information as follows:
-
When the following question appears, press Enter to accept the default (y).
The NetBackup and Media Manager software is built
for use on <platform> hardware. Do you want to install
NetBackup and Media Manager files? [y,n] (y)
-
When the following question appears, select where to install NetBackup and Media Manager software:
NetBackup and Media Manager are normally
installed in /usr/openv.
Is it OK to install in /usr/openv? [y,n] (y)
The path displayed for Solaris is /opt/openv.
To accept the default (y), press Enter.
To change the installation location, type n and press Enter. Then enter the appropriate destination.
Additional information about installation folder restrictions is available.
See Restrictions on the NetBackup installation directory.
- To accept the displayed (default) name, press Enter.
- To change the displayed (default) name, type n and enter the name that you want.
- For a clustered NetBackup server, enter the virtual name for the NetBackup server and not the actual local host name.
- To accept the displayed name (which is the name that you identified in the previous step), press Enter.
-
If you entered a virtual name for the server in the previous step, the installation script presents the following question:
Is this server part of a cluster installation?
If the answer is yes, press y and answer the series of cluster configuration questions that appear.
If the answer is no, press n.
- If there are no media servers for this master server, press Enter and proceed to the next step.
-
If there are media servers for this master server, type y and enter the name of each media server.
When you enter the media server names, you must enter the computer name and the domain name. For example:
alpha.domain.com
Where alpha is the computer name and domain.com is the domain name.
The media server names that you enter here are added to the bp.conf file on the master server, automatically. After you install the media server software later, the master server can then communicate with the media servers immediately.
-
To add a media server to an existing and an operational NetBackup environment, you cannot use the procedures in this guide. For complete details on how to add a media server to an existing and an operational NetBackup environment, see the NetBackup Administrator's Guide, Volume II.
http://www.veritas.com/docs/DOC5332
- If you have (or want to have) a clustered NetBackup server, type n.
-
For non-clustered installations, press Enter to accept the default answer (y) and start the NetBackup processes and the EMM server.
You must start these processes now because the EMM server must be running when you install any media servers later.
- Enter the Netbackup server or Enterprise server License.
-
Type y, then follow the prompts to add license keys for other NetBackup options and agents.
Although you can add licenses later, you should enter them now. If you add any licenses later through the NetBackup Administration Console, you must restart the console.
- After all licenses are entered, type q to quit the License Key Utility and complete the server software installation.
-
Verify or enter the correct computer name when prompted by the following message:
Installing NetBackup Enterprise Server version: 8.1.1
If this machine will be using a different network interface than
the default (name), the name of the preferred interface
should be used as the configured server name. If this machine
will be part of a cluster, the virtual name should be used as the
configured server name.
The domainname of your server appears to be "domain". You
may choose to use this domainname in your configured NetBackup
server name, or simply use "name" as the configured
NetBackup server name.
Would you like to use "name.domain" as the configured NetBackup server
name of this machine? [y, n] (y)
-
Identify or verify the master server by answering the following question when it appears:
Is <name> the master server? [y, n] (y)
-
Identify whether there are any media servers for this master server by answering the following question when it appears:
Do you want to add any media servers now? [y, n] (n)
-
When the following message appears, press Enter and accept the default name of the EMM server. You must configure EMM on the master server. All master servers must have their own EMM configuration. Remote EMM or shared EMM is no longer supported.
NetBackup maintains a centralized catalog (separate from the
image catalog) for data related to media and device
configuration, device management, storage units, hosts and host
aliases, media server status, NDMP credentials, and other
information. This is managed by the Enterprise Media Manager
server.
Enter the name of the Enterprise Media Manager (default: <name>)
-
Answer the following question when it appears:
Do you want to start the NetBackup job-related processes so backups and
restores can be initiated? [y, n] (y)
- You need wait until your initial installation is complete.
4.2-安裝NBU Console伺服器
- 運作NBU Server安裝程式;
-

AWS Veritas NBU for SAP DB2部署文檔 - 通過Windows UAC;
-
AWS Veritas NBU for SAP DB2部署文檔 - 安裝歡迎界面,選擇下一步;
-
AWS Veritas NBU for SAP DB2部署文檔 - 選擇接受許可協定,下一步;
-
AWS Veritas NBU for SAP DB2部署文檔 - 輸入許可号,選擇媒體伺服器;
-
AWS Veritas NBU for SAP DB2部署文檔 - 輸入管理賬戶資訊:選擇實作在Windows伺服器建立的本地組/使用者,輸入密碼;
-
AWS Veritas NBU for SAP DB2部署文檔 - 選擇NBU伺服器(即本機);
-
AWS Veritas NBU for SAP DB2部署文檔 - 确認開始安裝;
-
AWS Veritas NBU for SAP DB2部署文檔 - 安裝開始至止完成;
-
AWS Veritas NBU for SAP DB2部署文檔 - 檢視Windows 服務,看到NetBackup服務正确啟動,確定安裝成功;
-
AWS Veritas NBU for SAP DB2部署文檔 - 登陸NBU管理控制台,登陸;
-
AWS Veritas NBU for SAP DB2部署文檔 - 驗證能成功登陸管理控制台;
13.更新中文語言包;
下載下傳NBU中文語言包,解壓後打開執行,選擇NetBackup Chinese Language Pack Installation.
一直點選下一步直至完成安裝
14-登陸NBU管理平台以及建立token
輸入主機名稱和賬号密碼來進行登陸,控制台賬号添加方法請參考4.4配置
在證書管理内,右擊空白地方選擇新令牌建立,複制token令牌資訊,用于NBU media用戶端安裝使用,此token用于media和master伺服器的首次連接配接安全驗證使用。
4.3-安裝NBU Media伺服器
準備工作:
将media/client主機名及IP資訊更新到master和media/client伺服器上,確定網絡連通。
這裡需要注意DNS解析問題是否會導緻網絡不通。
用戶端媒體伺服器安裝:
[root@nbuclient001 NetBackup_8.1.1_LinuxR_x86_64]# ./install
Veritas Installation Script
Copyright (c) 2018 Veritas Technologies LLC. All rights reserved.
Installing NetBackup Server Software
Please review the VERITAS SOFTWARE LICENSE AGREEMENT located on
the installation media before proceeding. The agreement includes
details on the NetBackup Product Improvement Program.
For NetBackup installation and upgrade information specific to your
platform and to find out if your installed EEBs or hot fixes are
contained in this release, check the Installation and Upgrade checklists
and the Hot Fix and EEB Release Auditor, both available on the Veritas
Services and Operations Readiness Tools (SORT) page:
https://sort.veritas.com/netbackup.
ATTENTION! To help ensure a successful upgrade to NetBackup 8.1.1,
please visit the NetBackup 8.x Upgrade Portal:
https://www.veritas.com/docs/000115678.
Do you wish to continue? [y,n] (y) y
Starting NetBackup Deduplication installer
testing: /tmp/pdde_pkg_dir_1417
NetBackup Deduplication preinstall check passed
Is this host the master server? [y,n] (y) n
Checking for required system conditions...
ok server_conf_settings_critical: Inapplicable for new NetBackup installation: skipping
ok media_server_cluster_upgrade: NetBackup is not installed: skipping
ok remote_emm: NetBackup is not installed: skipping
ok wsl_account: Inapplicable for non - Master Server: skipping
ok unsupported_platform: Passed checks for unsupported platforms.
ok be_nb_same_host: inapplicable on linux: skipping
ok nbdb_ntfs_dir_symlink: inapplicable on linux: skipping
ok nbdb_maintenance_space: no NBDB maintenance required on new install: skipping
Checking for recommended system conditions...
ok os_update_level: inapplicable on linux: skipping
not ok ulimit_nofiles: nofiles ulimit 1024 is too low.
NetBackup Master and Media Server processes may run slower if they are
limited to fewer than 8000 open file descriptors. This test runs
'ulimit -n' and checks that the result is at least 8000 on NetBackup
servers. See
https://www.veritas.com/support/en_US/article.TECH75332
for more information.
ok hotfix_auditor: NetBackup is not installed or there is no hotfix or EEB data present. Skipping HF/EEB Auditor check.
ok ephemeral_port_range: The ephemeral port range does not include ports used by NetBackup services.
ok port_availability_check: Inapplicable for upgrade to non - Master Server: skipping
ok server_conf_settings_noncritical: Inapplicable for new NetBackup installation: skipping
not ok semaphore_limits: too low:
Performance of NetBackup Master and Media Servers can be affected
adversely if the system is configured with low semaphore limits. This
test checks whether the current semaphore limits are set as
recommended. See https://www.veritas.com/support/en_US/article.TECH203066 for
details.
If this machine will be using a different network interface than the
default (nbuclient001), the name of the preferred interface should be used
as the configured server name. If this machine will be part of a
cluster, the virtual name should be used as the configured server name.
The domainname of this machine appears to be "cn-north-1.compute.internal".
You may choose to use this domainname in your configured NetBackup server
name, or simply use "nbuclient001" as the configured NetBackup server name.
Would you like to use "nbuclient001.cn-north-1.compute.internal" as the configured
NetBackup server name of this machine? [y,n] (y) n
Enter the name of this NetBackup server: nbuclient001
What is the fully qualified name of the master server? nbumaster100
The NetBackup and Media Manager software is built for use on LINUX_RH_X86 hardware.
Do you want to install NetBackup and Media Manager files? [y,n] (y) y
NetBackup and Media Manager are normally installed in /usr/openv.
Is it OK to install in /usr/openv? [y,n] (y) y
Successfully unpacked /tmp/NetBackup_8.1.1_LinuxR_x86_64/linuxR_x86/catalog/anb/certcmdTool_for_UNIX.tar.gz.
Checking for local CA certificate
Local CA certificate is not found on host. Proceeding with installation.
Getting CA certificate details.
NOTE: Depending on the network, this action may take a few minutes.
To continue without setting up secure communication, press Ctrl+C.
CA Certificate received successfully from server nbumaster100.
Subject Name : /CN=nbatd/OU=root@nbu001/O=vx
Start Date : Apr 12 08:50:26 2018 GMT
Expiry Date : Apr 07 10:05:26 2038 GMT
SHA1 Fingerprint : D0:1C:4B:18:24:0A:1F:4A:60:9F:32:B1:B8:1B:4D:F5:7D:FC:65:B4
CA Certificate State : Not Trusted
Master server [nbumaster100] reports CA Certificate fingerprint
[D0:1C:4B:18:24:0A:1F:4A:60:9F:32:B1:B8:1B:4D:F5:7D:FC:65:B4].
Is this correct? [y,n] y
Storing CA certificate.
NOTE: Depending on the network, this action may take a few minutes.
To continue without setting up secure communication, press Ctrl+C.
The validation of root certificate fingerprint is successful.
CA certificate stored successfully from server nbumaster100.
Getting host certificate for hostname nbuclient001.
NOTE: Depending on the network, this action may take a few minutes.
To continue without setting up secure communication, press Ctrl+C.
An authorization token is required in order to get the host certificate for this
host. At the prompt, enter the authorization token or q to skip the question.
NOTE: The answer entered will not be displayed to the terminal.
Enter the authorization token for nbumaster100 or q to skip:
Getting host certificate with token for hostname nbuclient001.
NOTE: Depending on the network, this action may take a few minutes.
To continue without setting up secure communication, press Ctrl+C.
Host certificate and certificate revocation list received successfully from server nbumaster100.
Saving server binaries for LINUX_RH_X86.
Reading NetBackup files from /tmp/NetBackup_8.1.1_LinuxR_x86_64/linuxR_x86/anb
Checking for pre-existing SYMCnetbp package.
package SYMCnetbp is not installed
Checking for pre-existing VRTSnetbp package.
Installing VRTSnetbp package.
Installation of VRTSnetbp was successful.
More details regarding VRTSnetbp can be found in file
/tmp/install_netbppkg_trace.1562 on nbuclient001.
x openv/netbackup/client/Linux/
x openv/netbackup/client/Linux/Debian2.6.18/
x openv/netbackup/client/Linux/Debian2.6.18/client_bin.tar.gz
x openv/netbackup/client/Linux/Debian2.6.18/certcmdTool_for_UNIX.tar.gz
x openv/netbackup/client/Linux/Debian2.6.18/ssh_to_client
x openv/netbackup/client/Linux/Debian2.6.18/extract_java
x openv/netbackup/client/Linux/Debian2.6.18/cp_to_client
x openv/netbackup/client/Linux/Debian2.6.18/nbcheck
x openv/netbackup/client/Linux/Debian2.6.18/pddeagent.tar.gz
x openv/netbackup/client/Linux/Debian2.6.18/.sizes_JRE
x openv/netbackup/client/Linux/Debian2.6.18/nb_init_cfg
x openv/netbackup/client/Linux/Debian2.6.18/.sizes_NB-Java
x openv/netbackup/client/Linux/Debian2.6.18/nbbsdtar
x openv/netbackup/client/Linux/Debian2.6.18/client_config
x openv/netbackup/client/Linux/Debian2.6.18/.sizes_client_bin
x openv/netbackup/client/Linux/Debian2.6.18/PBX.tar.gz
x openv/netbackup/client/Linux/Debian2.6.18/nbj.conf
x openv/netbackup/client/Linux/Debian2.6.18/sftp_to_client
x openv/netbackup/client/Linux/Debian2.6.18/pdinstall
x openv/netbackup/client/Linux/Debian2.6.18/.sizes
x openv/netbackup/client/Linux/Debian2.6.18/installpbx
x openv/netbackup/client/Linux/Debian2.6.18/JRE.tar.gz
x openv/netbackup/client/Linux/Debian2.6.18/version
x openv/netbackup/client/Linux/Debian2.6.18/NB-Java.tar.gz
x openv/netbackup/client/Linux/SuSE3.0.76/
x openv/netbackup/client/Linux/SuSE3.0.76/VRTSpddea.rpm
x openv/netbackup/client/Linux/SuSE3.0.76/VRTSnbpck.rpm
x openv/netbackup/client/Linux/SuSE3.0.76/certcmdTool_for_UNIX.tar.gz
x openv/netbackup/client/Linux/SuSE3.0.76/ssh_to_client
x openv/netbackup/client/Linux/SuSE3.0.76/VRTSnbjre.rpm
x openv/netbackup/client/Linux/SuSE3.0.76/extract_java
x openv/netbackup/client/Linux/SuSE3.0.76/cp_to_client
x openv/netbackup/client/Linux/SuSE3.0.76/nbcheck
x openv/netbackup/client/Linux/SuSE3.0.76/nb_init_cfg
x openv/netbackup/client/Linux/SuSE3.0.76/VRTSnbjava.rpm
x openv/netbackup/client/Linux/SuSE3.0.76/VRTSnbcfg.rpm
x openv/netbackup/client/Linux/SuSE3.0.76/nbbsdtar
x openv/netbackup/client/Linux/SuSE3.0.76/VRTSpbx.rpm
x openv/netbackup/client/Linux/SuSE3.0.76/client_config
x openv/netbackup/client/Linux/SuSE3.0.76/VRTSnbclt.rpm
x openv/netbackup/client/Linux/SuSE3.0.76/nbj.conf
x openv/netbackup/client/Linux/SuSE3.0.76/sftp_to_client
x openv/netbackup/client/Linux/SuSE3.0.76/pdinstall
x openv/netbackup/client/Linux/SuSE3.0.76/.sizes
x openv/netbackup/client/Linux/SuSE3.0.76/version
x openv/netbackup/client/Linux/RedHat2.6.18/
x openv/netbackup/client/Linux/RedHat2.6.18/VRTSpddea.rpm
x openv/netbackup/client/Linux/RedHat2.6.18/VRTSnbpck.rpm
x openv/netbackup/client/Linux/RedHat2.6.18/certcmdTool_for_UNIX.tar.gz
x openv/netbackup/client/Linux/RedHat2.6.18/ssh_to_client
x openv/netbackup/client/Linux/RedHat2.6.18/VRTSnbjre.rpm
x openv/netbackup/client/Linux/RedHat2.6.18/extract_java
x openv/netbackup/client/Linux/RedHat2.6.18/cp_to_client
x openv/netbackup/client/Linux/RedHat2.6.18/nbcheck
x openv/netbackup/client/Linux/RedHat2.6.18/nb_init_cfg
x openv/netbackup/client/Linux/RedHat2.6.18/VRTSnbjava.rpm
x openv/netbackup/client/Linux/RedHat2.6.18/VRTSnbcfg.rpm
x openv/netbackup/client/Linux/RedHat2.6.18/nbbsdtar
x openv/netbackup/client/Linux/RedHat2.6.18/VRTSpbx.rpm
x openv/netbackup/client/Linux/RedHat2.6.18/client_config
x openv/netbackup/client/Linux/RedHat2.6.18/VRTSnbclt.rpm
x openv/netbackup/client/Linux/RedHat2.6.18/nbj.conf
x openv/netbackup/client/Linux/RedHat2.6.18/sftp_to_client
x openv/netbackup/client/Linux/RedHat2.6.18/pdinstall
x openv/netbackup/client/Linux/RedHat2.6.18/.sizes
x openv/netbackup/client/Linux/RedHat2.6.18/version
Copying RedHat2.6.18 Client Binaries
Installing VRTSnbpck ...
Installation of VRTSnbpck was successful. Check /tmp/install_VRTSnbpck.rpm_trace.2163 for details.
Installing VRTSpbx ...
Installation of VRTSpbx was successful. Check /tmp/install_VRTSpbx.rpm_trace.2163 for details.
Installing VRTSnbclt ...
Installation of VRTSnbclt was successful. Check /tmp/install_VRTSnbclt.rpm_trace.2163 for details.
Terminating NetBackup and/or Media Manager processes.
Installing NB-Java.
Installing VRTSnbjre ...
Installation of VRTSnbjre was successful.
More details regarding VRTSnbjre can be found in file
/tmp/install_VRTSnbjre.rpm_trace.2523 on nbuclient001.
Installing VRTSnbjava ...
Installation of VRTSnbjava was successful.
More details regarding VRTSnbjava can be found in file
/tmp/install_VRTSnbjava.rpm_trace.2523 on nbuclient001.
Migrating log files in /usr/openv/logs
Migration of log files complete.
No [x]inetd process found.
Installing VRTSpddea.rpm ...
Installation of VRTSpddea.rpm was successful. Check /tmp/install_VRTSpddea.rpm_trace.2163 for details.
Starting NetBackup Deduplication installer
testing: /tmp/pdde_pkg_dir_3133
Checking for SYMCpddea package...
Checking for VRTSpddea package...
Package VRTSpddea found.
NetBackup Deduplication software is installed.
NetBackup Deduplication is not yet configured.
Checking for SYMCpddes package...
Checking for VRTSpddes package...
Checking for SYMCpddea package...
Installing NetBackup Deduplication server package (/usr/openv/pddeserver.tar.gz)...
Extracting package VRTSpddes in /tmp/pdde_pkg_dir_3133.
Package VRTSpddes extracted to /tmp/pdde_pkg_dir_3133.
Installing package VRTSpddes.
Package VRTSpddes installed.
Installing NetBackup Extendable Storage File System Service (VxESFS) ...
Running install_esfs script ...
Successfully installed NetBackup Extendable Storage File System Service (VxESFS)
Running NetBackup Deduplication upgrade script (server mode)...
NetBackup Deduplication install finished successfully.
Version now installed: 11.0101.0018.0202
Full NetBackup Deduplication installation log saved to: /var/log/puredisk/2018-04-12_12:26-pdde-install.log
Installing VRTSnbcfg.rpm ...
Installation of VRTSnbcfg.rpm was successful. Check /tmp/install_VRTSnbcfg.rpm_trace.2163 for details.
Done executing NB.inst.
If you ran NB.inst instead of <cdrom_path>/install, you must
run /usr/openv/netbackup/bin/install_bp to initiate NetBackup.
Running /usr/openv/netbackup/bin/install_bp
A NetBackup Server or Enterprise Server license key is needed
for installation to continue.
Enter license key: KJNW-P8BN-DBW4-4HCR-CRPR-NWO4-F4K4-V7GG-VECP-P
Evaluation NetBackup Enterprise Server with Apr 30, 2018 expiration date will be registered.
Is this OK? [y,n] (y) n
KJNW-P8BN-DBW4-4HCR-CRPR-NWO4-F4K4-V7GG-VECP-P:
Evaluation NetBackup Enterprise Server Base product with the following features enabled:
Virtual Appliance
Replication Director
Accelerator
PureDisk Remote Office
PureDisk Option
SAN Client
PureDisk MS Exchange Agent
Enterprise Vault Agent
PureDisk MS SQL Server Agent
Flexible Disk Option
OpenStorage Disk Option
Virtual Tape Option
Bare Metal Restore
Encryption
Open File Backup
BigData
Remote Client Support
Robotic Library Sharing Support
Remote Media Server Support
Microsoft RSM Robotic Libraries
ADIC DAS/SDLC Robotic Libraries
IBM ATL Robotic Libraries
Fujitsu LMF Robotic Libraries
StorageTek ACS Robotic Libraries
Snapshot Client
MS SharePoint Agent
Inline Tape Copy
Vault
Library Based Tape Drives
DataStore
Encryption (Legacy DES 56-bit)
Encryption (Legacy DES 40-bit)
SAP extension
Sybase extension
Informix extension
Oracle extension
Lotus Notes extension
DB2 extension
MS SQL Server extension
MS Exchange extension
Shared Storage Option
NDMP
Additional clients
has been registered.
All additional keys should be added at this time.
Do you want to add additional license keys now? [y,n] (y) n
Use /usr/openv/netbackup/bin/admincmd/get_license_key
to add, delete or list license keys at a later time.
Installing NetBackup Enterprise Server version: 8.1.1
Resolved Master Server name [nbumaster100] from /tmp/nb_servers_tmp.
Checking network connections.
bp.conf: IP_ADDRESS_FAMILY = AF_INET: default value, no update needed
Successfully cleared host cache
Successfully cleared peer validation cache
Machine nbuclient001 is a media server, and it is not the EMMSERVER.
Successfully updated the session cache parameters.
Creating /usr/openv/tmp/sqlany
Installed SQL Anywhere Version 16.0.0.2322
Installation completed successfully
This is not a EMM and Master server, exiting
Starting the NetBackup Authentication daemon.
Starting the NetBackup network daemon.
Starting the NetBackup client daemon.
Starting the NetBackup SAN Client Fibre Transport daemon.
Starting the NetBackup Discovery Framework.
testing: /tmp/pdde_pkg_dir_1417
NetBackup Deduplication preinstall check passed
Is this host the master server? [y,n] (y) n
Checking for required system conditions...
ok server_conf_settings_critical: Inapplicable for new NetBackup installation: skipping
ok media_server_cluster_upgrade: NetBackup is not installed: skipping
ok remote_emm: NetBackup is not installed: skipping
ok wsl_account: Inapplicable for non - Master Server: skipping
ok unsupported_platform: Passed checks for unsupported platforms.
ok be_nb_same_host: inapplicable on linux: skipping
ok nbdb_ntfs_dir_symlink: inapplicable on linux: skipping
ok nbdb_maintenance_space: no NBDB maintenance required on new install: skipping
Checking for recommended system conditions...
ok os_update_level: inapplicable on linux: skipping
not ok ulimit_nofiles: nofiles ulimit 1024 is too low.
NetBackup Master and Media Server processes may run slower if they are
limited to fewer than 8000 open file descriptors. This test runs
'ulimit -n' and checks that the result is at least 8000 on NetBackup
This is not a EMM and Master server, exiting
Starting the NetBackup Authentication daemon.
Starting the NetBackup network daemon.
Starting the NetBackup client daemon.
Starting the NetBackup SAN Client Fibre Transport daemon.
Starting the NetBackup Discovery Framework.
Starting the NetBackup Event Manager.
Starting the NetBackup Deduplication Manager.
Starting the NetBackup Deduplication Engine.
Starting the NetBackup compatibility daemon.
Starting the Media Manager device daemon processes.
Starting the NetBackup Remote Monitoring Management System.
Starting the NetBackup Key Management daemon.
Starting the NetBackup Service Layer.
Starting the NetBackup CloudStore Service Container.
Starting the NetBackup Service Monitor.
Starting the NetBackup Bare Metal Restore Boot Server daemon.
NetBackup server installation complete.
4.4-配置NBU Master/Media連接配接
1-配置NBU Console登陸使用者:
NBU Console管理平台預設隻能root使用者進行登陸,如需要使用其它使用者進行登陸,需要添加賬号配置到NBU Master伺服器上,具體配置方法如下:
Vim /usr/openv/java/auth.conf
複制root配置的資訊,修改添加新的使用者名儲存退出即可。
2-部署基于主機名的安全證書
/ usr / openv / netbackup / bin / admincmd / bpnbaz -ProvisionCert host_name (在master上分别對master和media伺服器進行執行)
在netbackup管理主機屬性—master上附加伺服器添加client IP
重新開機client netbackup服務
/etc/init.d/netbackup stop
/etc/init.d/netbakcup start
4-配置每個用戶端的最大作業
以下過程顯示如何設定每個用戶端的最大作業數屬性。
為每個用戶端配置最大作業
在NetBackup管理控制台的左側窗格中,展開“ NetBackup管理”>“主機屬性”。
選擇主伺服器。
在右側窗格中,輕按兩下伺服器圖示。
點選全局屬性。
将每個用戶端的最大作業數更改為99。
每個用戶端的最大作業數指定每個用戶端允許的最大并發備份數,預設值是1。
4.5-配置AWS S3存儲
準備工作:
1、配置雲存儲服務(預設不需要配置,如nbcssc服務不能起來需要在master和media分别)
/usr/openv/netbackup/bin/nbcssc -t -a NetBackup
/usr/openv/netbackup/bin/nbcssc -s -a NetBackup -m cloud_master_host -f
注:Cloud_master_host修改為master主機名稱
2、檢查iptables服狀态,需要停止或者添加單獨的防火牆政策,放開NBU通信
service iptables stop
3、
在進行雲存儲伺服器之前,需要在“主機屬性”下面選擇“媒體伺服器”,然後雙機右側的機器名稱,将其連接配接到NBU console,否則後面建立磁盤池會報錯。
- 在管理控制台中,選擇“配置雲存儲伺服器”選項;
-
AWS Veritas NBU for SAP DB2部署文檔 - 選擇下一步;
-
AWS Veritas NBU for SAP DB2部署文檔 - 在雲存儲下來清單中,選擇Amazon(S3)選項;
-
AWS Veritas NBU for SAP DB2部署文檔 - 配置AWS中國區S3存儲的域名,并輸入賬号及驗證資訊;
-
AWS Veritas NBU for SAP DB2部署文檔 - 選擇相應的壓縮、加密選項,選擇下一步;
-
AWS Veritas NBU for SAP DB2部署文檔 - 确認配置資訊,選擇下一步;
-
AWS Veritas NBU for SAP DB2部署文檔 - 完成配置;
-
AWS Veritas NBU for SAP DB2部署文檔 - 選擇存儲池中相應的卷;
-
AWS Veritas NBU for SAP DB2部署文檔 - 在額外的卷選項界面中,選擇預設選項,下一步;
-
AWS Veritas NBU for SAP DB2部署文檔 - 确認卷選項,選擇下一步;
-
AWS Veritas NBU for SAP DB2部署文檔 - 成功為NBU配置雲存儲資源;
-
AWS Veritas NBU for SAP DB2部署文檔 - 這裡如果無法勾選上一步驟的“使用剛建立的磁盤池建立存儲單元”則需要手工在NBU console裡選擇存儲單元頁籤進行建立。
- 為建立的存儲資源命名,并行作業數根據實際配置,建議配置為99。
-
AWS Veritas NBU for SAP DB2部署文檔 - 注意這裡的“最大并發作業數”
- 完成操作;
-
AWS Veritas NBU for SAP DB2部署文檔 - 回到NBU管理控制台,驗證S3資源建立成功;
4.6-配置NBU Catalog政策
NBU Catalog内記錄了NBU政策的備份資訊以及Master的連接配接認證和資訊,需要定期對其進行備份,如果遇到主機當機,可以通過Catalog來進行還原,確定原備份可以正常恢複。
配置方法:
1-首先登陸NBU Console控制平台,在全局安全設定内選擇災難恢複,根據密碼規則設定災難恢複密碼,此密碼需要妥善儲存,如丢失遺忘後不能通過曆史Catalog進行還原。
2-密碼設定成功後,建立存儲單元用于存放Catalog日志,存儲單元路徑需要提前建立完成以及挂載在非作業系統磁盤上,避免作業系統故障影響丢失所有Catalog資料。
輸入存儲單元名稱,選擇目錄的絕對路徑,點選确定進行建立。
3-選擇配置目錄庫備份
點選下一步
輸入Catalog政策名稱,選中建立目錄庫備份政策,點選下一步
輸入政策名稱
選擇備份類型,建議使用預設,點選下一步
定義備份周期和保留周期,根據實際需要設定
選擇執行的時間
輸入之前建立的catalog存儲單元路徑以及登陸名和密碼,登陸名和密碼可以為NBU控制台登陸賬号,確定此賬号有權限對存儲單元路徑有讀寫執行的權限,點選下一步
選擇是否需要郵件發送,選擇否,可以根據客戶需要設定
點選完成,配置完成Catalog備份政策。
4.7-配置SAP DB2用戶端
1-将DB2 配置為與 NetBackup 一起工作:
使用
# cd /usr/openv/netbackup/bin
運作db2_config:
./db2_config
将出現以下消息:
Please specify the DB2 instance home path name:
提供适當的主路徑名稱,然後按
/home/db2inst1
将出現以下消息:
Do you have other DB2 instances? (y/n) [n]
根據需要添加其他
注:instance home 等資訊可以通過more /home/db2inst1/sqllib/db2profile 檢視。
例:
2-配置DB2備份腳步
建立一個新的目錄用于存放DB2每個執行個體的執行腳步,生産環境可以規劃完成後進行建立配置。
mkdir /db2/nbu/LSY/ (根據每個執行個體名稱建立一個檔案夾避免混淆)
複制/usr/openv/netbackup/ext/db_ext/db2/scripts/db2_backup到建立好的腳步路徑下。
使用chmod指令将檔案屬性改為775,使用chown指令将檔案所屬組改為執行個體的使用者名
修改腳步資訊如下,隻需要修改綠色字型部分,每個資料庫均需要一個腳步。
注意:
- db2.conf裡的預設的schedule不能修改
- policy名稱需要和NBU console裡建立的policy名稱一緻
- db2.conf裡“DB2 User Exit Program”部分全部注釋掉
- 在db2_backup備份腳本中,對應的db2 backup database指令中添加上online參數,放在$MY_DB2和$MY_SCHED之間
多db2執行個體配置示例
這裡需要注意db2_backup備份腳本和db2.conf配置檔案都是和執行個體一一對應的,每個db2執行個體都對應有各自的這兩個檔案。
==============================================================
##配置db2用戶端
[root@sc1dx4 netbackup]# cd bin/
[root@sc1dx4 bin]# ./db2_config
Please specify the DB2 instance home path name:
/db2/db2qnh
Do you have other DB2 instances? (y/n) [n]
y
Please specify the DB2 instance home path name:
/db2/db2qsy
Do you have other DB2 instances? (y/n) [n]
y
Please specify the DB2 instance home path name:
/db2/db2dnh
Do you have other DB2 instances? (y/n) [n]
y
Please specify the DB2 instance home path name:
/db2/db2dsy
Do you have other DB2 instances? (y/n) [n]
n
Linking /db2/db2qnh/sqllib/adm/db2uext2 to /usr/openv/netbackup/bin/db2uext2.64.
Copying /usr/openv/netbackup/ext/db_ext/db2/scripts/db2.conf to /db2/db2qnh/db2.conf.
Linking /db2/db2qsy/sqllib/adm/db2uext2 to /usr/openv/netbackup/bin/db2uext2.64.
Copying /usr/openv/netbackup/ext/db_ext/db2/scripts/db2.conf to /db2/db2qsy/db2.conf.
Linking /db2/db2dnh/sqllib/adm/db2uext2 to /usr/openv/netbackup/bin/db2uext2.64.
Copying /usr/openv/netbackup/ext/db_ext/db2/scripts/db2.conf to /db2/db2dnh/db2.conf.
Linking /db2/db2dsy/sqllib/adm/db2uext2 to /usr/openv/netbackup/bin/db2uext2.64.
Copying /usr/openv/netbackup/ext/db_ext/db2/scripts/db2.conf to /db2/db2dsy/db2.conf.
[root@sc1dx4 bin]#
[root@sc1dx4 bin]# ls -l /db2/*/db2.conf
-rw-rw-rw-. 1 root root 2474 Jul 13 14:37 /db2/db2dnh/db2.conf
-rw-rw-rw-. 1 root root 2474 Jul 13 14:37 /db2/db2dsy/db2.conf
-rw-rw-rw-. 1 root root 2474 Jul 13 14:37 /db2/db2qnh/db2.conf
-rw-rw-rw-. 1 root root 2474 Jul 13 14:37 /db2/db2qsy/db2.conf
[root@sc1dx4 bin]#
[root@sc1dx4 bin]# ls -l /db2/db2*/sqllib/adm/db2uext2
lrwxrwxrwx. 1 root dbdnhadm 36 Jul 13 14:37 /db2/db2dnh/sqllib/adm/db2uext2 -> /usr/openv/netbackup/bin/db2uext2.64
lrwxrwxrwx. 1 root dbdsyadm 36 Jul 13 14:37 /db2/db2dsy/sqllib/adm/db2uext2 -> /usr/openv/netbackup/bin/db2uext2.64
lrwxrwxrwx. 1 root dbqnhadm 36 Jul 13 14:37 /db2/db2qnh/sqllib/adm/db2uext2 -> /usr/openv/netbackup/bin/db2uext2.64
lrwxrwxrwx. 1 root dbqsyadm 36 Jul 13 14:37 /db2/db2qsy/sqllib/adm/db2uext2 -> /usr/openv/netbackup/bin/db2uext2.64
[root@sc1dx4 bin]#
======================
[root@sc1dx4 db2]# cd /db2/script/
[root@sc1dx4 script]# mkdir -p dnh qnh dsy qsy
[root@sc1dx4 ~]# cp /usr/openv/netbackup/ext/db_ext/db2/scripts/db2_backup /db2/script/qnh/
[root@sc1dx4 ~]# cp /usr/openv/netbackup/ext/db_ext/db2/scripts/db2_backup /db2/script/qsy/
[root@sc1dx4 ~]# cp /usr/openv/netbackup/ext/db_ext/db2/scripts/db2_backup /db2/script/dnh/
[root@sc1dx4 ~]# cp /usr/openv/netbackup/ext/db_ext/db2/scripts/db2_backup /db2/script/dsy/
[root@sc1dx4 ~]#
[root@sc1dx4 script]# chmod 775 */*
[root@sc1dx4 script]# ls -l */*
-rwxr-xr-x. 1 root root 1733 Jul 13 14:44 dnh/db2_backup
-rwxr-xr-x. 1 root root 1733 Jul 13 14:44 dsy/db2_backup
-rwxr-xr-x. 1 root root 1733 Jul 13 14:44 qnh/db2_backup
-rwxr-xr-x. 1 root root 1733 Jul 13 14:44 qsy/db2_backup
[root@sc1dx4 script]# id db2qnh
uid=530(db2qnh) gid=538(dbqnhadm) groups=538(dbqnhadm),500(sapinst)
[root@sc1dx4 script]# id db2qsy
uid=515(db2qsy) gid=518(dbqsyadm) groups=518(dbqsyadm),500(sapinst)
[root@sc1dx4 script]# id db2dnh
uid=527(db2dnh) gid=534(dbdnhadm) groups=534(dbdnhadm),500(sapinst)
[root@sc1dx4 script]# id db2dsy
uid=509(db2dsy) gid=510(dbdsyadm) groups=510(dbdsyadm),500(sapinst)
[root@sc1dx4 script]#
chown db2qnh:dbqnhadm /db2/script/qnh/db2_backup
chown db2qsy:dbqsyadm /db2/script/qsy/db2_backup
chown db2dnh:dbdnhadm /db2/script/dnh/db2_backup
chown db2dsy:dbdsyadm /db2/script/dsy/db2_backup
[root@sc1dx4 script]# ls -l */*
-rwxrwxr-x. 1 db2dnh dbdnhadm 1733 Jul 13 14:44 dnh/db2_backup
-rwxrwxr-x. 1 db2dsy dbdsyadm 1733 Jul 13 14:44 dsy/db2_backup
-rwxrwxr-x. 1 db2qnh dbqnhadm 1733 Jul 13 14:44 qnh/db2_backup
-rwxrwxr-x. 1 db2qsy dbqsyadm 1733 Jul 13 14:44 qsy/db2_backup
[root@sc1dx4 script]#
##添加授權位置(client上執行)
cd /usr/openv/netbackup/bin/
./nbsetconfig
DB_SCRIPT_PATH=/db2/script/qnh/db2_backup
DB_SCRIPT_PATH=/db2/script/qsy/db2_backup
DB_SCRIPT_PATH=/db2/script/dnh/db2_backup
DB_SCRIPT_PATH=/db2/script/dsy/db2_backup
==================
db2_backup檔案示例
#!/bin/sh
#bcpyrght
#***************************************************************************
# $Copyright: Copyright (c) 2018 Veritas Technologies LLC. All rights reserved $
#***************************************************************************
#ecpyrght
#
# These environment variables are initialized by Netbackup (bphdb)
#
echo "DB2_CLIENT = $DB2_CLIENT"
echo "DB2_SERVER = $DB2_SERVER"
echo "DB2_POLICY = $DB2_POLICY"
echo "DB2_SCHED = $DB2_SCHED"
echo "DB2_FULL = $DB2_FULL" # Is 1 if Full backup scheduled
echo "DB2_CINC = $DB2_CINC" # Is 1 if Cumulative incremental scheduled
echo "DB2_INCR = $DB2_INCR" # Is 1 if Differential incremental scheduled
#
# Change MY_LIB to the correct NetBackup library name for your host:
# Solaris or Linux 32-bit = nbdb2.so
# Solaris 64-bit = nbdb2.so64
# HPUX (ia64) = nbdb2.so
# AIX or HPUX = nbdb2.sl
# AIX or HPUX = nbdb2.sl64
#
MY_LIB=/usr/openv/netbackup/bin/nbdb2.so64
#根據實際需要進行修改,Linux預設不用修改
#
# Change MY_DB2 to the correct DB2 instance name for your database.
#
MY_DB2=SSY
#修改DB2的資料庫名稱
#
# Use the NetBackup schedule type to set DB2 full or incremental options.
#
if [ "$DB2_FULL" = "1" ] ; then
MY_SCHED=""
elif [ "$DB2_CINC" = "1" ] ; then
MY_SCHED="INCREMENTAL"
elif [ "$DB2_INCR" = "1" ] ; then
MY_SCHED="INCREMENTAL DELTA"
else
MY_SCHED=""
fi
#
# Initialize the backup command line.
# Customize the number of sessions and buffer options for your environment.
#
CMD_LINE="db2 BACKUP DATABASE $MY_DB2 online $MY_SCHED LOAD $MY_LIB OPEN 4 SESSIONS BUFFER 1024"
#
# Change MY_USER to the proper DB2 user for performing backups
#
MY_USER=db2ssy
#修改DB2執行個體使用者名稱
echo "Executing: $CMD_LINE"
su - $MY_USER -c "$CMD_LINE" >/db2/nbulog 2>&1
RETURN_STATUS=$?
# Return 0 for success, non-zero for errors
exit $RETURN_STATUS
3-添加授權位置
使用nbsetconfig輸入授權位置的值。用戶端需要使用root運作這些指令,使用适合您的代理的路徑,每個腳本均需要設定授權路徑,否則備份會失敗。
cd /usr/openv/netbackup/bin
[root @ client26 bin]#./nbsetconfig
nbsetconfig> DB_SCRIPT_PATH = /db2/nbu/TESTING-script/TESTING-script
nbsetconfig> DB_SCRIPT_PATH =/db2/nbu/
nbsetconfig>
<CTRL-d>
4-配置DB2參數
db2 update db cfg for TESTING using logarchmeth1 VENDOR:/usr/openv/netbackup/bin/nbdb2.so64 //修改為Vendor模式備份
db2 update db cfg for TESTING using TRACKMOD YES
停止應用使所有更改參數生效
db2 force application all
做離線備份,否則資料是backup pending狀态的,無法聯結
db2 backup db TESTING to /tmp //離線全備需要提前準備好空間
再次檢視目前的資料庫狀态
db2 get db cfg
5-修改db2.conf檔案
配置/db2/db2ssy/db2.conf檔案,為DB2備份指定備份政策的配置資訊。内容如下:
DATABASE TESTING
OBJECTTYPE DATABASE
POLICY DB2_DB_TESTING
SCHEDULE Default-Application-Backup
ENDOPER
DATABASE TESTING
OBJECTTYPE ARCHIVE
POLICY DB2_ARCH_TESTING
SCHEDULE Default-Application-Backup
ENDOPER
注:每個執行個體均需要配置一個db2.conf檔案,對于政策名稱可以根據實際需要設定
4.8-配置備份政策
1-建立資料庫備份政策:
登陸NBUConsole控制台,在政策内右擊建立政策
輸入政策名稱
選擇檔案系統資料庫,下一步
輸入政策名稱,政策類型選擇DB2
點選添加用戶端,輸入需要備份的SAP作業系統主機名
選擇完全備份,下一步
根據實際需要修改保留政策和備份間隔
選擇備份開始的時間段
點選完成
輕按兩下建立完成的備份政策,政策存儲選擇之前建立好的S3存儲
在備份選擇頁面,輸入配置DB2用戶端時準備的腳本路徑(包含腳本檔案名)
選擇日程表,将全備份的計劃名稱改為DB2_FULL後點選确認,備份政策建立完成。
2-Archive Log政策建立,
在NBU控制台内選擇建立備份政策,輸入政策名稱,不選擇向導進行建立。
政策類型選擇DB2, 政策存儲選擇配置好的S3存儲單元,點選用戶端頁面
輸入用戶端名稱後,點選确認,此政策不需要添加備份選擇,添加完成用戶端後點選完成,日志備份政策建立成功。
注:備份資料庫以及日志的政策名稱要和db2.conf内添加的資訊一緻。
4.9-DB2資料庫備份測試
登陸NBU控制台進行全備測試,選中備份政策右擊選擇手動進行備份點選确定後開始進行備份,日志備份政策會在做全備時自動執行。
點選确定
檢視備份完成的狀态
4.10-DB2日志歸檔測試
在DB2伺服器上,手工切日志db2 archive log for db TESTING,每次切換後都産生一次日志備份,從控制台可以看到日志歸檔政策會自動執行備份。
4.11-DB2恢複驗證
檢視曆史備份記錄
/user/openv/netbackup/bin/bplist -C sc1dx3 -S SRC105200 -t 18 -R /
可以檢視到曆史全備和日志備份的記錄
執行恢複指令
Db2 restore database TESTING load /usr/openv/netbackup/bin/nbdb2.so64
登陸控制台可以看到資料還原已經完成
等待直至資料庫恢複成功;
執行復原日志操作(db2 rollforward db TAT to end of logs and complete);
登陸NBU控制台,檢視日志恢複狀成功(狀态為Done):
連接配接上DB2 TESTING資料庫執行個體,檢視表内資料,資料一緻。
常用DB2指令:
根據時間戳來進行還原
db2 restore db sample load /usr/openv/netbackup/bin/nbdb2.so64 taken at 20110222164246
db2 rollforward db testdb to end of logs and complete
db2 list history
5-NBU容災功能測試
NBU容災功能可以采用CPM對NBU Master主機生成快照的方式來實作,根據客戶對于實際使用的需求,可以自定義設定更新快照的頻率。
當NBU Master主機發生當機并且不可恢複時,可以通過快照來對NBU主機進行還原,新的主機可以采用新的IP位址,但是主機名稱不能進行修改,主機建立完成後需要更新NBU 新Master主機以及用戶端主機的DNS解析,更新完成DNS解析後在新Master主機上執行如下指令清除緩存并重新開機Master後,新主機可以和用戶端正常聯通,備份恢複工作可以繼續進行。
/usr/openv/netbackup/bin/bpclntcmd -clear_host_cache
6-HA DB2 NBU部署
涉及HA DB2的NBU部署和不同的單執行個體DB2部署主要過程類似,請參考前面章節的内容。需要關注的地方,在下面已經列出,供參考。
環境說明:DB2配置了HA方案,當主節點DB2出現故障時會切換到備節點,正常生産過程中使用虛拟IP/虛拟主機進行對外服務。
配置目标:部署NBU,使其能夠在主節點和備節點進行正常的備份和恢複。
注意點01:在主備兩端的NBU client設定路徑授權
比如類似如下指令,在主備節點均執行:
cd /usr/openv/netbackup/bin/
./nbsetconfig
DB_SCRIPT_PATH=/db2/db2pnr/script/db2_backup
注意點02:主機屬性調整
需要在“主機屬性”的“媒體伺服器”頁面,在主備節點對應的兩個媒體伺服器中,将主備節點的主機名都附加進去。參見下圖
注意點03:備份政策調整
兩個方面:
- 對于資料庫備份政策,需要在用戶端頁面添加虛拟主機名
- 對于歸檔日志備份政策,需要在用戶端頁面添加主備節點主機名以及虛拟主機名
注意點04:在主節點配置bp.conf檔案
[root@sc1pxg db2pnr]# cat /db2/db2pnr/bp.conf
CLIENT_NAME = sc1erpvdbin
[root@sc1pxg db2pnr]#
7-問題處理與診斷
問題01:建立雲存儲伺服器無法擷取到S3 bucket資訊
症狀:建立雲存儲伺服器過程中無法擷取到S3 bucket資訊,最後會出現如下圖示的報錯:
分析及解決:
NBU工程師在生成的log檔案裡發現有sts相關報錯,參見下面的vxlog.230檔案内容,懷疑是sts相關的配置存在異常,是以就嘗試将目前的sts從nbu中删除,在重新開機NBU media/client服務,之後再次嘗試配置雲存儲伺服器,可以正常進行,至此,問題解決。
下面是相關的操作記錄。
vxlogview -p 51216 -o 230 -d all > /tmp/vxlog.230
07/16/2018 18:30:54.311 [Application] NB 51216 rdsm 230 PID:4748 TID:140198089262848 File
ID:222 [No context] [Error] V-230-22 RDSM has encountered an issue with STS where the serv
er was not found: getDiskVolumeInfoList():1277
07/16/2018 18:30:54.311 [Application] NB 51216 rdsm 230 PID:4748 TID:140198089262848 File
ID:222 [No context] [Error] V-230-1 RDSM has encountered a service exception: Error Locati
on: getDiskVolumeInfoList():1277, Error Text: getDiskVolumeInfoList, Error Domain: 3, Erro
r Code 2,055,011
07/16/2018 18:50:22.650 [Application] NB 51216 rdsm 230 PID:4748 TID:140198103971584 File
ID:222 [No context] [Error] V-230-22 RDSM has encountered an issue with STS where the serv
er was not found: getDiskVolumeInfoList():1277
07/16/2018 18:50:22.650 [Application] NB 51216 rdsm 230 PID:4748 TID:140198103971584 File
ID:222 [No context] [Error] V-230-1 RDSM has encountered a service exception: Error Locati
on: getDiskVolumeInfoList():1277, Error Text: getDiskVolumeInfoList, Error Domain: 3, Erro
r Code 2,055,011
nbemmcmd -listhosts
nbemmcmd -deletehost -machinename sc1dx5 -machinetype ndmp;
nbemmcmd -deletehost -machinename sc1dx5 -machinetype media
netbackup stop
netbackup start
nbemmcmd -listhosts
nbemmcmd -listhosts |grep x5
問題02:如何删除media server/client記錄?
##過期磁盤池上的備份
[root@SRC016004 admincmd]# ./bpexpdate -stype amazon_raw -dp sc1pxg
Are you SURE you want to delete all backup copies on sc1pxg y/n (n)? y
從磁盤卷中删除已删除的片段
[root@SRC016004 ~]# nbdelete -allvolumes -force
删除磁盤池
[root@SRC016004 ~]# nbdevconfig -deletedp -stype amazon_raw -dp sc1pxg
Disk pool sc1pxg has been deleted successfully
删除存儲伺服器
[root@SRC016004 ~]# nbdevconfig -deletests -storage_server sc1pxg -stype amazon_raw
Storage server sc1pxg has been successfully deleted
列出EMM中的主機
[root@SRC016004 ~]# nbemmcmd -listhosts
NBEMMCMD, Version: 8.1.1
The following hosts were found:
server SRC016004
master SRC016004
media sc1pxg
ndmp sc1pxg
ndmp SRC016004
ndmp sc1pxg003
Command completed successfully.
删除ndmp和media記錄
[root@SRC016004 ~]# nbemmcmd -deletehost -machinename sc1pxg -machinetype ndmp
NBEMMCMD, Version: 8.1.1
Command completed successfully.
[root@SRC016004 ~]# nbemmcmd -deletehost -machinename sc1pxg -machinetype media
NBEMMCMD, Version: 8.1.1
Command completed successfully.
确認已經删除
[root@SRC016004 ~]# nbemmcmd -listhosts
NBEMMCMD, Version: 8.1.1
The following hosts were found:
server SRC016004
master SRC016004
ndmp SRC016004
ndmp sc1pxg003
Command completed successfully.
[root@SRC016004 ~]#