在過去很長一段時間,我都非常希望能夠将OpenHarmony與HarmonyOS裝置進行一個關聯,但是礙于一些底層接口未完善一直無法實作。但是在前幾個月,OpenHarmony3.1 帶來了更多可能。本次,我将分享如何在搭載HarmonyOS的手機和搭載OpenHarmony的開發闆上,實作socket對話!
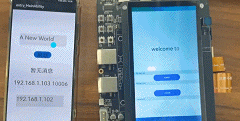
0. 效果示範
1.HarmonyOS側
1.1 建立一個JAVA工程,編寫簡單的測試頁面

- ability_main.xml (首頁面)
<?xml version="1.0" encoding="utf-8"?>
<DirectionalLayout
    xmlns:ohos="http://schemas.huawei.com/res/ohos"
    ohos:height="match_parent"
    ohos:width="match_parent"
    ohos:alignment="center"
    ohos:orientation="vertical">
    <TextField
        ohos:id="$+id:sendfield"
        ohos:height="200px"
        ohos:width="800px"
       ohos:bottom_margin="32vp"
        ohos:text_size="32fp"
        ohos:hint="請輸入發送資訊"
        ohos:background_element="$graphic:tfbg"
        />
    <Button
        ohos:id="$+id:btn"
        ohos:height="120px"
        ohos:width="300px"
        ohos:text="啟動"
        ohos:text_size="32fp"
       ohos:background_element="$graphic:btn"
        />
    <Text
        ohos:id="$+id:text"
        ohos:top_margin="50vp"
        ohos:height="match_content"
        ohos:width="match_content"
        ohos:text_size="32fp"
        ohos:text="暫無消息"


        />
    <Text
        ohos:id="$+id:localip"
        ohos:height="match_content"
        ohos:width="match_content"
        ohos:text="本機IP"
        ohos:top_margin="30vp"
        ohos:text_size="32fp"
        />
    <TextField
        ohos:id="$+id:textfield"
        ohos:height="200px"
        ohos:width="800px"
        ohos:top_margin="50vp"
        ohos:text_size="32fp"
        ohos:hint="請輸入IP位址"
        ohos:background_element="$graphic:tfbg"
        />

</DirectionalLayout>
這裡提供我自己編寫的一個測試頁面,但這并不是最重要的.
1.2 編寫socket功能
目前,鴻蒙的Socket通信功能隻能在JAVA側實作,并且官網對相關的功能解析不夠全面,但是足夠實作UDP通信。
這裡直接參考官網,可以快速實作Socket功能,傳送門:JAVA-Socket。
在MainAbilitySlice中編寫兩個主要函數,并結合個人情況綁定到測試按鍵上即可。
- StartServer()
HiLog.info(LABEL_LOG, "StartServer run");

                NetManager netManager = NetManager.getInstance(null);

                if (!netManager.hasDefaultNet()) {
                    HiLog.error(LABEL_LOG,
                            "netManager.hasDefaultNet() failed");

                    return;
                }

                NetHandle netHandle = netManager.getDefaultNet();
                DatagramSocket socket = null;

                // 通過Socket綁定來進行資料傳輸
                try {
                    HiLog.info(LABEL_LOG, "wait receive data");

                    //通過getLocalIpAddress()快速擷取本機的IP位址
                    InetAddress address = netHandle.getByName(getLocalIpAddress());
                    //端口号+主機位址
                    socket = new DatagramSocket(10006, address);
                    netHandle.bindSocket(socket);
                    /*至此綁定Socket結束*/
                    HiLog.info(LABEL_LOG, "綁定成功");

                    /*監聽函數*/
                    byte[] buffer = new byte[1024];
                    DatagramPacket response = new DatagramPacket(buffer,
                            buffer.length);

                    while (true) {
                        //接收資料
                        socket.receive(response);

                        int len = response.getLength();
                        HiLog.info(LABEL_LOG, "接收成功");
                        //将資料列印到螢幕上
                        s = new String(buffer, StandardCharsets.UTF_8).substring(0,
                                len);
                                //一個textfield元件
                                text.setText(s);

                        HiLog.info(LABEL_LOG, "receive data: " + s);
                    }
                } catch (IOException e) {
                    HiLog.error(LABEL_LOG, "rev IOException: ");
                }
} - sendMessage()
NetManager netManager = NetManager.getInstance(null);

                if (!netManager.hasDefaultNet()) {
                    HiLog.error(LABEL_LOG,
                            "netManager.hasDefaultNet() failed");

                    return;
                }

                NetHandle netHandle = netManager.getDefaultNet();

                // 通過Socket綁定來進行資料傳輸
                DatagramSocket socket = null;

                try {
                    //從textfield元件擷取使用者輸入的對端ip位址
                    HOST = iptf.getText();

                    InetAddress address = netHandle.getByName(HOST);
                    socket = new DatagramSocket();
                    netHandle.bindSocket(socket);

                    /*至此 已綁定對端Socket*/

                    //從一個textfield元件擷取使用者輸入的要發送的資訊。
                    String data = new String(sendtf.getText());

                    //這裡預設還是發送至對端的10006端口
                    DatagramPacket request = new DatagramPacket(data.getBytes(
                            StandardCharsets.UTF_8), data.length(),
                            address, PORT);
                    // buffer指派
                    // 發送資料
                    socket.send(request);
                    HiLog.info(LABEL_LOG, "send data: " + data);
                } catch (IOException e) {
                    HiLog.error(LABEL_LOG, "send IOException: ");
                } finally {
                    if (null != socket) {
                    }
} - getlocalip()
private String getLocalIpAddress() {
        WifiDevice wifiDevice = WifiDevice.getInstance(getContext());
        Optional<IpInfo> ipInfo = wifiDevice.getIpInfo();
        int ip = ipInfo.get().getIpAddress();
        return (ip & 0xFF) + "." + ((ip >> 8) & 0xFF) + "." + ((ip >> 16) & 0xFF) + "." + (ip >> 24 & 0xFF);
    }
至此,接收資訊和發送資訊的函數都編寫完了。但并沒有結束,這樣的函數并不能跑在UI線程上,我們必須讓其在其他線程上運作,那必須請出我們最愛的EventRunner.
1.3 編寫Mythread類
EventRunner傳送門
- 建立一個Mythread.java 檔案
package com.example.hoop.util;

import ohos.eventhandler.EventHandler;
import ohos.eventhandler.EventRunner;


public class Mythread {
    public static void inUI(Runnable runnable) {
        //傳回主線程
        EventRunner runner = EventRunner.getMainEventRunner();

        EventHandler eventHandler = new EventHandler(runner);

        eventHandler.postSyncTask(runnable);
    }

    public static void inBG(Runnable runnable) {
        EventRunner runner = EventRunner.create(true);

        EventHandler eventHandler = new EventHandler(runner);
        //投遞任務,我們的Socket函數應該投遞于此。
        eventHandler.postTask(runnable, 0, EventHandler.Priority.IMMEDIATE);
    }
} - 将任務投遞給EventRunner
隻需要全部投遞給剛剛編寫的兩類函數就可以了
private void sendMessage() {
        Mythread.inBG(new Runnable() {
            @Override
            public void run() {
                NetManager netManager = NetManager.getInstance(null);
                if (!netManager.hasDefaultNet()) {
                    HiLog.error(LABEL_LOG,"netManager.hasDefaultNet() failed");
                    return;
                }
                NetHandle netHandle = netManager.getDefaultNet();
                // 通過Socket綁定來進行資料傳輸
                DatagramSocket socket = null;
                try {
                    //從textfield元件擷取使用者輸入的對端ip位址
                    HOST=iptf.getText();
                    InetAddress address = netHandle.getByName(HOST);
                    socket = new DatagramSocket();
                    netHandle.bindSocket(socket);
                    /*至此 已綁定對端Socket*/

                    //從一個textfield元件擷取使用者輸入的要發送的資訊。
                    String data = new String(sendtf.getText());
                    //這裡預設還是發送至對端的10006端口
                    DatagramPacket request = new DatagramPacket(data.getBytes(StandardCharsets.UTF_8), data.length(), address, PORT);
                    // buffer指派
                    // 發送資料
                    socket.send(request);
                    HiLog.info(LABEL_LOG,"send data: " + data);

                } catch (IOException e) {

                    HiLog.error(LABEL_LOG,"send IOException: ");
                } finally {
                    if (null != socket) {

                    }
                }
            }
        });
    }

    private void StartServer() {
        Mythread.inBG(new Runnable() {
            @Override
            public void run() {

                HiLog.info(LABEL_LOG,"StartServer run");
                NetManager netManager = NetManager.getInstance(null);
                if (!netManager.hasDefaultNet()) {

                    HiLog.error(LABEL_LOG,"netManager.hasDefaultNet() failed");
                    return;
                }
                NetHandle netHandle = netManager.getDefaultNet();
                DatagramSocket socket = null;
                // 通過Socket綁定來進行資料傳輸
                try {

                    HiLog.info(LABEL_LOG,"wait receive data");
                    //通過getLocalIpAddress()快速擷取本機的IP位址
                    InetAddress address = netHandle.getByName(getLocalIpAddress());
                    //端口号+主機位址
                    socket = new DatagramSocket(10006, address);
                    netHandle.bindSocket(socket);
                    /*至此綁定Socket結束*/
                    HiLog.info(LABEL_LOG,"綁定成功");

                    /*監聽函數*/
                    byte[] buffer = new byte[1024];
                    DatagramPacket response = new DatagramPacket(buffer, buffer.length);
                    while(true){
                        //接收資料
                        socket.receive(response);
                        int len = response.getLength();
                        HiLog.info(LABEL_LOG,"接收成功");
                        //将資料列印到螢幕上
                        s = new String(buffer, StandardCharsets.UTF_8).substring(0, len);
                        Mythread.inUI(new Runnable() {
                            @Override
                            public void run() {
                                //一個textfield元件
                                text.setText(s);
                            }
                        });

                        HiLog.info(LABEL_LOG,"receive data: " + s);
                    }
                } catch (IOException e) {
                    HiLog.error(LABEL_LOG,"rev IOException: " );
                }
            }
        });

    }
2.OpenHarmony側
2.1 建立工程,編寫測試頁面
- index.html
<div class="container">
   <text class="title">
     {{ title }}
   </text>
   <!--    <div style="width: 30%;height: 30%;background-color: blueviolet;">-->
   <!--    </div>-->
   <!--    <input  type="text" id="localip" placeholder="輸入本機IP"-->
   <!--           @change="newlocalip">-->
   <!--    </input>-->
   <text style="width: 300px;height: 70px;">
     本機IP{{getIpAddress()}}
   </text>
   <button type="capsule" style="width: 300px;height: 70px;" onclick="creatScoket"> 點選建立 </button>
   <input id="remoteip" placeholder="輸入伺服器IP" @change="newremoteip" />
   <button type="capsule" style="width: 300px;height: 70px;margin-top: 5%;" onclick="sendMessage"> 點選連接配接 </button>
   <input placeholder="輸入需要發送的資訊" type="text" enterkeytype="done" @change="newMessage" />
  </div>
2.2 編寫Socket功能
OpenHarmony-socket
import socket from '@ohos.net.socket';
import wifi from '@ohos.wifi';
export default {
    data: {
        title: "等待新的消息...",
        tcp: socket.constructTCPSocketInstance(),
        remoteip:'none',
        localip:'none',
        msg:"A NEW WORLD",
        udp:socket.constructUDPSocketInstance(),

    },
    onInit() {
      this.getIpAddress();
      this.creatScoket();
      this.title="暫無新消息"
    },
    //建立udpSocket 預設端口10006
    creatScoket: async function(){
        this.udp.bind({address: this.getIpAddress(), port: 10006, family: 1}, err => {
            if (err) {
                console.info('bind fail');
                this.title='bind fail'
                return;
            }
            this.title='bind success';
            console.info('bind success');
        })
//          this.tcp.bind({address: this.localip, port: 10006,family: 1}, err => {
//            if (err) {
//                console.log('bind fail');
//                this.title='bind fail';
//                return;
//            }
//            this.title='bind success';
//            console.log('bind success');
//        })
        //監聽收到的資訊 列印到螢幕上
       this.udp.on('message', value => {
           let buffer = value.message;
           let dataView = new DataView(buffer);
           let str = "";
           for (let i = 0;i < dataView.byteLength; ++i) {
               str += String.fromCharCode(dataView.getUint8(i))
           }
           this.title =str;
        });
    },
    sendMessage: async function(){

//        let promise1 = this.udp.connect({ address: {address: this.remoteip, port: 10006, family: 1} , timeout: 6000});
//        promise1.then(() => {
//            console.log('connect success');
//            let promise2 =this.udp.send({
//                data:this.msg
//            });
//            promise2.then(() => {
//                console.log('send success');
//            }).catch(err => {
//                console.log('send fail');
//            });
//        }).catch(err => {
//            this.title='connect fail';
//            console.log('connect fail');
//        });
        //發送資訊
        let promise = this.udp.send({
            data:this.msg,
            address: {
                address:this.remoteip,
                port:10006,
                family:1
            }
        });
        promise.then(() => {
            this.title='send success';
            console.info('send success');
        }).catch(err => {
            this.title='send fail'
            console.info('send fail');
        });
    },
    newlocalip(e){
       this.localip = e.value;
        this.title = e.value;
    },
    newremoteip(e){
        this.remoteip = e.value;
    },
    newMessage(e){
        this.msg=e.value;
        this.title=e.value;
    },
    //擷取本機ip位址
    getIpAddress(){
       let ip=wifi.getIpInfo().ipAddress;
       this.localip = (ip >> 24 & 0xFF)+"."+ ((ip >> 16) & 0xFF)+"."+((ip >> 8) & 0xFF)+"."+(ip & 0xFF);
    },

}
3.測試
這裡為了便于測試,我們最好下載下傳一個網絡調試助手
網絡調試助手
3.1 結果
- OpenHarmony側
- HarmonyOS側
- OpenHarmony與HarmonyOS關聯