作者:俞才彬
本文正在參加星光計劃3.0–夏日挑戰賽
前言
初學鴻蒙JS開發技術不久,想要快速結合官方文檔上手鴻蒙JS元件開發,本文主要結合HarmonyOS官網上的相關元件及API實作一個根據日期持久化存儲待辦事項。
效果示範
實作步驟
1. 确定兩個頁面
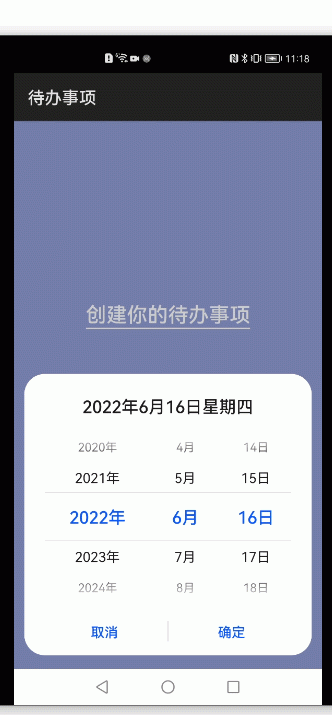
首先确定有兩個頁面:選擇日期頁面、待辦事項頁面。選擇日期頁面将選擇的日期如:
'2022-6-16'
作為路由參數傳遞到代辦事項頁,後者把這個日期作為緩存的
key
去取資料,并渲染在頁面上。
2. 選擇日期頁面
頁面結構如下:
<!-- index.hml -->
<div class="container">
    <text class="welcome">
        <span>建立你的待辦事項</span>
    </text>
    <div class="date-picker">
        <text class="pick-date" @click="showDatePicker">
            <span>點我選擇日期</span>
        </text>
        <!-- 不寫value,視圖将不會顯示 -->
        <picker
            id="picker"
            type="date"
            start="2002-2-5"
            end="2030-6-5"
            selected="{{ getCurrentDate }}"
            onchange="dateOnChange"
            show="false">
        </picker>
    </div>
</div>
樣式如下:
/* index.less */
@theme_color: rgba(120, 132, 206, .8);

.container {
    background-color: @theme_color;
    flex-direction: column;
    align-items: center;
    justify-content: center;
    .welcome {
        color: #fff;
        margin-bottom: 120px;
        font-size: 24px;
        font-weight: 600;
        border-bottom: 2px solid #fff;
    }
    .date-picker {
        justify-content: center;
        .pick-date{
            color: #FFF;
            line-height: 43px;
            border: 2px solid #fff;
            border-radius: 50px;
            padding: 10px 50px;
            font-size: 20px;
        }
    }
}
時間選擇器使用
picker
元件,
type
設定為
date
,預設值為今天。選擇日期時,觸發
onchange
事件,拿到選擇的日期,點選确定後,跳轉至待辦事項頁面,并将日期作為路由參數傳遞。
// index.js
import router from '@system.router';

export default {
    data: {
        dateValue: '', // 時間選擇器的值
    },
    // 去待辦事項頁面
    goDay() {
        const self = this;
        router.push({
            uri: "pages/day/day",
            params: {
                currentDate: self.dateValue,
            }
        });
    },
    showDatePicker(){
        this.$element("picker").show();
    },
    dateOnChange(e) {
        this.dateValue = e.year + "-" + (e.month+1) + "-" + e.day;
        this.goDay();
    },
    onInit() {
        // 時間選擇器預設為當天
        this.dateValue = this.getCurrentDate;
    },
    computed: {
        // 擷取目前日期
        getCurrentDate() {
            let now = new Date();
            return now.getFullYear() + "-" + (now.getMonth() + 1) + "-" + now.getDate();
        }
    }
}
3. 待辦事項頁面
3.1 進入待辦事項頁面
進入待辦事項頁面需要根據路由參數(傳遞的日期)判斷是否是今天,是今天則展示動态的數字時鐘。
還需要根據路由參數從緩存中讀取待辦事項資料,并設定給
list
,用于頁面展示。調用官網API的
storage.get()
方法,由于後續修改資料可能涉及多層回調,考慮到代碼可讀性,将從緩存中讀資料操作用
Promise
封裝。
// day.js
data: {
	keyword: "", // 輸入框内容
	list: [],
	//        list: [
	//            { title: '學習鴻蒙OS', done: false },
	//            { title: '學習js開發鴻蒙應用', done: true },
	//            { title: '學習java開發鴻蒙應用', done: false },
	//            { title: '學習鴻蒙OS', done: false },
	//        ],
	currentDate: '', // 上個頁面傳來的選擇日期
	clock: '', // 今天的時鐘
	timerID: null,
	istoday: false, // 是否今天
	noTodoTips: {
		todayTxt: '請先添加今天的待辦事項吧!',
		notTodayTxt: '當日還沒有待辦事項!'
	},
	isListEmpty: false,
	isDoneEmpty: false,
	isUnDoneEmpty: false
},
onInit() {
    // 判斷是否是今天
    this.istoday = (new Date(this.currentDate).toDateString() === new Date().toDateString());
    if (this.istoday) { // 如果是今天則顯示時鐘
        this.timerID = setInterval(this.updateTime, 1000);
        this.updateTime();
    }
    this.setList();
},
// 從緩存中拿資料并指派給list
async setList() {
	let res = await this.getListFromStorage(this.currentDate);
	this.list = res;

	// 用于控制總、未完成、完成的視圖顯示
	this.isListEmpty = (this.list.length == 0);
	this.isUnDoneEmpty = (this.list.filter(item => !item.done).length == 0);
	this.isDoneEmpty = (this.list.filter(item => item.done).length == 0);
},
getListFromStorage(key) {
	return new Promise((resolve, reject) => {
		storage.get({
			key: key,
			success: function(data) {
                resolve(JSON.parse(data));
			},
			fail: function(data, code) {
				reject(JSON.parse(data));
			},
			complete: function() {},
			default: [] // key不存在則傳回的預設值
		});
	});
},
updateTime() {
	let now = new Date();
	this.clock =
		this.zeroPadding(now.getHours(), 2)
		+ ':' +
		this.zeroPadding(now.getMinutes(), 2)
		+ ':' +
		this.zeroPadding(now.getSeconds(), 2);
},
zeroPadding(num, digit) {
	let zero = '';
	for (let i = 0; i < digit; i++) {
		zero += '0';
	}
	return (zero + num).slice(-digit);
},
3.2 分别展示全部、未完成、已完成待辦事項
使用
tabs
元件和清單元件
list
渲染分别展示全部、未完成和已完成待辦事項。
若無資料,全部區域展示 “請先添加今天的待辦事項吧!”,已完成和未完成區域展示無資料圖檔。
<!-- day.hml -->
<div class="container">
    <div class="time-area">
        <text class="select-date">
            <span>{{ currentDate }} {{ getWeek }}</span>
        </text>
        <text class="today-time">
            <span if="{{ istoday }}">{{ clock }}</span>
        </text>
    </div>
    <tabs class="tabs" onchange="tabChange">
        <tab-bar class="tabBar">
            <text class="tabBarItem all">全部({{ getListSum }})</text>
            <text class="tabBarItem undo">未完成({{ getUndoSum }})</text>
            <text class="tabBarItem done">已完成({{ getDoneSum }})</text>
        </tab-bar>
        <tab-content class="tabContent">
            <div>
                <div if="{{ isListEmpty }}" class="no-data-all">
                    <text>
                        <span>{{ (getListSum == 0) && istoday ?  noTodoTips.todayTxt : noTodoTips.notTodayTxt}}</span>
                    </text>
                </div>
                <list class="todo-list" else>
                    <list-item class="todo-item" for="{{ list }}">
                        <div class="todo-item-inner">
                            <input type="checkbox" onchange="changeStatus($idx)" checked="{{ $item.done }}"></input>
                            <piece content="{{ $item.title }}" closable="true" onclose="remove($idx)" class="piece-item"></piece>
                        </div>
                    </list-item>
                </list>
            </div>
            <div>
                <div if="{{ isUnDoneEmpty }}" class="no-data-img">
                    <image class="no-data-images img-way" src="../../common/images/no_data.jpg" style="width: 200px;"></image>
                </div>
                <list class="todo-list" else>
                    <list-item class="todo-item" for="{{ list }}">
                        <div class="todo-item-inner" if="{{ !$item.done }}">
                            <input type="checkbox" onchange="changeStatus($idx)" checked="{{ $item.done }}"></input>
                            <piece content="{{ $item.title }}" closable="true" onclose="remove($idx)" class="piece-item"></piece>
                        </div>
                    </list-item>
                </list>
            </div>
            <div>
                <div if="{{ isDoneEmpty }}" class="no-data-img">
                    <image class="no-data-images img-way" src="../../common/images/no_data.jpg" style="width: 200px;"></image>
                </div>
                <list class="todo-list" else>
                    <list-item class="todo-item" for="{{ list }}">
                        <div class="todo-item-inner" if="{{ $item.done }}">
                            <input type="checkbox" onchange="changeStatus($idx)" checked="{{ $item.done }}"></input>
                            <piece content="{{ $item.title }}" closable="true" onclose="remove($idx)" class="piece-item"></piece>
                        </div>
                    </list-item>
                </list>
            </div>
        </tab-content>
    </tabs>

    <div class="header">
        <input
            id="addinp"
            class="input"
            type="text"
            value="{{ keyword }}"
            maxlength="20"
            enterkeytype="done"
            placeholder="請輸入待辦事項"
            onchange="change">
        </input>
        <button class="buttons" @click="add">添加</button>
    </div>
</div>
在計算屬性中計算全部、未完成、已完成的個數,用于
tabs
展示。
// day.js
	computed: {
		// 全部個數
		getListSum() {
			return
            	Object.prototype.toString.call(this.list) == '[object Array]' ? this.list.length : 0;
		},
		// 傳回未完成項目的個數
		getUndoSum() {
			return this.list.filter(item => !item.done).length;
		},
		// 傳回完成項目的個數
		getDoneSum() {
			return this.list.filter(item => item.done).length;
		},
		// 星期幾
		getWeek() {
			let week = ['天', '一', '二', '三', '四', '五', '六'];
			let day = (new Date(this.currentDate)).getDay();
			return '星期' + week[day];
		}
    },
3.3 添加待辦事項
在輸入框中輸入内容,點選添加按鈕,添加待辦事項,并調用
storage.set()
API将
list
存在緩存中,成功之後更新
list
以更新視圖。若輸入框無内容,使用
prompt.showToast
提示輸入内容。
// day.js
change(e) {
    this.keyword = e.value;
},
add() {
    if (this.keyword === "") return prompt.showToast({
        message: "請輸入内容"
    })
    this.list.push({ title: this.keyword, done: false });
    this.keyword = "";
    this.setStorage();
},
// 封裝函數供修改或者添加緩存中的資料
setStorage() {
	const self = this;
	storage.set({
		key: this.currentDate,
		value: JSON.stringify(this.list),
		success: function() {
			self.setList();
		},
		fail: function(data, code) {}
	});
},
3.4 完成 / 取消待辦事項
點選選擇框,勾選或者取消勾選待辦事項,并設定緩存。
// day.js
changeStatus(index) {
    this.list[index].done = !this.list[index].done;
    this.setStorage();
},
3.5 删除待辦事項
使用
piece
元件的
onclose
事件删除待辦事項,删除前使用
prompt.showDialog
彈窗方法詢問是否删除,點選确認後删除,并設定緩存。
// day.js
showDialog(options = {}) {
    if (JSON.stringify(options) == "{}") return;
    prompt.showDialog(options);
},
remove(index) {
    let self = this;
    let options = {
        message: "确定要删除嗎?",
        buttons: [
            {
                text: '确定',
                color: '#87cbff',
            },
            {
                text: '取消',
                color: '#666666',
            },
        ],
        success: function(data) {
            if(data.index == 0){
                self.list.splice(index, 1);
                self.setStorage();
            }
        },
        cancel: function() {
            console.log('dialog cancel callback');
        },
    };
    this.showDialog(options);
},
總結
以上就是完成帶日期緩存效果的待辦事項的全部過程了,算是對鴻蒙JS開發快速上手的初步認識吧, 後期還可以對其完善,比如在樣式、功能方面等等,希望可以和大家共同學習鴻蒙更多的知識,一起進步。
更多原創内容請關注:中軟國際 HarmonyOS 技術團隊
入門到精通、技巧到案例,系統化分享HarmonyOS開發技術,歡迎投稿和訂閱,讓我們一起攜手前行共建鴻蒙生态。
![初學者試試,HarmonyOS應用開發者基礎認證[圖]](data:image/gif;base64,R0lGODlhAQABAIAAAP///wAAACwAAAAAAQABAAACAkQBADs=)