1. pwd:顯示目前所在的位置
# 顯示目前工作目錄的絕對路徑
[15:31:44 root@node00 tmp]# pwd
/tmp

# 如果目前目錄是軟連結目錄,則顯示軟連結目錄的實體路徑
[15:35:54 root@node00 a]# pwd -P
/tmp/a

# 如果目前目錄是軟連結目錄,還是顯示邏輯路徑(預設)
[15:35:58 root@node00 a]# pwd -L
/tmp/b/a

# 使用PWD環境變量輸出目前目錄的絕對路徑
[15:47:10 root@node00 a]# echo $PWD
/tmp/b/a
複制
2. cd:切換目錄
# 切換到home目錄,由環境變量$HOME決定
[15:47:51 root@node00 a]# cd

# 切換到home目錄,由環境變量$HOME決定
[15:47:51 root@node00 a]# cd ~

# 切換到上一個工作目錄
[15:50:02 root@node00 ~]# cd -

# 傳回上一級目錄
[15:50:51 root@node00 ~]# cd ..

# 切換到軟連結目錄的源目錄
[15:52:20 root@node00 /]# cd /tmp/b/a -P

# 切換到軟連結目錄的邏輯目錄
[15:52:20 root@node00 /]# cd /tmp/b/a -L
複制
3. tree:以樹型結構顯示目錄下的内容
# 安裝tree指令
[16:00:29 root@node00 tmp]# yum install -y tree

[15:56:16 root@node00 tmp]# tree /tmp
/tmp
├── a
├── b
│   └── a -> /tmp/a
├── b.txt
├── hsperfdata_root
├── systemd-private-62ed86d1fa3b4a8d8e0f50e9957c5c73-chronyd.service-UIg3EK
│   └── tmp
├── vmware-root_811-4290756501
├── vmware-root_821-4290232204
└── vmware-root_832-2730693535

# 顯示所有檔案,包括隐藏檔案
[15:57:05 root@node00 tmp]# tree -a ~
/root
├── .bash_history
├── .bash_logout
├── .bash_profile
├── .bashrc
├── .cshrc
├── .lesshst
├── .pki
│   └── nssdb
├── .tcshrc
└── .viminfo

# 隻顯示目錄
[15:57:05 root@node00 tmp]# tree -d /tmp

# 顯示每個檔案的絕對路徑
[15:57:05 root@node00 tmp]# tree -f /tmp
[15:57:53 root@node00 tmp]# tree -f /tmp
/tmp
├── /tmp/a
├── /tmp/b
│   └── /tmp/b/a -> /tmp/a
├── /tmp/b.txt
├── /tmp/hsperfdata_root
├── /tmp/systemd-private-62ed86d1fa3b4a8d8e0f50e9957c5c73-chronyd.service-UIg3EK
│   └── /tmp/systemd-private-62ed86d1fa3b4a8d8e0f50e9957c5c73-chronyd.service-UIg3EK/tmp
├── /tmp/vmware-root_811-4290756501
├── /tmp/vmware-root_821-4290232204
└── /tmp/vmware-root_832-2730693535

# 不顯示樹枝
[15:58:53 root@node00 tmp]# tree -if /tmp
/tmp
/tmp/a
/tmp/b
/tmp/b/a -> /tmp/a
/tmp/b.txt
/tmp/hsperfdata_root
/tmp/systemd-private-62ed86d1fa3b4a8d8e0f50e9957c5c73-chronyd.service-UIg3EK
/tmp/systemd-private-62ed86d1fa3b4a8d8e0f50e9957c5c73-chronyd.service-UIg3EK/tmp
/tmp/vmware-root_811-4290756501
/tmp/vmware-root_821-4290232204
/tmp/vmware-root_832-2730693535

# 指定最大周遊層數
[16:00:25 root@node00 tmp]# tree -L 1 /tmp
/tmp
├── a
├── b
├── b.txt
├── hsperfdata_root
├── systemd-private-62ed86d1fa3b4a8d8e0f50e9957c5c73-chronyd.service-UIg3EK
├── vmware-root_811-4290756501
├── vmware-root_821-4290232204
└── vmware-root_832-2730693535

# 在檔案末尾加上檔案類型辨別符
# /:目錄
# *:執行檔案
# =:Socket
# @:符号連接配接
# |:管道
[16:02:24 root@node00 tmp]# tree -F /tmp
/tmp
├── a/
├── b/
│   └── a -> /tmp/a/
├── b.txt
├── hsperfdata_root/
├── systemd-private-62ed86d1fa3b4a8d8e0f50e9957c5c73-chronyd.service-UIg3EK/
│   └── tmp/
├── vmware-root_811-4290756501/
├── vmware-root_821-4290232204/
└── vmware-root_832-2730693535/
複制
4. mkdir:建立目錄
# 建立目錄,如果目錄已經存在,則給出提示
[16:05:35 root@node00 tmp]# mkdir test

# 遞歸建立目錄
[16:05:35 root@node00 tmp]# mkdir -p /test/a/b/c

# 列印建立目錄的過程
[16:05:39 root@node00 tmp]# mkdir -pv /tmp/test/a/b/c
mkdir: created directory ‘/tmp/test/a’
mkdir: created directory ‘/tmp/test/a/b’
mkdir: created directory ‘/tmp/test/a/b/c’

# 建立目錄并設定權限,遞歸建立的目錄隻有第一層目錄具有該權限
[16:08:33 root@node00 tmp]# mkdir -p -m 600 /tmp/test2
複制
5. touch:建立檔案或者更該檔案時間戳
# 如果檔案不存在,則建立該檔案,否則更新該檔案的時間戳
[16:11:34 root@node00 tmp]# touch a.txt

# 建立多個檔案
[16:11:34 root@node00 tmp]# touch a.txt b.txt

# 批量建立檔案,注意是兩個點
touch test{0..5}.txt

# 檢視檔案時間戳
[16:16:34 root@node00 tmp]# stat a.txt
  File: ‘a.txt’
  Size: 0           Blocks: 0          IO Block: 4096   regular empty file
Device: 803h/2051d  Inode: 16777289    Links: 1
Access: (0644/-rw-r--r--)  Uid: (    0/    root)   Gid: (    0/    root)
# 最新通路時間
Access: 2020-04-08 16:13:23.390704295 +0800
# 最新修改時間
Modify: 2020-04-08 16:13:23.390704295 +0800
# 最新的狀态改變時間
Change: 2020-04-08 16:13:23.390704295 +0800

# 隻修改通路時間(修改通路時間會自動更新狀态改變時間),不加參數的話預設同時修改3個時間
[16:17:46 root@node00 tmp]# touch -a a.txt
[16:19:14 root@node00 tmp]# stat a.txt
  File: ‘a.txt’
  Size: 0           Blocks: 0          IO Block: 4096   regular empty file
Device: 803h/2051d  Inode: 16777289    Links: 1
Access: (0644/-rw-r--r--)  Uid: (    0/    root)   Gid: (    0/    root)
Access: 2020-04-08 16:19:14.359872616 +0800
Modify: 2020-04-08 16:13:23.390704295 +0800
Change: 2020-04-08 16:19:14.359872616 +0800

# 隻修改修改時間(修改修改時間會自動更新狀态改變時間)
[16:19:15 root@node00 tmp]# touch -m a.txt
[16:19:36 root@node00 tmp]# stat a.txt
  File: ‘a.txt’
  Size: 0           Blocks: 0          IO Block: 4096   regular empty file
Device: 803h/2051d  Inode: 16777289    Links: 1
Access: (0644/-rw-r--r--)  Uid: (    0/    root)   Gid: (    0/    root)
Access: 2020-04-08 16:19:14.359872616 +0800
Modify: 2020-04-08 16:19:36.322009588 +0800
Change: 2020-04-08 16:19:36.322009588 +0800

# 手動指定修改時間 -d yyyyMMdd
[16:23:29 root@node00 tmp]# touch -d 20200408 a.txt
[16:23:36 root@node00 tmp]# stat a.txt
  File: ‘a.txt’
  Size: 0           Blocks: 0          IO Block: 4096   regular empty file
Device: 803h/2051d  Inode: 16777289    Links: 1
Access: (0644/-rw-r--r--)  Uid: (    0/    root)   Gid: (    0/    root)
Access: 2020-04-08 00:00:00.000000000 +0800
Modify: 2020-04-08 00:00:00.000000000 +0800
Change: 2020-04-08 16:23:36.233505783 +0800

# 手動指定修改時間 -t yyyyMMddHHmm.ss
[16:24:50 root@node00 tmp]# touch -t 202004081620.50 a.txt
[16:26:02 root@node00 tmp]# stat a.txt
  File: ‘a.txt’
  Size: 0           Blocks: 0          IO Block: 4096   regular empty file
Device: 803h/2051d  Inode: 16777289    Links: 1
Access: (0644/-rw-r--r--)  Uid: (    0/    root)   Gid: (    0/    root)
Access: 2020-04-08 16:20:50.000000000 +0800
Modify: 2020-04-08 16:20:50.000000000 +0800
Change: 2020-04-08 16:26:02.889420414 +0800

# 設定檔案時間戳與另一個指定檔案的時間戳相同
[16:23:40 root@node00 tmp]# stat b.txt
  File: ‘b.txt’
  Size: 0           Blocks: 0          IO Block: 4096   regular empty file
Device: 803h/2051d  Inode: 16809902    Links: 1
Access: (0644/-rw-r--r--)  Uid: (    0/    root)   Gid: (    0/    root)
Access: 2020-04-08 16:13:23.390704295 +0800
Modify: 2020-04-08 16:13:23.390704295 +0800
Change: 2020-04-08 16:13:23.390704295 +0800
 Birth: -

# 将b.txt的時間戳賦給a.txt
[16:24:21 root@node00 tmp]# touch -r b.txt a.txt
[16:24:47 root@node00 tmp]# stat a.txt
  File: ‘a.txt’
  Size: 0           Blocks: 0          IO Block: 4096   regular empty file
Device: 803h/2051d  Inode: 16777289    Links: 1
Access: (0644/-rw-r--r--)  Uid: (    0/    root)   Gid: (    0/    root)
Access: 2020-04-08 16:13:23.390704295 +0800
Modify: 2020-04-08 16:13:23.390704295 +0800
Change: 2020-04-08 16:24:47.059947500 +0800
 Birth: -
複制
6. ls:顯示目錄下内容及屬性資訊
- ls指令使用
# 顯示所有檔案和目錄
[16:29:31 root@node00 test]# ls
a.txt  b.txt  dir01  dir02

# 顯示所有檔案和目錄,包括隐藏目錄
[16:29:33 root@node00 test]# ls -a
.  ..  a.txt  b.txt  dir01  dir02

# 列出檔案和目錄的詳細屬性
[16:30:08 root@node00 test]# ls -l
total 0
-rw-r--r-- 1 root root 0 Apr  8 16:29 a.txt
-rw-r--r-- 1 root root 0 Apr  8 16:29 b.txt
drwxr-xr-x 2 root root 6 Apr  8 16:29 dir01
drwxr-xr-x 2 root root 6 Apr  8 16:29 dir02

# 根據最後修改時間進行排序,預設根據檔案名進行排序
16:30:35 root@node00 test]# ls -t
dir01  dir02  a.txt  b.txt

# 根據排序規則的相反順序進行排序
[16:32:23 root@node00 test]# ls -tr
b.txt  a.txt  dir02  dir01

# 在檔案末尾加上檔案類型辨別符
# /:目錄
# *:執行檔案
# =:Socket
# @:符号連接配接
# |:管道
[16:32:45 root@node00 test]# ls -F
a.txt  b.txt  dir01/  dir02/

# 隻在目錄後在"/"辨別符,其他類型的不加辨別符号
[16:36:28 root@node00 test]# ls -p
a.txt  b.txt  dir01/  dir02/

# 隻顯示目錄,目标是目錄,則顯示該目錄,不列出該目錄下的檔案
[16:36:17 root@node00 test]# ls -d dir01
dir01

# 顯示Inode資訊
[16:37:13 root@node00 test]# ls -i
17989879 a.txt  16809902 b.txt  34192561 dir01  50602242 dir02

# 人性化的顯示檔案的大小,需要與l配套使用
[16:39:31 root@node00 jdk1.8.0_241]# ls -lh
total 26M
drwxr-xr-x. 2 10143 10143 4.0K Dec 11 18:35 bin
-r--r--r--. 1 10143 10143 3.2K Dec 11 18:35 COPYRIGHT
drwxr-xr-x. 3 10143 10143  132 Dec 11 18:35 include
-rw-r--r--. 1 10143 10143 5.0M Dec 11 15:41 javafx-src.zip
drwxr-xr-x. 5 10143 10143  185 Dec 11 18:35 jre
drwxr-xr-x. 5 10143 10143  245 Dec 11 18:35 lib
-r--r--r--. 1 10143 10143   44 Dec 11 18:35 LICENSE
drwxr-xr-x. 4 10143 10143   47 Dec 11 18:35 man
-r--r--r--. 1 10143 10143  159 Dec 11 18:35 README.html
-rw-r--r--. 1 10143 10143  424 Dec 11 18:35 release
-rw-r--r--. 1 10143 10143  21M Dec 11 18:35 src.zip
-rw-r--r--. 1 10143 10143 114K Dec 11 15:41 THIRDPARTYLICENSEREADME-JAVAFX.txt
-r--r--r--. 1 10143 10143 166K Dec 11 18:35 THIRDPARTYLICENSEREADME.txt

# 顯示除了"."和".."之外的所有的檔案和目錄,包括隐藏檔案
[16:40:24 root@node00 ~]# ls -A
.bash_history  .bash_logout  .bash_profile  .bashrc  .cshrc  .lesshst  .pki  .tcshrc  .viminfo

# 根據檔案大小降序排序
[16:42:36 root@node00 lib]# ls -S
tools.jar  ant-javafx.jar  jconsole.jar  javafx-mx.jar  jexec         orb.idl         visualvm
ct.sym     sa-jdi.jar      dt.jar        ir.idl         packager.jar  missioncontrol  amd64

# 遞歸列出所有子目錄
[16:43:20 root@node00 jdk1.8.0_241]# ls -R

# 逐行列出項目而不是逐欄列出
[16:43:20 root@node00 jdk1.8.0_241]# ls -x
bin      COPYRIGHT  include                             javafx-src.zip               jre  lib  LICENSE  man  README.html
release  src.zip    THIRDPARTYLICENSEREADME-JAVAFX.txt  THIRDPARTYLICENSEREADME.txt

# 根據擴充名進行排序
[16:44:13 root@node00 jdk1.8.0_241]# ls -X
bin        include  lib      man      README.html                         THIRDPARTYLICENSEREADME.txt  src.zip
COPYRIGHT  jre      LICENSE  release  THIRDPARTYLICENSEREADME-JAVAFX.txt  javafx-src.zip

# 根據狀态改變時間進行排序
[16:45:05 root@node00 jdk1.8.0_241]# ls -c

# 根據狀态最後通路時間進行排序
[16:45:05 root@node00 jdk1.8.0_241]# ls -u

# 是否使用顔色來區分不同的檔案
# auto:自動顯示(預設)
# never:不顯示
# always:總是顯示
[16:47:03 root@node00 test]# ls --color=auto
a.txt  b.txt  dir01  dir02

# 以完整的時間格式輸出
[16:47:20 root@node00 test]# ls --full-time
total 4
-rw-r--r-- 1 root root 11 2020-04-08 16:38:32.326683692 +0800 a.txt
-rw-r--r-- 1 root root  0 2020-04-08 16:29:22.658730596 +0800 b.txt
drwxr-xr-x 2 root root  6 2020-04-08 16:29:30.261785276 +0800 dir01
drwxr-xr-x 2 root root  6 2020-04-08 16:29:30.261785276 +0800 dir02

# 顯示狀态改變時間,與l選項配合使用(預設使用檔案的最後修改時間)
[16:49:47 root@node00 test]# ls -l --time=ctime
total 4
-rw-r--r-- 1 root root 11 Apr  8 16:38 a.txt
-rw-r--r-- 1 root root  0 Apr  8 16:29 b.txt
drwxr-xr-x 2 root root  6 Apr  8 16:29 dir01
drwxr-xr-x 2 root root  6 Apr  8 16:29 dir02

# 顯示最後通路時間,與l選項配合使用(預設使用檔案的最後修改時間)
[16:49:53 root@node00 test]# ls -l --time=atime
total 4
-rw-r--r-- 1 root root 11 Apr  8 16:29 a.txt
-rw-r--r-- 1 root root  0 Apr  8 16:29 b.txt
drwxr-xr-x 2 root root  6 Apr  8 16:29 dir01
drwxr-xr-x 2 root root  6 Apr  8 16:29 dir02

# 設定時間格式,與l選項配合使用
[16:52:19 root@node00 test]# ls -l --time-style=full-iso
total 4
-rw-r--r-- 1 root root 11 2020-04-08 16:38:32.326683692 +0800 a.txt
-rw-r--r-- 1 root root  0 2020-04-08 16:29:22.658730596 +0800 b.txt
drwxr-xr-x 2 root root  6 2020-04-08 16:29:30.261785276 +0800 dir01
drwxr-xr-x 2 root root  6 2020-04-08 16:29:30.261785276 +0800 dir02
[16:52:25 root@node00 test]# ls -l --time-style=long-iso
total 4
-rw-r--r-- 1 root root 11 2020-04-08 16:38 a.txt
-rw-r--r-- 1 root root  0 2020-04-08 16:29 b.txt
drwxr-xr-x 2 root root  6 2020-04-08 16:29 dir01
drwxr-xr-x 2 root root  6 2020-04-08 16:29 dir02
[16:52:49 root@node00 test]# ls -l --time-style=iso
total 4
-rw-r--r-- 1 root root 11 04-08 16:38 a.txt
-rw-r--r-- 1 root root  0 04-08 16:29 b.txt
drwxr-xr-x 2 root root  6 04-08 16:29 dir01
drwxr-xr-x 2 root root  6 04-08 16:29 dir02
[16:52:57 root@node00 test]# ls -l --time-style=locale
total 4
-rw-r--r-- 1 root root 11 Apr  8 16:38 a.txt
-rw-r--r-- 1 root root  0 Apr  8 16:29 b.txt
drwxr-xr-x 2 root root  6 Apr  8 16:29 dir01
drwxr-xr-x 2 root root  6 Apr  8 16:29 dir02

# 找到最新建立的檔案
[17:06:25 root@node00 test]# ls -ltr
total 4
-rw-r--r-- 1 root root  0 Apr  8 16:29 b.txt
drwxr-xr-x 2 root root  6 Apr  8 16:29 dir02
drwxr-xr-x 2 root root  6 Apr  8 16:29 dir01
-rw-r--r-- 1 root root 11 Apr  8 16:38 a.txt
複制
- 給ls指令起别名
# 檢視系統預設的ls别名
[16:53:05 root@node00 test]# alias | grep ls
alias l.='ls -d .* --color=auto'
alias ll='ls -l --color=auto'
alias ls='ls --color=auto'

# 自定義别名(臨時生效)
[16:56:48 root@node00 test]# alias lst='ls -l --time-style=long-iso --color=auto'
[17:00:47 root@node00 test]# lst
total 4
-rw-r--r-- 1 root root 11 2020-04-08 16:38 a.txt
-rw-r--r-- 1 root root  0 2020-04-08 16:29 b.txt
drwxr-xr-x 2 root root  6 2020-04-08 16:29 dir01
drwxr-xr-x 2 root root  6 2020-04-08 16:29 dir02

# 自定義别名(永久生效)
# 編輯/etc/bashrc檔案,将别名的配置加入其中

# System wide functions and aliases
# Environment stuff goes in /etc/profile
alias lst='ls -l --time-style=long-iso --color=auto'

# 儲存退出然後 source /etc/bashrc
複制
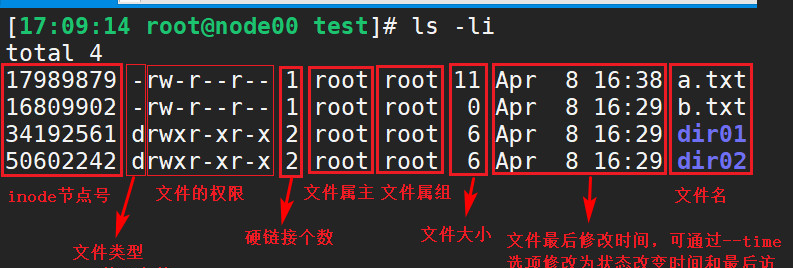
- 使用
ls -li
7. cp:複制檔案或目錄
-
cp
# 将a.txt複制為a2.txt
[17:10:53 root@node00 test]# cp a.txt a2.txt
# 如果a是一個軟連結,則複制後的檔案c也是一個軟連結,由a的源檔案指定c
[17:46:15 root@node00 test]# cp -d a c
[17:46:26 root@node00 test]# ll
total 12
lrwxrwxrwx 1 root root  5 2020-04-08 17:45 a -> a.txt
-rw-r--r-- 1 root root 11 2020-04-08 16:38 a.txt
lrwxrwxrwx 1 root root  5 2020-04-08 17:46 c -> a.txt

# 複制後的檔案保留原檔案的屬性:所有者、所屬組、權限以及時間戳
[17:46:15 root@node00 test]# cp -p a.txt a3.txt
[17:46:27 root@node00 test]# cp -p a.txt a3.txt
[17:49:24 root@node00 test]# stat a.txt
  File: ‘a.txt’
  Size: 11          Blocks: 8          IO Block: 4096   regular file
Device: 803h/2051d  Inode: 17989879    Links: 1
Access: (0644/-rw-r--r--)  Uid: (    0/    root)   Gid: (    0/    root)
Access: 2020-04-08 17:44:23.713472120 +0800
Modify: 2020-04-08 16:38:32.326683692 +0800
Change: 2020-04-08 16:38:32.326683692 +0800
 Birth: -
[17:49:28 root@node00 test]# stat a3.txt
  File: ‘a3.txt’
  Size: 11          Blocks: 8          IO Block: 4096   regular file
Device: 803h/2051d  Inode: 17989880    Links: 1
Access: (0644/-rw-r--r--)  Uid: (    0/    root)   Gid: (    0/    root)
Access: 2020-04-08 17:44:23.713472120 +0800
Modify: 2020-04-08 16:38:32.326683692 +0800
Change: 2020-04-08 17:49:24.921869537 +0800

# 遞歸複制目錄以及子目錄和檔案
[17:51:42 root@node00 test]# cp -r dir01 dir03

# -a:等同于-pdr
[17:51:42 root@node00 test]# cp -a dir01 dir04

# 如果目标檔案存在,提示使用者是否進行覆寫
# 預設cp帶-i選項,因為系統定義了cp的别名
[17:52:11 root@node00 test]# cp -i a.txt a2.txt
cp: overwrite ‘a2.txt’? y/n
[17:58:40 root@node00 test]# alias | grep cp
alias cp='cp -i'

# 将多個檔案複制到指定的目錄中
[17:58:08 root@node00 test]# cp a.txt a2.txt dir01
[17:58:35 root@node00 test]# ls dir01/
a2.txt  a.txt
# 如果目标參數在前,需要使用-t選項
[17:58:39 root@node00 test]# cp -t dir02 a.txt a2.txt
[17:58:40 root@node00 test]# ls dir02/
a2.txt  a.txt

# 當檔案路徑重複時,可以使用{}來快捷書寫
# 以下兩種寫法是等效的
[18:06:15 root@node00 test]# cp /etc/ssh/sshd_config /etc/ssh/sshd_config.bak
[18:07:29 root@node00 test]# cp /etc/ssh/sshd_config{,.bak}
複制
- 讓
cp
-i
# 1.使用指令絕對路徑,這樣就不會使用别名
[17:59:30 root@node00 test]# which cp
alias cp='cp -i'
    /usr/bin/cp
[18:01:02 root@node00 test]# /usr/bin/cp a.txt a2.txt

# 2.指令開頭使用"\"
[18:01:17 root@node00 test]# \cp a.txt a2.txt

# 3.臨時取消cp的别名
unalias cp

# 4.永久取消cp的别名
# 修改/root/bashrc

# User specific aliases and functions

alias rm='rm -i'
# 注釋掉之後,儲存退出,source /root/bashrc
# alias cp='cp -i'
alias mv='mv -i'
複制
8. mv:移動或者重命名檔案
# 将a.txt的名稱修改為aa.txt
# 如果目标檔案是一個已經存在的目錄,則把目标檔案移動到該目錄下
[18:11:01 root@node00 test]# mv a.txt aa.txt

# 如果目标檔案已經存在,則不會詢問是否覆寫,而是直接覆寫
[18:13:41 root@node00 test]# mv -f a.txt a2.txt

# 如果目标檔案已經存在,則詢問是否覆寫,而不是直接覆寫
[18:13:41 root@node00 test]# mv -i a.txt a2.txt
# mv預設使用-i選項,因為系統内置了mv的别名
[18:19:20 root@node00 test]# alias | grep mv
alias mv='mv -i'

# 如果目标檔案已經存在,則不會覆寫目标檔案,而是什麼也不做
[18:13:41 root@node00 test]# mv -n a.txt a2.txt

# 隻有在源檔案比目标檔案新,或者目标檔案不存在的時候,才進行移動
[18:13:41 root@node00 test]# mv -u a.txt a2.txt

# 移動多個檔案到指定目錄下
# 如果目标目錄在前,需要使用-t選項
[18:13:50 root@node00 test]# mv a2.txt a3.txt dir02/
# 把dir02/a2.txt dir02/a3.txt這兩個檔案移動到dir03目錄下
[18:17:13 root@node00 test]# mv -t dir03 dir02/a2.txt dir02/a3.txt
複制
9. rm:删除檔案或者目錄
# 删除檔案
[18:24:09 root@node00 test]# rm a.txt
rm: remove regular file ‘a.txt’? y

# 強制删除,忽略不存在的檔案,不提示是否确認删除
[18:24:18 root@node00 test]# rm -f b

# 删除之前詢問是否删除,預設詢問,因為系統别名中設定了
[18:24:18 root@node00 test]# rm -i b
[18:25:29 root@node00 test]# alias | grep rm
alias rm='rm -i'

# 遞歸删除目錄
[18:26:45 root@node00 test]# rm -rf dir01

# 在删除超過三個檔案或者遞歸删除前要求确認
[18:28:11 root@node00 test]# rm -rI dir04
rm: remove 1 argument recursively? y
複制
10. 危險操作
- CentOS7中,執行
rm -rf /
[18:28:31 root@node00 test]# rm -rf /
rm: it is dangerous to operate recursively on ‘/’
rm: use --no-preserve-root to override this failsafe
複制
- 執行
rm -rf --no-preserve-root /
/
- 執行
rm -rf /*
/
- 執行
rm -rf ./*
rm -rf ./test/*
rm -rf ./test/ *
/