配置詳解
1、接口服務工程的pom檔案中引入swagger2
<dependency>
<groupId>io.springfox</groupId>
<artifactId>springfox-swagger2</artifactId>
<version>2.7.0</version>
</dependency>
<dependency>
<groupId>io.springfox</groupId>
<artifactId>springfox-swagger-ui</artifactId>
<version>2.7.0</version>
</dependency>
2、注入swagger配置
@Configuration
@EnableSwagger2
public class SwaggerConfig {
@Bean
public Docket createRestApi() {
return new Docket(DocumentationType.SWAGGER_2)
.apiInfo(apiInfo())
.select()
.apis(RequestHandlerSelectors.basePackage("com.xx.xx"))
.apis(RequestHandlerSelectors.withClassAnnotation(Api.class))
.apis(RequestHandlerSelectors.withMethodAnnotation(ApiOperation.class))
.paths(PathSelectors.any())
.build();
}
private ApiInfo apiInfo() {
return new ApiInfoBuilder()
.title("example系統接口文檔")
.description("這是系統接口文檔說明")
.contact(new Contact("XXXX", "", ""))
.version("1.0")
.build();
}
@Bean
UiConfiguration uiConfig() {
return new UiConfiguration(null, "list", "alpha", "schema",
UiConfiguration.Constants.DEFAULT_SUBMIT_METHODS, false, true, 60000L);
}
}
3、在接口(controller)添加swagger注解
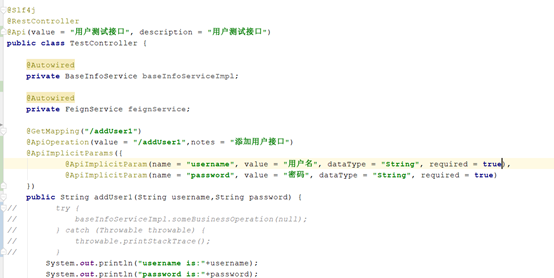
詳細注解下邊會做詳細解釋
4、啟動類加注解
@EnableSwagger2
單個項目配置swagger2已經完成,通路http://127.0.0.1:8081/rest/swagger-ui.html

5、網關工程引入swagger的pom(同1)
6、網關工程注入swagger2配置
@Configuration
@EnableSwagger2
public class Swagger2Config {
@Bean
public Docket createRestApi() {
return new Docket(DocumentationType.SWAGGER_2)
.apiInfo(apiInfo());
}
private ApiInfo apiInfo() {
return new ApiInfoBuilder()
.title("系統內建api")
.description("系統接口內建文檔說明")
.contact(new Contact("XXXX", "", ""))
.version("1.0")
.build();
}
}
7、網關內建接口工程swagger2(建議使用第二種)
網關搜尋配置
@Component
@Primary
public class DocumentationConfig implements SwaggerResourcesProvider {
@Override
public List<SwaggerResource> get() {
List resources = new ArrayList<>();
resources.add(swaggerResource("Hello接口", "/XX-api/aaa/rest/v2/api-docs", "1.0"));
resources.add(swaggerResource("檢查系統接口", "/XX-api/rest/v2/api-docs", "1.0"));
return resources;
}
private SwaggerResource swaggerResource(String name, String location, String version) {
SwaggerResource swaggerResource = new SwaggerResource();
swaggerResource.setName(name);
swaggerResource.setLocation(location);
swaggerResource.setSwaggerVersion(version);
return swaggerResource;
}
}
2、網關zuul配置檔案配置,自動搜尋(需同步配置檔案)
@Component
@Primary
public class DocumentationConfig implements SwaggerResourcesProvider {
private final RouteLocator routeLocator;
public DocumentationConfig(RouteLocator routeLocator) {
this.routeLocator = routeLocator;
}
@Override
public List<SwaggerResource> get() {
List<SwaggerResource> resources = new ArrayList<>();
List<Route> routes = routeLocator.getRoutes();
//在這裡周遊的時候,可以排除掉敏感微服務的路由
routes.forEach(route -> resources.add(swaggerResource(route.getId(), route.getFullPath().replace("**", "v2/api-docs"),"2.0")));
return resources;
}
private SwaggerResource swaggerResource(String name, String location, String version) {
SwaggerResource swaggerResource = new SwaggerResource();
swaggerResource.setName(name);
swaggerResource.setLocation(location);
swaggerResource.setSwaggerVersion(version);
return swaggerResource;
}
}
8、zuul配置
配置後,swagger2會根據routes配置去找對應的v2/api-docs。
當strip-prefix=true的時候 (http://127.0.0.1:8040/api/user/list -> http://192.168.1.100:8080/user/list)
當strip-prefix=false的時候(http://127.0.0.1: 8040/api/user/list -> http://192.168.1.100:8080/api/user/list)
strip-prefix會影響到查找接口工程swagger檔案,注意和上第7點中route.getFullPath().replace("**", "v2/api-docs"),"2.0")));配合。
9、網關啟動類加注解
@EnableSwagger2
通路:http://127.0.0.1:8040/swagger-ui.html
至此,zuul內建swagger2完畢。
常用注解
- @Api()用于類;
表示辨別這個類是swagger的資源
- @ApiOperation()用于方法;
表示一個http請求的操作
- @ApiParam()用于方法,參數,字段說明;
表示對參數的添加中繼資料(說明或是否必填等)
- @ApiModel()用于類
表示對類進行說明,用于參數用實體類接收
- @ApiModelProperty()用于方法,字段
表示對model屬性的說明或者資料操作更改
- @ApiIgnore()用于類,方法,方法參數
表示這個方法或者類被忽略
- @ApiImplicitParam() 用于方法
表示單獨的請求參數
- @ApiImplicitParams() 用于方法,包含多個 @ApiImplicitParam
具體參數說明:
@Api()
用于類;表示辨別這個類是swagger的資源
tags–表示說明
value–也是說明,可以使用tags替代
但是tags如果有多個值,會生成多個list
@ApiOperation() 用于方法;表示一個http請求的操作
value用于方法描述
notes用于提示内容
tags可以重新分組(視情況而用)
@ApiParam() 用于方法,參數,字段說明;表示對參數的添加中繼資料(說明或是否必填等)
name–參數名
value–參數說明
required–是否必填
@ApiModel()用于類 ;表示對類進行說明,用于參數用實體類接收
value–表示對象名
description–描述
都可省略
@ApiModelProperty()用于方法,字段; 表示對model屬性的說明或者資料操作更改
value–字段說明
name–重寫屬性名字
dataType–重寫屬性類型
required–是否必填
example–舉例說明
hidden–隐藏
@ApiIgnore()用于類或者方法上,可以不被swagger顯示在頁面上
比較簡單, 這裡不做舉例
@ApiImplicitParam() 用于方法
表示單獨的請求參數
@ApiImplicitParams() 用于方法,包含多個 @ApiImplicitParam
name–參數ming
value–參數說明
dataType–資料類型
paramType–參數類型
example–舉例說明
————————————————
版權聲明:本文為CSDN部落客「我願随風而行」的原創文章,遵循CC 4.0 BY-SA版權協定,轉載請附上原文出處連結及本聲明。
原文連結:https://blog.csdn.net/guozhangjie1992/article/details/95676729