《Redis5.x入門教程》目錄
- 第一章 · 準備工作
- 第二章 · 資料類型
- 第三章 · 指令
- 第四章 · 配置
- 第五章 · Java用戶端(上)
- 第六章 · 事務
- 第七章 · 分布式鎖
- 第八章 · Java用戶端(下)
第八章 · Java用戶端(下)
有關本章節源碼:https://github.com/yu-linfeng/redis5.x_tutorial/tree/master/code/spring-data-redis
Java用戶端(上)章節中我們使用了redis的Java用戶端的第三方開源架構——Jedis,但目前Java應用已經被Spring(Spring Boot)統治了大半江山,就連一些資料連接配接操作的封裝Spring也不放過,這其中也不乏有redis的封裝——
Spring Data Redis
。關于
Spring Data Redis
的官方介紹:https://spring.io/projects/spring-data-redis。
使用
Spring Data Redis
後,你會發現一切變得如此簡單,隻需要配置檔案即可做到開箱即用。
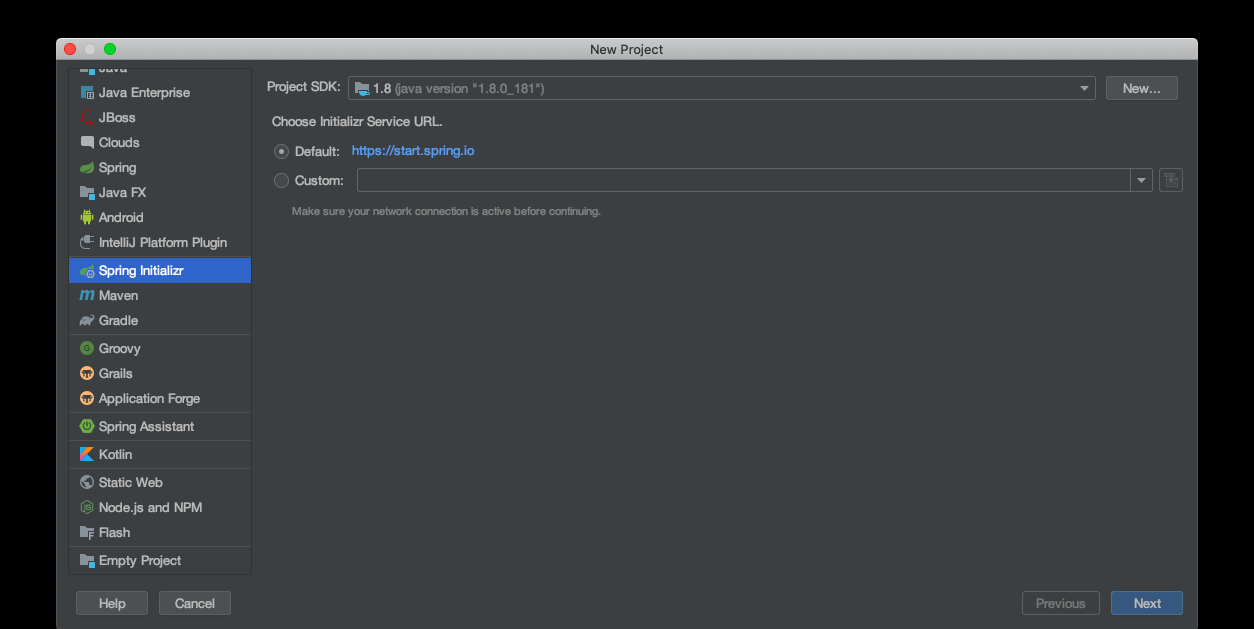
我們通過IDEA中的
Spring Initializer
建立Spring Boot工程,并選擇
Spring Data Redis
,主要步驟入下圖所示:
第一步,建立工程,選擇
Spring Initializr
。
第二步,選擇SpringBoot的依賴
NoSQL -> Spring Data Redis
。

建立好後,我們通過
ymal
格式的配置檔案
application.yml
配置相關配置項。
spring:
  redis:
    host: 127.0.0.1
    port: 6379
複制
Spring Data Redis
中操作redis的最關鍵的類是
RedisTemplate
,了解過
Spring Data
的朋友應該很熟悉
~Template
字尾,我們在配置好
application.yml
後直接寫一個測試類體驗一下,什麼是開箱即用:
package com.coderbuff.springdataredis;

import org.junit.jupiter.api.Test;
import org.springframework.beans.factory.annotation.Autowired;
import org.springframework.boot.test.context.SpringBootTest;
import org.springframework.data.redis.core.RedisTemplate;

@SpringBootTest
public class SpringDataRedisApplicationTests {

    @Autowired
    private RedisTemplate<String, String> redisTemplate;

    @Test
    void testDefaultRestTemplate() {
        redisTemplate.opsForValue().set("default_redis_template", "1");
    }
}
複制
什麼是開箱即用,這就是開箱即用。我們沒有再寫任何的類,隻需要兩行配置即可使用。
通常情況下,我們喜歡“封裝”,喜歡把
redisTemplate.opsForValue().set
這樣的操作封裝成工具類
redisUtil.set
,是以我們封裝一下
RedisTemplate
,順帶熟悉它的API。
package com.coderbuff.springdataredis.util;

import org.springframework.beans.factory.annotation.Autowired;
import org.springframework.data.redis.core.RedisTemplate;
import org.springframework.stereotype.Component;

import java.util.concurrent.TimeUnit;

/**
 * redis操作工具類
 * @author okevin
 * @date 2020/2/18 14:34
 */
@Component
public class RedisUtil {

    @Autowired
    private RedisTemplate<Object, Object> redisTemplate;

    /**
     * 字元串類型寫入操作
     * @param key key值
     * @param value value值
     */
    public void set(String key, String value) {
        this.redisTemplate.opsForValue().set(key, value);
    }

    /**
     * 可設定過期時間字元串類型寫入操作
     * @param key key值
     * @param value value值
     * @param expire 過期時間
     * @param timeUnit 過期時間機關
     */
    public void set(String key, String value, Long expire, TimeUnit timeUnit) {
        this.redisTemplate.opsForValue().set(key, value, expire, timeUnit);
    }

    /**
     * 字元串類型讀取操作
     * @param key key值
     * @return value值
     */
    public String get(String key) {
        return (String) this.redisTemplate.opsForValue().get(key);
    }
}
複制
編寫測試類:
package com.coderbuff.springdataredis.util;

import org.junit.jupiter.api.Assertions;
import org.junit.jupiter.api.Test;
import org.springframework.beans.factory.annotation.Autowired;
import org.springframework.boot.test.context.SpringBootTest;

/**
 * @author okevin
 * @date 2020/2/18 23:14
 */
@SpringBootTest
public class RedisUtilTests {

    @Autowired
    private RedisUtil redisUtil;

    @Test
    public void testSet() {
        redisUtil.set("redis_util", "1");
        Assertions.assertEquals("1", redisUtil.get("redis_util"));
    }
}
複制
實際上,真正要把
Spring Data Redis
用好,還可以做以下工作:
- 把redis作為Spring的緩存管理
注意本文使用的是SpringBoot2.x與SpringBoot1.x有一定的差別。
package com.coderbuff.springdataredis.config;

import org.springframework.cache.annotation.CachingConfigurerSupport;
import org.springframework.cache.annotation.EnableCaching;
import org.springframework.context.annotation.Bean;
import org.springframework.context.annotation.Configuration;
import org.springframework.data.redis.cache.RedisCacheManager;
import org.springframework.data.redis.connection.RedisConfiguration;
import org.springframework.data.redis.connection.RedisConnectionFactory;
import org.springframework.data.redis.core.RedisTemplate;

/**
 * redis配置
 * @author okevin
 * @date 2020/2/18 14:20
 */
@Configuration
@EnableCaching
public class RedisConfig extends CachingConfigurerSupport {

    /**
     * 使用redis作為spring的緩存管理工具
     * 注意:springboot2.x與springboot1.x此處的差別較大
     * 在springboot1.x中,要使用redis的緩存管理工具為以下代碼:
     *
     * public CacheManager cacheManager(RedisTemplate redisTemplate) {
     *     RedisCacheManager redisCacheManager = new RedisCacheManager(redisTemplate);
     *     return redisCacheManager;
     * }
     *
     * @param redisConnectionFactory redis連接配接工廠
     * @return redis緩存管理
     */
    @Bean
    public RedisCacheManager cacheManager(RedisConnectionFactory redisConnectionFactory) {
        RedisCacheManager redisCacheManager = RedisCacheManager.create(redisConnectionFactory);
        return redisCacheManager;
    }
}
複制
- 盡管SpringBoot已經為我們構造好了
RedisTemplate
RedisTemplate
我們可以定制
RedisTemplate
,例如序列化的方式等,當然這些都不是必須的:
package com.coderbuff.springdataredis.config;

import org.springframework.cache.annotation.CachingConfigurerSupport;
import org.springframework.cache.annotation.EnableCaching;
import org.springframework.context.annotation.Bean;
import org.springframework.context.annotation.Configuration;
import org.springframework.data.redis.cache.RedisCacheManager;
import org.springframework.data.redis.connection.RedisConnectionFactory;
import org.springframework.data.redis.core.RedisTemplate;

/**
 * redis配置
 * @author okevin
 * @date 2020/2/18 14:20
 */
@Configuration
@EnableCaching
public class RedisConfig extends CachingConfigurerSupport {

    //省略上面的cacheManager注入

    @Bean
    public RedisTemplate<Object, Object> redisTemplate(RedisConnectionFactory redisConnectionFactory) {
        RedisTemplate<Object, Object> redisTemplate = new RedisTemplate<>();
        redisTemplate.setConnectionFactory(redisConnectionFactory);     //配置連接配接工廠

        /*使用Jackson序列化和反序列化key、value值,預設使用JDK的序列化方式
        Jackson2JsonRedisSerializer jackson2JsonRedisSerializer = new Jackson2JsonRedisSerializer(Object.class);
        ObjectMapper om = new ObjectMapper();
        om.setVisibility(PropertyAccessor.ALL, JsonAutoDetect.Visibility.ANY);  //指定要序列化的域,ALL表示所有字段、以及set/get方法,ANY是都有包括修飾符private和public
        om.enableDefaultTyping(ObjectMapper.DefaultTyping.NON_FINAL);   //指定序列化輸入的類型,NON_FINAL表示必須是非final修飾的類型
        jacksonSeial.setObjectMapper(om);

        //以下資料類型通過jackson序列化
        redisTemplate.setValueSerializer(jacksonSeial);
        redisTemplate.setKeySerializer(new StringRedisSerializer());
        redisTemplate.setHashKeySerializer(new StringRedisSerializer());
        redisTemplate.setHashValueSerializer(jacksonSeial);
        */
        redisTemplate.afterPropertiesSet();
        return redisTemplate;
    }
}
複制
想要學習更多
Spring Data Redis
,就請打開官網(https://spring.io/projects/spring-data-redis)盡情探索吧