【開篇說明】
學習Android第一步便是“init”,作為天字第一号程序,代碼羞澀難懂,但是也極其重要,熟悉init的原理對後面Zygote -- SystemServer -- 核心服務等一些列源碼的研究是有很大作用的,是以既然說研究Android源碼,就先拿init “庖丁解牛”!
【正文開始】
Init程序,它是一個由核心啟動的使用者級程序,當Linux核心啟動之後,運作的第一個程序是init,這個程序是一個守護程序,确切的說,它是Linux系統中使用者控件的第一個程序,是以它的程序号是1。它的生命周期貫穿整個linux 核心運作的始終, linux中所有其它的程序的共同始祖均為init程序,可以通過“adb shell ps | grep init”檢視程序号。
對于init程序的功能分為4部分:
- 分析和運作所有的init.rc檔案;
- 生成裝置驅動節點; (通過rc檔案建立)
- 處理子程序的終止(signal方式);
- 提供屬性服務。
Android init程序的入口檔案在system/core/init/init.cpp中,由于init是指令行程式,是以分析init.cpp首先應從main函數開始:
int main(int argc, char** argv) {    // 入口函數main
    if (!strcmp(basename(argv[0]), "ueventd")) {
        return ueventd_main(argc, argv);
    }

    if (!strcmp(basename(argv[0]), "watchdogd")) {
        return watchdogd_main(argc, argv);
    }

    // Clear the umask.
    umask(0);    // 清除屏蔽字(file mode creation mask),保證建立的目錄的通路權限不受屏蔽字影響。
    add_environment("PATH", _PATH_DEFPATH);

    bool is_first_stage = (argc == 1) || (strcmp(argv[1], "--second-stage") != 0);    // 判斷是否是系統啟動的第一階段,隻有啟動參數中有--second-stage才為第二階段
    // Get the basic filesystem setup we need put together in the initramdisk
    // on / and then we'll let the rc file figure out the rest.
    if (is_first_stage) {
        mount("tmpfs", "/dev", "tmpfs", MS_NOSUID, "mode=0755");                        // 挂載tmpfs檔案系統
        mkdir("/dev/pts", 0755);
        mkdir("/dev/socket", 0755);
        mount("devpts", "/dev/pts", "devpts", 0, NULL);                                 // 挂載devpts檔案系統
        #define MAKE_STR(x) __STRING(x)
        mount("proc", "/proc", "proc", 0, "hidepid=2,gid=" MAKE_STR(AID_READPROC));     // 挂載proc檔案系統
        mount("sysfs", "/sys", "sysfs", 0, NULL);                                       // 挂載sysfs檔案系統
    }
以上代碼主要做的工作就是:【建立檔案系統目錄并挂載相關的檔案系統】
int main(int argc, char** argv) {
    /* 01. 建立檔案系統目錄并挂載相關的檔案系統 */
    /* 02. 屏蔽标準的輸入輸出/初始化核心log系統 */
    // We must have some place other than / to create the device nodes for
    // kmsg and null, otherwise we won't be able to remount / read-only
    // later on. Now that tmpfs is mounted on /dev, we can actually talk
    // to the outside world.
    open_devnull_stdio();    // 重定向标準輸入輸出到/dev/_null_  -->  定義在system/core/init/Util.cpp中
    // init程序通過klog_init函數,提供輸出log資訊的裝置  -->  定義在system/core/libcutils/Klog.c中
    klog_init();      // 對klog進行初始化
    klog_set_level(KLOG_NOTICE_LEVEL);  // NOTICE level
繼續分析源碼,接下來要做的就是初始化屬性域:
int main(int argc, char** argv) {
    /* 01. 建立檔案系統目錄并挂載相關的檔案系統 */
    /* 02. 屏蔽标準的輸入輸出/初始化核心log系統 */
    /* 03. 初始化屬性域 */
    NOTICE("init %s started!\n", is_first_stage ? "first stage" : "second stage");
    if (!is_first_stage) {      // 引入SELinux機制後,通過is_first_stage區分init運作狀态
        // Indicate that booting is in progress to background fw loaders, etc.
        close(open("/dev/.booting", O_WRONLY | O_CREAT | O_CLOEXEC, 0000));      /* 檢測/dev/.booting檔案是否可讀寫、建立等*/
        property_init();        // 初始化屬性域 --> 定義于system/core/init/Property_service.cpp

        // If arguments are passed both on the command line and in DT,
        // properties set in DT always have priority over the command-line ones.
        process_kernel_dt();
        process_kernel_cmdline();     // 處理核心指令行
        // Propagate the kernel variables to internal variables
        // used by init as well as the current required properties.
        export_kernel_boot_props();
    }
看一下property_init方法:位于system/core/init/Property_service.cpp中
void property_init() {
    if (__system_property_area_init()) {         // 調用此函數初始化屬性域
        ERROR("Failed to initialize property area\n");
        exit(1);
    }
}
繼續分析main函數:
int main(int argc, char** argv) {
    /* 01. 建立檔案系統目錄并挂載相關的檔案系統 */
    /* 02. 屏蔽标準的輸入輸出/初始化核心log系統 */
    /* 03. 初始化屬性域 */
    /* 04. 完成SELinux相關工作 */
    // Set up SELinux, including loading the SELinux policy if we're in the kernel domain.
    selinux_initialize(is_first_stage);     // 調用selinux_initialize啟動SELinux
詳細看一下selinux_initialize()函數:
static void selinux_initialize(bool in_kernel_domain) {     // 區分核心态和使用者态
    Timer t;      //使用Timer計時,計算selinux初始化耗時

    selinux_callback cb;
    cb.func_log = selinux_klog_callback;              // 用于列印Log的回調函數
    selinux_set_callback(SELINUX_CB_LOG, cb);
    cb.func_audit = audit_callback;                    // 用于檢查權限的回調函數
    selinux_set_callback(SELINUX_CB_AUDIT, cb);

    if (in_kernel_domain) {        // 核心态處理流程,第一階段in_kernel_domain為true
        INFO("Loading SELinux policy...\n");        // 該行log列印不出,INFO級别
        // 用于加載sepolicy檔案。該函數最終将sepolicy檔案傳遞給kernel,這樣kernel就有了安全政策配置檔案
        if (selinux_android_load_policy() < 0) {
            ERROR("failed to load policy: %s\n", strerror(errno));
            security_failure();
        }

        bool kernel_enforcing = (security_getenforce() == 1);      // 核心中讀取的資訊
        bool is_enforcing = selinux_is_enforcing();                // 指令行中得到的資訊
        if (kernel_enforcing != is_enforcing) {
        // 用于設定selinux的工作模式。selinux有兩種工作模式:
            // 1、”permissive”,所有的操作都被允許(即沒有MAC),但是如果違反權限的話,會記錄日志
            // 2、”enforcing”,所有操作都會進行權限檢查。在一般的終端中,應該工作于enforing模式
            if (security_setenforce(is_enforcing)) {        //設定selinux的模式,是開還是關
                ERROR("security_setenforce(%s) failed: %s\n",
                      is_enforcing ? "true" : "false", strerror(errno));
                security_failure();    // 将重新開機進入recovery mode
            }
        }

        if (write_file("/sys/fs/selinux/checkreqprot", "0") == -1) {
            security_failure();
        }

        NOTICE("(Initializing SELinux %s took %.2fs.)\n",
               is_enforcing ? "enforcing" : "non-enforcing", t.duration());   //輸出selinux的模式,與初始化耗時
    } else {
        selinux_init_all_handles(); //如果啟動第二階段,調用該函數
    }
}
回到main函數中繼續分析:
int main(int argc, char** argv) {
    /* 01. 建立檔案系統目錄并挂載相關的檔案系統 */
    /* 02. 屏蔽标準的輸入輸出/初始化核心log系統 */
    /* 03. 初始化屬性域 */
    /* 04. 完成SELinux相關工作 */
    /* 05. 重新設定屬性 */
    // If we're in the kernel domain, re-exec init to transition to the init domain now
    // that the SELinux policy has been loaded.
    if (is_first_stage) {
        if (restorecon("/init") == -1) {    // 按selinux policy要求,重新設定init檔案屬性
            ERROR("restorecon failed: %s\n", strerror(errno));
            security_failure();
        }
        char* path = argv[0];
        char* args[] = { path, const_cast<char*>("--second-stage"), nullptr };     //設定參數--second-stage


    if (execv(path, args) == -1) {        // 執行init程序,重新進入main函數
            ERROR("execv(\"%s\") failed: %s\n", path, strerror(errno));
            security_failure();
        }
    }

    // These directories were necessarily created before initial policy load
    // and therefore need their security context restored to the proper value.
    // This must happen before /dev is populated by ueventd.
    NOTICE("Running restorecon...\n");
    restorecon("/dev");
    restorecon("/dev/socket");
    restorecon("/dev/__properties__");
    restorecon("/property_contexts");

    restorecon_recursive("/sys");

    epoll_fd = epoll_create1(EPOLL_CLOEXEC);         // 調用epoll_create1建立epoll句柄
    if (epoll_fd == -1) {
        ERROR("epoll_create1 failed: %s\n", strerror(errno));
        exit(1);
    }
接着往下分析:
int main(int argc, char** argv) {
    /* 01. 建立檔案系統目錄并挂載相關的檔案系統 */
    /* 02. 屏蔽标準的輸入輸出/初始化核心log系統 */
    /* 03. 初始化屬性域 */
    /* 04. 完成SELinux相關工作 */·
    /* 05. 重新設定屬性 */
    /* 06. 建立epoll句柄 */
    /* 07. 裝載子程序信号處理器 */
    signal_handler_init();       // 裝載子程序信号處理器
Note:init是一個守護程序,為了防止init的子程序成為僵屍程序(zombie process),需要init在子程序結束時擷取子程序的結束碼,通過結束碼将程式表中的子程序移除,防止成為僵屍程序的子程序占用程式表的空間(程式表的空間達到上限時,系統就不能再啟動新的程序了,會引起嚴重的系統問題)。
細化signal_handler_init()函數:
void signal_handler_init() {        // 函數定位于:system/core/init/Singal_handler.cpp
    // 在linux當中,父程序是通過捕捉SIGCHLD信号來得知子程序運作結束的情況
    // Create a signalling mechanism for SIGCHLD.
    int s[2];
    // 利用socketpair建立出已經連接配接的兩個socket,分别作為信号的讀、寫端
    if (socketpair(AF_UNIX, SOCK_STREAM | SOCK_NONBLOCK | SOCK_CLOEXEC, 0, s) == -1) {
        ERROR("socketpair failed: %s\n", strerror(errno));
        exit(1);
    }

    signal_write_fd = s[0];
    signal_read_fd = s[1];

    // Write to signal_write_fd if we catch SIGCHLD.
    struct sigaction act;
    memset(&act, 0, sizeof(act));
    // 信号處理器為SIGCHLD_handler,其被存在sigaction結構體中,負責處理SIGCHLD消息
    act.sa_handler = SIGCHLD_handler;       // 信号處理器:SIGCHLD_handler
    act.sa_flags = SA_NOCLDSTOP;            // 僅當程序終止時才接受SIGCHLD信号
    // 調用信号安裝函數sigaction,将監聽的信号及對應的信号處理器注冊到核心中
    sigaction(SIGCHLD, &act, 0);
    // 相對于6.0的代碼,進一步作了封裝,用于終止出現問題的子程序
    ServiceManager::GetInstance().ReapAnyOutstandingChildren();

    register_epoll_handler(signal_read_fd, handle_signal);        // 定義在system/core/init/Init.cpp
}
Linux程序通過互相發送接收消息來實作程序間的通信,這些消息被稱為“信号”。每個程序在處理其它程序發送的信号時都要注冊處理者,處理者被稱為信号處理器。
注意到sigaction結構體的sa_flags為SA_NOCLDSTOP。由于系統預設在子程序暫停時也會發送信号SIGCHLD,init需要忽略子程序在暫停時發出的SIGCHLD信号,是以将act.sa_flags 置為SA_NOCLDSTOP,該标志位表示僅當程序終止時才接受SIGCHLD信号。
觀察SIGCHLD_handler具體工作:
static void SIGCHLD_handler(int) {
    /* init程序是所有程序的父程序,當其子程序終止産生SIGCHLD信号時,SIGCHLD_handler對signal_write_fd執行寫操作,由于socketpair的綁定關系,這将觸發信号對應的signal_read_fd收到資料。*/
    if (TEMP_FAILURE_RETRY(write(signal_write_fd, "1", 1)) == -1) {
        ERROR("write(signal_write_fd) failed: %s\n", strerror(errno));
    }
}
在裝在信号監聽器的最後,有如下函數:register_epoll_handler(signal_read_fd, handle_signal);
void register_epoll_handler(int fd, void (*fn)()) {        // 回到init.cpp中
    epoll_event ev;
    ev.events = EPOLLIN;
    ev.data.ptr = reinterpret_cast<void*>(fn);
    // epoll_fd增加一個監聽對象fd,fd上有資料到來時,調用fn處理
    // 當epoll句柄監聽到signal_read_fd中有資料可讀時,将調用handle_signal進行處理。
    if (epoll_ctl(epoll_fd, EPOLL_CTL_ADD, fd, &ev) == -1) {
        ERROR("epoll_ctl failed: %s\n", strerror(errno));
    }
}
【小結】
當init程序調用signal_handler_init後,一旦收到子程序終止帶來的SIGCHLD消息後,将利用信号處理者SIGCHLD_handler向signal_write_fd寫入資訊; epoll句柄監聽到signal_read_fd收消息後,将調用handle_signal進行處理。
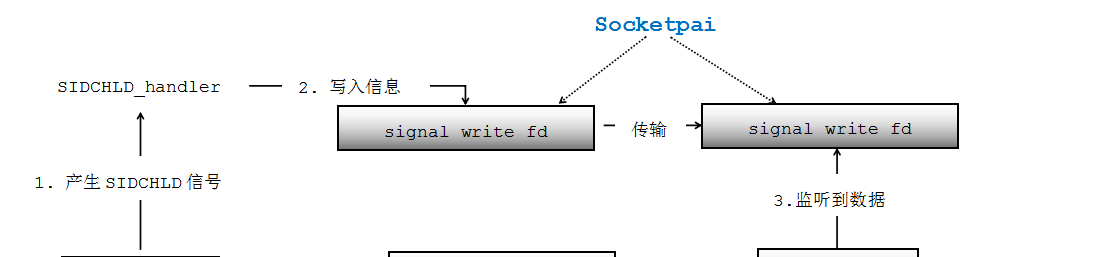
檢視handle_signal函數:
static void handle_signal() {      // --> 位于system/core/init/signal_handler.cpp中
    // Clear outstanding requests.
    char buf[32];
    read(signal_read_fd, buf, sizeof(buf));

    ServiceManager::GetInstance().ReapAnyOutstandingChildren();
}
從代碼中可以看出,handle_signal隻是清空signal_read_fd中的資料,然後調用ServiceManager::GetInstance().ReapAnyOutstandingChildren()。
繼續分析:
// 定義于system/core/init/service.cpp中,是一個單例對象。
ServiceManager::ServiceManager() {     // 預設private屬性
}

ServiceManager& ServiceManager::GetInstance() {
    static ServiceManager instance;
    return instance;
}
void ServiceManager::ReapAnyOutstandingChildren() {
    while (ReapOneProcess()) {    // 實際調用了ReapOneProcess函數
    }
}
接下來看下ReapOneProcess這個函數:
bool ServiceManager::ReapOneProcess() {
    int status;
    //用waitpid函數擷取狀态發生變化的子程序pid
    //waitpid的标記為WNOHANG,即非阻塞,傳回為正值就說明有程序挂掉了
    pid_t pid = TEMP_FAILURE_RETRY(waitpid(-1, &status, WNOHANG));
    if (pid == 0) {
        return false;
    } else if (pid == -1) {
        ERROR("waitpid failed: %s\n", strerror(errno));
        return false;
    }
    // 利用FindServiceByPid函數,找到pid對應的服務。
    // FindServiceByPid主要通過輪詢解析init.rc生成的service_list,找到pid與參數一直的svc
    Service* svc = FindServiceByPid(pid);

    std::string name;
    if (svc) {
        name = android::base::StringPrintf("Service '%s' (pid %d)",
                                           svc->name().c_str(), pid);
    } else {
        name = android::base::StringPrintf("Untracked pid %d", pid);
    }

    if (WIFEXITED(status)) {
        NOTICE("%s exited with status %d\n", name.c_str(), WEXITSTATUS(status));
    } else if (WIFSIGNALED(status)) {
        NOTICE("%s killed by signal %d\n", name.c_str(), WTERMSIG(status));         // 輸出服務結束原因
    } else if (WIFSTOPPED(status)) {
        NOTICE("%s stopped by signal %d\n", name.c_str(), WSTOPSIG(status));
    } else {
        NOTICE("%s state changed", name.c_str());
    }

    if (!svc) {
        return true;
    }

    if (svc->Reap()) {                 // 結束服務,相對于6.0作了進一步的封裝,重新開機一些子程序,不做具體分析
        waiting_for_exec = false;
        RemoveService(*svc);           // 移除服務對應的資訊
    }

    return true;
}
繼續分析main()函數:
int main(int argc, char** argv) {
    /* 01. 建立檔案系統目錄并挂載相關的檔案系統 */
    /* 02. 屏蔽标準的輸入輸出/初始化核心log系統 */
    /* 03. 初始化屬性域 */
    /* 04. 完成SELinux相關工作 */·
    /* 05. 重新設定屬性 */
    /* 06. 建立epoll句柄 */
    /* 07. 裝載子程序信号處理器 */
    /* 08. 啟動比對屬性的服務端*/
    property_load_boot_defaults();      // 程序調用property_load_boot_defaults進行預設屬性配置相關的工作
    export_oem_lock_status();

    std::string bootmode = property_get("ro.bootmode");      // 擷取啟動模式
    if (strncmp(bootmode.c_str(), "ffbm", 4) == 0){
    property_set("ro.logdumpd","0");
    }else{
    property_set("ro.logdumpd","1");
    }
    start_property_service();      // 啟動屬性服務
看下property_load_boot_defaults()函數:位于system/core/init/Property_service.cpp中
// property_load_boot_defaults實際上就是調用load_properties_from_file解析配置檔案       /* 09. 設定預設系統屬性 */
// 然後根據解析的結果,設定系統屬性
void property_load_boot_defaults() {
    load_properties_from_file(PROP_PATH_RAMDISK_DEFAULT, NULL);
}
接着繼續分析main:
int main(int argc, char** argv) {
    /* 01. 建立檔案系統目錄并挂載相關的檔案系統 */
    /* 02. 屏蔽标準的輸入輸出/初始化核心log系統 */
    /* 03. 初始化屬性域 */
    /* 04. 完成SELinux相關工作 */·
    /* 05. 重新設定屬性 */
    /* 06. 建立epoll句柄 */
    /* 07. 裝載子程序信号處理器 */
    /* 08. 設定預設系統屬性 */
    /* 09. 啟動配置屬性的服務端 */
    /* 10. 比對指令和函數之間的對應關系 */
    const BuiltinFunctionMap function_map;          // system/core/init/builtins.cpp
    Action::set_function_map(&function_map);        // 在Action中儲存function_map對象,記錄了指令與函數之間的對應關系
【結尾】
由于init涉及的知識點是相當多,代碼之間的邏輯也是極其複雜,
接下來,安卓init:Android7.0系統Init原理(二)中将詳細分析init.rc的解析過程。
![與專家面對面:Android開發入門問與答[圖]](data:image/gif;base64,R0lGODlhAQABAIAAAP///wAAACwAAAAAAQABAAACAkQBADs=)