本篇詳細部署安裝 prometheus 的監控節點。
實驗環境
192.168.122.101 主
192.168.122.102  新加節點
[[email protected] ~]# systemctl stop firewalld
[[email protected] ~]# setenforce 0
# 解壓
[[email protected] ~]# wget -c https://github.com/prometheus/node_exporter/releases/download/v0.18.1/node_exporter-0.18.1.linux-amd64.tar.gz
[[email protected] ~]# tar zxf node_exporter-0.18.1.linux-amd64.tar.gz
[[email protected] ~]# ls
anaconda-ks.cfg                   node_exporter-0.18.1.linux-amd64.tar.gz
node_exporter-0.18.1.linux-amd64
[[email protected] ~]# mv node_exporter-0.18.1.linux-amd64 node
[[email protected] ~]# ls
anaconda-ks.cfg  node  node_exporter-0.18.1.linux-amd64.tar.gz
移動檔案目錄位置
[[email protected] ~]# mv node /usr/local/node_exporter

[[email protected] ~]# cd /usr/local/node_exporter
[[email protected] node_exporter]# ls
LICENSE  node_exporter  NOTICE
[[email protected] node_exporter]# cp node_exporter  /usr/local/bin/
添加為系統服務
[[email protected] node_exporter]# vim /usr/lib/systemd/system/node_exporter.service

[Unit]
Description=node_exporter
After=network-online.target remote-fs.target nss-lookup.target
Wants=network-online.target

[Service]
Type=simple
ExecStart=/usr/local/node_exporter/node_exporter
ExecReload=/bin/kill -s HUP $MAINPID
ExecStop=/bin/kill -s TERM $MAINPID

[Install]
WantedBy=multi-user.target
添加至開機自啟
[[email protected] node_exporter]# systemctl daemon-reload
[[email protected] node_exporter]# systemctl enable node_exporter.service
Created symlink from /etc/systemd/system/multi-user.target.wants/node_exporter.service to /usr/lib/systemd/system/node_exporter.service.
[[email protected] node_exporter]# systemctl start node_exporter.service

[[email protected] node_exporter]# netstat -antuple | grep node_exporter
tcp6       0      0 :::9100                 :::*                    LISTEN      0          24837      2247/node_exporter
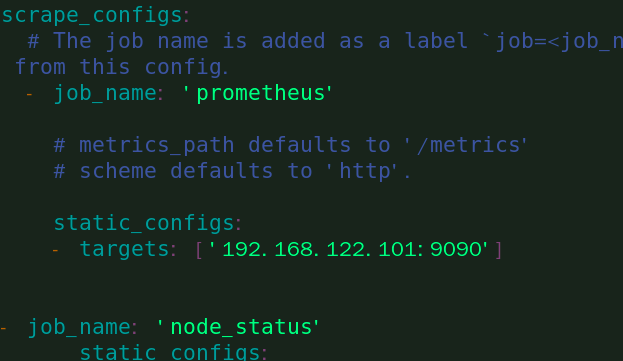
在 Prometheus 添加相應節點
[[email protected] ~]# cd /usr/local/prometheus/
[[email protected] prometheus]# ls
conf               consoles  LICENSE  prometheus  relus
console_libraries  data      NOTICE   promtool    tsdb

[[email protected] prometheus]# cd conf/
[[email protected] conf]# ls
prometheus.yml  prometheus.yml.bak
[[email protected] conf]# vim prometheus.yml

重新開機 Prometheus 服務
[[email protected] conf]# promtool check config prometheus.yml
Checking prometheus.yml
  SUCCESS: 0 rule files found

[[email protected] conf]# systemctl restart prometheus.service
注意:一定要注意yml檔案中的空格縮進
通路 IP 檢視 Prometheus
檢視 Promrtheus 的服務發現
Grafana 基本介紹
Grafana 是近幾年興起的開源可視化工具,采用 Go 語言所編寫,天然支援 Prometheus,不僅如此,Grafana
還支援多種資料源,包括 Elasticsearch,InfluxDB,MySQL,OpenTSDB。
我們把 Prometheus 部署好之後,通路并使用了它的 Web 界面,我們可以看到它的 Web界面較為簡陋,通常适合檢視名額和呈現單個圖表,另外它支援的可視化圖示類型也有限,是以這個時候我們就需要為 Prometheus 添加一個功能較為全面的可視化平台。
Grafana 基本術語
DataSource(資料源)
在上面我們說到了,Grafana 支援多種資料源,包括但不限于 Prometheus,而資料源通俗來講就是提供資料的對象,比如 Zabbix,比如 Prometheus

Dashboard(儀表盤)
儀表盤就是一個呈現頁面,當我們添加好對應的資料源以後,這個時候就需要實作資料的可視化,在 Grafana 中,可以通過 Dashboard 來組織和管理資料可視化圖表

Row(行)
行是 Dashboard 的組成單元,一個 Dashboard 可以包含多個行,而一個行當中又可以展示一種或者多種資訊的組合,比如負載狀态,記憶體使用率,磁盤使用率

Panel(面闆)
面闆我們可以了解為是 Row 展示資訊的方式,它支援表格(tables),清單(alert list),熱圖(heatmap),在Grafana 當中,所有的面闆均以插件的形式進行使用

Query Editor(查詢編輯器)
查詢器的作用是指定擷取哪一部分的資料,這個有點類似于 SQL 語句,但我們如果添加的資料源為 Prometheus,那實際上使用的為 PromQL

User(使用者)
使用者和我們平常登入系統的使用者概念一樣,Grafana 中包含三種角色,分别為 admin,editor,viewer,read only editor,在這其中,admin 的權限最高,它可以執行如何操作,editor 隻能建立 DashBoard,viewer 隻能檢視DashBoard,read only editor可以修改 DashBoard,但不允許儲存

Organization(組織)
在 Grafana 當中,DataSource 與 Dashboard 屬于一個組織,每個使用者可以擁有多個不同的組織,在不同的組織當中,可以為不同的使用者賦予不同的權限需要知道的是,不同組織之間的資料源和儀表闆都不同,每當在 Grafana 當中建立一個組織,就相當于開啟了一個全新的視圖,這時候所有的資料源與儀表盤等内容都要重新去添加和配置
Grafana 安裝部署
安裝 主節點上
[[email protected] ~]#wget -c https://dl.grafana.com/oss/release/grafana-6.6.1-1.x86_64.rpm
[[email protected] ~]# yum install grafana-6.6.1-1.x86_64.rpm  -y
修改配置檔案
[[email protected] ~]# cd /etc/grafana/
[[email protected] grafana]# ls
grafana.ini  ldap.toml  provisioning
[[email protected] grafana]# cp grafana.ini  grafana.ini.bak
[[email protected] grafana]# vim grafana.ini
[paths]
# 定義資料存儲路徑
data = /var/lib/grafana
# 存儲資料的時間,預設24小時
temp_data_lifetime = 24h
# 定義日志存儲路徑
logs = /var/log/grafana
# 定義插件存儲路徑
plugins = /var/lib/grafana/plugins
# 配置路徑
provisioning = conf/provisioning

[server]
# 通路協定
protocol = http
# 監聽IP位址
http_addr = 10.0.0.21
# 監聽的端口
http_port = 3000
# 定義在浏覽器中通路Grafana的全路徑
root_url = %(protocol)s://%(domain)s:%(http_port)s/
serve_from_sub_path = false
# 是否記錄web請求日志,預設為關閉
router_logging = false
# 前端靜态檔案的存儲路徑
static_root_path = public
enable_gzip = true
……

[users]
# 是否允許普通使用者登入,預設為允許
allow_sign_up = true
# 是否允許普通使用者建立組織,預設為允許
allow_org_create = true
# 如果為true,則自動把新增的使用者增加到id為1的組織中,如果為false,則建立使用者的時候會新增一個組織 ,預設為true
auto_assign_org = true
# 預設的背景頁面,也可以選擇light
default_theme = dark
設定開機自啟
[[email protected] grafana]# systemctl enable grafana-server.service
Created symlink from /etc/systemd/system/multi-user.target.wants/grafana-server.service to /usr/lib/systemd/system/grafana-server.service.
[[email protected] grafana]# systemctl start grafana-server.service

[[email protected] grafana]# netstat -antuple | grep grafana
tcp        0      0 192.168.122.101:3000    0.0.0.0:*               LISTEN      997        25306      2210/grafana-server
進行通路
預設賬号:admin
預設密碼:admin
第一次登入會讓你設定新密碼,也可以點選跳過
Grafana添加主機
add data source
選擇promethus
寫出url 儲存
Grafana 添加模闆
點選import
導入的是中文版