相信在實際開發過程當中,肯定少不了這樣的功能:
點選
AppBar
右上角的按鈕,彈出一個菜單供使用者選擇。
幸運的是,Flutter 提供給我們了一個 Widget,直接就能實作如上的效果。
PopupMenuButton
還是老規矩,先看官方的說明:
Displays a menu when pressed and calls onSelected[1] when the menu is dismissed because an item was selected. The value passed to onSelected[2] is the value of the selected menu item.
One of child[3] or icon[4] may be provided, but not both. If icon[5] is provided, then PopupMenuButton[6] behaves like an IconButton[7].
If both are null, then a standard overflow icon is created (depending on the platform).
大緻意思為:
當按下的時候顯示一個菜單,選擇了一個項目的時候會回調onSelected
,傳遞的值是所選菜單的值。
可以提供
orchild
icon
,但是不能同時提供。
如果為空,則提供一個預設的圖示,取決于平台。
構造函數
看完了官方說明,再來看構造函數:
const PopupMenuButton({ Key key, @required this.itemBuilder, this.initialValue, this.onSelected, this.onCanceled, this.tooltip, this.elevation = 8.0, this.padding = const EdgeInsets.all(8.0), this.child, this.icon, this.offset = Offset.zero, this.enabled = true,}) : assert(itemBuilder != null),assert(offset != null),assert(enabled != null),assert(!(child != null && icon != null)), // fails if passed both parameterssuper(key: key); 複制
這裡面每一個參數應該都很好了解,就不做過多的解釋了,
唯一必傳的參數就是
itemBuilder
,也可以看到後面的斷言:
assert(!(child != null && icon != null))
判斷了 child 、icon 是否同時不為空,如果是的話就報錯了。
簡單 Demo
構造函數了解了,官方也提供了一個 Demo,我們來看一下運作效果:
再來看一下代碼:
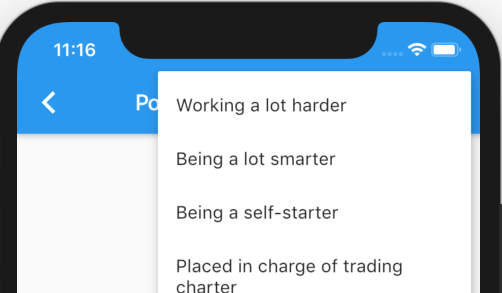
/// 首先定義了一個枚舉enum WhyFarther {  harder,  smarter,  selfStarter,  tradingCharter,}
/// ------------------------------------
/// build 方法Widget build(BuildContext context) {  return Scaffold(    appBar: AppBar(      title: Text('PopupMenuButtonPage'),      actions: <Widget>[        PopupMenuButton<WhyFarther>(          onSelected: (WhyFarther result) {            setState(() {              _selection = result;            });          },          icon: Icon(Icons.more_vert),          itemBuilder: (BuildContext context) => <PopupMenuEntry<WhyFarther>>[            const PopupMenuItem<WhyFarther>(              value: WhyFarther.harder,              child: Text('Working a lot harder'),            ),            const PopupMenuItem<WhyFarther>(              value: WhyFarther.smarter,              child: Text('Being a lot smarter'),            ),            const PopupMenuItem<WhyFarther>(              value: WhyFarther.selfStarter,              child: Text('Being a self-starter'),            ),            const PopupMenuItem<WhyFarther>(              value: WhyFarther.tradingCharter,              child: Text('Placed in charge of trading charter'),            ),          ],        ),      ],    ),    body: Container(),  );}
複制
解釋一下邏輯:
1.首先定義了一個枚舉2.然後在
AppBar
的「actions」裡定義了
PopupMenuButton
3.設定 icon 為
Icon(Icons.more_vert)
4.
itemBuilder
需傳回一個
List<PopupMenuEntry<T>>
5.這裡傳入的值就是
PopupMenuItem<WhyFarther>
6.然後定義
onSelected
參數接收點選回調
這樣整體的邏輯就是定義好了,運作一下:

總結
這樣就完成了一個超級簡單并且實用的菜單彈出框,
其實它的實作邏輯和
DropdownButton
差不多,都是使用了
PopupRoute
,
有對這方面感興趣的同學,可以檢視我以前寫的文章:Flutter 源碼系列:DropdownButton 源碼淺析
完整代碼已經傳至GitHub:https://github.com/wanglu1209/WFlutterDemo