Color correction and color grading are the processes of adjusting the color of a video to achieve a more balanced or stylistic look. Final Cut Pro X makes this reasonably easy to do.
顔色校正和顔色分級是調整視訊顔色以實作更加平衡或風格化外觀的過程。 Final Cut Pro X使得此操作相當容易。
There are some differences between correction and grading. Color correction comes first and is where you correct over or undersaturated video to make the colors more uniform between clips. Color grading is used to give your footage a distinct look and adjust the overall mood of the clip. You’ll use the same tools for both techniques though, so the process is similar.
校正和分級之間存在一些差異。 首先進行色彩校正,然後在其中校正過飽和或過飽和的視訊,以使片段之間的顔色更均勻。 顔色分級用于使您的素材具有鮮明的外觀并調整剪輯的整體氛圍。 不過,您将為兩種技術使用相同的工具,是以過程類似。
If you don’t have Final Cut, the same basic steps will apply to whatever editing program you are using, but the UI will look a little different.
如果沒有Final Cut,則相同的基本步驟将應用于您使用的任何編輯程式,但UI看起來會有所不同。
基礎 (The Basics)

In Final Cut, you’ll perform color correction and grading through the Color Board, which is just an effect in Final Cut like any other. It’s so often used that Apple has given it a hotkey—Command+6. This technically opens the “Color Inspector” tool for any clip, but if you don’t have the color board effect already on your clip, Final Cut adds it automatically. Navigating Final Cut with hotkeys is much easier, and you can find a full list of them here. Alternatively, you could drag the effect on the clip and then click on it in the inspector.
在Final Cut中,您将通過配色闆執行顔色校正和分級,這在Final Cut中就像其他效果一樣。 它是如此常用,以至于蘋果給了它一個熱鍵-Command + 6。 從技術上講,這将為任何剪輯打開“顔色檢查器”工具,但是如果您的剪輯上沒有彩闆效果,則Final Cut會自動添加它。 使用熱鍵導航Final Cut更加容易,您可以在此處找到它們的完整清單。 或者,您可以在剪輯上拖動效果,然後在檢查器中單擊它。
Once you’ve got it pulled up, the first window you’ll see is the color tab. There are also tabs for saturation and exposure, and you can navigate between them with Control+Command+C, S, or E.
一旦将其拉起,您将看到的第一個視窗是顔色頁籤。 還有用于飽和度和曝光的頁籤,您可以使用Control + Command + C,S或E在它們之間進行導航。
There are four sliders in each pane for master control, shadows, mid-tones, and highlights. Master control will change the look of the whole clip at once, and the other sliders will change the dark, gray, and light parts of the image individually.
每個窗格中有四個滑塊,分别用于主要,陰影,中間調和高光。 主要件将立即更改整個剪輯的外觀,其他滑塊将分别更改圖像的暗,灰和亮部分。
In the Color pane, moving them horizontally will change the color, and moving them vertically will change the intensity of the effect. If you move them below the centerline, it will have a negative effect. The same rules apply to the other tabs as well.
在“顔色”窗格中,水準移動它們會改變顔色,垂直移動它們會改變效果的強度。 如果将它們移動到中心線以下,将會産生負面影響。 相同的規則也适用于其他頁籤。
使用範圍掌握顔色分級 (Using Scopes to Master Color Grading)
Color grading by eye alone can be pretty hard, as you’re making many small improvements that you might not even notice one at a time. The different scope viewers help to dial in and perfect these changes.
僅憑眼睛進行色彩分級可能會非常困難,因為您正在進行許多小的改進,甚至可能一次都看不到。 不同的作用域檢視器有助于撥入并完善這些更改。
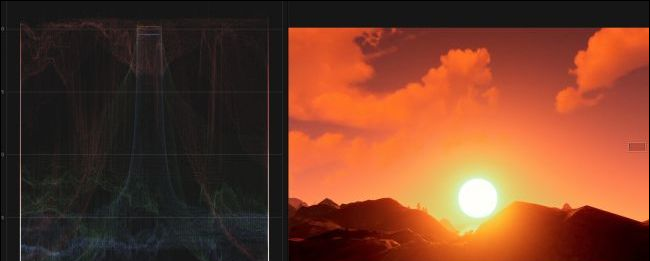
You can open video scopes by pressing Command+7 or from View > Show in Viewer > Video Scopes. The first interesting one is the vectorscope, which plots pixels by color (which direction they’re facing on the circle) and by intensity (how far from the center they are).
您可以通過按Command + 7或從“視圖”>“在檢視器中顯示”>“視訊範圍”來打開視訊範圍。 第一個有趣的是矢量示波器,它通過顔色(像素在圓上朝向的方向)和強度(像素距中心的距離)繪制像素。
The vectorscope is pretty useful for finding the average complementary color of your footage. Just drag the master color wheel around until it lands on the opposite side:
矢量示波器對于查找素材的平均補色非常有用。 隻需拖動主色輪,直到其落在另一側即可:
Ideally, you’d probably want your footage to be somewhere close to the middle, but it all comes down to artistic preference.
理想情況下,您可能希望您的鏡頭位于中間位置,但這全都取決于藝術偏好。
You can change scopes with the button in the top right corner.
您可以使用右上角的按鈕更改範圍。
You can adjust the channels that each scope displays here as well, making it easy to do things like switching from viewing all colors to viewing only the red channel.
您還可以調整每個示波器在此處顯示的通道,使操作變得很容易,例如從檢視所有顔色切換為僅檢視紅色通道。
使用曝光對鏡頭進行歸一化 (Using Exposure to Normalize Your Footage)
The Luma waveform scope is useful for adjusting the exposure of your clip. Usually, you’ll want the deepest blacks of your footage to be at zero and the whites to be at 100%, but again this comes down to artistic preference.
亮度波形示波器可用于調整剪輯的曝光。 通常,您會希望素材中最深的黑色為零,而白色為100%,但這又取決于藝術偏好。
You can adjust the shadows and highlights individually on the Exposure tab.
您可以在“曝光”頁籤上分别調整陰影和高光。
You can see now that the top of the clip is near 100, and the lows are near 0. Don’t go too far though, as you’ll start clipping and losing detail. Also, you’ll want to adjust this over the whole video if your footage isn’t constant.
現在,您可以看到剪輯的頂部接近100,而最低點接近0。不過不要過分,因為您将開始剪輯并丢失細節。 此外,如果您的鏡頭不固定,您将希望在整個視訊中進行調整。
使用關鍵幀适應剪輯 (Using Keyframes to Adapt to Your Clip)
Like everything in Final Cut, you can adjust the color board using keyframes. Keyframes save your settings at a particular time and transition between them, effectively animating your clip. You can add a new keyframe with the plus button next to the color board. There’s no hotkey for doing this, but you can cut, copy, and paste keyframes with Option+Shift+X, C, or V, respectively.
像Final Cut中的所有内容一樣,您可以使用關鍵幀來調整顔色闆。 關鍵幀會在特定時間儲存您的設定,并在它們之間進行過渡,進而有效地制作剪輯動畫。 您可以使用色闆旁邊的加号按鈕添加新的關鍵幀。 沒有熱鍵可以執行此操作,但是您可以分别使用Option + Shift + X,C或V剪切,複制和粘貼關鍵幀。
You’ll want to right-click your clip and select “Show Video Animation” (or press Control+V), so you can see the keyframes you’re editing—they’re hidden by default.
您需要右鍵單擊剪輯,然後選擇“顯示視訊動畫”(或按Control + V),以便可以看到正在編輯的關鍵幀-預設情況下它們是隐藏的。
When you add a new keyframe, it will copy the current settings to that keyframe. You can add a second keyframe, click on it in the timeline, and edit the settings on that one. Final Cut will automatically fade between the settings for each one.
添加新的關鍵幀時,它将把目前設定複制到該關鍵幀。 您可以添加第二個關鍵幀,在時間軸上單擊它,然後在該關鍵幀上編輯設定。 Final Cut将在每個設定之間自動消失。
使用形狀和顔色蒙版進行局部調整 (Making Localized Adjustments with Shape and Color Masks)
This one’s pretty simple, but it’s hidden behind a button menu. The rectangle shaped button next to the “Add Keyframe” button brings up the “Masking” menu. The first option is to shape masks, which lets you make adjustments with an elliptical or rectangular mask. It seems a bit restrictive, but you can add multiple masks for more complicated objects.
這很簡單,但是隐藏在按鈕菜單後面。 “添加關鍵幀”按鈕旁邊的矩形按鈕調出“蒙版”菜單。 第一個選項是使蒙版成形,使您可以使用橢圓形或矩形蒙版進行調整。 似乎有些限制,但是您可以為更複雜的對象添加多個蒙版。
The other option is color masks, which you can use in combination with shape masks. You can use these to “select” a color in your footage and perform adjustments to it. You can use the softness slider or additional color masks to catch a wider range of colors. For example, you could turn a red shirt into a blue one with a couple of red color masks (and maybe some shape masks, if there’s more red in the scene).
另一個選項是顔色蒙版,可以将其與形狀蒙版結合使用。 您可以使用它們來“選擇”素材中的顔色并對其進行調整。 您可以使用柔和度滑塊或其他顔色蒙版來捕獲更廣泛的顔色。 例如,您可以将紅色襯衫變成帶有兩個紅色蒙版的藍色襯衫(如果場景中有更多的紅色,可能還需要一些形狀蒙版)。
You can also animate the positions of these masks independently of the main color board, as they have their own keyframes. Each of the masks also has controls to adjust the inside and outside of the masks independently.
您還可以獨立于主配色闆設定這些蒙版的位置動畫,因為它們具有自己的關鍵幀。 每個面罩還具有控件以獨立調整面罩的内部和外部。
翻譯自: https://www.howtogeek.com/367795/how-to-color-grade-and-color-correct-in-final-cut-pro-x/