前一篇文章,Android短信攔截機制适配的坑(上)--4.4以下系統
介紹了廣播接收的順序,但是我明确說明在4.4以下系統,那麼4.4及以上系統會遇到說明問題呢?
首先我們要來了解4.4系統短信的機制的改變,主要是這篇文章
http://android-developers.blogspot.com/2013/10/getting-your-sms-apps-ready-for-kitkat.html
還有兩篇篇中文翻譯大家也可以看看
http://blog.csdn.net/maybe_windleave/article/details/17740345
讓你的短信應用迎接Android 4.4(KitKat)
下面我再來說明一下google對短信機制的修改,首先一個原則是,
4.4及其以後系統,隻能設定一個預設的SMS短信app,但短信到達,首先會通知這個app,并且隻有這個app有對短信資料庫的修改權限和短信的發送權限
并且短信廣播,不再是有序廣播,也就是App沒有辦法攔截這個廣播,所有app都快接收到短信到達的廣播通知,但是隻有預設SMS短信app可以修改短信記錄
但是!不排除有些作業系統,例如小米會修改這個機制!
那麼我再次拿我上一篇文章的需求來說,
需求是:新短信到達以後,項目app希望可以提示使用者未讀短信的資料,并且可以将短信置為已讀。
問題是:和微信電話本沖突的情況,由于微信電話本也要實作上述功能,可是它有一個坑就是,它收到短信以後,就将短信置為已讀
解決方法是:比微信電話本更早接收到新短信到達的通知,但是可惜的是,由于我的app不是短信app,是以不能這樣做以緻使使用者收不到新短信
但是我們這裡隻是來說我們要怎麼做,才能比微信電話本早。
在前一篇文章中,已經說過了設定最高優先權的辦法,這裡面臨的一個新問題就是,預設Sms短信app還是會比我們先,是以我最好讓使用者将我們的App設定為預設sms短信app
根據上面的參考文章,我做了一個簡單的demo,這個demo讓我們可以在系統選項中,将我們的app設定為預設sms短信app
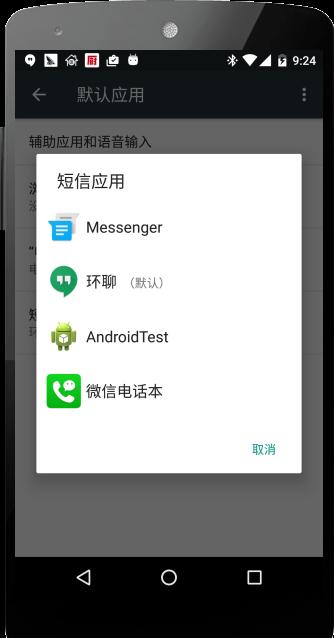
在我們的原生6.0系統的手機上,是這樣的,設定-》應用-》預設應用-》短信應用-》選擇AndroidTest
怎麼才能做到呢?如果大家看了我提到的文章,就應該知道怎麼做,如果嫌麻煩,可以看一下我的設定,首先是AndroidManifest的設定
<?xml version="1.0" encoding="utf-8"?>
<manifest xmlns:android="http://schemas.android.com/apk/res/android"
    package="com.example.androidtest"
    android:versionCode="1"
    android:versionName="1.0" >

    <uses-sdk
        android:minSdkVersion="8"
        android:targetSdkVersion="21" />
	    <uses-permission android:name="android.permission.WRITE_SMS" />
    <uses-permission android:name="android.permission.READ_SMS" />
    <uses-permission android:name="android.permission.RECEIVE_SMS" />
    <uses-permission android:name="android.permission.RECEIVE_MMS" />
    <application
        android:allowBackup="true"
        android:icon="@drawable/ic_launcher"
        android:label="@string/app_name">
        <activity
            android:name=".MainActivity"
            android:label="@string/app_name" >
            <intent-filter>
                <action android:name="android.intent.action.MAIN" />

                <category android:name="android.intent.category.LAUNCHER" />
            </intent-filter>
        </activity>

        <receiver android:name="com.example.androidtest.SmsReceiver" android:permission="android.permission.BROADCAST_SMS">
            <intent-filter android:priority="2147483647">
            	<action android:name="android.provider.Telephony.SMS_DELIVER" />
            	<action android:name="android.provider.Telephony.SMS_RECEIVED" />
            </intent-filter>
        </receiver>

        <!-- BroadcastReceiver that listens for incoming MMS messages -->

        <receiver android:name=".MmsReceiver"
            android:permission="android.permission.BROADCAST_WAP_PUSH">
            <intent-filter>
                <action android:name="android.provider.Telephony.WAP_PUSH_DELIVER" />
                <data android:mimeType="application/vnd.wap.mms-message" />
            </intent-filter>
        </receiver>
        <!-- Activity that allows the user to send new SMS/MMS messages -->

        <activity android:name=".ComposeSmsActivity" >
            <intent-filter>
                <action android:name="android.intent.action.SEND" />
                <action android:name="android.intent.action.SENDTO" />
                <category android:name="android.intent.category.DEFAULT" />
                <category android:name="android.intent.category.BROWSABLE" />
                <data android:scheme="sms" />
                <data android:scheme="smsto" />
                <data android:scheme="mms" />
                <data android:scheme="mmsto" />
            </intent-filter>
        </activity>

        <!-- Service that delivers messages from the phone "quick response" -->
        <service android:name=".HeadlessSmsSendService"
                 android:permission="android.permission.SEND_RESPOND_VIA_MESSAGE"
                 android:exported="true" >
            <intent-filter>
                <action android:name="android.intent.action.RESPOND_VIA_MESSAGE" />
                <category android:name="android.intent.category.DEFAULT" />
                <data android:scheme="sms" />
                <data android:scheme="smsto" />
                <data android:scheme="mms" />
                <data android:scheme="mmsto" />
            </intent-filter>
        </service>

    </application>

</manifest>
其實
1、是設定短信擷取的權限
2、是設定SmsReceiver,MmsReceiver,ComposeSmsActivity,HeadlessSmsSendService,并且這四個一個都不能少,而且對于的action之類的都要設定正确(簡單來說,你copy我的,根據自己的實際改改就行了)
接下來為了簡單起見,我設定了四個最簡單的類
MmsReceiver:
package com.example.androidtest;

import android.content.BroadcastReceiver;
import android.content.Context;
import android.content.Intent;
import android.util.Log;

public class MmsReceiver extends BroadcastReceiver{

	@Override
	public void onReceive(Context context, Intent intent) {
		Log.i("cky","MmsReceiver: "+intent);
	}

}
ComposeSmsActivity:
package com.example.androidtest;

import android.app.Activity;
import android.os.Bundle;
import android.util.Log;

public class ComposeSmsActivity extends Activity{
	@Override
	protected void onCreate(Bundle savedInstanceState) {
		// TODO Auto-generated method stub
		super.onCreate(savedInstanceState);
		Log.i("cky","ComposeSmsActivity");
	}
}
HeadlessSmsSendService:
package com.example.androidtest;

import android.app.Service;
import android.content.Intent;
import android.os.IBinder;
import android.util.Log;

public class HeadlessSmsSendService extends Service{

	@Override
	public IBinder onBind(Intent intent) {
		Log.i("cky","HeadlessSmsSendService: "+intent);
		return null;
	}

}
在SmsReceiver裡面,我列印了新短信的資訊,并且查詢了短信資料庫(查詢短信權限是有的,但是沒有修改權限)
package com.example.androidtest;

import android.content.BroadcastReceiver;
import android.content.Context;
import android.content.Intent;
import android.database.Cursor;
import android.net.Uri;
import android.os.Bundle;
import android.telephony.SmsMessage;
import android.transition.Slide;
import android.util.Log;
import android.widget.Toast;

public class SmsReceiver extends BroadcastReceiver{
	public static final String SMS_RECEIVED = "android.provider.Telephony.SMS_RECEIVED";
	public SmsReceiver() {
		Log.i("cky", "new SmsReceiver");
	}
	@Override
	public void onReceive(Context context, Intent intent) {
		// TODO Auto-generated method stub
		Log.i("cky", "jie shou dao");
		Cursor cursor = null;
        try {
            if (SMS_RECEIVED.equals(intent.getAction())) {
	            Log.d("cky", "sms received!");
	            Bundle bundle = intent.getExtras();
	            if (bundle != null) {
	                Object[] pdus = (Object[]) bundle.get("pdus");
	                final SmsMessage[] messages = new SmsMessage[pdus.length];
	                for (int i = 0; i < pdus.length; i++) {
	                    messages[i] = SmsMessage.createFromPdu((byte[]) pdus[i]);
	                }
	                if (messages.length > 0) {
	                    String msgBody = messages[0].getMessageBody();
	                    String msgAddress = messages[0].getOriginatingAddress();
	                    long msgDate = messages[0].getTimestampMillis();
	                    String smsToast = "New SMS received from : "
	                            + msgAddress + "\n'"
	                            + msgBody + "'";
	                    Toast.makeText(context, smsToast, Toast.LENGTH_LONG)
	                            .show();
	                    Log.d("cky", "message from: " + msgAddress + ", message body: " + msgBody
	                            + ", message date: " + msgDate);
	                }
	            }
	            cursor = context.getContentResolver().query(Uri.parse("content://sms"), new String[] { "_id", "address", "read", "body", "date" }, "read = ? ", new String[] { "0" }, "date desc");
	            if (null == cursor){
	                return;
	            }

	            Log.i("cky","m cursor count is "+cursor.getCount());
	            Log.i("cky","m first is "+cursor.moveToFirst());


            }
        } catch (Exception e) {
            e.printStackTrace();
            Log.e("cky", "Exception : " + e);
        } finally {
            if (cursor != null) {
                cursor.close();
                cursor = null;
            }
        }

	}
}
最後是MainActivity,裡面有一個按鈕,按一下就将新短信設定為已讀
package com.example.androidtest;

import android.annotation.SuppressLint;
import android.app.Activity;
import android.content.ContentValues;
import android.content.Intent;
import android.database.Cursor;
import android.net.Uri;
import android.os.Bundle;
import android.provider.Telephony;
import android.provider.Telephony.Sms;
import android.util.Log;
import android.view.View;
import android.view.View.OnClickListener;
import android.widget.Button;

@SuppressLint("NewApi")
public class MainActivity extends Activity {
	SmsReceiver myReceiver;
	Button btn;
	@Override
	protected void onCreate(Bundle savedInstanceState) {
		super.onCreate(savedInstanceState);
		setContentView(R.layout.activity_main);
		btn = (Button) findViewById(R.id.btn);
		btn.setOnClickListener(new OnClickListener() {

			@Override
			public void onClick(View v) {
				test();
			}
		});
	}
	//将新短信設定為已讀
	public void test(){
		Cursor cursor = null;
        try {
            cursor = getContentResolver().query(Uri.parse("content://sms/inbox"), new String[] { "_id", "address", "read" }, "read = ? ", new String[] {"0" }, "date desc");
            if (cursor != null) {
                ContentValues values = new ContentValues();
                values.put("read", "1");
                for (cursor.moveToFirst(); !cursor.isAfterLast(); cursor.moveToNext()) {
                    Log.v("cky", "" + cursor.getInt(cursor.getColumnIndex("_id")) + "  ,  " + cursor.getString(cursor.getColumnIndex("address")));
                    int res = getContentResolver().update(Uri.parse("content://sms/inbox"), values, "_id=?", new String[] { "" + cursor.getInt(cursor.getColumnIndex("_id")) });
                    Log.i("cky","geng xin = "+res);
                }
            }
        } catch (Exception e) {
            e.printStackTrace();
        } finally {
            if (cursor != null) {
                cursor.close();
                cursor = null;
            }
        }
	}
}
接下來就是測試
1,當我們沒有設定AndroidTest為預設sms短信app的時候,給手機發短信,通過logcat可以看到有新短信,但是資料庫查詢不到(這個原因見上一篇文章);
點選按鈕,沒有辦法将短信設定為已讀(geng xin=0)

2,我将AndriodTest設定為預設Sms短信app,結果如下,我們可以将短信設定為已讀了(geng xin-1),并且資料庫查詢,也有新短信資訊
綜上所述,就可以使我們的app最先接收到短信了
可是問題是,我們的App既想修改短信資料庫,又不想作為短信app,怎麼辦呢?
答案是涼拌。。雖然google為我們提供了一種機智的方法,就是在我們要操作短信資料庫的時候,将我們的app設定為預設sms短信app
資料庫操作結束以後,再還原回來
步驟如下:
1查詢目前預設的短信應用包名并把包名儲存起來。
String defaultSmsApp = Telephony.Sms.getDefaultSmsPackage(context);
2請求使用者把你的應用設定成預設短信應用以便進行短信還原(你必須作為預設短信應用才可以寫入資料到SMS Provider中)。
Intent intent = new Intent(context, Sms.Intents.ACTION_CHANGE_DEFAULT);
intent.putExtra(Sms.Intents.EXTRA_PACKAGE_NAME, context.getPackageName());
startActivity(intent);
3當你還原完所有短信之後,請求使用者把步驟一儲存的應用設定回預設短信應用。
Intent intent = new Intent(context, Sms.Intents.ACTION_CHANGE_DEFAULT);
intent.putExtra(Sms.Intents.EXTRA_PACKAGE_NAME, defaultSmsApp);
startActivity(intent);
上面的做法,看起來不錯,但是在實際應用中,大部分作業系統都會彈出一個确認視窗,隻有使用者點選了以後,才能修改成功
就是這個彈出視窗,影響使用者體驗(意味着每次app修改短信資料庫,都會有彈出視窗);
并且這個視窗彈出以後,和你的資料庫操作是異步的,也就是可能使用者還沒有确認關閉這個視窗,你就進行了資料庫操作,結果導緻操作失敗
至于怎麼監聽這個系統級的彈出視窗,我還沒有辦法,有知道的朋友可以給我說說謝謝!
文章到此結束,不得不說,Android适配的坑實在是太多了!