(一)請描述一次完整的http請求處理過程
- http請求圖解
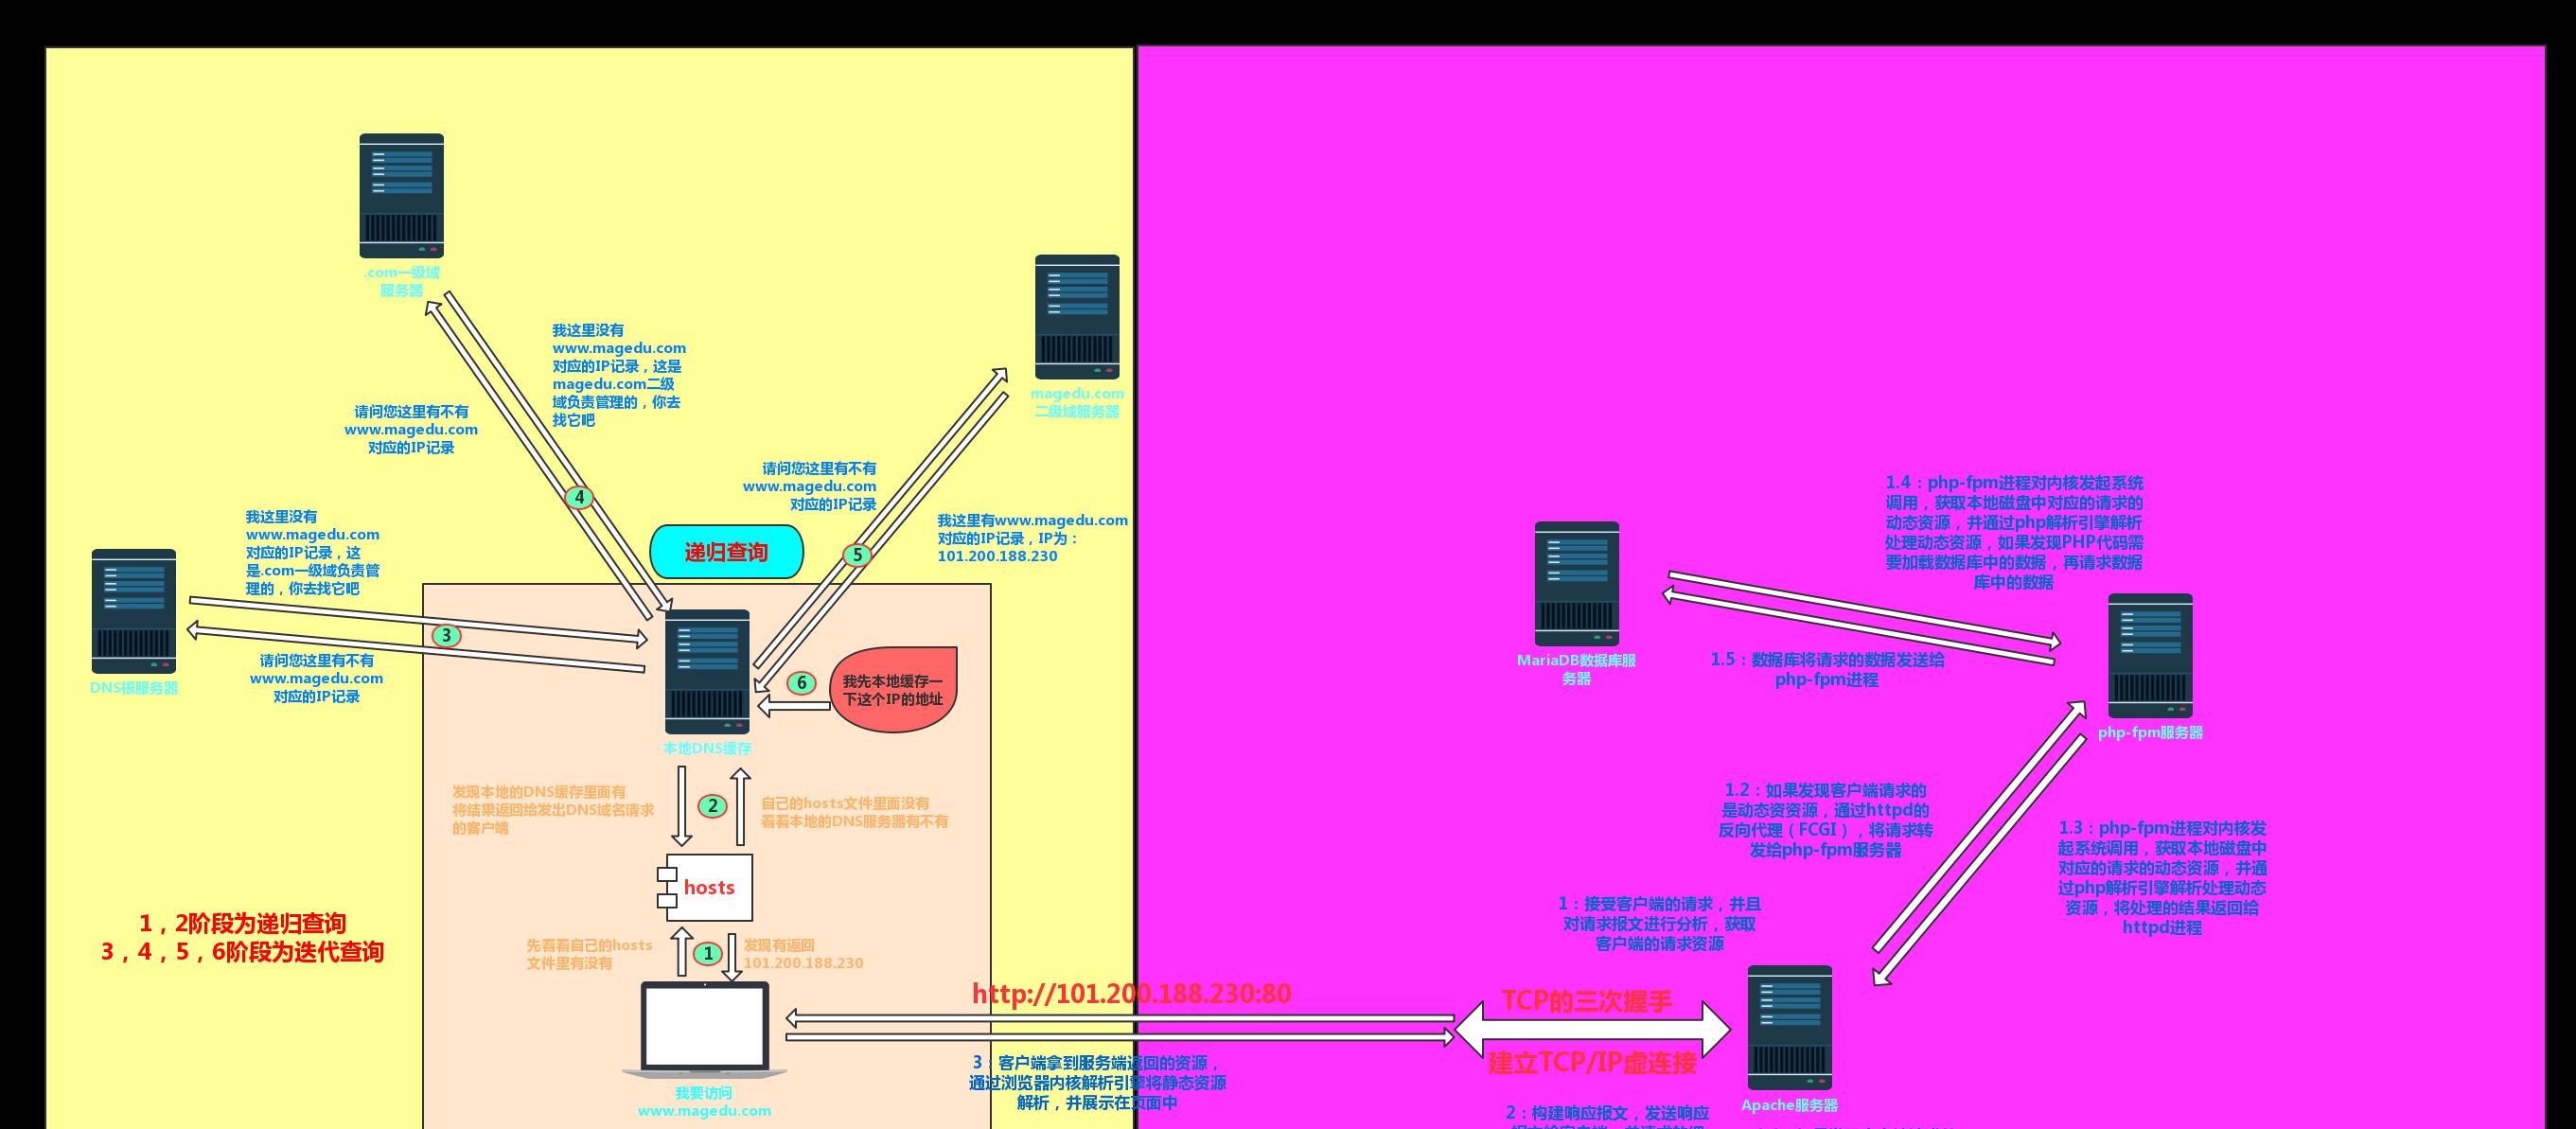
http web實戰
(二)httpd所支援的處理模型有哪些,他們的分别使用于哪些環境。
- 所謂httpd支援的處理模型及httpd的mpm機制
- perfork:多程序模型,每個程序響應一個請求
- 一個主程序:負責生成子程序及回收子程序,負責建立套接字,負責接收請求,并将其派發給某子程序進行處理
- n個子程序:每個子程序處理一個請求
- 工作模型:會預先生成5個空閑程序,随時等待用于響應使用者請求;在其配置檔案中可以指定負責最大空閑子程序和最小空閑子程序;
-

http web實戰
-
- 适用場景:它适合于沒有線程安全庫,需要避免線程相容性問題的系統。它是要求将每個請求互相獨立的情況下最好的MPM,這樣若一個請求出現問題就不會影響到其他請求,适合于并發量适中而又追求穩定的使用者使用。
- worker:多程序多線程模型,每線程處理一個使用者請求
- 一個主程序:負責生成子程序;負責建立套接字;負責接收請求,并将其派發給某子程序進行處理
- 多個子程序:每個子程序負責生成多個線程
- 每個線程:負責響應使用者請求
- 并發響應數量:m*n,m:子程序數量,n:每個子程序所能建立的最大線程數量
- 适用場景:占據更少的記憶體,高并發下表現更優秀。
- event:事件驅動模型,多程序模型,每個程序響應多個請求
- 一個主程序 :負責生成子程序;負責建立套接字;負責接收請求,并将其派發給某子程序進行處理
- 子程序:基于事件驅動機制直接響應多個請求
- 适用場景:event模型是三種模型中效率最高的一種,可以突破10K的限制(即并發數1W),對海量的系統特别适用。
- 簡要圖解
-
http web實戰
- perfork:多程序模型,每個程序響應一個請求
(三)源碼編譯安裝LAMP環境(基于wordpress程式),并寫出詳細的安裝、配置、測試過程。
- LAMP部署前,主機規劃
- 啟用兩台CentOS 6主機
- IP:192.168.10.217,安裝httpd-2.4,php-5.4
- IP:192.168.10.218,安裝MariaDB-5.5
- 啟用兩台CentOS 6主機
- LAMP程式的安裝順序
- 先安裝:在 IP:192.168.10.218的主機上安裝MariaDB-5.5
- 再安裝:在IP:192.168.10.217的主機上安裝httpd-2.4
- 最後安裝:在IP:192.168.10.217的主機上安裝php-5.4
- 安裝MariaDB-5.5
- 在 IP:192.168.10.218的主機上的/root目錄下下載下傳 mariadb-5.5.54-linux-x86_64.tar源碼包
- 準備資料目錄
-
mkdir -pv /mydata/data
-
chown -R mysql.mysql /mydata/data
-
- 安裝配置mariadb
-
groupadd mysql
-
useradd -g mysql mysql
-
tar xf mariadb-5.5.54-linux-x86_64.tar -C /usr/local
-
cd /usr/local
-
ln -sv mariaDB-version mysql
-
cd /usr/local/mysql
-
chown -R root:mysql ./*
-
cp support-files/my-large.cnf /etc/mysql/my.cnf
-
vi /etc/mysql/my.cnf
-
datadir = /mydata/data
-
innodb_file_per_table = ON
-
skip_name_resolve = ON
-
-
scripts/mysql_install_db --user=mysql --datadir=/mydata/data
-
cp support-files/mysql.server /etc/init.d/mysqld
-
chkconfig –add mysqld
-
service mysqld start
-
- 将mysql的庫檔案共享連結出來
-
vi /etc/ld.so.conf.d/mysql.conf
- 添加:
/usr/local/msyql/lib
- 重讀配置檔案:
ldconfig
- 檢查mysql的庫檔案是否可以讀取:
ldconfig -p | grep mysql
-
- 将mysql的用戶端程式的路徑添加到環境變量中
-
vi /etc/profile.d/mysql.sh
- 添加
export PATH=/usr/local/mysql/bin:$PATH
- 讓核心重新讀取配置檔案:. /etc/profile.d/mysql.sh
-
- 使用mysql的安全安裝工具對mysql進行安全加強
-
mysql_secure_installation
-
- 登入mysql , 授權遠端登入的root使用者
-
grant all on *.* to [email protected]'192.168.%.%' identified by 'yhy3426356';
-
flush privileges;
-
- 安裝httpd-2.4
- 由于在CentOS 6上安裝httpd-2.4,需要編譯安裝,依賴apr-1.4+ , 依賴apr-util-1.4+,那麼如果需要在CentOS 6上安裝httpd需要編譯安裝,并且安裝Development tools、Server Platform Development包組和pcre-devel包
- 下載下傳apr-1.5.2.tar和apr-util-1.5.4.tar在目前目錄下 , 解壓 ,下載下傳httpd-2.4到目前目錄下,解壓
- 1:編譯安裝apr-1.4+
-
./configure --prefix=/usr/local/apr/
-
make && make install
-
- 2:編譯安裝apr-util-1.4+
-
./configure --prefix=/usr/local/apr-util --with-apr=/usr/local/apr
-
make && make install
-
- 3:編譯安裝httpd-2.4
-
./configure --prefix=/usr/local/apache-2.4 --sysconfdir=/etc/httpd-2.4 --enable-so --enable-ssl --enable-cgi --enable-rewrite --enable-modules=most --enable-mpms-shared=all --with-zlib --with-pcre --with-apr=/usr/local/apr --with-apr-util=/usr/local/apr-util --with-mpm=prefor
-
make && make install
-
- 4:自帶的Apache服務控制腳本:apachectl腳本在/usr/local/httpd-2.4/bin/目錄下,可以将這個目錄添加到環境變量中,編輯
vi /etc/profile.d/httpd.sh
export PATH=/usr/local/apache-2.4/bin/:$PATH
apachectl start
- 5:另外,一般來說需要将頭檔案和庫檔案輸出
-
ln -sv /usr/local/apache-2.4/include /usr/include/httpd
-
- 6:編寫服務腳本實作service httpd start 啟動httpd
- 可以拷貝一個啟動腳本,修改中對應的變量
-
cp /etc/init.d/httpd httpd2.4
-
vi httpd-2.4
-
#注釋
 # if [ -f /etc/sysconfig/httpd ]; then
 # . /etc/sysconfig/httpd
 # fi
 # 修改為編譯安裝的apachectl路徑
 apachectl=/usr/local/apache-2.4/bin/apachectl
 # 修改為編譯安裝的httpd路徑
 httpd=${HTTPD-/usr/local/apache-2.4/bin/httpd}
 prog=httpd
 # 修改為編譯安裝的pidfile路徑
 pidfile=${PIDFILE-/usr/local/apache-2.4/logs/httpd.pid}
 lockfile=${LOCKFILE-/var/lock/subsys/httpd-2.4}
 RETVAL=0
 STOP_TIMEOUT=${STOP_TIMEOUT-10}
 雖然可以這樣修改,但是服務控制腳本一定要會編寫,屬于shell程式設計部分
-
chkconfig --add /etc/rc.d/init.d/httpd-2.4
-
service httpd-2.4 start
- 添加apache 使用者和使用者組,并且修改主配置檔案指定user為apache,group為apache
- CentOS 7 編譯安裝php5.4安裝 (編譯為httpd的子產品)
- 下載下傳php-5.4.26.tar ,解壓
-
yum install libxml2-devel libmcrypt-devel bzip2-devel curl-devel -y
- 如果MariaDB和PHP安裝不在一台主機上使用:
./configure --prefix=/usr/local/php5.4 --with-mysql=mysqlnd --with-openssl --with-mysqli=mysqlnd --with-pdo-mysql=mysqlnd --enable-mbstring --with-png-dir --with-jpeg-dir --with-freetype-dir --with-zlib --with-libxml-dir=/usr --enable-xml --enable-sockets --with-apxs2=/usr/local/apache-2.4/bin/apxs --with-config-file-path=/etc --with-config-file-scan-dir=/etc/php.d --with-bz2 --with-curl
- 拷貝php的主配置檔案:
cp php.ini-production /etc/php.ini
- 編輯httpd的主配置檔案,注釋中心主機,啟用虛拟機,在主配置檔案中添加:
-
include /etc/httpd-2.4/extra/httpd-vhosts.conf
 include /etc/httpd-2.4/extra/httpd-php.conf
-
- 編輯/etc/httpd-2.4/extra/httpd-vhosts.conf檔案
- 修改:
<VirtualHost *:80>
 ServerAdmin [email protected]
 DocumentRoot "/apps/vhosts/b.net"
 ServerName www.b.net
 ErrorLog "logs/b.net_error_log"
 CustomLog "logs/b.net_access_log" common
 </VirtualHost>
 <VirtualHost *:80>
 ServerAdmin [email protected]
 DocumentRoot "/apps/vhosts/c.org"
 ServerName www.c.org
 ErrorLog "logs/c.org_error_log"
 CustomLog "logs/c.org_access_log" common
 </VirtualHost>
- 修改:
- 編輯/etc/httpd-2.4/extra/httpd-php.conf
- 添加:
DirectoryIndex index.php
 AddType application/x-httpd-php .php
- 添加:
- 首先在/apps/vhosts/b.net中測試下php和mysql
- vi index.php
-
<?php
 $conn=mysql_connect('192.168.10.218','root','yhy3426356');
 if ($conn)
 echo "ok";
 else
 echo "failured";
 phpinfo();
 ?>
- 顯示結果為ok!!!和PHP的編譯參數
-
- vi index.php
- 下載下傳WordPress源碼,将wordpress裡面的所有的檔案解壓至/apps/vhosts/b.net中
- 并且在資料庫中建立Wordpress的資料庫,和授權一個使用者給WordPress
(四)建立httpd伺服器(基于編譯的方式進行),要求:
提供兩個基于名稱的虛拟主機:
    (a)www1.stuX.com,頁面檔案目錄為/web/vhosts/www1;錯誤日志為/var/log/httpd/www1.err,通路日志為/var/log/httpd/www1.access;
    (b)www2.stuX.com,頁面檔案目錄為/web/vhosts/www2;錯誤日志為/var/log/httpd/www2.err,通路日志為/var/log/httpd/www2.access;
    (c)為兩個虛拟主機建立各自的首頁檔案index.html,内容分别為其對應的主機名;
    (d)通過www1.stuX.com/server-status輸出httpd工作狀态相關資訊,且隻允許提供帳号密碼才能通路(status:status)。
- 思路:提過一台CentOS 7主機,yum 安裝 httpd,在主配置檔案中注釋中心主機,在虛拟主機中啟用兩個server name 。www1.stuX.com虛拟機中,錯誤日志設定:ErrorLog “/var/log/httpd/www1.err”, 通路日志設定:CustomLog “/var/log/httpd/www1.access” combined”。在 www1.stuX.com虛拟機中,錯誤日志設定:/var/log/httpd/www2.err,通路日志設定:/var/log/httpd/www2.access。并且在每一個DocumentRoot中寫入index.html,内容為其對應的主機名
- 試驗過程如下:
- (1)在主配置檔案中登出中心主機
- (2)編輯子配置檔案中的虛拟主機檔案
-
vi /etc/httpd/conf.d/vhost.conf
- 添加内容如下:
-
<VirtualHost *:80>
 ServerName www1.stuX.com
 DocumentRoot "/web/vhosts/www1"
 ErrorLog "/var/log/httpd/www1.err"
 CustomLog "/var/log/httpd/www1.access" combined
 <Directory "/web/vhosts/www1">
 Options none
 AllowOverride none
 Require all granted
 </Directory>
 <Location /server-status>
 SetHandler server-status
 AuthType Basic
 AuthName "please enter your username and password!"
 AuthUserFile "/etc/httpd/conf/.htpasswd"
 Require valid-user
 </Location>
 </VirtualHost>
 <VirtualHost *:80>
 ServerName www2.stuX.com
 DocumentRoot "/web/vhosts/www2"
 ErrorLog "/var/log/httpd/www2.err"
 CustomLog "/var/log/httpd/www2.access" combined
 <Directory "/web/vhosts/www2">
 Options none
 AllowOverride none
 Require all granted
 </Directory>
 </VirtualHost>
-
-
- (3)生成虛拟使用者檔案
-
htpasswd -m -c /etc/httpd/conf/.htpasswd tom
-
- (4)測試結果
- 
- 
- 
- 
(五)為第4題中的第2個虛拟主機提供https服務,使得使用者可以通過https安全的通路此web站點;
()要求使用證書認證,證書中要求使用的國家(CN)、州(HA)、城市(ZZ)群組織(MageEdu);
()設定部門為Ops,主機名為www2.stuX.com,郵件為[email protected].com;
- (1)準備CA主機,負責簽證(IP:192.168.10.219)
-
(umask 077;openssl genrsa -out /etc/pki/CA/private/cakey.pem 4096)
-
openssl req -new -x509 -key /etc/pki/CA/private/cakey.pem -out /etc/pki/CA/cacert.pem -days 3655
-
mkdir -pv /etc/pki/CA/{certs,crl,newcerts}
-
touch /etc/pki/CA/{serial,index.txt}
-
echo 01 > /etc/pki/CA/serial
-
- (2)在httpd伺服器上(IP:192.168.10.216),申請簽證請求
-
mkdir /etc/httpd/ssl
-
cd /etc/httpd/ssl
-
(umask 077;openssl genrsa -out /etc/httpd/ssl/httpd.key 2048)
-
openssl req -new -key /etc/httpd/ssl/httpd.key -out httpd.csr -days 365
-
scp httpd.csr [email protected]:/root/
-
- (3)CA主機上給httpd伺服器簽證
-
openssl ca -in /root/httpd.csr -out /etc/pki/CA/certs/httpd.crt -days 365
-
scp /etc/pki/CA/certs/httpd.crt [email protected]:/etc/httpd/ssl/
-
- (4)在httpd服務端安裝mod_ssl子產品,并設定https虛拟主機
-
yum -y install mod_ssl
- 編輯配置檔案
/etc/httpd/conf.d/ssl.conf
- 修改:
-
DocumentRoot "/web/vhosts/www2"
 ServerName www2.stuX.com
 SSLCertificateFile /etc/httpd/ssl/httpd.crt
 SSLCertificateKeyFile /etc/httpd/ssl/httpd.key
 <Directory "/web/vhosts/www2">
 Options none
 AllowOverride none
 Require all granted
 </Directory>
-
-
- (5)檢驗結果
- 
(六)在LAMP架構中,請分别以php編譯成httpd子產品形式和php以fpm工作為獨立守護程序的方式來支援httpd,列出詳細的過程。
- (1)
php作為httpd的子產品編譯安裝
- 當使用者的請求到達的時候,到達web伺服器,靜态的内容都會在本地裝載,都由httpd通過系統調用進行裝載,如果裝載的是靜态内容,直接傳回,如果是動态内容,交給httpd的php子產品進行處理,将處理的結果進行傳回給用戶端,如果動态頁面需要請求資料,那麼php代碼會通過網絡套接字連接配接到MariaDB資料庫。這種模式可以使用兩天伺服器,httpd+php 一台,MariaDB一台
- (2)
php作為php-fpm編譯安裝,作為一項單獨的服務
- 當使用者的請求到達的時候,到達web伺服器,靜态的内容都會在本地裝載,都由httpd通過系統調用進行裝載,如果裝載的是靜态内容,直接傳回。如果是動态内容,将整個請求的URL通過fcgi子產品反向代理至php-fpm服務,php-fpm程序會通過URL加載本地的動态資源路徑,如果動态頁面需要請求資料,那麼php代碼會通過網絡套接字連接配接到MariaDB資料庫。可以将三個服務分别拆分至不同的主機上