這是一個繼承了BaseAdapter的工具類,裡面已經實作了幾個簡單方法。
使用這個工具類可以很更友善的使用BaseAdapter來進行ListView頁面資料的适配。
使用這個工具類的步驟:
1.需要重寫構造方法傳入集合類型的資料或數組類型的資料
2.重寫getView的方法實作具體視圖的顯示
ListView的顯示隻支援集合資料,這裡已經把數組資料進行過轉換了,是以才能直接傳入數組的資料。
一.工具類的設計
package com.android.utils;

import android.content.Context;
import android.widget.BaseAdapter;

import java.util.ArrayList;
import java.util.List;

/**
 * 這是一個簡化BaseAdapter擴充卡的工具類
 * 這是使用的是定義一個泛型T,使用時傳入什麼資料,T就是什麼資料
 * 實際設計中除了getVIew方法外,其他的方法基本是差不多的
 * 是以繼承這個工具類後隻要重寫getView方法,就可以使用BaseAdapter了
 */

public abstract class ListItemAdapter<T> extends BaseAdapter {
    //定義集合資料
    List<T> list = new ArrayList<T>();
    //上下文
    Context context;

    //傳入的是一個集合的資料的情況
    public ListItemAdapter(Context context, List<T> list) {

        this.context = context;
        this.list = list;
    }

    //傳入的是一個數組資料的情況
    //其實數組也是要轉換為集合的資料,因為擴充卡隻接受集合的資料
    public ListItemAdapter(Context context, T[] list) {
        this.context = context;
        for (T t : list) {
            this.list.add(t);
        }
    }

    //傳回資料的總數
    @Override
    public int getCount() {
        return list == null ?  : list.size();
    }

    //傳回集合中某個遊标值的對象
    @Override
    public T getItem(int position) {
        return list == null ? null : list.get(position);
    }

    //傳回選中的條目的遊标值
    @Override
    public long getItemId(int position) {
        return position;
    }

}
二.調用的示例
這裡分别使用數組資料和集合資料結合ListView分别顯示多行資料。
(一)建立布局檔案
1.首頁布局activity_main.xml
<LinearLayout
        xmlns:android="http://schemas.android.com/apk/res/android"
        xmlns:tools="http://schemas.android.com/tools"
        android:layout_width="match_parent"
        android:layout_height="match_parent"
        android:orientation="horizontal"
        >

        <ListView
            android:layout_weight="1"
            android:layout_width="0dp"
            android:layout_height="match_parent"
            android:id="@+id/lv1"
            />
              <ListView
            android:layout_weight="1"
            android:layout_width="0dp"
            android:layout_height="match_parent"
            android:id="@+id/lv2"
            />

 </LinearLayout>
這裡設計兩個ListView分别顯示兩種資料的情況。
2.ListView中每一個條目的布局檔案item_list.xml
<LinearLayout
        xmlns:android="http://schemas.android.com/apk/res/android"
        xmlns:tools="http://schemas.android.com/tools"
        android:layout_width="match_parent"
        android:layout_height="wrap_content"
        android:orientation="horizontal"
        android:gravity="center_vertical"
        >
        <ImageView
            android:layout_margin="20dp"
            android:layout_width="wrap_content"
            android:layout_height="wrap_content"
            android:id="@+id/item_iv"
            android:src="@drawable/ic_launcher"
            />
         <TextView
             android:layout_height="wrap_content"
             android:layout_width="wrap_content"
             android:id="@+id/item_tv"
             android:text="文本内容"
             />


    </LinearLayout>
這裡每一個條目的設計也是比較簡單的,左邊是一個圖檔,右邊是一個文本。
(二)工具類,上面已經展示!
(三)主方法的調用類
package com.example.utils;
import java.util.ArrayList;
import java.util.List;
import com.android.utils.ListItemAdapter;
import android.app.Activity;
import android.content.Context;
import android.os.Bundle;
import android.view.View;
import android.view.ViewGroup;
import android.widget.Adapter;
import android.widget.ImageView;
import android.widget.ListAdapter;
import android.widget.ListView;
import android.widget.TextView;
/**
*Adapter工具類的使用示範
* @param <T>
*
*/
public class MainActivity extends Activity {
//定義布局内的控件
ListView lv1;
ListView lv2;
@Override
protected void onCreate(Bundle savedInstanceState) {
super.onCreate(savedInstanceState);
setContentView(R.layout.activity_main);
//執行個體化控件
lv1=(ListView) findViewById(R.id.lv1);
lv2=(ListView) findViewById(R.id.lv2);
//數組的資料
String[] data1=new String[];
for(int i=;i<data1.length;i++){
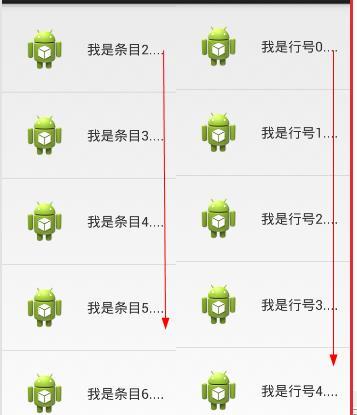
data1[i]="我是條目"+i+"....";
}
//給ListView1設定擴充卡,要給擴充卡添加資料
lv1.setAdapter(new Myadater(this,data1));
//集合的資料
List<String>data2=new ArrayList<String>();
for(int i=;i<data1.length;i++){
data2.add( "我是行号"+i+"....");
}
//給ListView1設定擴充卡,要給擴充卡添加資料
lv2.setAdapter(new Myadater(this,data2));
}
//建立擴充卡的類
public class Myadater extends ListItemAdapter<String>{
//接收數組資料的構造器
Myadater(Context context, String[] list) {
super(context, list);
}
//接收集合資料的構造器
Myadater(Context context, List<String> list) {
super(context, list);
}
@Override
public View getView(int arg0, View arg1, ViewGroup arg2) {
ViewHolder hodler;
if (arg1==null) {
arg1=View.inflate(MainActivity.this,R.layout.item_list,null);
hodler=new ViewHolder(arg1);
arg1.setTag(hodler);
}else {
hodler=(ViewHolder) arg1.getTag();
}
//設定控件
hodler.imageView.setImageResource(R.drawable.ic_launcher);
hodler.textView.setText(getItem(arg0));
//傳回緩存資料的對象
return arg1;
}
//資料緩存的類
class ViewHolder{
ImageView imageView;
TextView textView;
public ViewHolder(View contentView) {
imageView=(ImageView) contentView.findViewById(R.id.item_iv);
textView=(TextView) contentView.findViewById(R.id.item_tv);
}
}
}
}
程式運作後顯示,左右兩個ListView的視圖界面,如圖所示:
ListView的顯示在大部分的程式中都會用到,是以這個工具類收藏起來,在需要使用的時候,就可以很友善的調用了。
![與專家面對面:Android開發入門問與答[圖]](data:image/gif;base64,R0lGODlhAQABAIAAAP///wAAACwAAAAAAQABAAACAkQBADs=)