1. 在CentOS上安裝logstash5.5:
參考這篇文章。 隻是這文章比較久了,現在有些變化,我還是把過程寫下來:
1,下載下傳logstash5.5.1
2, 解壓tar zxvf logstash-5.5.1.tar.gz
3, 進入logstash-5.5.1目錄, 根據網上的文章,還需要單獨安裝logstash-input-jdbc, 但是現在都已經內建在5.5.1的安裝包i面了
- 參考官方的plugin說明文檔, 在指令行中運作:
該指令列出所有已安裝的插件
這個指令列出所有已安裝插件的名稱和版本,截屏部分如下,你會發現logstash-input-jdbc(4.2.1)已經安裝了:

2. 安裝ElasticSearch
安裝文檔
根據安裝好後,運作./bin/elasticsearch, 報記憶體不夠,因為我的虛機隻有1G的記憶體,運作’top’指令發現隻有150M的可用記憶體,怎麼辦呢?修改/usr/local/es/elasticsearch-5.4.3/config目錄下的jvm.options檔案:
vim jvm.options
修改成128m:
################################################################
## IMPORTANT: JVM heap size
################################################################
##
## You should always set the min and max JVM heap
## size to the same value. For example, to set
## the heap to 4 GB, set:
##
## -Xms4g
## -Xmx4g
##
## See https://www.elastic.co/guide/en/elasticsearch/reference/current/heap-size.html
## for more information
##
################################################################

# Xms represents the initial size of total heap space
# Xmx represents the maximum size of total heap space


-Xms128m
-Xmx128m
ES不能用root使用者啟動,建立一個新的使用者es, 切換到es:
su es
之後在ES的安裝目錄裡執行:
./bin/elasticsearch
可以在指令行裡用curl指令檢視ES是否已經運作(預設端口9200),指令如下:
系統會顯示:

3. 安裝Mysql, 情形和這個文章描述的一樣,最後還是裝了又卸掉。
安裝原生tar.gz包的官方指南
太麻煩,于是安裝了MariaDB, 安裝教程
配置MariaDB,root的密碼是simon, 之後加了一個可以從遠端通路的帳号:
MariaDB [(none)]> CREATE USER 'zoujia'@'%' IDENTIFIED BY 'simon';
并授予一切權利:
MariaDB [(none)]> GRANT ALL PRIVILEGES ON *.* TO 'zoujia'@'%' WITH GRANT OPTION;
這樣就能從NaviCat遠端連接配接了。
4. 使用logstash的logstash-input-jdbc插件來将mysql資料庫中的資料導入到ES, 根據這個官方說明操作
- 首先要在logstash目錄下建立一個jdbc.conf檔案:
input {
    stdin {
    }
    jdbc {
      # mysql jdbc connection string to our backup databse
      jdbc_connection_string => "jdbc:mysql://localhost:3306/test"
      # the user we wish to excute our statement as
      jdbc_user => "simon"
      jdbc_password => "simon"
      # the path to our downloaded jdbc driver
      jdbc_driver_library => "/opt/logstash-5.5.1/mysql-connector-java-5.1.36.jar"
      # the name of the driver class for mysql
      jdbc_driver_class => "com.mysql.jdbc.Driver"
      jdbc_paging_enabled => "true"
      jdbc_page_size => "50000"
      statement_filepath => "jdbc.sql"
      schedule => "* * * * *"
      type => "jdbc"
    }
}

filter {
    json {
        source => "message"
        remove_field => ["message"]
    }
}

output {
    elasticsearch {
        hosts => ["127.0.0.1:9200"]
        index => "mysql01"
        document_id => "%{id}"    }
    stdout {
        codec => json_lines
    }
}
- 其中要上傳一個’mysql-connector-java-5.1.36.jar’檔案到logstash目錄下,以對應配置檔案中的:
- 在logstash目錄下建立一個jdbc.sql檔案:
select * from simontable
對應配置檔案中:
statement_filepath => "jdbc.sql"
``` 選項

 運作指令:


<div class="se-preview-section-delimiter"></div>
[[email protected]_27_195_centos logstash-5.5.1]# bin/logstash -f jdbc.conf
等上大約半分鐘(沒辦法,買的虛機配置很低, 隻有1G的記憶體), 開始工作:
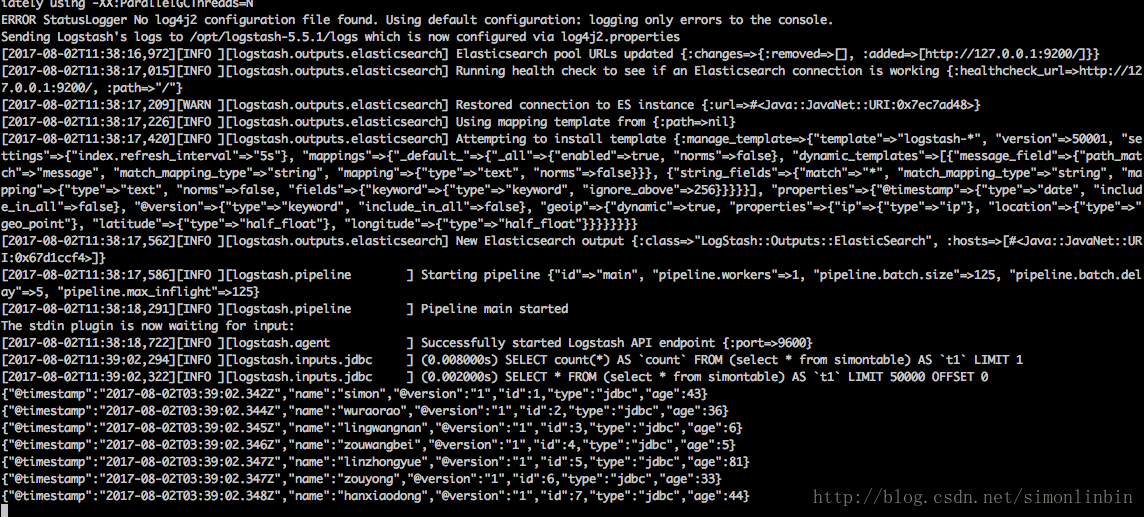
系統會每一秒鐘執行一次, 在elasticsearch裡面執行:
<div class="se-preview-section-delimiter"></div>
[[email protected]_27_195_centos ~]# curl http://localhost:9200/mysql01/_search?pretty
會顯示已經導入的記錄:


<div class="se-preview-section-delimiter"></div>
{
“took” : 120,
“timed_out” : false,
“_shards” : {
“total” : 5,
“successful” : 5,
“failed” : 0
},
“hits” : {
“total” : 7,
“max_score” : 1.0,
“hits” : [
{
“_index” : “mysql01”,
“_type” : “jdbc”,
“_id” : “5”,
“_score” : 1.0,
“_source” : {
“@timestamp” : “2017-08-02T03:11:00.220Z”,
“name” : “linzhongyue”,
“@version” : “1”,
“id” : 5,
“type” : “jdbc”,
“age” : 81
}
},
{
“_index” : “mysql01”,
“_type” : “jdbc”,
“_id” : “2”,
“_score” : 1.0,
“_source” : {
“@timestamp” : “2017-08-02T03:11:00.218Z”,
“name” : “wuraorao”,
“@version” : “1”,
“id” : 2,
“type” : “jdbc”,
“age” : 36
}
},
{
“_index” : “mysql01”,
“_type” : “jdbc”,
“_id” : “4”,
“_score” : 1.0,
“_source” : {
“@timestamp” : “2017-08-02T03:11:00.219Z”,
“name” : “zouwangbei”,
“@version” : “1”,
“id” : 4,
“type” : “jdbc”,
“age” : 5
}
},
{
“_index” : “mysql01”,
“_type” : “jdbc”,
“_id” : “6”,
“_score” : 1.0,
“_source” : {
“@timestamp” : “2017-08-02T03:11:00.220Z”,
“name” : “zouyong”,
“@version” : “1”,
“id” : 6,
“type” : “jdbc”,
“age” : 33
}
},
{
“_index” : “mysql01”,
“_type” : “jdbc”,
“_id” : “1”,
“_score” : 1.0,
“_source” : {
“@timestamp” : “2017-08-02T03:11:00.218Z”,
“name” : “simon”,
“@version” : “1”,
“id” : 1,
“type” : “jdbc”,
“age” : 43
}
},
{
“_index” : “mysql01”,
“_type” : “jdbc”,
“_id” : “7”,
“_score” : 1.0,
“_source” : {
“@timestamp” : “2017-08-02T03:11:00.223Z”,
“name” : “hanxiaodong”,
“@version” : “1”,
“id” : 7,
“type” : “jdbc”,
“age” : 44
}
},
{
“_index” : “mysql01”,
“_type” : “jdbc”,
“_id” : “3”,
“_score” : 1.0,
“_source” : {
“@timestamp” : “2017-08-02T03:11:00.219Z”,
“name” : “lingwangnan”,
“@version” : “1”,
“id” : 3,
“type” : “jdbc”,
“age” : 6
}
}
]
}
}
“`
測試結果: 增加和更改MariaDB中的原表,都可以在ES中回報出來,但如果是删除了一條記錄,但是在ES該記錄仍然存在,隻是他的@timestamp不再更行了,見下圖:
第二條記錄在MariaDB中已經删除了,你可以看到它的時間比上面的記錄早3分鐘。
[root@VM_27_195_centos ~]# curl http://localhost:9200/mysql01/_search?pretty
會顯示已經導入的記錄:
{
  "took" : ,
  "timed_out" : false,
  "_shards" : {
    "total" : ,
    "successful" : ,
    "failed" :
  },
  "hits" : {
    "total" : ,
    "max_score" : ,
    "hits" : [
      {
        "_index" : "mysql01",
        "_type" : "jdbc",
        "_id" : "5",
        "_score" : ,
        "_source" : {
          "@timestamp" : "2017-08-02T03:11:00.220Z",
          "name" : "linzhongyue",
          "@version" : "1",
          "id" : ,
          "type" : "jdbc",
          "age" :
        }
      },
      {
        "_index" : "mysql01",
        "_type" : "jdbc",
        "_id" : "2",
        "_score" : ,
        "_source" : {
          "@timestamp" : "2017-08-02T03:11:00.218Z",
          "name" : "wuraorao",
          "@version" : "1",
          "id" : ,
          "type" : "jdbc",
          "age" :
        }
      },
      {
        "_index" : "mysql01",
        "_type" : "jdbc",
        "_id" : "4",
        "_score" : ,
        "_source" : {
          "@timestamp" : "2017-08-02T03:11:00.219Z",
          "name" : "zouwangbei",
          "@version" : "1",
          "id" : ,
          "type" : "jdbc",
          "age" :
        }
      },
      {
        "_index" : "mysql01",
        "_type" : "jdbc",
        "_id" : "6",
        "_score" : ,
        "_source" : {
          "@timestamp" : "2017-08-02T03:11:00.220Z",
          "name" : "zouyong",
          "@version" : "1",
          "id" : ,
          "type" : "jdbc",
          "age" :
        }
      },
      {
        "_index" : "mysql01",
        "_type" : "jdbc",
        "_id" : "1",
        "_score" : ,
        "_source" : {
          "@timestamp" : "2017-08-02T03:11:00.218Z",
          "name" : "simon",
          "@version" : "1",
          "id" : ,
          "type" : "jdbc",
          "age" :
        }
      },
      {
        "_index" : "mysql01",
        "_type" : "jdbc",
        "_id" : "7",
        "_score" : ,
        "_source" : {
          "@timestamp" : "2017-08-02T03:11:00.223Z",
          "name" : "hanxiaodong",
          "@version" : "1",
          "id" : ,
          "type" : "jdbc",
          "age" :
        }
      },
      {
        "_index" : "mysql01",
        "_type" : "jdbc",
        "_id" : "3",
        "_score" : ,
        "_source" : {
          "@timestamp" : "2017-08-02T03:11:00.219Z",
          "name" : "lingwangnan",
          "@version" : "1",
          "id" : ,
          "type" : "jdbc",
          "age" :
        }
      }
    ]
  }
}
測試結果: 增加和更改MariaDB中的原表,都可以在ES中回報出來,但如果是删除了一條記錄,但是在ES該記錄仍然存在,隻是他的@timestamp不再更行了,見下圖:
第二條記錄在MariaDB中已經删除了,你可以看到它的時間比上面的記錄早3分鐘。