IdentityServer官方提供web頁面,可以根據需求修改樣式。具體UI下載下傳跟配置參考官網文檔。
文檔位址:https://identityserver4.readthedocs.io/en/release/quickstarts/3_interactive_login.html
使用UI登入涉及的知識點參考園裡大佬@solenovex的文章。這裡不在重複說明,感興趣的同學可以去看看。原文位址:https://www.cnblogs.com/cgzl/p/9253667.html
我這裡是根據官方提供的UI進行修改、自定義使用者登入、通路API。
源碼位址:https://github.com/YANGKANG01/IdentityServer4-IdentityAuth
一、配置IdentityServer
1、引入官網包:
IdentityServer4
2、需要重新定義Web端資訊,除了
ClientId,AllowedGrantTypes,ClientSecrets,AllowedScopes
等屬性還需要配置登入成功或登出後的傳回位址
RedirectUris
跟
PostLogoutRedirectUris
。
Config
檔案配置如下:
using IdentityServer4;
using IdentityServer4.Models;
using System;
using System.Collections.Generic;
using System.Linq;
using System.Threading.Tasks;

namespace IdentityServer
{
    /// <summary>
    /// IdentityServer配置
    /// </summary>
    public class Config
    {
        /// <summary>
        /// 添加對OpenID Connect的支援
        /// </summary>
        /// <returns></returns>
        public static IEnumerable<IdentityResource> GetIdentityResources()
        {
            return new List<IdentityResource>
            {
                new IdentityResources.OpenId(), //必須要添加,否則報無效的scope錯誤
                new IdentityResources.Profile()
            };
        }
        /// <summary>
        /// 定義系統中的API資源
        /// </summary>
        /// <returns></returns>
        public static IEnumerable<ApiResource> GetApiResources()
        {
            return new List<ApiResource>
            {
                new ApiResource("api1", "My API")
            };
        }

        /// <summary>
        /// 用戶端通路資源
        /// </summary>
        /// <returns></returns>
        public static IEnumerable<Client> GetClients()
        {
            // 用戶端資訊
            return new List<Client>
            {
             //自定義接口登入的用戶端
             new Client
                {
                    //用戶端ID名稱
                    ClientId = "client1",
                    //用戶端通路方式:密碼驗證
                    AllowedGrantTypes = GrantTypes.ResourceOwnerPassword,
                    //用于認證的密碼加密方式
                    ClientSecrets =
                    {
                        new Secret("secret".Sha256())
                    },
                    //用戶端有權通路的範圍
                    AllowedScopes = { "api1",
                    IdentityServerConstants.StandardScopes.OpenId, //必須要添加,否則報403 forbidden錯誤
                    IdentityServerConstants.StandardScopes.Profile
                 }
                },
                //定義mvc用戶端
                new Client
                {
                    //用戶端ID名稱
                    ClientId = "mvc",
                    ClientName = "MVC Client",
                    //通路類型
                    AllowedGrantTypes = GrantTypes.Hybrid,
                    //關閉确認是否傳回身份資訊界面
                    RequireConsent=false,
                   // 登入成功後重定向位址
                    RedirectUris = { "http://localhost:5002/signin-oidc" },
                   //登出成功後的重定向位址
                    PostLogoutRedirectUris = { "http://localhost:5002/signout-callback-oidc" },
                     //用于認證的密碼加密方式
                    ClientSecrets =
                    {
                        new Secret("secret".Sha256())
                    },
                     //用戶端有權通路的範圍
                    AllowedScopes = new List<string>
                    {
                        IdentityServerConstants.StandardScopes.OpenId,
                        IdentityServerConstants.StandardScopes.Profile,
                        "api1",//要通路的api名稱
                    },
                }
            };
        }
    }
}
3、Startup的配置跟前面自定義接口登入一樣沒什麼變化,這裡也貼下源碼友善沒看前篇的同學:
using System;
using System.Collections.Generic;
using System.Linq;
using System.Threading.Tasks;
using IdentityServer.Service;
using Microsoft.AspNetCore.Builder;
using Microsoft.AspNetCore.Hosting;
using Microsoft.AspNetCore.Http;
using Microsoft.Extensions.DependencyInjection;
namespace IdentityServer
{
public class Startup
{
// This method gets called by the runtime. Use this method to add services to the container.
// For more information on how to configure your application, visit https://go.microsoft.com/fwlink/?LinkID=398940
public void ConfigureServices(IServiceCollection services)
{
//配置身份伺服器與記憶體中的存儲,密鑰,用戶端和資源
services.AddIdentityServer()
.AddDeveloperSigningCredential()
.AddInMemoryIdentityResources(Config.GetIdentityResources())//使用者資訊模組化
.AddInMemoryApiResources(Config.GetApiResources())//添加api資源
.AddInMemoryClients(Config.GetClients())//添加用戶端
.AddResourceOwnerValidator<LoginValidator>()//使用者校驗
.AddProfileService<ProfileService>();
//注冊mvc服務
services.AddMvc();
}
// This method gets called by the runtime. Use this method to configure the HTTP request pipeline.
public void Configure(IApplicationBuilder app, IHostingEnvironment env)
{
if (env.IsDevelopment())
{
app.UseDeveloperExceptionPage();
}
//添加到HTTP管道中。
app.UseIdentityServer();
//添加靜态資源通路
app.UseStaticFiles();
//添加mvc到管道中
app.UseMvcWithDefaultRoute();
}
}
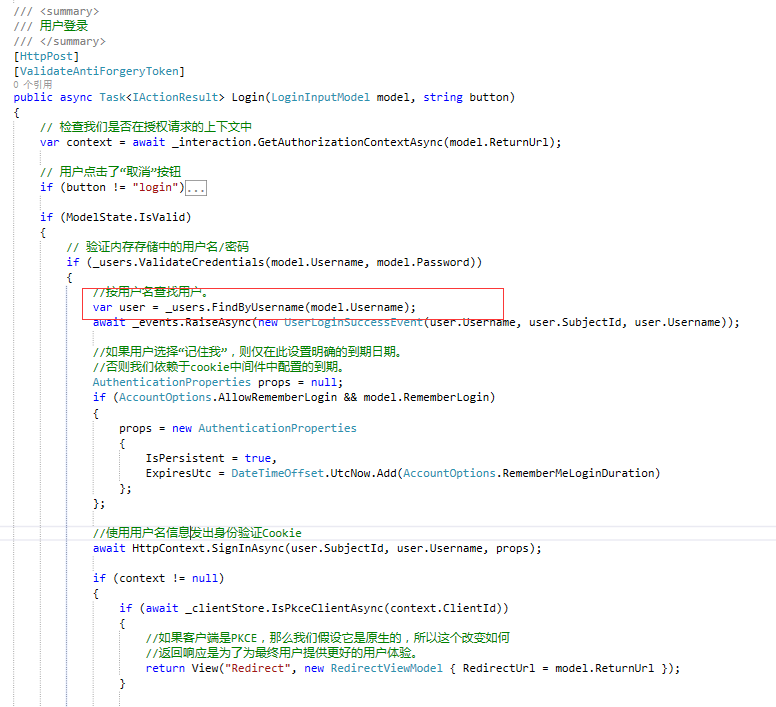
} 4、添加官網UI後找到
AccountController
類,修改登入方法
Login
,把下圖中的代碼替換成自己的查詢資料庫使用者即可,這裡官方使用的是
TestUsers
類中自定義的使用者來登入。
二、Web端配置擷取登入後的使用者資訊
IdentityModel
2、Startup配置如下。
ResponseType
傳回類型詳情可參考@solenovex的文章,大佬在文章說的比較詳細,這裡不在重複說明,位址:https://www.cnblogs.com/cgzl/p/9253667.html
using System;
using System.Collections.Generic;
using System.IdentityModel.Tokens.Jwt;
using System.Linq;
using System.Threading.Tasks;
using Microsoft.AspNetCore.Authentication;
using Microsoft.AspNetCore.Builder;
using Microsoft.AspNetCore.Hosting;
using Microsoft.AspNetCore.Http;
using Microsoft.AspNetCore.Mvc;
using Microsoft.Extensions.Configuration;
using Microsoft.Extensions.DependencyInjection;

namespace Web
{
    public class Startup
    {
        public Startup(IConfiguration configuration)
        {
            Configuration = configuration;
        }

        public IConfiguration Configuration { get; }

        // This method gets called by the runtime. Use this method to add services to the container.
        public void ConfigureServices(IServiceCollection services)
        {
            services.Configure<CookiePolicyOptions>(options =>
            {
                // This lambda determines whether user consent for non-essential cookies is needed for a given request.
                options.CheckConsentNeeded = context => true;
                options.MinimumSameSitePolicy = SameSiteMode.None;
            });

            JwtSecurityTokenHandler.DefaultInboundClaimTypeMap.Clear();

            services.AddAuthentication(options =>
            {
                options.DefaultScheme = "Cookies";
                options.DefaultChallengeScheme = "oidc";
            })
                .AddCookie("Cookies")
                .AddOpenIdConnect("oidc", options =>
                {
                    options.SignInScheme = "Cookies";
                    //授權端服務位址
                    options.Authority = "http://localhost:5000/";
                    //是否https請求
                    options.RequireHttpsMetadata = false;
                    //用戶端ID名稱
                    options.ClientId = "mvc";
                    options.ClientSecret = "secret";
                    //傳回的類型
                    options.ResponseType = "code id_token";
                    //添加自定義使用者資訊
                    options.Scope.Clear();
                    options.Scope.Add("openid");
                    options.Scope.Add("profile");
                    //是否存儲token
                    options.SaveTokens = true;
                    //用于設定在從令牌端點接收的id_token建立辨別後,處理程式是否應轉到使用者資訊端點
                    options.GetClaimsFromUserInfoEndpoint = true;
                    //通路名稱api
                    options.Scope.Add("api1");
                    //避免claims被預設過濾掉,如果不想讓中間件過濾掉nbf和amr, 把nbf和amr從被過濾掉集合裡移除。可以使用下面這個方方式:
                    options.ClaimActions.Remove("nbf");
                    options.ClaimActions.Remove("amr");
                    //删除某些Claims
                    options.ClaimActions.DeleteClaim("sid");
                    options.ClaimActions.DeleteClaim("idp");
                });

            services.AddMvc().SetCompatibilityVersion(CompatibilityVersion.Version_2_1);
        }

        // This method gets called by the runtime. Use this method to configure the HTTP request pipeline.
        public void Configure(IApplicationBuilder app, IHostingEnvironment env)
        {
            if (env.IsDevelopment())
            {
                app.UseDeveloperExceptionPage();
            }
            else
            {
                app.UseExceptionHandler("/Home/Error");
            }

            app.UseStaticFiles();
            app.UseCookiePolicy();
            //添加使用者驗證中間件
            app.UseAuthentication();
            //
            app.UseMvc(routes =>
            {
                routes.MapRoute(
                    name: "default",
                    template: "{controller=Home}/{action=Index}/{id?}");
            });
        }
    }
}
3、在需要登入的頁面方法添加
Authorize
特性。

啟動web 會看到頁面自動重定向到登入頁面效果如圖:
4、擷取使用者資訊可使用
HttpContext.User.Identity
來擷取目前使用者資訊,代碼如下:
//擷取使用者資訊
 var claimIdentity = (ClaimsIdentity)HttpContext.User.Identity;
 var claimsPrincipal = claimIdentity.Claims as List<Claim>;
5、擷取使用者
token
,這裡的
token
是服務端生成發送給用戶端,用于身份校驗,可使用
token
通路需要登入權限的API接口。代碼如下:
//擷取使用者token
var token = await HttpContext.GetTokenAsync(OpenIdConnectParameterNames.AccessToken);
Ps:登出登入預設跳轉到退出資訊提示頁面,如不需要修改服務端的
AccountOptions
類中的
AutomaticRedirectAfterSignOut
屬性,預設為
false
,修改為
true
即可。
三、API配置
IdentityServer4.AccessTokenValidation
2、Startup類配置如下:
using System;
using System.Collections.Generic;
using System.Linq;
using System.Threading.Tasks;
using Microsoft.AspNetCore.Builder;
using Microsoft.AspNetCore.Hosting;
using Microsoft.AspNetCore.Mvc;
using Microsoft.Extensions.Configuration;
using Microsoft.Extensions.DependencyInjection;
using Microsoft.Extensions.Logging;
using Microsoft.Extensions.Options;

namespace API
{
    public class Startup
    {
        public Startup(IConfiguration configuration)
        {
            Configuration = configuration;
        }

        public IConfiguration Configuration { get; }

        // This method gets called by the runtime. Use this method to add services to the container.
        public void ConfigureServices(IServiceCollection services)
        {
            services.AddMvcCore()
                    .AddAuthorization()//添加身份驗證服務
                    .AddJsonFormatters();
            //AddAuthentication将身份驗證服務添加到DI并配置"Bearer"為預設方案
            services.AddAuthentication("Bearer")
                    .AddIdentityServerAuthentication(options =>
                    {
                        options.Authority = "http://localhost:5000";//identifyServer服務位址
                        options.RequireHttpsMetadata = false;//是否使用https

                        options.ApiName = "api1";//進行身份驗證的API資源的名稱
                    });
        }

        // This method gets called by the runtime. Use this method to configure the HTTP request pipeline.
        public void Configure(IApplicationBuilder app, IHostingEnvironment env)
        {
            if (env.IsDevelopment())
            {
                app.UseDeveloperExceptionPage();
            }
            //将身份驗證中間件添加到管道中
            app.UseAuthentication();

            app.UseMvc();
        }
    }
}
3、給對應的API接口添加
Authorize
特性,Web端登入通過
token
通路該接口。代碼如下:
//擷取使用者token
var token = await HttpContext.GetTokenAsync(OpenIdConnectParameterNames.AccessToken);
//執行個體化HttpClient
var client = new HttpClient();
client.SetBearerToken(token);
//請求identity接口
var response = await client.GetAsync("http://localhost:5001/identity");
if (!response.IsSuccessStatusCode)
{
     Console.WriteLine(response.StatusCode);
}