大家好~我是米洛
!
我正在從0到1打造一個開源的接口測試平台, 也在編寫一套與之對應的完整
教程
,希望大家多多支援。
歡迎關注我的公衆号
,擷取最新文章教程!米洛的測開日記
回顧
書接上回,我們找準了一款
看似不錯
的郵件模闆,但由于資料都是死的,是以我們需要擷取測試報告産生的資料,并渲染
HTML模闆
。
這節我們就來徹徹底底完善這塊功能。
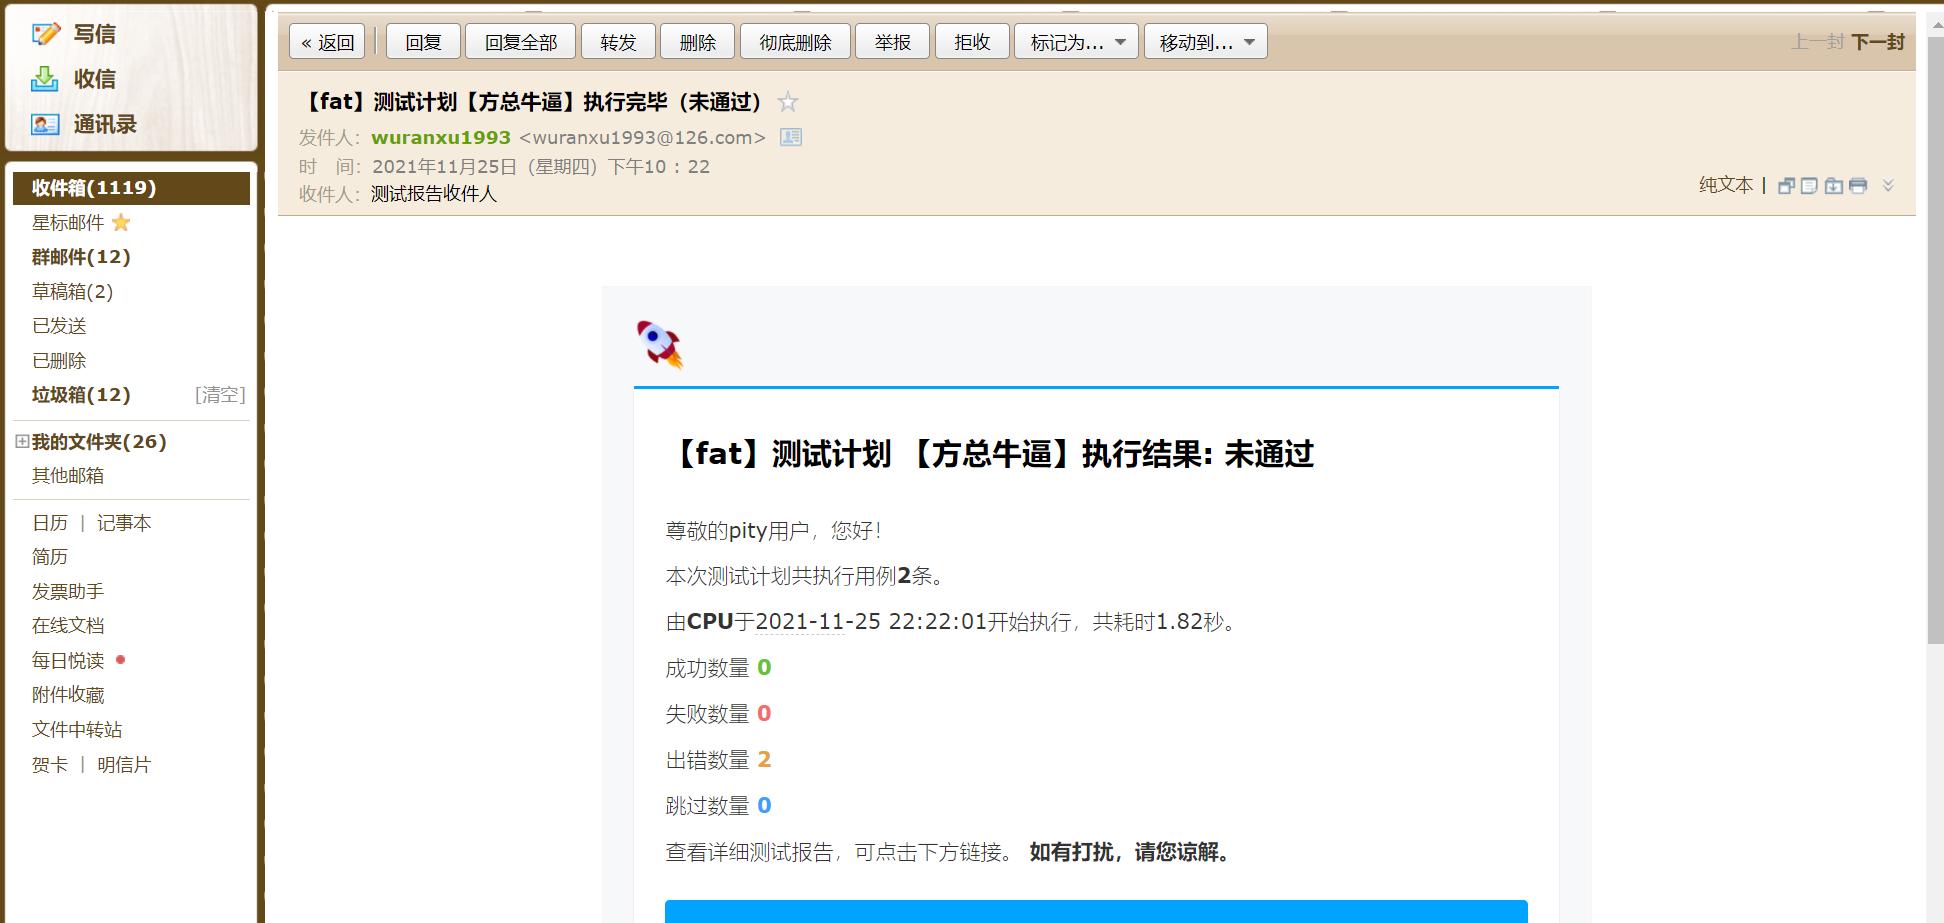
效果圖
這次資料已經真實,而且有定時任務直接跑了發送出來,
相當靠譜
編寫郵件子產品
由于之前yagmail不是太好用,是以我們需要改寫
send_msg
方法,由于比較簡單,我就直接上代碼了。
不過在此之前呢,我們需要先去配置檔案裡面加上一個字段:

其實smtplib提供了From的選項,我本來想叫
Pity自動化測試平台
,但是那樣的話郵件死活發不出去,遂放棄。
@staticmethod
    def send_msg(subject, content, attachment=None, *receiver):
        configuration = SystemConfiguration.get_config()
        data = configuration.get("email")
        sender = data.get("sender")
        to = data.get("to")
        message = MIMEText(content, 'html', 'utf-8')
        message['From'] = sender
        message['To'] = Header(to, 'utf-8')
        message['Subject'] = Header(subject, 'utf-8')

        try:
            smtp = smtplib.SMTP()
            smtp.connect(data.get("host"))
            # 我們用set_debuglevel(1)就可以列印出和SMTP伺服器互動的所有資訊。
            smtp.set_debuglevel(1)
            smtp.login(sender, data.get("password"))
            smtp.sendmail(sender, list(receiver), message.as_string())
        except Exception as e:
            raise Exception(f"發送測試報告郵件失敗: {e}")
新的send_msg方法很簡單,在保持參數一緻的情況下,代碼量比yagmail多了很多。
大概思路就是先封裝MIMETEXT,并設定為html模式,接着把
收件人
、
發件人
主題
以及
内容
等資料都放入其中,最後通過sendmail發送郵件。
改造run_test_plan方法
- 添加執行人參數
目前我們的測試計劃還不支援
手動執行
,一方面為了适配手動執行,一方面為了在郵件展現執行人資訊,是以我們在run_test_plan加上執行人這個參數:
執行人預設是0,也就是CPU(小時候打小霸王的時候的感覺)
-
改寫run_multiple方法
run_multiple這個方法是我們測試計劃執行的核心方法,由于我們測試計劃是支援
多環境
的,并且一個測試環境對應一份測試報告。
我們在執行完一個測試計劃可能出現多個報告連結,每個環境也有自己的通過率這些資料。
是以我們需要記錄一個map,裡面存放env => 測試結果的映射,最終傳回。
由于我們是異步執行,是以我們在外部設定一個map,當做參數傳遞進去,由于
引用傳遞
順理成章的,run_multiple方法裡面也需要改造,它應該接收新的map參數,但為了不影響原先的功能,是以它可傳可不傳。
下面是擷取執行人姓名的操作:
接着是run_multiple在傳回之前的改造:
生成真實html
上述操作都是為了
擷取測試報告需要的資料
,擷取了之後我們還得利用
jinja2
渲染html。
這裡我放上原生html:
<!DOCTYPE html>
<html>
<head>
<title>
測試報告
</title>
</head>
<body>
<div>
<includetail>
<div align="center">
<div class="open_email" style="margin-left: 8px; margin-top: 8px; margin-bottom: 8px; margin-right: 8px;">
<div>
<br>
<span class="genEmailContent">
<div id="cTMail-Wrap"
style="word-break: break-all;box-sizing:border-box;text-align:center;min-width:320px; max-width:660px; border:1px solid #f6f6f6; background-color:#f7f8fa; margin:auto; padding:20px 0 30px; font-family:'helvetica neue',PingFangSC-Light,arial,'hiragino sans gb','microsoft yahei ui','microsoft yahei',simsun,sans-serif">
<div class="main-content" style="">
<table style="width:100%;font-weight:300;margin-bottom:10px;border-collapse:collapse">
<tbody>
<tr style="font-weight:300">
<td style="width:3%;max-width:30px;"></td>
<td style="max-width:600px;">
<div id="cTMail-logo" style="width:92px; height:25px;">
<a href="">
<img border="0" src="https://gitee.com/woodywrx/picture/raw/master/2021-11-24/1637761462006-image.png"
style="width:36px; height:36px;display:block">
</a>
</div>
<p style="height:2px;background-color: #00a4ff;border: 0;font-size:0;padding:0;width:100%;margin-top:20px;"></p>
<div id="cTMail-inner" style="background-color:#fff; padding:23px 0 20px;box-shadow: 0px 1px 1px 0px rgba(122, 55, 55, 0.2);text-align:left;">
<table style="width:100%;font-weight:300;margin-bottom:10px;border-collapse:collapse;text-align:left;">
<tbody>
<tr style="font-weight:300">
<td style="width:3.2%;max-width:30px;"></td>
<td style="max-width:480px;text-align:left;">
<h1 id="cTMail-title" style="font-size: 20px; line-height: 36px; margin: 0px 0px 22px;">
【<strong>{{ env }}</strong>】測試計劃 【<strong>{{ plan_name }}</strong>】執行結果: <strong>{{plan_result}} </strong>
</h1>
<p id="cTMail-userName" style="font-size:14px;color:#333; line-height:24px; margin:0;">
尊敬的pity使用者,您好!
</p>
<p class="cTMail-content" style="line-height: 24px; margin: 6px 0px 0px; overflow-wrap: break-word; word-break: break-all;">
<span style="color: rgb(51, 51, 51); font-size: 14px;">
本次測試計劃共執行用例<strong>{{ total }}</strong>條。
</span>
</p>
<p class="cTMail-content" style="line-height: 24px; margin: 6px 0px 0px; overflow-wrap: break-word; word-break: break-all;">
<span style="color: rgb(51, 51, 51); font-size: 14px;">
由<strong>{{ executor }}</strong>于{{ start_time }}開始執行,共耗時{{cost}}秒。
</span>
</p>
<p class="cTMail-content" style="line-height: 24px; margin: 6px 0px 0px; overflow-wrap: break-word; word-break: break-all;">
<span style="color: rgb(51, 51, 51); font-size: 14px;">
成功數量 <strong style="color: #67C23A">{{ success }}</strong>
</span>
</p>
<p class="cTMail-content" style="line-height: 24px; margin: 6px 0px 0px; overflow-wrap: break-word; word-break: break-all;">
<span style="color: rgb(51, 51, 51); font-size: 14px;">
失敗數量 <strong style="color: #F56C6C">{{ failed }}</strong>
</span>
</p>
<p class="cTMail-content" style="line-height: 24px; margin: 6px 0px 0px; overflow-wrap: break-word; word-break: break-all;">
<span style="color: rgb(51, 51, 51); font-size: 14px;">
出錯數量 <strong style="color: #E6A23C">{{ error }}</strong>
</span>
</p>
<p class="cTMail-content" style="line-height: 24px; margin: 6px 0px 0px; overflow-wrap: break-word; word-break: break-all;">
<span style="color: rgb(51, 51, 51); font-size: 14px;">
跳過數量 <strong style="color: #409EFF">{{ skip }}</strong>
</span>
</p>
<p class="cTMail-content" style="line-height: 24px; margin: 6px 0px 0px; overflow-wrap: break-word; word-break: break-all;">
<span style="color: rgb(51, 51, 51); font-size: 14px;">檢視詳細測試報告,可點選下方連結。
<span style="font-weight: bold;">如有打擾,請您諒解。</span>
</span>
</p>
<p class="cTMail-content"
style="font-size: 14px; color: rgb(51, 51, 51); line-height: 24px; margin: 6px 0px 0px; word-wrap: break-word; word-break: break-all;">
<a id="cTMail-btn" href="{{report_url}}" title=""
style="font-size: 16px; line-height: 45px; display: block; background-color: rgb(0, 164, 255); color: rgb(255, 255, 255); text-align: center; text-decoration: none; margin-top: 20px; border-radius: 3px;">
點選此處檢視完整報告
</a>
</p>
<p class="cTMail-content" style="line-height: 24px; margin: 6px 0px 0px; overflow-wrap: break-word; word-break: break-all;">
<span style="color: rgb(51, 51, 51); font-size: 14px;">
<br>
無法正常顯示?請複制以下連結至浏覽器打開:
<br>
<a href="{{report_url}}" title=""
style="color: rgb(0, 164, 255); text-decoration: none; word-break: break-all; overflow-wrap: normal; font-size: 14px;">
這裡是測試報告連結
</a>
</span>
</p>
</td>
<td style="width:3.2%;max-width:30px;"></td>
</tr>
</tbody>
</table>
</div>
<div id="cTMail-copy" style="text-align:center; font-size:12px; line-height:18px; color:#999">
<table style="width:100%;font-weight:300;margin-bottom:10px;border-collapse:collapse">
<tbody>
<tr style="font-weight:300">
<td style="width:3.2%;max-width:30px;"></td>
<td style="max-width:540px;">
<p style="text-align:center; margin:20px auto 14px auto;font-size:12px;color:#999;">
此郵件由pity自動發出,請勿回複。
</p>
<p id="cTMail-rights" style="max-width: 100%; margin:auto;font-size:12px;color:#999;text-align:center;line-height:22px;">
<img border="0" src="https://gitee.com/woodywrx/picture/raw/master/2021-8-7/1628267097936-qrcode_for_gh_554fe7a74955_258.jpg"
style="width:84px; height:84px; margin:0 auto;">
<br>
關注測試開發坑貨,了解pity更多内容
<br>
</p>
</td>
<td style="width:3.2%;max-width:30px;"></td>
</tr>
</tbody>
</table>
</div>
</td>
<td style="width:3%;max-width:30px;"></td>
</tr>
</tbody>
</table>
</div>
</div>
</span>
</div>
</div>
</div>
</includetail>
</div>
</body>
</html>
上述代碼在
pity/templates/report.html
檔案内。
接着編寫渲染html的方法:
其中kwargs是傳遞對應的參數給html。
之前也說過一個郵件對應一個位址,是以send_msg調用的地方也得跟着修改。
至此,我們的郵件推送功能就全部完成了。
今天的内容就到這裡了,咱們下期見。