前言:
首先得說下為什麼寫這篇文章。因為學習了Handler,MessageQueue與Looper後,感覺三者的關系是越學越亂,有時看一下這個人寫的東西,感覺明白了,然後再看下另外一個人寫的,感覺又有點不一樣,大體是相同,但是總是會找出那麼一兩個沖突點,也許是我個人的了解能力不行導緻了解偏差吧,總之是我對不起那些辛苦寫部落格的部落客。畢竟學習光看别人的也沒用,還是得自己動手去驗證,更何況看别人的還看得那麼不解,是以我決定還是自己看API文檔和SDK的源碼研究下。
摘要:本文主要從讀API文檔開始,進行我對Handler、MessageQueue和Looper的推斷,得出推斷後我再跟蹤SDK各個類的源碼驗證我的判斷,進一步得到推論結果,最後利用代碼驗證我們關于三者關系的推論,同時介紹了如何使用Handler和Message。
========================================================================
文章結構:
1. Handler、MessageQueue和Looper的關系:
1.1 通過查API文檔推斷三者關系:
1.2 通過SDK源碼驗證推斷
1.3 三者關系總結
2. 代碼實踐、驗證結論
2.1 消息的建立方式
2.2 消息接收與處理的代碼示範
2.3 利用代碼驗證我們的推斷結果:
要知道如何使用這三個對象,首先,我們得明白這三者一個大概的關系。其實三個對象用起來并不會太難,但是他們的關系如果不好好研究下很容易了解錯了。
1.1 通過查API文檔推斷三者關系:
首先看下官網對關于Handler的描述:
Class Overview
A Handler allows you to send and process
Message
and Runnable objects associated with a thread's
MessageQueue
. Each Handler instance is associated with a single thread and that thread's message queue. When you create a new Handler, it is bound to the thread / message queue of the thread that is creating it -- from that point on, it will deliver messages and runnables to that message queue and execute them as they come out of the message queue.
來源: <http://developer.android.com/reference/android/os/Handler.html>
意思就是Handler允許你發送消息或使用post的方法把Runnable對象添加到Handler依附的消息隊列、線程上執行。我們根據此OverView做出推斷1:每一個Handler都對應一個簡單線程和消息隊列,在哪個線程執行個體化,則綁定該線程以及其消息隊列。Handler能發送消息到消息隊列,同時也是由Handler把消息從消息隊列取下來在對應的線程上處理。
上述文字提到了消息(Message)和消息隊列(MessageQueue),關于消息,大家都不陌生,顧名思義則可知消息是封裝了某些資料的對象,而消息隊列呢?現在的作業系統基本都有消息隊列這個機制,Windows有兩種線程,分别是GUI線程和Worker線程,隻有GUI才有消息隊列,而Worker線程是沒有的,但是當Worker線程産生了一個視窗,那麼它也會産生一個消息隊列。安卓下不同,安卓是預設主線程即UI線程會有消息隊列,其他線程建立是沒有的,但是當它啟用了Looper.prepare()方法,不管該線程是否有GUI,都會在該線程建立一個消息隊列,消息隊列主用用來存放線程内以及線程間各個元件的互相通信的消息,他們通信的方式是通過Handler互相發送消息。
通過上述,我們可以初步得出線程間的元件如果需要通信可以選擇通過通信目的線程内的Handler對象把本程序的消息發送到通信目的線程的消息隊列,再由通信目的線程的Handler對象把該消息從消息隊列取下,并在通信目的線程處理消息。前提是發送消息前,該Handler必須由通信目的線程完成執行個體化。那麼上述說到Looper又是怎麼回事?來看API文檔關于Handler是怎麼說的。
Class used to run a message loop for a thread. Threads by default do not have a message loop associated with them; to create one, call
prepare()
in the thread that is to run the loop, and then
loop()
to have it process messages until the loop is stopped.
Most interaction with a message loop is through the
Handler
class.
原來這家夥是通過與Handler的互動控制消息隊列的循環,再看看消息隊列的OverView:
Low-level class holding the list of messages to be dispatched by a
Looper
. Messages are not added directly to a MessageQueue, but rather through
MessageQueue.IdleHandler
objects associated with the Looper.
You can retrieve the MessageQueue for the current thread with
Looper.myQueue()
.
可以看出Looper負責配置設定消息隊列中的消息。Message也不會直接加到消息隊列,而是通過MessageQueue.IdleHandler來與Looper互動。
推斷2:上面我們說Handler把消息發到消息隊列,再由Handler從消息隊列取下消息進行處理,而這裡說Looper是配置設定消息的,消息也不是直接加到消息隊列,而是通過MessageQueue.IdleHandler與Looper互動添加的。那麼到這裡可以推斷他們存在這樣一層關系——Handler封裝消息,把消息發給Looper,由Looper與MessageQueue進行互動,把消息添加到消息隊列,同樣由Looper把消息從消息隊列上取下,再交由Handler處理。
到底是不是如我們推斷那樣,下面通過讀SDK源碼來驗證推斷。
1.2 通過SDK源碼驗證推斷
首先我們必須先看下Handler源碼,看它是否真的發送消息是發給了Looper,首先得先看看Handler的構造函數:
| 1 2 3 4 5 6 7 8 9 10 11 12 13 14 15 16 17 18 19 20 21 22 23 24 25 | |
|
從兩個構造函數我們都可以看出想要構造一個Handler對象,都離不開Looper,無參構造函數是通過Looper.myLooper()來擷取Looper對象,并綁定Looper對象對應的MessageQueue。這一點驗證推斷1——在哪個線程執行個體化,該Handler綁定了哪個線程以及其消息隊列,綁定哪個線程,說白了就是綁定該線程的Looper。
那麼發送消息是怎麼發送的呢?
| 26 27 28 29 | |
從Handler的sendMessage方法一步一步跟蹤下去,發現其實到最後是調用先前通過mLooper.mQueue擷取到的消息隊列的enqueueMessage方法來添加消息。
那麼,是如何處理消息的呢?我們從API文檔裡面得知Looper的一個寫法是:
|
handleMessage是Handler如何處理消息的回調函數,我們可以通過重寫該函數實作我們自己定義的處理消息的方法。那它是怎麼被觸發的呢?Looper.loop()又是幹嘛的?
不妨看下loop函數的源碼:
| 30 31 32 33 34 35 36 37 38 39 40 41 42 43 44 45 46 47 48 49 50 51 52 53 | |
可以看到源碼比較關鍵的一步是調用Handler的dispatchMessage方法,而且是傳入了Message對象作為參數,我們可以猜測該函數可能涉及到處理消息函數,因為處理消息函數(handleMessage)也是在Handler中的。接下來看dispatchMessage的源碼。
|
由此到這裡,對于Handler如何建立如何發消息,如何處理消息,這個過程如何與MessageQueue和Looper互動我們比較清楚了,是以接下來做個總結。
1.3 三者關系總結
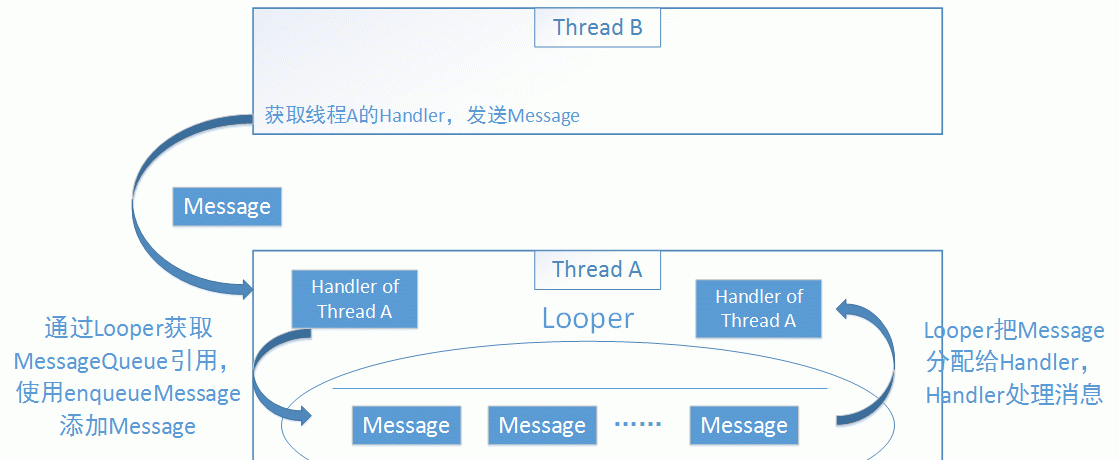
由此,到這裡可以得出我們的初步結論,想要利用Handler完成發送消息并處理消息的過程大概是這樣的(以線程A發消息給線程B為例):
(1)執行個體化與線程A綁定的Handler(前提是該線程已經有Looper,沒有可通過prepare方法獲得):
兩種方法,一種是線上程A直接調用無參構造器執行個體化,使得Handler與線程A的Looper、MessageQueue綁定;
另一種是在其他線程使用Handler帶Looper參數的構造器,傳入線程A的Looper進行執行個體化,同樣可得與線程A的Looper、MessageQueue相綁定的Handler對象;
(2)重寫處理消息的函數handleMessage
(3)線上程B使用線程A的Handler對象發送一個消息,該Handler在執行個體化時已經通過Looper獲得了線程A的MessageQueue,Handler使用獲得的MessageQueue對象的enqueueMessage把消息添加到隊列以完成消息的發送;
(4)使用Looper的loop函數運作消息隊列,這個過程是loop把消息從消息隊列取下,傳給Handler的dispatchMessage,判斷該如何處理消息,如果沒有其他callback則調用到了Handler的handleMessage處理消息。
這裡可以驗證我們的推斷2,但是推斷2有一點是講錯了,handler并沒有把消息發給Looper,由Looper去處理,而是從Looper擷取了與MessageQueue的“話語權”,Handler通過使用MessageQueue的enqueueMessage方法進行消息的發送。而處理消息則是由Looper執行loop去循環MessageQueue,并調用Handler的dispatchMessage去處理消息。是以Handler是發送、處理消息的,Looper是管理MessageQueue與Handler通信的機制,而MessageQueue是負責儲存、管理Message對象的。
三者的關系圖為:
2.1 消息的建立方式
Message一般建立對象使用Message m = Message.obtain(); 之是以這樣操作時因為系統的消息池可能存在消息未被使用,我們可通過該方法去擷取未被使用的消息,這樣就能夠避免一直建立消息對象而又存在很多未被使用消息存在記憶體,達到節省記憶體目的。這是sdk關于Message.obtain函數的源碼:
|
可以看出obtain會先去判斷消息池是否為空,如果為空則new Message(),如果不是則從消息池取出消息傳回。
2.2 消息接收與處理的代碼示範
了解完原理後,我們來使用Handler發送與處理消息就感覺明朗多了,主要使用方法是:
(1) 建立Handler對象,重寫handleMessage方法,Handler類裡面該方法内容是空,需要開發者根據不同情況自己重寫;
(2)擷取消息對象:可以通過Message的obtain方法擷取消息對象,其實擷取消息的方法多種多樣,可以通過Message,也可以通過Handler,但是看了一下源碼,各種消息擷取的方法歸根到底都是調用了Message的obtain方法。
(3)設定Message所攜帶的各種值,設定值的方法也是多種多樣,設定的辦法根據擷取消息方法的不同而不同,但是歸根到底各個方法都是先obtian擷取Message對象,然後再對其各個屬性進行指派,這就是面向對象的好處之一;
(4)發送消息;
下面以同個線程和不同線程利用Handler發送、處理消息為例子:
(1)同線程:
package cth.android.handlerexer;
import android.app.Activity;
import android.os.Bundle;
import android.os.Handler;
import android.os.Message;
import android.util.Log;
import android.view.View;
import android.view.View.OnClickListener;
import android.widget.Button;
public class MainActivity extends Activity implements OnClickListener {
    private Button btn_sendMsg1;
    private Button btn_sendMsg2;
    private Button btn_sendMsg3;
    private Button btn_sendMsg4;

    private Handler handler = new Handler(){
        public void handleMessage(android.os.Message msg) {
            Log.i("cth","--arg1-->" + msg.arg1);
            Log.i("cth","--arg2-->" + msg.arg2);
            Log.i("cth","--what-->" + msg.what);
            Log.i("cth","--obj-->" + msg.obj);
            Log.i("cth","--getWhen-->" + msg.getWhen());
            Log.i("cth","--getTarget-->" + msg.getTarget());

        };
    };
    @Override
    protected void onCreate(Bundle savedInstanceState) {
        super.onCreate(savedInstanceState);
        setContentView(R.layout.activity_main);
        btn_sendMsg1 = (Button) findViewById(R.id.btn_sendMsg1);
        btn_sendMsg2 = (Button) findViewById(R.id.btn_sendMsg2);
        btn_sendMsg3 = (Button) findViewById(R.id.btn_sendMsg3);
        btn_sendMsg4 = (Button) findViewById(R.id.btn_sendMsg4);
    }
    @Override
    public void onClick(View v) { //各個函數的點選事件
        switch (v.getId()) {
        case R.id.btn_sendMsg1:
            Message msg = Message.obtain();  //通過obtain方法擷取一個消息對象
            msg.arg1 = 1;                   //設定各種值
            msg.arg2 = 2;
            msg.what = 3;
            msg.obj = "Message.obtain()";
            handler.sendMessage(msg);       //利用Handler把消息發送出去
            //obtain的重載方法,直接設定message的值
            Message msg1 = Message.obtain(handler, 3, 1, 2, "Message.Obtain(handler,what,arg1,arg2,obj)");
            msg1.sendToTarget();  //原理還是利用Handler發送
            break;
        case R.id.btn_sendMsg2:
            handler.sendEmptyMessage(3);    //發送一個隻帶what=3的空消息,雖說是空消息,但實際還是有利用Message.obtain()擷取。
            handler.sendMessage(Message.obtain()); //發送空消息
            break;
        case R.id.btn_sendMsg3:
            handler.sendEmptyMessageDelayed(4, 5000);  //發送一個延時5秒的消息
            break;
        case R.id.btn_sendMsg4:
            handler.sendEmptyMessageAtTime(3, 9000);  //發送一個消息,在9秒内發送出去
            break;
        }
    }
}
(2)不同線程:
設立設立三個按鈕,一個是主線程向兩個子線程發送消息1、消息2。另外兩個按鍵是啟動兩個子線程,接收主線程利用子線程的Handler對象h1、h2發的消息,兩個子線程收到消息後,還利用主線程的Handler對象h3發回确認消息。 (注意:主線程發送消息前一定得先啟動兩個子線程)
package cth.android.handlerlooper;
import android.app.Activity;
import android.os.Bundle;
import android.os.Handler;
import android.os.Looper;
import android.os.Message;
import android.util.Log;
import android.view.Menu;
import android.view.MenuItem;
import android.view.View;
import android.view.View.OnClickListener;
import android.widget.Button;
public class MainActivity extends Activity implements OnClickListener {
    private Button btn_sendMsg, btn_receiveMsg1, btn_receiveMsg2;

    private Handler h1 = null;
    private Handler h2 = null;
    private Handler h3 = new Handler(){
        public void handleMessage(Message msg) {  //主線程執行個體化h3,用以接受子線程發回的确認消息
            Log.i("cth", "主線程接收消息中...");
            super.handleMessage(msg);
            Log.i("cth", "--主線程收到的obj-->" + msg.obj);
            Log.i("cth","該消息隊列是" + Looper.myQueue().toString());
            msg.recycle();
        }
    };

    @Override
    protected void onCreate(Bundle savedInstanceState) {
        super.onCreate(savedInstanceState);
        setContentView(R.layout.activity_main);
        btn_sendMsg = (Button) findViewById(R.id.btn_sendMsg);
        btn_sendMsg.setOnClickListener(this);
        btn_receiveMsg1 = (Button) findViewById(R.id.btn_receiveMsg1);
        btn_receiveMsg1.setOnClickListener(this);
        btn_receiveMsg2 = (Button) findViewById(R.id.btn_receiveMsg2);
        btn_receiveMsg2.setOnClickListener(this);
    }
    @Override
    public void onClick(View v) {
        switch (v.getId()) {
        case R.id.btn_sendMsg:
            if (h1 != null) {
                Message msg = Message.obtain(h1, 1);
                msg.sendToTarget();  //發到子線程1的消息隊列
                Log.i("cth", "已發送消息1");
            }

            if (h2 != null) {
                Message msg = Message.obtain(h2, 2);
                msg.sendToTarget();  //發到子線程2的消息隊列
                Log.i("cth", "已發送消息2");
            }
            break;
        case R.id.btn_receiveMsg1:
            new Thread(new Runnable() {
                @Override
                public void run() {
                    Log.i("cth", "新線程1開啟");
                    Looper.prepare();
                    h1 = new Handler() {
                        public void handleMessage(Message msg) {  //子線程1執行個體化h1
                            Log.i("cth", "子線程1接收消息中...");
                            super.handleMessage(msg);
                            Log.i("cth", "--子線程1收到的what-->" + msg.what);
                            Log.i("cth","該消息隊列是" + Looper.myQueue().toString());


                            Message msg3 = h3.obtainMessage();
                            msg3.obj = "子線程1收到what=" + msg.what;
                            msg3.sendToTarget();
                            msg.recycle();

                        }
                    };
                    Looper.loop();

                }
            }).start();
            break;
        case R.id.btn_receiveMsg2:
            new Thread(new Runnable() {
                @Override
                public void run() {
                    Log.i("cth", "新線程2開啟");
                    Looper.prepare();
                    h2 = new Handler() {
                        public void handleMessage(Message msg) {  //子線程2執行個體化h2
                            Log.i("cth", "子線程2接收消息中...");
                            super.handleMessage(msg);
                            Log.i("cth", "--子線程2收到的what-->" + msg.what);
                            Log.i("cth","該消息隊列是" + Looper.myQueue().toString());

                            Message msg3 = h3.obtainMessage();
                            msg3.obj = "子線程2收到what=" + msg.what;
                            msg3.sendToTarget();
                            msg.recycle();
                        }
                    };
                    Looper.loop();
                }
            }).start();
            break;
        default:
            break;
        }
    }
}
運作結果:

2.3 利用代碼驗證我們的推斷結果:
首先我們的建立一個類,繼承Handler,重寫我們前面推斷所涉及到的函數,所涉及到的包括sendMessage、sendMessageDelayed和sendMessageAtTime、dispatchMessage和handleMessage,其中sendMessage和sendMessageDelayed是final的,無法重寫,是以我們隻重寫後三個,如果sendMessageAtTime被調用到就能證明前兩個被調用到了。以下是Handler子類的源代碼:
|
如果均被調用且調用順序和我們推斷的相同,則可驗證我們的推斷結論是正确的。
接下來,建立一個按鈕,點選按鈕建立一個子線程,在子線程使用該Handler子類的對象發送消息:
|
運作後我們觀看日志,可以看到和我們推斷結果完全相同結果:
其中MessageQueue的enqueueMessage方法和Looper的loop方法都無法重寫,是以Log打不出來,但是通過Handler各個函數的輸出順序已經可以驗證我們之前的推斷結論了。