Cobbler 可以用來快速建立 Linux 安裝,自動化安裝系統
安裝環境
Centos 6.0 + VMware
Cobler伺服器位址:192.168.32.80
1、CentOS 6網絡基本配置
- 指令配置 重新開機後會還原
- ip位址、子網路遮罩
- ifconfig eth0 192.168.32.80 netmask 255.255.255.0
- 網關
- route add default gw 192.168.32.1 dev eth0
- 主機名
- hostname centos
- 1、IP 靜态配置
- vi /etc/sysconfig/network-scripts/ifcfg-eth0
- static 靜态 dhcp 動态擷取
- BOOTPROTO=static
- IPADDR=192.168.32.80
- NETMASK=255.255.255.0
- NETWORK=192.168.32.0
- ONBOOT=yes
- 2、網關配置
- vi /etc/sysconfig/network
- NETWORKING=yes
- HOSTNAME=cobbler
- GATEWAY=192.168.32.1
- 3、DNS配置
- vi /etc/resolv.conf
- nameserver 8.8.8.8
- 4、重新開機網卡
- service network restart
2、安裝EPEL
- 适用于Centos 5&Red Hat5
- rpm -Uvh http://mirrors.ustc.edu.cn/epel/5/i386/epel-release-5-4.noarch.rpm
- rpm -Uvh http://mirrors.ustc.edu.cn/epel/5/x86_64/epel-release-5-4.noarch.rpm
- 适用與系統Centos 6&Red Hat 6
- rpm -Uvh http://mirrors.ustc.edu.cn/epel/6/i386/epel-release-6-8.noarch.rpm
- rpm -Uvh http://mirrors.ustc.edu.cn/epel/6/x86_64/epel-release-6-8.noarch.rpm
- 更新緩存
- yum makecache
也可以在安裝一個網易163的源 http://mirrors.163.com/
3、安裝cobbler 及依賴包
- yum -y install PyYAML cobbler tftp-server httpd dhcp yum-utils cman xinetd pykickstart
4、修改cobbler 配置檔案
- Wiki: http://github.com/cobbler/cobbler/wiki
- vi /etc/cobbler/settings
- cobbler伺服器位址
- server: 192.168.32.250
- 設定PXE server的IP位址
- next_server: 192.168.32.250
- 開啟管理DHCP服務
- manage_dhcp: 1
- 設定預設的kickstart配置檔案(無需改動)
- default_kickstart: /var/lib/cobbler/kickstarts/default.ks
- 注意:cobbler啟動使用的kickstart檔案是/var/lib/cobbler/kickstarts/sample.ks
5、修改tftp、rsync、dhcp
- 開啟 tftp
- vi /etc/xinetd.d/tftp
- disable = no
- 開啟 rsync
- vi /etc/xinetd.d/rsync
- disable = no
- DHCP 修改
- vi /etc/cobbler/dhcp.template
- subnet 192.168.32.0 netmask 255.255.255.0 {
- option routers 192.168.32.1; 路由
- option domain-name-servers 202.96.209.133,8.8.8.8; DNS
- option subnet-mask 255.255.255.0; 子網路遮罩
- range dynamic-bootp 192.168.32.100 192.168.32.254;分發範圍
- filename "/pxelinux.0";
- default-lease-time 21600;
- max-lease-time 43200;
- next-server $next_server;
- }
6、關閉iptables、SElinux
- iptables
- service iptables stop
- chkconfig --level 35 iptables off
- SElinux
- vi /etc/selinux/config
- SELINUX=disabled
7、啟動服務并設定為開機啟動
- service xinetd start
- service httpd start
- service cobblerd start
- 設定開機啟動
- chkconfig --level 345 httpd on
- chkconfig --level 345 xinetd on
- chkconfig --level 345 cobblerd on
- 最好reboot 系統下
8、cobbler檢查
- cobbler check
- 1 : The 'server' field in /etc/cobbler/settings must be set to something other than localhost,or kickstarting features will not work. This should be a resolvable hostname or IP for the boot server as reachable by all machines that will use it.
- 2 : For PXE to be functional, the 'next_server' field in /etc/cobbler/settings must be set to something other than 127.0.0.1, and should match the IP of the boot server on the PXE network.
- 3 : you need to set some SELinux content rules to ensure cobbler works correctly in your SELinux environment, run the following: /usr/sbin/semanage fcontext -a -t public_content_t "/tftpboot/.*" && \ /usr/sbin/semanage fcontext -a -t public_content_t "/var/www/cobbler/p_w_picpaths/.*"
- 4 : some network boot-loaders are missing from /var/lib/cobbler/loaders, you may run 'cobbler get-loaders' to download them, or, if you only want to handle x86/x86_64 netbooting, you may ensure that you have installed a *recent* version of the syslinux package installed and can ignore this message entirely. Files in this directory, should you want to support all architectures, should include pxelinux.0, menu.c32, elilo.efi, and yaboot.The 'cobbler get-loaders' command is the easiest way to resolve these requirements.
- 5 : change 'disable' to 'no' in /etc/xinetd.d/tftp
- 6 : change 'disable' to 'no' in /etc/xinetd.d/rsync
- 7 : since iptables may be running, ensure 69, 80, and 25151 are unblocked
- 8 : debmirror package is not installed, it will be required to manage debian deployments and repositories
- 9 : The default password used by the sample templates for newly installed machines (default_password_crypted in /etc/cobbler/settings) is still set to 'cobbler' and should be changed, try: "openssl passwd -1 -salt 'random-phrase-here' 'your-password-here'" to generate new one Restart cobblerd and then run 'cobbler sync' to apply changes.
- 10 : service dhcpd is not running
- 1、編輯/etc/cobbler/settings檔案,找到 server選項,修改為适當的ip位址,本執行個體配置ip為:192.168.10.1
- 2、編輯/etc/cobbler/settings檔案,找到 next_server選項,修改為适當的ip位址,本執行個體配置ip為:192.168.10.1
- 3、SELinux的設定。如果上面已經關閉了SELinux就不用管了
- 4、執行 cobbler get-loaders,系統将自動下載下傳loader程式,完成提示4的修複工作。
- 5、編輯/etc/xinetd.d/tftp檔案,将檔案中的disable字段的配置由yes改為no
- 6、編輯/etc/xinetd.d/rsync檔案,将檔案中的disable字段的配置由yes改為no
- 7、在iptables中将69,80,25151端口打開。如果僅僅隻是在内部環境中使用,建議直接将防火牆關掉
- 8、提示說debmirror沒安裝。如果不是安裝 debian之類的系統,此提示可以忽略,如果需要安裝,下載下傳位址為:
- http://rpmfind.net/linux/rpm2html/search.php?query=debmirrorCentOS 6使用RHEL 5的包就可以。
- 9、修改cobbler使用者的預設密碼,可以使用如下指令生成密碼,并使用生成後的密碼替換/etc/cobbler/settings中 default_password_crypted 的密碼。生成密碼指令:
- #openssl passwd -1 -salt 'random-phrase-here' '[任意密碼]'
- 10、DHCP不用理會
完成後 重新開機cobbler
- service cobblerd restart
9、cobbler導入 Centos CD光牒ISO 檔案,可以光驅挂載,也可FTP上傳ISO
- mount /dev/cdrom /mnt/
- cobbler import --path=/mnt --name=centos6-00
- 提示:task started: 2012-12-30_235021_import
- 提示:task started (id=Media import, time=Sun Dec 30 23:50:21 2012)
- (等待導入完成)
- 出現 *** TASK COMPLETE *** 表示完成
- 檢視
- cobbler list
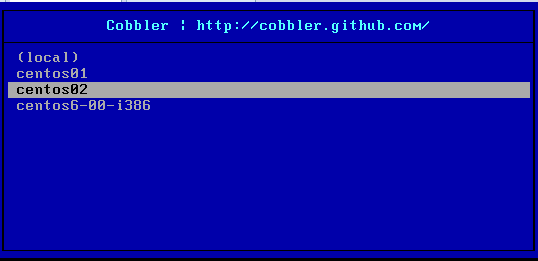
設定profile 了
- 建立profile KS檔案指向centos01.ks
- cobbler profile add --name=centos02 --distro=centos6-00-i386 --kickstart=/var/lib/cobbler/kickstarts/centos02.ks
- cobbler sync
- service cobblerd restart
- 已經全部準備就緒,啟動客戶機進行測試(下面的07-20可稍後再看)
- 修改profile
- cobbler profile rename --name=centos02 --newname=centos03
- 删除profile
- cobbler profile remove --name=centos03
- 删除distro
- cobbler distro remove --name=centos6-00-i386
- 檢視資訊
- cobbler list (distros,profiles)
- cobbler distro list
- cobbler distro(顯示更多可使用查詢指令)
- cobbler profile list
- cobbler profile(顯示更多可使用查詢指令)
- cobbler profile report (詳細資訊KS檔案指定路徑)
- cobbler sync (更改任何内容最好都要執行下)
自動安裝過程中的規定規則是配置kickstart ,cobbler 預設使用的是 /var/lib/cobbler/kickstarts/sample.ks 10、用戶端測試(調整為network啟動)
選擇需要的 Enter 就不需要管了(當然要是KS檔案書寫錯誤了,就需要修改下喽)
![linux-svn解除安裝與安裝[圖]](data:image/gif;base64,R0lGODlhAQABAIAAAP///wAAACwAAAAAAQABAAACAkQBADs=)