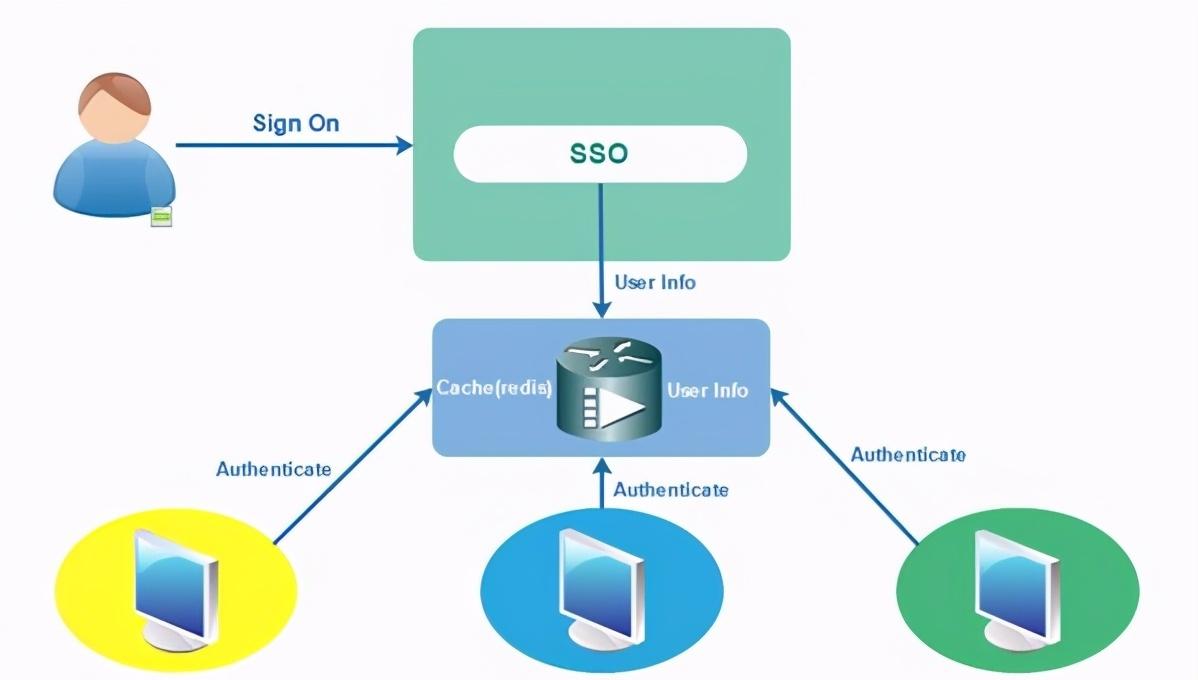
SSO用戶端設計
下面通過子產品merchant-security對 SSO用戶端安全認證部分的實作進行封裝,以便各個接入SSO的用戶端應用進行引用。

安全認證的項目管理配置
SSO用戶端安全認證的項目管理使用了如下所示的依賴配置:
<dependencies>
<dependency>
<groupId>com.demo</groupId>
<artifactId>merchant-client</artifactId><version>${project.version)</version></dependency>
<dependency>
<groupId>org.springframework.cloud</groupId>
<artifactId>spring-cloud-starter-oauth2</artifactId></dependency>
<dependency>
<groupId>org.springframework.boot</groupId>
<artifactId>spring-boot-starter-data-redis</artifactId></dependency>
</dependencies>
這個配置除主要引用Spring Cloud OAuth 2元件實作應用的安全管理和認證功能外,還引用了merchant-client子產品以提供調用商家服務接口的功能,引用了Spring Boot Redis元件以提供使用緩存的功能。
安全認證項目的配置類
在SSO的用戶端中啟用Spring Security的認證功能,主要是通過一個配置類實作的。如下代碼所示,我們建立一個配置類SecurityConfiguration,它繼承于WebSecurityConfigurerAdapter:
@Configuration
@EnableOAuth2Sso
@EnableConfigurationProperties (SecuritySettings.class)
public class SecurityConfiguration extends webSecurityConfigurerAdapter{
@Autowired
private AuthenticationManager authenticationManager;@Autowired
private SecuritySettings settings;
@Autowired
private RoleRestService roleRestService;@Autowired
private RedisCache redisCache;
@Bean(name = BeanIds.AUTHENT ICATION MANAGER)Goverride
public AuthenticationManager authenticationManagerBean() throws Excepti
return super.authenticationManagerBean();
)
@override
public void configure(HttpSecurity http) throws Exception
http.antMatcher("/**")
.authorizeRequests()
.antMatchers( "/login**").permitAll()
.antMatchers(settings.getPermitall()). permitAll()
.anyRequest()
.authenticated()
.and ().csrf().requireCsrfProtectionMatcher (csrfSecurityRequest
Matcher())
.csrfTokenRepository (csrfTokenRepository()) .and()
.addFilterAfter (csrfHeaderFilter(),CsrfFilter.class).logout()
.logoutUrl("/logout").permitAll()
.logoutSuccessUrl(settings.getLogoutsuccssurl()).and()
.exceptionHandling().accessDeniedPage (settings.getDeniedpage();
}
@Bean
public CustomFilterSecurityInterceptor customFilter() throws Exception t
CustomFilterSecurityInterceptor customFilter = new
CustomFilterSecurityInterceptor();
customFilter.setSecurityMetadataSource (securityMetadataSource());customFilter.setAccessDecisionManager(accessDecisionManager());
customFilter.setAuthenticationManager(authenticationManager);
return customFilter;
}
@Bean
public CustomAccessDecisionManager accessDecisionManager() {
return new CustomAccessDecisionManager();
}
@Bean
public CustomSecurityMetadataSource securitywetadataSource(){
return new CustomSecurityMetadataSource(roleRestService,redisCache) ;
}
}
這個配置類主要實作了以下功能:
(1)使用注解@EnableOAuth2Sso啟用應用的SSO用戶端功能。
(2)通過重寫configure方法,來使用一些自定義的安全配置。其中,SecuritySettings是一個自定義的配置類,提供了成功退出時的連結配置、允許通路的連結配置和拒絕通路的連結配置等設定參數。
(3)在配置中通過一個自定義過濾器customFilter引入其他幾個以custom開頭的自定義設計,包括安全管理中繼資料和權限管理驗證等設計。
權限管理驗證設計
使用者權限驗證設計主要由兩部分設計組成,分别為安全資源中繼資料管理和使用者通路資源權限檢查設計。
建立一個安全資源中繼資料管理類CustomSecurityMetadataSource,實作安全資源中繼資料管理設計,代碼如下所示:
public class CustomSecurityMetadataSource implementsFilterInvocationSecurityMetadatasource{
private static final Logger logger =
LoggerFactory.getLogger (CustomSecurityMetadataSource.class);
public static final String MERCHANT CENTER ROLES ALL="MERCHANT_ CENTER ROLES ALL";
private PathMatcher pathMatcher = new AntPathMatcher();
private RoleRestService roleRestService;private RedisCache rediscache;
coverride
public Collection<ConfigAttribute> getAllConfigAttributes()
return null;
public CustomSecurityMetadataSource (RoleRestService roleRestSeRedisCache redisCache) {
super();
this.roleRestService = roleRestService;this.redisCache = redisCache;
private List<RoleQ0> loadResourceWithRoles()i
String roles = roleRestService.findList();
List<RoleQ0> list = new Gson().fromJson (roles, new
TypeToken<List<RoleQ0>>() {]}.getType());
if(list !=null) {
redisCache.set (MERCHANT_CENTER_ROLES_ALL + "LIST",list,
180);
}
return list;
}
@override
public Collection<configAttribute> getAttributes(0bject object)
throws IllegalArgumentException {
String url = ((FilterInvocation) object).getRequestUrl();
//logger.info("請求資源:
er.info("請求資源:"
url);
//先從緩存中取角色清單
0bject objects = redisCache.get (MERCHANT CENTER ROLES ALL + "LIST");List<RoleQo> roleQoList = null;
if(CommonUtils.isNull(objects)) {
roleQoList = loadResourceWithRoles();/ /如果緩存不存在,則從API 中讀取角
//色清單
]else{
roleQoList=(List<RoleQo>)objects;
}
Collection<ConfigAttribute> roles = new ArrayList<>();//有權限的角色清單
//檢查每個角色的資源,如果與請求資源比對,則加入角色清單。為後面權限檢查提供依據
if(roleQoList !=null && roleQoList.size() >0){
for (RoleQo role0o :roleQoList) {//循環角色清單
List<ResourceQo> resourceQos = roleQo.getResources();if(resourceQos != null &&resourceQos.size() >0)
for (ResourceQo resourceQo :resourceQos){//循環資源清單
if(resourceQo .getUrl()!=null &&
pathMatcher.match (resourceQo. getUr1()+"/**",url)){
ConfigAttribute attribute =new
SecurityConfig(roleQo.getName());
roles.add(attribute);
logger.debug("加入權限角色清單===角色資源:{,角色名稱:
{}=-=", resourceQo.getUrl(),roleQo.getName ());
break;
}
}
}
}
}
return roles;
}
}
在這個設計中,主要通過重寫FilterInvocationSecurityMetadataSource 的 getAttributes方法,從使用者通路的URL資源中,檢查系統的角色清單中是否存在互相比對的權限設定。
如果存在,
則将其存入一個安全中繼資料的角色清單中。這個清單将為後面的權限檢查提供依據
從這裡可以看出,對于一個資源,如果我們不指定哪個角色可以通路,則所有使用者都可以通路。
因為資源的中繼資料管理使用了動态加載的方法,是以對使用者的權限管理也能實作線上更新,同時,這裡還借助了緩存技術提高中繼資料的通路性能。
有了安全資源的中繼資料管理,我們就可以對使用者的行為進行實時權限檢查了。
建立一個權限檢查的實作類CustomAccessDecisionManager,對一個使用者是否有權限通路資源進行實時權限檢查。這個類實作了AccessDecisionManager,代碼如下所示:
public class CustomAccessDecisionManager implements AccessDecisionManager {
private static final Logger logger =
LoggerFactory.getLogger (CustomAccessDecisionManager.class);
@Override
public void decide (Authentication authentication,0bject object,
Collection<ConfigAttribute>configAttributes)
throws AccessDeniedException,InsufficientAuthenticationExceptionif(configAttributes == nul1){
return;
}
//從 CustomSecurityMetadataSource (getAttributes)中擷取請求資源所需的角色集合Iterator<ConfigAttribute> iterator= configAttributes.iterator();
while (iterator.hasNext()){
ConfigAttribute configAttribute= iterator.next();//有權限通路資源的角色
String needRole = configAttribute.getAttribute();logger.debug("具有權限的角色:" +needRole);
//在使用者擁有的權限中檢查是否有比對的角色
for (GrantedAuthority ga : authentication.getAuthorities())1
if (needRole.equals(ga.getAuthority())) {
return;
}
}
}
//如果所有使用者角色都不比對,則使用者沒有權限
throw new AccessDeniedException("沒有權限通路!");
}
}
在這個設計中,通過重寫AccessDecisionManager的權限決斷方法decide,将安全管理中繼資料中的角色與使用者的角色進行比較,如果使用者的角色與中繼資料的角色比對,則說明使用者有通路權限,否則使用者沒有通路權限。
用戶端應用接入sso
有了SSO用戶端的安全管理封裝之後,對于一個需要接入SSO的Web應用,隻需在應用的項目管理配置中增加對SSO用戶端安全管理元件的引用,就可以使用SSO的功能了。
下面我們以商家管理應用子產品merchant-web 為例進行說明,其他 Web UI應用可以參照這種方法接入SSO。在商家管理背景中,需要接入SSO的用戶端應用有庫存管理、訂單管理、物流管理等,可以根據實際需要決定。
首先,在項目配置管理中引用SSO用戶端安全管理的封裝元件,代碼如下所示:
<!--單點登入--><dependency>
<groupId>com.demo</groupId>
<artifactId>merchant-security</artifactId><version>${project.version)</version>
</dependency>
因為是在同一個項目工程中引用的,是以使用了項目的版本号。如果是其他應用引用的,則将上面的版本改為2.1-SNAPSHOT。
其次,在應用的配置檔案 application.yml中使用如下所示設定:
spring:redis:
host: 127.0.0.1port: 6379
security:
oauth2:
client:
client-id: ssoclient
client-secret: ssosecret
access-token-uri: http://localhost:8000/oauth/token
user-authorization-uri: http://localhost:8000/oauth/authorizeresource:
token-info-uri:http://localhost:8000/oauth/check token
securityconfig:
logoutsuccssurl:/tosignoutpermitall:
- /test/大★
- /actuator/*大deniedpage: /deny
ssohome: http://localhost:8000/
其中,redis使用了本地的伺服器,security.oauth2配置項是Spring Cloud OAuth2元件使用的一些配置參數。我們使用這些參數設定clientld和 clientSecret,即 SSO服務端設計配置類中設定的用戶端ID和密鑰。而 accessTokenUri和userAuthorizationUri分别用來指定擷取令牌和進行認證的端點。
securityconfig配置項下面的幾個設定,是由配置類SecuritySettings提供的幾個自定義配置參數設定的。其中,ssohome為接入SSO的用戶端應用提供了一個通路SSO首頁的連結。
除上面這些配置外,對于接入了SSO的 Web應用,在資料編輯和管理方面還需要做一些調整,以保證資料的建立和編輯能夠正常送出。另外,接入了SSO的應用還可以根據使用者權限自動配置設定菜單。
有關跨站請求的相關設定
在使用Spring Security之後,必須在頁面中增加跨站請求僞造防禦的相關設定,才能在建立或編輯資料時正常送出表單,否則有關表單送出的請求,将會被拒絕通路。
首先統一在頁面模闆loyout.html的頭部增加如下所示代碼:
<meta name=" csrf" th:content="${csrf.token}"/>
<meta name=" csrf header" th:content="$ { csrf,headerName }"/>
然後在一個公共調用的 public.js中增加如下所示代碼,以接收來自頁面的傳遞參數:
$(function (){
var token = $("meta [name='_csrf']").attr( "content");
var header = $ ("meta[name='csrf header']").attr("content");$ (document).ajaxSend(function (e, xhr, options) {
xhr.setRequestHeader (header, token);
});
});
這樣做的目的是讓背景能夠驗證頁面表單送出的合法性,進而對資料送出起到一定的保護作用。
根據使用者權限自動配置設定菜單
通過登入使用者的關聯對象,我們可以取得一個使用者的菜單清單,進而可以根據使用者權限自動配置設定使用者的系統菜單。
在應用的首頁控制器UserController 中使用如下所示的實作方法:
@Controller
@RequestMapping("/user")
public class UserController extends BaseController{
CRequestMapping("/index")
public String index (ModelMap model,Principal user, HttpServletRequestrequest) throws Exception {
List<ModelQo> menus = super.getModels(user.getName(), request);model.addAttribute("menus", menus);
model .addAttribute("user",user);
model .addAttribute("ssohome", ssohome);return "user/index";
}
其中,getModels就是擷取使用者菜單的具體實作,代碼如下所示:
public abstract class BaseController {
private PathMatcher pathMatcher = new AntpathMatcher();
@Autowired
private UserRestService userService;
@value("${spring. application.name} ")private string serviceName;
public List<ModelQo> getModels (String userName,HttpServletRequestrequest){
//根據登入使用者擷取使用者對象
String json = userService.findByName (userName) ;
UserQo user = new Gson().fromJson (json,UserQo.class);
//根據比對分類擷取子產品(二級菜單)清單
List<ModelQo> modelList = new ArrayEist<>();List<Long>modelIds = new ArrayList<>();
for(RoleQo role : user.getRoles()){
for(ResourceQo resource : role.getResources()){
String link = resource.getModel().getKind ().getLink ();//分類頂級
//菜單連結
//擷取子產品清單,去重
if(! modelIds.contains (resource.getModel().getId())
& & pathMatcher.match(serviceName, link)){
modelList.add(resource. getModel ());
modelIds.add(resource.getModel().get Id());
}
}
}
return modelList;
}
}
首先從使用者的角色中,找出其關聯的資源清單;然後從每一個資源中找出與目前應用名稱互相比對的子產品對象,最後經過去重整理之後得到的子產品清單,就是一個應用的菜單體系。
通過使用這個子產品清單,就可以在應用的導航頁面nav.html上使用如下所示的設計,循環輸出菜單:
<ul>
<li th:each="model:$ {menus}"><a th:classappend="${page ==
'$ {model.host}' ? 'currentPageNav': '')"th:href="e{${model.host}}"th: text="$ {model.name } "></a></li>
</ul>
通過上面這些設計,即可實作根據使用者權限自動配置設定菜單的功能。完成上面的開發之後,就可以進行測試了。
首先确認注冊中心已經啟動,然後分别啟動merchant-restapi應用、merchant-sso應用和merchant-web應用。
在所有應用啟動成功之後,通過浏覽器打開商家系統Web應用的連結:http://localhost:8081
打開連結後,在彈出的登入界面中輸入前面單元測試中生成的使用者名和密碼進行登入。
登入成功後,即可打開商家系統merchant-web 應用的首頁。
商家系統隻有一個使用者管理功能,是以它的首頁如圖10-8所示。在這裡,商家管理者可以進行使用者管理的操作。
小結
本章通過商豕夥版一知限管理,可以使用在分們個分散開發的微服務應用組信隊台中,商家使用者通過統一權限管理,可以使用在分布式環境中任何其他已經接
本文給大家講解的内容商家管理背景與sso設計: SSO用戶端設計
- 下篇文章給大家講解的是平台管理背景與商家菜單資源管理;
- 覺得文章不錯的朋友可以轉發此文關注小編;
- 感謝大家的支援!