fs部分源碼閱讀
Octopus 源碼閱讀——fs部分
開源代碼
bitmap.cpp
bitmap中的代碼基本上沒啥好說的,比較清楚。不過不解的是為什麼在初始化的時候要統計freecount,理論上buffer不是應該可以直接初始化成全零嗎?
Bitmap::Bitmap(uint64_t count, char *buffer) /* Constructor of bitmap. */
{
    if (count % 8 == 0) {
        if (buffer != NULL) {           /* Judge if buffer is null or not. */
            bytes = (uint8_t *)buffer;  /* Assign byte array of bitmap. */
            varCountTotal = count;      /* Initialize count of total bits. */
            varCountFree = 0;           /* Initialize count of free bits. */
            for (unsigned int index = 0; index < varCountTotal / 8; index++) { /* Search in all bytes in array. */
                for (int offset = 0; offset <= 7; offset++) { /* Search in all offsets in byte. */
                    if ((bytes[index] & (1 << (7 - offset))) == 0) { /* Judge if bit is cleared. */
                        varCountFree++; /* Increment of free bit. */
                    }
                }
            }
        } else {
            fprintf(stderr, "Bitmap: buffer pointer is null.\n");
            exit(EXIT_FAILURE);         /* Fail due to null buffer pointer. */
        }
    } else {
        fprintf(stderr, "Bitmap: count should be times of eight.\n");
        exit(EXIT_FAILURE);             /* Fail due to count alignment. */
    }
}
dmfs.cpp
入口
filesystem.cpp
這個2k+的代碼量看着就刺激。。。正式開始:
分布式事務實作
這部分相關的函數是Tx開頭的一些,具體的實作在RPCServer中實作(因為要先找到TxManager),這個實作主要是因為要保證metadata的一緻性,是以在mknod之類的時候需要分布式事務的支援。
FileSystem
首先比較建議和RPCServer的代碼一起看,會比較清晰。
有些比較直覺的函數就不貼出來了。
updateRemoteMeta
更新remote Metadata,分為兩種情況:
- 需要更新的metadata的存儲位置在本地:直接在本地memcpy即可
- 需要更新的metadata的存儲位置不在本地:使用RDMA的write_with_imm來進行處理,RDMA write + read
void FileSystem::updateRemoteMeta(uint16_t parentNodeID, DirectoryMeta *meta, uint64_t parentMetaAddress, uint64_t parentHashAddress) {
	Debug::debugTitle("updateRemoteMeta");
	/* Prepare imm data. */
	uint32_t imm, temp;
	/*
	|  12b  |     20b    |
	+-------+------------+
	| 0XFFF | HashAdress |
	+-------+------------+
	*/
	temp = 0XFFF;
	imm = (temp << 20);
	imm += (uint32_t)parentHashAddress;
	/* Remote write with imm. */
	uint64_t SendBuffer;
    /* 得到發送端的buffer位址(根據NodeID) */
	server->getMemoryManagerInstance()->getServerSendAddress(parentNodeID, &SendBuffer);
	uint64_t RemoteBuffer = parentMetaAddress;
	Debug::debugItem("imm = %x, SendBuffer = %lx, RemoteBuffer = %lx", imm, SendBuffer, RemoteBuffer);
	if (parentNodeID == server->getRdmaSocketInstance()->getNodeID()) {
        /* 如果在本地,那麼從參數meta的位址直接memcpy到RemoteBuffer為基址的相應位置即可 */
		memcpy((void *)(RemoteBuffer + server->getMemoryManagerInstance()->getDmfsBaseAddress()), (void *)meta, sizeof(DirectoryMeta));
		//unlockWriteHashItem(0, parentNodeID, parentHashAddress);
		return;
	}
    /* 如果更新的雙方不在一台機器上,先把meta中的資料複制到sendbuffer */
    uint64_t size = sizeof(DirectoryMeta) - sizeof(DirectoryMetaTuple) * (MAX_DIRECTORY_COUNT - meta->count);
	memcpy((void *)SendBuffer, (void *)meta, size);
    server->getRdmaSocketInstance()->RdmaWrite(parentNodeID, SendBuffer, RemoteBuffer, size, -1, 1);
	server->getRdmaSocketInstance()->RdmaRead(parentNodeID, SendBuffer, RemoteBuffer, size, 1);
	/* Data will be written to the remote address, and lock will be released with the assist of imm data. */
	/* WRITE READ will be send after that, flushing remote data. */
}
RDMA call
server得到client,執行RDMACall(細節待補充)
getParentDirectory
/* Get parent directory.
   Examples:    "/parent/file" -> "/parent" return true
                "/file"        -> "/" return true
                "/"            -> return false
   @param   path    Path.
   @param   parent  Buffer to hold parent path.
   @return          If succeed return true, otherwise return false. */
getNameFromPath
/* Get file name from path.
   Examples:    '/parent/file' -> 'file' return true
                '/file'        -> 'file' return true
                '/'            -> return false
   @param   path    Path.
   @param   name    Buffer to hold file name.
   @return          If succeed return true, otherwise return false. */
parseMessage
根據sendMessage的不同執行不同的動作,是以會看到主體結構是一個switch case。代碼裡接下來對這些用到的功能函數進行了實作。
addMetaToDirectory
根據hashUnique來進行區分,如果hashNode在本地,那麼直接更新本地的DirectoryTable,然後再更新分布式事務即可。
如果hashNode不在本地,那麼需要給對應的Node發送一個ADDMETATODIRECTORY類型的message。
removeMetaToDirectory
同樣的,remove也需要分成本地和遠端,如果是本地,就直接重新整理chainItems,把需要remove的Meta覆寫掉,之後更新分布式事務log即可。
如果是遠端,那麼就需要給對應的hashNode發送一個REMOVEMETATODIRECTORY類型的message。
updateDirectoryMeta
本地:直接memcpy對應的metadata即可。
遠端:發送一個對應類型的message
mknodWithMeta
建立實際的檔案時使用。
實際上mknod隻有本地方式,Octopus保證了一個file的data block和inode在一個機器上,使用者可以在機器A上建立檔案a,但是檔案a實際存儲在機器B上,而且檔案a的data blocks和inode都存儲在機器B上,并不會說inode存在A上,data blocks存在B上這種情況。(個人了解:這是比較顯然的,不然還會需要不止一次hash)。
(個人了解:也就是說,實際上分布式檔案系統并不能做到把整個叢集看作一個機器,其中還是存在一定的限制)
直接通過執行個體化的storage在inode table中建立一個inode即可,具體的create操作在template table中實作。
mknod(WithoutMeta)
建立空檔案時使用。
如标題所示,實際上這裡的mknod是沒有添加有效的metadata的,我們可以暫時了解為一個空的inode。
分成2pc和collect-dispatch兩種方式,分别對應mknod2pc和mknodcd兩個函數。
mknod2pc:
(這個暫時不是我們研究的重點,暫且跳過)
mknodcd:
我們其實會發現,Octopus中并沒有用到太多的VFS層面類似inode,dentry之類的說法,因為目前的實作中,并沒有類似VFS的思想(個人了解本文中實作的FileMeta有點類似于inode加dentry結構的混合體)。但是實際上代碼中的parentHashAddress和parentMetaAddress就類似于dentry的作用,就是先找到這個inode的父目錄,把父目錄的inode對應的孩子數加一,之後更新到本地的分布式事務中,更新結束後調用
updateRemoteData
即可。因為
updateRemoteData
區分本地和遠端,是以這裡并不用判斷parentNodeID是否在本地。update之後就正常的在本地create inode然後把這個inode放到hashTable中即可。
需要注意的是這裡是先更新分布式事務,再update parent-inode的Data,之後在本地建立inode,并放到hashTable中,最後送出本地事務。
getattr
從FileMeta的Table中得到對應的FileMeta。(根據path得到hash值)。
access
注釋給的比較明确,就是根據path判斷一下這個file或者dir是否存在。
mkdir
同樣的也分成了mkdircd和mkdir2pc,我們依舊不關注2pc的實作,來看mkdircd的實作:
會發現mkdircd和mknodcd的代碼基本一緻,除了使用的結構體不同,是以也側面反映出,實際上建立檔案和建立目錄實際上差別不大。
readdir
得到某一個目錄下面的檔案以及目錄的名字,類似的,根據path得到metadata,之後周遊metadata中的name,複制到一個list中,在函數體外可以通過list指針通路。
recursivereaddir
遞歸讀取,讀取目前目錄下的全部目錄以及檔案名。
具體實作就是在readdir的時候,根據name和parentDirectory拼接成的新path繼續readdir。
readDirectoryMeta
就像我們之前分析的,directory的meta可以在不同的機器上通路,是以這裡也需要區分本地和遠端。
Lock相關
lockWriteHashItem
unlockWriteHashItem
lockReadHashItem
unlockReadHashItem
基本是用到lock.cpp中的函數(不過那個讀寫鎖我是真的了解不了)
構造函數
hashtable.cpp
構造函數沒啥可說的,就是初始化一些items的位址等。最後可以發現使用連結清單來儲存bitmap中的freebit,避免了周遊的開銷。
FreeBit *currentFreeBit;
for (uint64_t i = 1; i < bitmapChainedItems->countTotal(); i++) {
    currentFreeBit = (FreeBit *)malloc(sizeof(FreeBit));
    currentFreeBit->position = i;
    currentFreeBit->nextFreeBit = headFreeBit;
    headFreeBit = currentFreeBit;
}
(這裡使用頭插法構造連結清單,自己寫代碼從來沒寫過這種,記錄一下。)
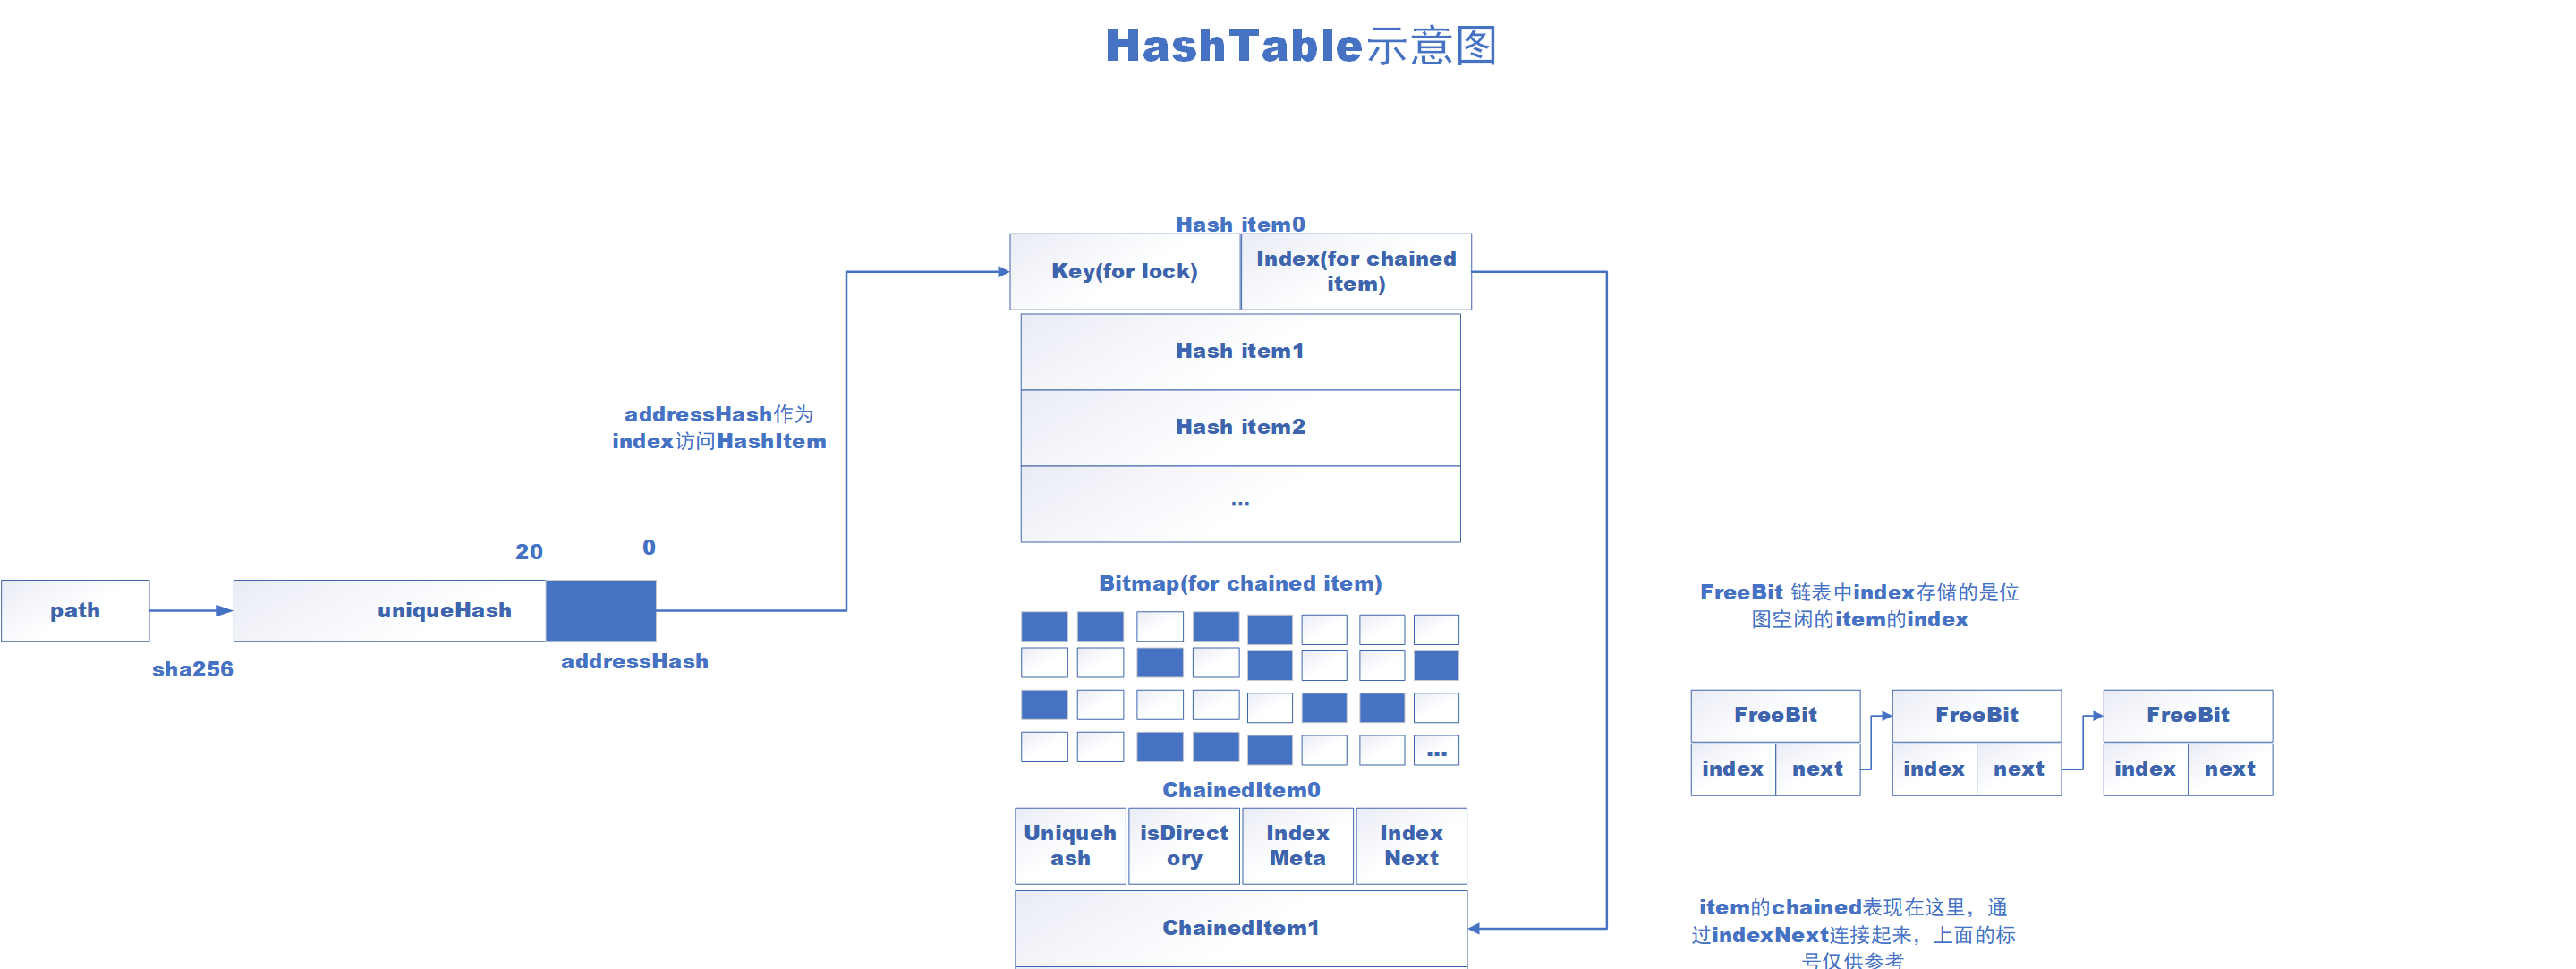
HashTable::get
步驟:
- 通過path得到一個 unique hash
- unique hash 的後20位作為 address hash
- 使用 address hash 作為 hash items 的索引,找到合适的item;
- 之後從hash item 中拿出chained item 的 index,因為可能出現hash沖突,是以從index開始向下依次周遊,直到找到相同的unique hash
其實就是開放鍊位址法解決hash沖突。(是以有一個do while)
bool HashTable::get(const char *path, uint64_t *indexMeta, bool *isDirectory)
{
    if ((path == NULL) || (indexMeta == NULL) || (isDirectory == NULL)) {
        return false;                   /* Fail due to null parameters. */
    } else {
        UniqueHash hashUnique;
        HashTable::getUniqueHash(path, strlen(path), &hashUnique); /* Get unique hash. */
        // printf("%016x%016x%016x%016x\n", hashUnique.value[3], hashUnique.value[2], hashUnique.value[1], hashUnique.value[0]);
        AddressHash hashAddress = HashTable::getAddressHash(&hashUnique); /* Get address hash by unique hash. */
        // getAddressHash(path, strlen(path), &hashAddress); /* Get address hash. */
        bool result;
        mutexBitmapChainedItems.lock(); /* Though currently there is no bitmap reading or writing, other operations such as delete might affect hash item reading. */
        {
            uint64_t indexHead = itemsHash[hashAddress].indexHead;
            if (indexHead == 0) {
                result = false;         /* Fail due to no hash item. */
            } else {
                // UniqueHash hashUnique;
                // getUniqueHash(path, strlen(path), &hashUnique); /* Get unique hash. */
                uint64_t indexCurrent = indexHead; /* Index of current chained item. */
                bool found = false;
                do {                    /* Traverse every chained item. */
                    if (memcmp(&(itemsChained[indexCurrent].hashUnique), &(hashUnique), sizeof(UniqueHash)) == 0) {
                        *indexMeta = itemsChained[indexCurrent].indexMeta; /* Save meta index. */
                        *isDirectory = itemsChained[indexCurrent].isDirectory; /* Save state of directory. */
                        found = true;   /* Found one matched. */
                        break;          /* Jump out. */
                    } else {
                        indexCurrent = itemsChained[indexCurrent].indexNext; /* Move to next chained item. */
                    }
                } while (indexCurrent != 0); /* If current item is over last chained item then jump out. */
                if (found == true) {
                    result = true;      /* Succeed. Find one matched. */
                } else {
                    result = false;     /* Fail due to no chained item matched. */
                }
            }
        }
        mutexBitmapChainedItems.unlock(); /* Unlock hash table bitmap. */
        return result;                  /* Return specific result. */
    }
}
HashTable::put
基本的hash開放鍊位址法實作(跟我們用數組模拟的方式有些不同,使用FreeBit來維護空閑item,但是本質上還是開放鍊位址法)。
HashTable::del
删除一個hash item 和 chained item,與連結清單中删除節點非常類似。
剩下的方法基本是統計hash item 和 chained item等這些item的數量長度等。沒什麼需要專門分析的。總結一下hashtable的基本資料結構和操作:
lock.cpp
讀寫鎖的原理比較容易懂,但是代碼中存在着一堆magic number,比如
LockAddress + 4
的4之類,猜測可能和metadata的結構有關,這裡暫時跳過。
這裡是一個讀寫鎖實作,在另一篇文章中實作了一個python版本的,這裡的實作基本一緻。
但是代碼裡還是存在一些問題:
uint64_t LockService::WriteLock(uint16_t NodeID, uint64_t Address) {
    /* Address是相對位址,相對 hash item table 基址的位移 */
    int workerid = server->getIDbyTID();
    uint16_t ID = __sync_fetch_and_add(&WriteID, 1ULL);
    uint64_t key = (uint64_t)NodeID;
    uint64_t LockAddress = MetaDataBaseAddress + Address;
    key = key << 16;
    key += ID;
    key = key << 32;
    while (true) {
        if (__sync_bool_compare_and_swap((uint64_t *)LockAddress, 0ULL, key))
            break;
        //if (workerid == 0) {
        server->RequestPoller(workerid);
        //}
    }
    return key;
}

bool LockService::WriteUnlock(uint64_t key, uint16_t NodeID, uint64_t Address) {
    uint64_t LockAddress = MetaDataBaseAddress + Address;
    uint32_t *p = (uint32_t *)(LockAddress + 4);
    *p = 0;
    return true;
}
這個寫解鎖的操作為什麼要加4呢?理論上這裡執行完,寫加鎖這裡
__sync_bool_compare_and_swap((uint64_t *)LockAddress, 0ULL, key)
LockAddress的内容完全沒變啊,解完鎖之後依舊無法執行新的寫操作。
storage.cpp
storage.cpp的構造函數主要是進行記憶體配置設定的工作(count是自己輸入的,是以個人感覺sizeBufferUsed中的Used可能不太準确。。。),分别是Hashtable,file metadata的table,file block的table,directory metadata的table。
Storage::Storage(char *buffer, char* bufferBlock, uint64_t countFile, uint64_t countDirectory, uint64_t countBlock, uint64_t countNode)
{
    if ((buffer == NULL) || (bufferBlock == NULL) || (countFile == 0) || (countDirectory == 0) ||
        (countBlock == 0) || (countNode == 0)) {
        fprintf(stderr, "Storage::Storage: parameter error.\n");
        exit(EXIT_FAILURE);             /* Exit due to parameter error. */
    } else {
        hashtable = new HashTable(buffer, countDirectory + countFile); /* Initialize hash table. */
        Debug::notifyInfo("sizeof Hash Table = %d MB", hashtable->sizeBufferUsed / 1024 / 1024);

        tableFileMeta = new Table<FileMeta>(buffer + hashtable->sizeBufferUsed, countFile); /* Initialize file meta table. */
        Debug::notifyInfo("sizeof File Meta Size = %d MB", tableFileMeta->sizeBufferUsed / 1024 / 1024);

        tableDirectoryMeta = new Table<DirectoryMeta>(buffer + hashtable->sizeBufferUsed + tableFileMeta->sizeBufferUsed, countDirectory); /* Initialize directory meta table. */
        Debug::notifyInfo("sizeof Directory Meta Size = %d MB", tableDirectoryMeta->sizeBufferUsed / 1024 / 1024);

        tableBlock = new Table<Block>(bufferBlock, countBlock); /* Initialize block table. */

        this->countNode = countNode;    /* Assign count of nodes. */
        sizeBufferUsed = hashtable->sizeBufferUsed + tableFileMeta->sizeBufferUsed + tableDirectoryMeta->sizeBufferUsed + tableBlock->sizeBufferUsed; /* Size of used bytes in buffer. */
    }
}
還有一個getNodeHash函數,應該是得到server node的編号,等到遇到的時候再詳細看。
TxManager.cpp
最關鍵的函數是:
void TxManager::TxDistributedPrepare(uint64_t TxID, bool action) {
	DistributedLogEntry *log = (DistributedLogEntry *)DistributedLogAddress;
	log[TxID].prepare = action;
	FlushData((uint64_t)&log[TxID].prepare, CACHELINE_SIZE);
}
emmm,我是沒看出來這裡涉及了什麼collect-dispatch操作。。。
![作業系統學習筆記——第六章 檔案管理[圖]](data:image/gif;base64,R0lGODlhAQABAIAAAP///wAAACwAAAAAAQABAAACAkQBADs=)