部署參考:http://blog.csdn.net/qq_29277155/article/details/53205582
部分參考:https://linux.cn/article-6985-1.html
https://suricata-ids.org/download/
http://suricata.readthedocs.io/en/latest/index.html
http://www.cnblogs.com/piaolingzxh/p/4217480.html
Suricata是一個高性能的網絡IDS,IPS和網絡安全監控引擎。Suricata是一個網絡入侵檢測和防護引擎,由開放資訊安全基金會及其支援的廠商開發。該引擎是多線程的,内置支援IPV6。可加載現有的Snort規則和簽名,支援Barnyard 和 Barnyard2 工具.
IDS:英文“Intrusion Detection Systems”的縮寫,中文意思是“入侵檢測系統”。依照一定的安全政策,通過軟、硬體,對網絡、系統的運作狀況進行監視,盡可能發現各種攻擊企圖、攻擊行為或者攻擊結果,以保證網絡系統資源的機密性、完整性和可用性。
Barnyard:知名的開源IDS的日志工具,具有快速的響應速度,優異的資料庫寫入功能,是做自byebug定義的入侵檢測系統不可缺少的插件。
IPS:入侵預防系統(IPS: Intrusion Prevention System)是電腦網絡安全設施,是對防病毒軟體(Antivirus Programs)和防火牆(Packet Filter, Application Gateway)的補充。 入侵預防系統(Intrusion-prevention system)是一部能夠監視網絡或網絡裝置的網絡資料傳輸行為的計算機網絡安全裝置,能夠即時的中斷、調整或隔離一些不正常或是具有傷害性的網絡資料傳輸行為。是新一代的侵入檢測系統(IDS)。
IDS和IPS的差別:IDS隻是發現攻擊、産生報警,而IPS不但可以發現攻擊,更重要的是針對攻擊采取行動。
一、部署Suricata、Barnyard 2、Snorby伺服器
1、mysql安裝
yum install -y mysql-community-server
啟動mysql
systemctl start mysqld.service
給mysql賦權限,設定密碼,允許登入的主機,省略,
2、安裝相關的依賴
yum install epel-release
#mv /etc/yum.repos.d/CentOS-Base.repo /etc/yum.repos.d/CentOS-Base.repo.backup
#wget -O /etc/yum.repos.d/CentOS-Base.repo http://mirrors.aliyun.com/repo/Centos-6.repo
#yum clean all
#yum makecache
安裝依賴包
yum -y install ImageMagickgcc-c++ patch readline readline-devel zlib zlib-devel git-core libyaml-devel libffi-devel openssl-devel make libpcap-devel pcre-devel libyaml-devel file-devel jansson-devel nss-devel libcap-ng-devel libnet-devel tar libnetfilter_queue-devel lua-devel mysql-devel fontconfig-devel libX11-devel libXrender-devel libxml2-devel libxslt-devel qconf
cd /opt/
wget -O libhtp-0.5.20.tar.gz https://codeload.github.com/OISF/libhtp/tar.gz/0.5.20
tar zxvf libhtp-0.5.20.tar.gz && cd libhtp-0.5.20
./autogen.sh
./configure && make && make install
3、安裝Ruby on rails
curl -L get.rvm.io | bash -s stable
command curl -sSL https://rvm.io/mpapis.asc | gpg2 --import -#導入證書
source /etc/profile.d/rvm.sh
rvm install 2.0.0
rvm use 2.0.0--default 如果有多個ruby 版本,才使用這條語句。
ruby -v
gem install bundler # 安裝bundler
git clone git://github.com/Snorby/snorby.git
cd /opt/snorby
建立snorby_config.yml和database.yml兩個檔案
cp config/snorby_config.yml.example config/snorby_config.yml
cp config/database.yml.example config/database.yml
修改檔案參考:https://linux.cn/article-6985-1.html
修改檔案Gemfile,把gem 'rake', '0.9.2' 改成 gem 'rake', '> 0.9.2'
sed -i '/dm-postgres-adapter/d' Gemfile
設定iptables
/etc/init.d/iptables stop #關閉防火牆,其他主機可以通路http://ip:3000
iptables -I INPUT -p tcp --dport 3000 -mstate --state=NEW,ESTABLISHED,RELATED -j ACCEPT
初始化rails
bundle install
rake snorby:setup
啟動服務snory:
rails server -e production &
[1] 1519
[david-dai@dep006 snorby]$ syck has been removed, psych is used instead
=> Booting Thin
=> Rails 3.2.22 application starting in production on http://0.0.0.0:3000
=> Call with -d to detach
=> Ctrl-C to shutdown server
4、安裝suricata
yum install suricata
編輯suricata.yaml檔案
touch /var/log/suricata/suricata.waldo
修改日志格式檔案:
sed -i -e '/default-log-format/a\ default-log-format: "[%i] %t -(%f:%l) <%d> (%n) -- "' /etc/suricata/suricata.yaml
開啟syslog 功能, 在/etc/suricata/suricata.yaml , 找到:
sed -i -e '\/var\/log\/suricata\/suricata.log/,/Step 4/s/no/yes/g' /etc/suricata/suricata.yaml
開啟unified2 logging in the suricata yaml:
sed -i -e '/unified2-alert/,/unified2.alert/s/no/yes/g' /etc/suricata/suricata.yaml
找到#pid-file: /var/run/suricata.pid把前面的#号去掉
sed -i -e '/pid-file/a\pid-file: /var/run/suricata.pid' /etc/suricata/suricata.yaml
找到rule-files,把下面的emerging-icmp.rules 和emerging-virus.rules删除掉。(unfinished)
啟用 threshold,找到#threshold-file: /etc/suricata/threshold.config
sed -i -e '/threshold-file/a\threshold-file: /etc/suricata/threshold.config' /etc/suricata/suricata.yaml
首次配置 Suricata IDS 參考:https://linux.cn/article-6985-1.html
vim /etc/suricata/suricata.yaml
(1)所有的interface:etho 修改為:interface:em2 因為我隻有em1和em2 網卡,這裡監測公網ip的em2網卡流量,ye可以監測em1網卡流量。
(2)現在到了配置 Suricata 的時候了。配置檔案的位置是 /etc/suricata/suricata.yaml。參照以下指令,用文本編輯器打開這個檔案。
為default-log-dir關鍵字指定 Suricata 日志檔案所在的位置。
default-log-dir: /var/log/suricata/
(3)在vars部分下方,你會發現幾項對 Suricata 來說很重要變量。HOME_NET變量需要指定 Suricata 檢查的網絡。被配置設定給 EXTERNAL_NET 變量的 !$HOME_NET 代表除本地網絡之外的其他網絡。XXX_PORTS變量用來辨識不同服務所用到的端口号。需要注意的是無論使用什麼端口,Suricata 都可以自動檢測 HTTP 流量。是以是不是正确指定端口就顯得沒那麼重要了。
vars:
address-groups:
HOME_NET: "[221.228.208.0/24,172.22.66.0/24]"
(4)host-os-policy 部分用于防禦利用作業系統網絡棧的自身行為來逃避檢測的一些知名攻擊手段(例如:TCP reassembly)。作為對策,通過針對目标作業系統而對檢測引擎算法進行微調,現代 IDC 提供了“基于目标”的檢測手段。是以,如果你知道某台主機運作了什麼作業系統的話,将這個資訊提供給 Suricata 就可以大幅提高檢測的成功率。這就是 host-os-policy 存在的意義。本例中,預設的 IDC 政策是 Linux 系統。如果針對某個 IP 位址沒有指定作業系統資訊,Suricata 會預設應用基于 Linux 系統的檢測政策。如下,當捕獲到對 192.168.122.0/28 和 192.168.122.155通訊時,Suricata 就會應用基于 Windows 系統的檢測政策。
host-os-policy:
windows: [0.0.0.0/0]
bsd: []
bsd-right: []
old-linux: []
linux: [0.0.0.0/0]
old-solaris: []
solaris: []
hpux10: []
hpux11: []
irix: []
macos: []
vista: []
windows2k3: []
按照以下方法關閉 em 接口的 LRO/GRO 功能。
sudo ethtool -K em1 gro off lro off
sudo ethtool -K em2 gro off lro off
Suricata 支援許多運作模式。運作模式決定着 IDC 會使用何種線程。以下指令可以檢視所有 可用的運作模式。
sudo /usr/local/bin/suricata --list-runmodes
安裝規則,也可以從其他伺服器上拷貝過來到/etc/suricata/rules目錄即可:
root@deptest34:/home/david/suricata-2.0.8# make install-rules
install -d "/etc/suricata/rules"
/usr/bin/wget -qO - http://rules.emergingthreats.net/open/suricata-2.0/emerging.rules.tar.gz | tar -x -z -C "/etc/suricata/" -f -
You can now start suricata by running as root something like '/usr/local/bin/suricata -c /etc/suricata//suricata.yaml -i eth0'.
If a library like libhtp.so is not found, you can run suricata with:
'LD_LIBRARY_PATH=/usr/local/lib /usr/local/bin/suricata -c /etc/suricata//suricata.yaml -i eth0'.
While rules are installed now, it's highly recommended to use a rule manager for maintaining rules.
The two most common are Oinkmaster and Pulledpork. For a guide see:
https://redmine.openinfosecfoundation.org/projects/suricata/wiki/Rule_Management_with_Oinkmaster
root@deptest34:/home/david/suricata-2.0.8# echo $?
更新規則指令:
suricatasc -c reload-rules
啟動suricata:
LD_LIBRARY_PATH=/usr/local/lib /usr/sbin/suricata -c /etc/suricata/suricata.yaml -i em2 -D &
tailf /var/log/suricata/stats.log
5、安裝barnyard2
wget https://codeload.github.com/firnsy/barnyard2/tar.gz/v2-1.13
tar xvfz barnyard2-2-1.13.tar.gz && cd barnyard2-2-1.13/
./configure --with-mysql-libraries=/usr/lib64/mysql/ --with-mysql=/usr/bin/mysql
make && make install
vim /etc/suricata/barnyard2.conf
配置Barnyard 2
#把Barnyard 2安裝源檔案中的etc/barnyard2.conf檔案拷貝到Suricata的配置目錄下
cd /opt/barnyard2-2-1.13
cp ./etc/barnyard2.conf /etc/suricata/
#建立barnyard2日志目錄/var/log/barnyard2
mkdir /var/log/barnyard2
修改barnyard2.conf
把 預設的snort檔案配置改成 suricata
sed -i 's/snort/suricata/g' /etc/suricata/barnyard2.conf
sed -i 's/gen-msg.map/\/rules\/gen-msg.map/g' /etc/suricata/barnyard2.conf
sed -i 's/sid-msg.map/\/rules\/sid-msg.map/g' /etc/suricata/barnyard2.conf
把資料庫資訊添加到barnyard2.conf
sed -i '$a output database: log, mysql, user=root password=1q2w3e4r dbname=snorby host=localhost' /etc/suricata/barnyard2.conf
#找到“config hostname”和“config interface”,em2是鏡像端口所在的網卡,按照你的實際情況修改
sed -i -e '/#config hostname: thor/\a/config hostname: $hostname/' /etc/suricata/barnyard2.conf
sed -i -e '/#config interface: eth0/\a/config interface: em2/' /etc/suricata/barnyard2.conf
sed -i -e '/config waldo_file/a\config waldo_file: /var/log/suricata/suricata.waldo' /etc/suricata/barnyard2.conf
啟動barnyard2:
sudo /usr/local/bin/barnyard2 -c /etc/suricata/barnyard2.conf -d /var/log/suricata -f unified2.alert -w /var/log/suricata/suricata.waldo –D &
到目前為止,一台伺服器ids/ips 監測部署好監測用戶端和展示服務端,如果需要監測其他伺服器,怎麼辦?
好像網絡上把流量鏡像拷貝到這台伺服器上,是一種方法。這裡采用C/S方法,部署suricata用戶端。
二、ubuntu 伺服器上安裝Suricata、Barnyard 2用戶端
這裡在每台伺服器上部署Suricata,儲存為waldo格式,Barnyard2把日志全部推送到snorby伺服器上,統一展示。
1、安裝依賴包
apt-get install libpcre3 libpcre3-dbg libpcre3-dev libpcap*\
build-essential autoconf automake libtool pkg-config\
libpcap-dev libnet1-dev mysql-client libmysqlclient16 flex software-properties-common python-software-properties
2、這裡采用ppa方式安裝suricata,也可以使用編譯安裝suricata,編譯安裝barnyard2
sudo add-apt-repository ppa:oisf/suricata-stable
sudo apt-get update
sudo apt-get install suricata
wget http://www.tcpdump.org/release/libpcap-1.2.1.tar.gz
tar -zxvf libpcap-1.2.1.tar.gz
cd libpcap-1.2.1
apt-get install flex
root@TS-DEP-CENTER01:/tmp/barnyard2-2-1.13# /sbin/ldconfig
cd /tmp/
wget https://www.openinfosecfoundation.org/download/suricata-3.2.4.tar.gz
tar -zxvf suricata-3.2.4.tar.gz
cd suricata-3.2.4
make clean
./configure --prefix=/usr/ --sysconfdir=/etc/ --localstatedir=/var/
make
make install
mkdir -p /var/log/barnyard2
mkdir -p /var/log/suricata
mv v2-1.13 barnyard2-2-1.13.tar.gz
cd /tmp/barnyard2-2-1.13
./configure --with-mysql && make && make install
3、修改barnyard2 和 suricata的配置檔案
可以拷貝之前的配置,我直接用salt同步。
參考上文,省略
barnyard2配置示例:
root@TS-DEP-CENTER01:/opt# grep -v '^#' /etc/suricata/barnyard2.conf | grep -v '^$'
config reference_file: /etc/suricata/reference.config
config classification_file: /etc/suricata/classification.config
config gen_file: /etc/suricata//rules/gen-msg.map
config sid_file: /etc/suricata//rules/sid-msg.map
config hostname: TS-DEP-CENTER01-172.22.66.41
config interface: em2
input unified2
output alert_fast: stdout
output database: log, mysql, user=root password=1q2w3e4r dbname=snorby host=172.22.66.6
4、啟動suricata:
suricata -c /etc/suricata/suricata.yaml -i em1 -D &
5、啟動barnyard2
列印出來的日志會告訴你是否連接配接資料庫成功,上報的host和網卡資訊。
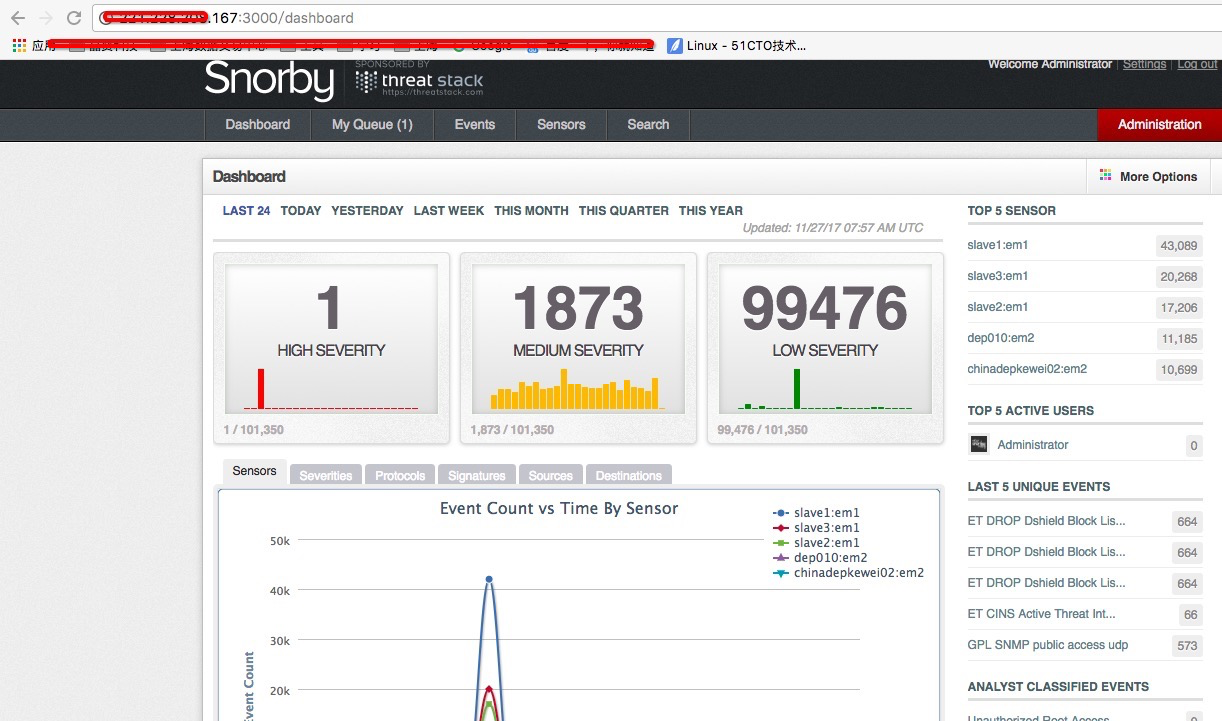
然後到系統上檢視sensor(host)資訊:
問題:
depshlt02(ubuntu14.04)
The following packages have unmet dependencies:
libpcre3-dbg : Depends: libpcrecpp0 (= 1:8.31-2ubuntu2.1) but 1:8.31-2ubuntu2.3 is to be installed
libpcre3-dev : Depends: libpcrecpp0 (= 1:8.31-2ubuntu2.1) but 1:8.31-2ubuntu2.3 is to be installed
問題解決:
vim /etc/apt/source.list 添加:
deb http://cn.archive.ubuntu.com/ubuntu/ trusty main universe multiverse restricted
deb http://cn.archive.ubuntu.com/ubuntu/ trusty-updates main universe multiverse restricted
然後執行:
apt-get update
apt-get install libpcre3 libpcre3-dbg libpcre3-dev build-essential autoconf automake libtool libpcap-dev libnet1-dev mysql-client
最終在snorby系統上可以看event統計資訊和sensors主機資訊。

三、salt批量在伺服器上安裝:
1、定義兩個salt組
一個組包含兩個ip (一個内網,一個公網),另一個組僅僅包含一個内網ip
root@TS-OP03:/home/david-dai# vim /etc/salt/master.d/group.conf
nodegroups:
suricata_two_ip: '[email protected] or [email protected] or [email protected] or [email protected] or [email protected] or [email protected] or [email protected] or [email protected]
or [email protected] or [email protected] or [email protected] or [email protected] or [email protected] or [email protected] or [email protected] or [email protected] or [email protected].
66.46 or [email protected] or [email protected]'
suricata_one_ip: '[email protected] or [email protected] or [email protected] or [email protected] or [email protected] or [email protected] or [email protected] or [email protected].
51 or [email protected] or [email protected] or [email protected] or [email protected] or [email protected] or [email protected] or [email protected]'
2、針對第一個組two ip,em1是内網ip,em2是公網ip,雙網卡隻監測公網ip的em2網卡流量。
安裝依賴包:
salt -N suricata_two_ip cmd.run "apt-get install -y bison flex libpcap*"
salt -N suricata_two_ip cmd.run 'apt-get install -y --force-yes libpcre3 libpcre3-dbg libpcre3-dev build-essential autoconf automake libtool pkg-config libpcap-dev libnet1-dev mysql-client libmysqlclient16 flex software-properties-common python-software-properties'
3、同步一些必要的配置(suricata.yaml&barnyard.con)
salt -N suricata_two_ip cmd.run 'sudo add-apt-repository ppa:oisf/suricata-stable'
salt -N suricata_two_ip cmd.run 'sudo apt-get update '
salt -N suricata_two_ip cmd.run 'sudo apt-get install -y suricata '
salt -N suricata_two_ip cmd.run 'dpkg -l | grep suricata'
root@TS-OP03:/home/david-dai# cp suricata.yaml /srv/salt/chinadep/
salt -N suricata_two_ip cp.get_file salt://chinadep/suricata.yaml /etc/suricata/suricata.yaml
root@TS-OP03:/home/david-dai# cp barnyard2.conf /srv/salt/chinadep/
root@TS-OP03:/home/david-dai# cp -pr barnyard2-2-1.13 /srv/salt/chinadep/
root@TS-OP03:/home/david-dai# ls -ld /srv/salt/chinadep/
salt -N suricata_two_ip cp.get_dir salt://chinadep/barnyard2-2-1.13 /tmp/
salt -N suricata_two_ip cp.get_file salt://chinadep/barnyard2.conf /etc/suricata/barnyard2.conf
4、安裝suricata&barnary
root@TS-OP03:/home/david-dai# vim /srv/salt/chinadep/barnyard.sh
#!/bin/bash
sed -i 's/^config hostname./config hostname: '$(hostname)'/g' /etc/suricata/barnyard2.conf
apt-get install -y --force-yes libmysqlclient libdbd-mysql-perl mysql-common mysql-client libmysql
apt-get install -y --force-yes bison flex libpcap
apt-get install -y --force-yes libpcre3 libpcre3-dbg libpcre3-dev build-essential autoconf automake libtool pkg-config libpcap-dev libnet1-dev mysql-client
t libmysqlclient16 flex software-properties-common python-software-properties
cd /tmp
tar -zxvf libpcap-1.2.1.tar.gz
cd /tmp/libpcap-1.2.1
./configure
make
/sbin/ldconfig
echo $? >/tmp/barnyard_two_ip.txt
cd /tmp/barnyard2-2-1.13/
chmod +x autogen.sh
ln -s /usr/lib/x86_64-linux-gnu/libmysqlclient* /usr/include/mysql/
./configure --with-mysql-libraries=/usr/include/mysql --with-mysql=/usr/bin/mysql
echo $? >>/tmp/barnyard_two_ip.txt
salt -N suricata_two_ip cp.get_file salt://chinadep/barnyard.sh /tmp/barnyard.sh
salt -N suricata_two_ip cmd.run 'chmod +x /tmp/barnyard.sh'
salt -N suricata_two_ip cmd.run 'sh -x /tmp/barnyard.sh'
5、檢查配置
root@TS-OP03:/home/david-dai# salt -N suricata_two_ip cmd.run "grep ^'config hostname' /etc/suricata/barnyard2.conf "
CK749X1:
config hostname: TS-DEP-CENTER05
8K649X1:
config hostname: TS-DEP-CENTER06
插入一句話:如果登入伺服器,想在單台伺服器上sed修改hostname,請執行如下指令:
sed -i 's/^config hostname./config hostname: '
hostname
'/g' /etc/suricata/barnyard2.conf"或者:"sed -i 's/^config hostname./config hostname: '$(hostname)'/g' /etc/suricata/barnyard2.conf"