完成一個RESTful服務,提供幾個通路接口,用來操作較簡單的聯系人資訊,資料儲存在Sql Server資料庫中。
1.使用STS建立工程。
使用STS建立RESTful工程,可以參考:
《用Spring Tools Suite(STS)開始一個RESTful Web Service》
《SpringBoot建構RESTful service完成Get和Post》
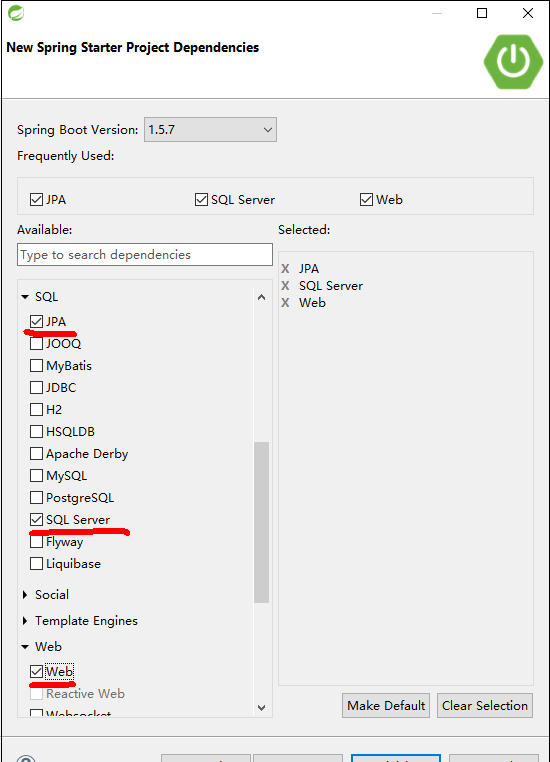
建立項目時的Project Name,Group,Atifact,Package這些參數按照實際要求填。
項目引入依賴web,JPA,SQL Server依賴。
<?xml version="1.0" encoding="UTF-8"?>
<project xmlns="http://maven.apache.org/POM/4.0.0" xmlns:xsi="http://www.w3.org/2001/XMLSchema-instance"
    xsi:schemaLocation="http://maven.apache.org/POM/4.0.0 http://maven.apache.org/xsd/maven-4.0.0.xsd">
    <modelVersion>4.0.0</modelVersion>

    <groupId>com.kxh.example</groupId>
    <artifactId>demo0003</artifactId>
    <version>0.0.1-SNAPSHOT</version>
    <packaging>jar</packaging>

    <name>demo0003</name>
    <description>Demostrate that operate sql server</description>

    <parent>
        <groupId>org.springframework.boot</groupId>
        <artifactId>spring-boot-starter-parent</artifactId>
        <version>1.5.6.RELEASE</version>
        <relativePath/> <!-- lookup parent from repository -->
    </parent>

    <properties>
        <project.build.sourceEncoding>UTF-8</project.build.sourceEncoding>
        <project.reporting.outputEncoding>UTF-8</project.reporting.outputEncoding>
        <java.version>1.8</java.version>
    </properties>

    <dependencies>
        <dependency>
            <groupId>org.springframework.boot</groupId>
            <artifactId>spring-boot-starter-data-jpa</artifactId>
        </dependency>
        <dependency>
            <groupId>org.springframework.boot</groupId>
            <artifactId>spring-boot-starter-web</artifactId>
        </dependency>

        <dependency>
            <groupId>com.microsoft.sqlserver</groupId>
            <artifactId>mssql-jdbc</artifactId>
            <scope>runtime</scope>
        </dependency>
        <dependency>
            <groupId>org.springframework.boot</groupId>
            <artifactId>spring-boot-starter-test</artifactId>
            <scope>test</scope>
        </dependency>
    </dependencies>

    <build>
        <plugins>
            <plugin>
                <groupId>org.springframework.boot</groupId>
                <artifactId>spring-boot-maven-plugin</artifactId>
            </plugin>
        </plugins>
    </build>
</project>
2.建構資料庫表。
在SQL Sever中的目标資料庫中建一個contact表。
表結構:
id是主鍵,并且設定其為自增辨別,可以自動生成遞增的值作為id。

3.建立包結構
根包為:com.kxh.example.demo
4.建立領域對象“聯系人”實體。
在包“com.kxh.example.demo.domain”下建立類“Contact”,并且加上Entity注解。
為id屬性增加Id注解表示這是個主鍵。
為id屬性增加GeneratedValue,并設定id值生成的政策是自增。
package com.kxh.example.demo.domain;

import javax.persistence.Entity;
import javax.persistence.GeneratedValue;
import javax.persistence.GenerationType;
import javax.persistence.Id;

@Entity
public class Contact {
    @Id
    @GeneratedValue(strategy = GenerationType.IDENTITY)
    private long id;

    private String name;

    private String phone;

    private String mail;

    public Contact() {
        super();
    }

    public Contact(String name, String phone, String mail) {
        super();

        this.name = name;
        this.phone = phone;
        this.mail = mail;
    }

    public long getId() {
        return this.id;
    }

    public void setId(long value) {
        this.id = value;
    }

    public String getName() {
        return this.name;
    }

    public void setName(String value) {
        this.name = value;
    }

    public String getPhone() {
        return phone;
    }

    public void setPhone(String value) {
        this.phone = value;
    }

    public String getMail() {
        return this.mail;
    }

    public void setMail(String value) {
        this.mail = value;
    }
}
5.建立資料操作對象。
在包“com.kxh.example.demo.dao”下建立接口“ContactsRepository”,從“JpaRepository”繼承,可以完成最常用的CRUD。
該接口定義了根據name查一個聯系人。也定義了可以通過對name的模糊查詢聯系人,findBy的寫法可以參考官方文檔以完成更多的查詢。
package com.kxh.example.demo.dao;

import java.util.List;
import org.springframework.data.jpa.repository.JpaRepository;

import com.kxh.example.demo.domain.Contact;

public interface ContactsRepository extends JpaRepository<Contact, Long> {
    Contact findByName(String name);

    List<Contact> findByNameLike(String name);
}
6.建立RestController向外提供服務
在包“com.kxh.example.demo.controller”先建立類“ContactsController”。
寫上RestController注解,進行根url路徑的映射。
将ContactsRepository定義為類成員變量,并打上Autowired注解,由架構自動進行執行個體化。
package com.kxh.example.demo.controller;

import java.util.ArrayList;
import java.util.List;

import org.springframework.beans.factory.annotation.Autowired;
import org.springframework.web.bind.annotation.RequestBody;
import org.springframework.web.bind.annotation.RequestMapping;
import org.springframework.web.bind.annotation.RequestMethod;
import org.springframework.web.bind.annotation.RestController;

import com.kxh.example.demo.dao.ContactsRepository;
import com.kxh.example.demo.domain.Contact;
import com.kxh.example.demo.service.ContactsService;

@RestController
@RequestMapping("/contacts")
public class ContactsController {

    @Autowired
    ContactsRepository contactsRepository;

    //新增
    @RequestMapping(value="/save/new", method=RequestMethod.POST)
    public Contact saveNewContact(@RequestBody Contact contact) {return this.contactsRepository.save(contact);
    }

    //更新
    @RequestMapping(value="/save/updated", method=RequestMethod.PUT)
    public Contact saveUpdatedContact(@RequestBody Contact contact) {
        Contact contactExisted = this.contactsRepository.findByName(contact.getName());
        contactExisted.setPhone(contact.getPhone());
        contactExisted.setMail(contact.getMail());
        return this.contactsRepository.save(contactExisted);
    }

    //删除
    @RequestMapping(value="/remove", method=RequestMethod.DELETE)
    public void removeContact(long id) {
        this.contactsRepository.delete(id);
    }

    //查詢,通過name查詢一條
    @RequestMapping(value="/query/byname", method=RequestMethod.GET)
    public Contact findContactByName(String name) {
        Contact contact = this.contactsRepository.findByName(name);
        return contact;
    }

    //查詢,通過like name查詢多條
    @RequestMapping(value="/query/likename", method=RequestMethod.GET)
    public List<Contact> findContactLikeName(String name) {
        String nameWhere = org.apache.commons.lang.StringUtils.join(new String[]{"%", name, "%"}, "");
        List<Contact> contacts = this.contactsRepository.findByNameLike(nameWhere);
        return contacts;
    }
}
7.完成,運作。
這裡使用curl進行調試。
建立
執行curl的指令:
curl -i -H "Content-Type:application/json;charset:utf-8" -X POST -d "{\"name\":\"Aissen\",\"phone\":\"13237123112\",\"mail\":\"[email protected]\"}" http://localhost:8080/contacts/save/new 執行後資料表中會增加一條記錄。
更新
執行指令,修改聯系人電話和郵箱。
curl -i -H "Content-Type:application/json" -X PUT -d "{\"name\":\"Aissen\",\"phone\":\"13231444444\",\"mail\":\"[email protected]\"}" http://localhost:8080/contacts/save/updated 執行後,記錄被修改。
查詢單個
在浏覽器中通路查詢rul。
http://localhost:8080/contacts/query/byname?name=Tom 結果:
查詢多個
http://localhost:8080/contacts/query/likename?name=to 結果:
删除
執行指令,參數id設為需要删除的聯系人的id。
curl -i -X DELETE http://localhost:8080/contacts/remove?id=6 代碼
End