有時在項目中直接把圖檔放到Assets.xcassets中,或者直接拖拽到項目中,會使得項目的包過大。
解決辦法:需要将圖檔資源打包成bundle
打包過程如下:
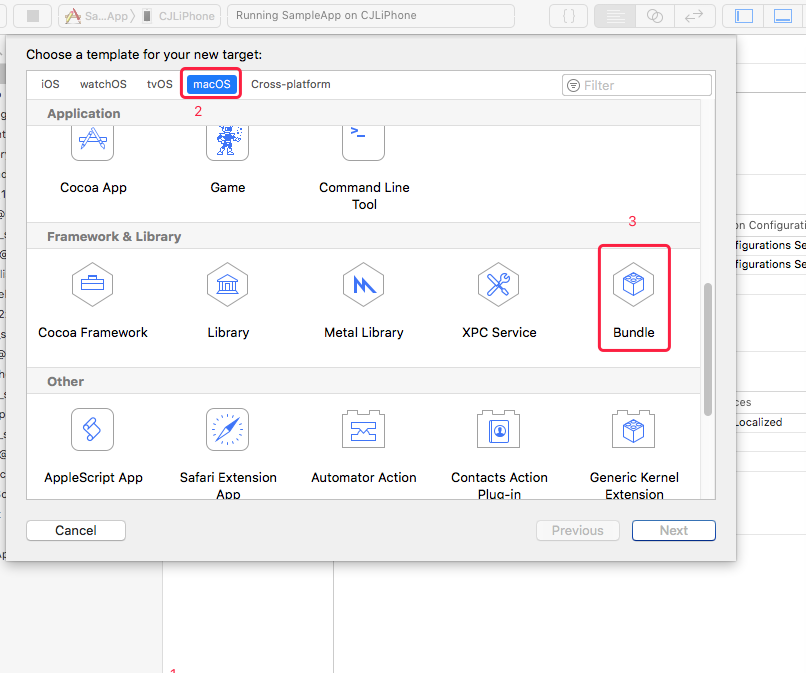
1、建立bundle
選擇target下的+号-->選擇macOS-->選擇Framework & Library 下的Bundle,建立bundle
 swift 将圖檔資源打包成Bundle
  swift 将圖檔資源打包成Bundle
 2、配置bundle
前往build setting修改以下屬性
1) ”base sdk “ 改為 iOS(因為建立的時候是基于macOS建立的,是以要修改成iOS)
swift 将圖檔資源打包成Bundle 2)“Build Active Architecture Only” 設定為yes(僅編譯目前環境,如果每個環境都編譯一遍會使包變大) swift 将圖檔資源打包成Bundle 3)"Skip Install" 設定為 NO(不需要安裝相關配置) swift 将圖檔資源打包成Bundle 4)“Installation Directiotory ”删掉後面的路徑(不安裝相關配置,也不需要安裝路徑) swift 将圖檔資源打包成Bundle 5)"COMBINE_HIDPI_IMAGES" 設定為 "NO"(不然圖檔會是tiff格式) swift 将圖檔資源打包成Bundle 6)"IOS Deployment Target" 設定為 "iOS 9.0"為了相容更多版本 swift 将圖檔資源打包成Bundle 7)"Strip Debug Symbols During Copy" 中"Release"模式設定為 "YES" swift 将圖檔資源打包成Bundle 8)Code Signing Identity 選擇 Don't Code Sign swift 将圖檔資源打包成Bundle 3、導入圖檔
在build phases 中的 copy bundle resources 點選 + 号添加圖檔資源
swift 将圖檔資源打包成Bundle 4、編譯生成bundle包
将項目調成在真機模式下 然後command+b編譯程式
swift 将圖檔資源打包成Bundle 找到項目的products 中的 icon.bundle,右鍵 show in finder,找到生成的bundle包,将其拖入項目中 swift 将圖檔資源打包成Bundle swift 将圖檔資源打包成Bundle swift 将圖檔資源打包成Bundle 5、使用bundle中的圖檔 let bundlePath = Bundle.main.path(forResource: "icon", ofType: "bundle")
let bundle = Bundle.init(path: bundlePath!)
let imageStr = bundle.path(forResource: "like@2x", ofType: "png")
UIImage.init(named: "icon.bundle/[email protected]")