對于 ContentProvider 還不是很熟悉的同學,可以閱讀上一篇 Android ContentProvider 基本原理和使用詳解。本文主要是對 contentProvider 的源碼進行分析,進而了解 ContentProvider 的實作原理。
本文分析基于 android 10 的源碼, API 級别 29。
ContentProvider 啟動流程
ContentProvider (CP) 啟動流程圖如下:可以對着這個來閱讀下面的内容。
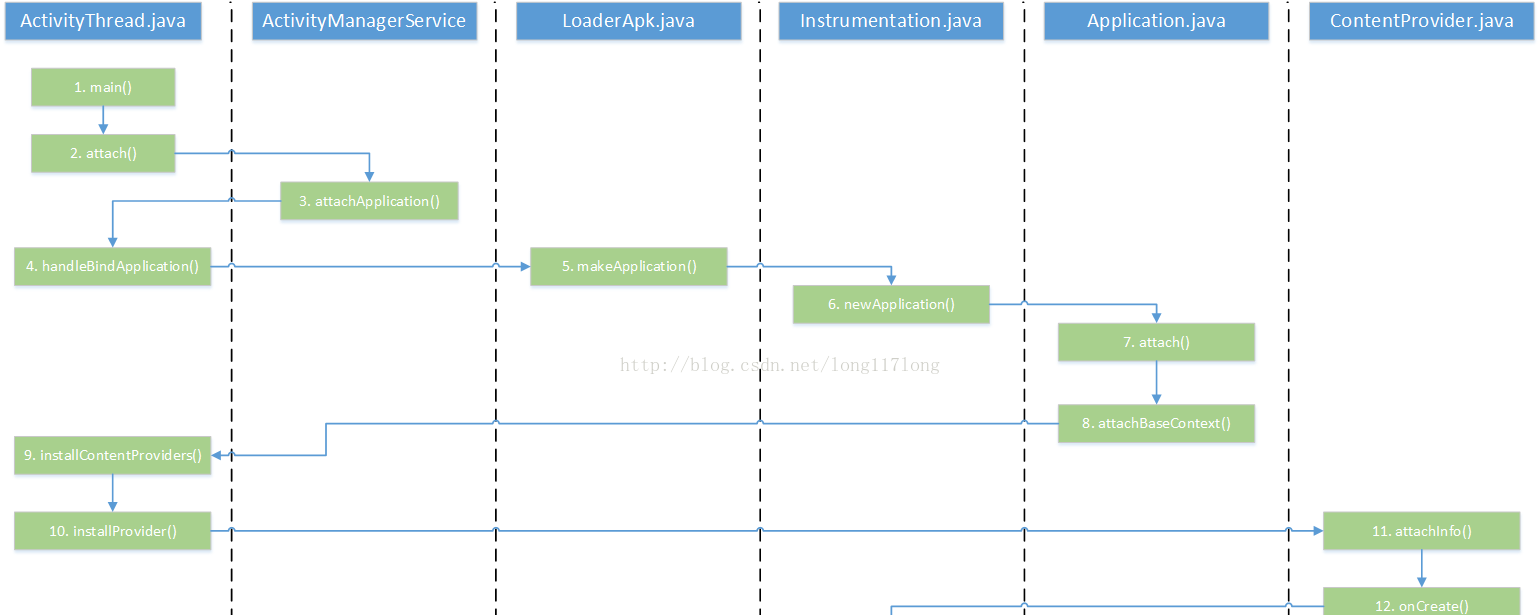
1、ActivityThread.handleBindApplication
對于了解 Activity 啟動流程的,可以知道
Application
執行個體是在
ActivityThread
的
handleBindApplication
方法中建立。在講解這個方法時疏漏了一點,那就是
ContentProvider
會在這個方法中建立。
// ActivityThread
private void handleBindApplication(AppBindData data) {
    // ......
        Application app;try {
            // If the app is being launched for full backup or restore, bring it up in
            // a restricted environment with the base application class.
            app = data.info.makeApplication(data.restrictedBackupMode, null);

            // Propagate autofill compat state
            app.setAutofillOptions(data.autofillOptions);

            // Propagate Content Capture options
            app.setContentCaptureOptions(data.contentCaptureOptions);

            mInitialApplication = app;

            // don't bring up providers in restricted mode; they may depend on the
            // app's custom Application class
            if (!data.restrictedBackupMode) {
                if (!ArrayUtils.isEmpty(data.providers)) {
                    installContentProviders(app, data.providers);
                }
            }

            // Do this after providers, since instrumentation tests generally start their
            // test thread at this point, and we don't want that racing.
            try {
          // Instrumentation onCreate 方法
                mInstrumentation.onCreate(data.instrumentationArgs);
            }
            catch (Exception e) {
                throw new RuntimeException(
                    "Exception thrown in onCreate() of "
                    + data.instrumentationName + ": " + e.toString(), e);
            }
            try {
         // application 的 onCreate 方法
                mInstrumentation.callApplicationOnCreate(app);
            } catch (Exception e) {
                if (!mInstrumentation.onException(app, e)) {
                    throw new RuntimeException(
                      "Unable to create application " + app.getClass().getName()
                      + ": " + e.toString(), e);
                }
            }
        } finally {
            // If the app targets < O-MR1, or doesn't change the thread policy
            // during startup, clobber the policy to maintain behavior of b/36951662
            if (data.appInfo.targetSdkVersion < Build.VERSION_CODES.O_MR1
                    || StrictMode.getThreadPolicy().equals(writesAllowedPolicy)) {
                StrictMode.setThreadPolicy(savedPolicy);
            }
        }
   // ......
}
上面簡化了大量代碼,但重要部分還在。AppBindData 對象 data 的成員變量 providers 儲存了要在目前應用程式程序中啟動的 CP 元件,接下會調用 installContentProviders 方法。
可以看到
installContentProviders
在
Application
onCreate
之前調用,是以可以得出結論:
ContentProvider
onCreate
Application
之前調用。onCreate
因為 onCreate 是在啟動過程中關掉用的,是以盡量避免在裡面執行耗時的操作,例如與IO相關的操作;否則,就可能造成 Content Provider 元件啟動逾時。
ActivityThread.installContentProviders
private void installContentProviders(
            Context context, List<ProviderInfo> providers) {
        final ArrayList<ContentProviderHolder> results = new ArrayList<>();

        for (ProviderInfo cpi : providers) {
            ContentProviderHolder cph = installProvider(context, null, cpi,
                    false /*noisy*/, true /*noReleaseNeeded*/, true /*stable*/);
            if (cph != null) {
                cph.noReleaseNeeded = true;
                results.add(cph);
            }
        }

        try {
       // 釋出到 AMS 中
            ActivityManager.getService().publishContentProviders(
                getApplicationThread(), results);
        } catch (RemoteException ex) {
            throw ex.rethrowFromSystemServer();
        }
    }
這個方法主要做了兩件事。
- 第一.通過循環變量 providerinfo 資訊,調用 installProvider 方法将 provider 資訊安裝完成并封裝成了一個 ContentProviderHolder 類型的對象,裡面包含 IContentProvider 接口。
- 第二.調用AMS服務的publishContentProviders方法,将這些安裝完成的 Provider 資訊釋出到AMS 服務,以便其他程序通路。
ContentProviderHolder
ContentProviderHolder
它是什麼呢?它其實是一個可以在程序間傳遞的資料對象 (aidl),看一下它的定義:
public class ContentProviderHolder implements Parcelable {
    public final ProviderInfo info;
    public IContentProvider provider;
    public IBinder connection;
    ...
裡面包含了 CP 的很多資訊,是以 AMS 拿到 ContentProviderHolder (CPH),就等于拿到了所有 CP 的資訊,後面發不到 AMS 就是依賴該對象。
ActivityThread.installProvider
接下來會調用 ActivityThread 的
installProvider
方法,如果傳入的 holder 為 null,是以就會在
installProvider
中建立
ContentProvider
執行個體并加入 HashMap 中進行緩存。
那就先來看 installProvider 的處理過程,在來看 AMS 釋出 ContentProvider 的過程。
private ContentProviderHolder installProvider(Context context,
            ContentProviderHolder holder, ProviderInfo info,
            boolean noisy, boolean noReleaseNeeded, boolean stable) {
        ContentProvider localProvider = null;
     // 記住這裡的類型
        IContentProvider provider;
     // 第一次安裝肯定為空
        if (holder == null || holder.provider == null) {
            Context c = null;
            ApplicationInfo ai = info.applicationInfo;
       // 擷取上下文
            if (context.getPackageName().equals(ai.packageName)) {
                c = context;
            } else if (mInitialApplication != null &&
                    mInitialApplication.getPackageName().equals(ai.packageName)) {
                c = mInitialApplication;
            } else {
                try {
                    c = context.createPackageContext(ai.packageName,
                            Context.CONTEXT_INCLUDE_CODE);
                } catch (PackageManager.NameNotFoundException e) {
                    // Ignore
                }
            }
       // 上下文為空直接傳回
            if (c == null) {
                Slog.w(TAG, "Unable to get context for package " +
                      ai.packageName +
                      " while loading content provider " +
                      info.name);
                return null;
            }

            if (info.splitName != null) {
                try {
                    c = c.createContextForSplit(info.splitName);
                } catch (NameNotFoundException e) {
                    throw new RuntimeException(e);
                }
            }

            try {
                final java.lang.ClassLoader cl = c.getClassLoader();
                LoadedApk packageInfo = peekPackageInfo(ai.packageName, true);
                if (packageInfo == null) {
                    // System startup case.
                    packageInfo = getSystemContext().mPackageInfo;
                }
          // 執行個體化
                localProvider = packageInfo.getAppFactory()
                        .instantiateProvider(cl, info.name);
                // 擷取接口
                provider = localProvider.getIContentProvider();
                if (provider == null) {
                    Slog.e(TAG, "Failed to instantiate class " +
                          info.name + " from sourceDir " +
                          info.applicationInfo.sourceDir);
                    return null;
                }
                if (DEBUG_PROVIDER) Slog.v(
                    TAG, "Instantiating local provider " + info.name);
                // XXX Need to create the correct context for this provider.  調用 attachInfo 方法來進行初始化,可以參看流程圖
                localProvider.attachInfo(c, info);
            } catch (java.lang.Exception e) {
                if (!mInstrumentation.onException(null, e)) {
                    throw new RuntimeException(
                            "Unable to get provider " + info.name
                            + ": " + e.toString(), e);
                }
                return null;
            }
        } else {
            provider = holder.provider;
            if (DEBUG_PROVIDER) Slog.v(TAG, "Installing external provider " + info.authority + ": "
                    + info.name);
        }

        ContentProviderHolder retHolder;

        synchronized (mProviderMap) {
            if (DEBUG_PROVIDER) Slog.v(TAG, "Checking to add " + provider
                    + " / " + info.name);
            IBinder jBinder = provider.asBinder();
            if (localProvider != null) {
          // 根據包名,元件名字擷取元件的類名
                ComponentName cname = new ComponentName(info.packageName, info.name);
                // 看根據名字是否可以找到
                ProviderClientRecord pr = mLocalProvidersByName.get(cname);
          // 第一次建立 pr 為空
                if (pr != null) {
                    if (DEBUG_PROVIDER) {
                        Slog.v(TAG, "installProvider: lost the race, "
                                + "using existing local provider");
                    }
                    provider = pr.mProvider;
                } else {
                    holder = new ContentProviderHolder(info);
                    holder.provider = provider;
                    holder.noReleaseNeeded = true;
                    pr = installProviderAuthoritiesLocked(provider, localProvider, holder);
                    mLocalProviders.put(jBinder, pr);
                    mLocalProvidersByName.put(cname, pr);
                }
                retHolder = pr.mHolder;
            } else {
                ProviderRefCount prc = mProviderRefCountMap.get(jBinder);
                if (prc != null) {
                    if (DEBUG_PROVIDER) {
                        Slog.v(TAG, "installProvider: lost the race, updating ref count");
                    }
                    // We need to transfer our new reference to the existing
                    // ref count, releasing the old one...  but only if
                    // release is needed (that is, it is not running in the
                    // system process).
                    if (!noReleaseNeeded) {
                        incProviderRefLocked(prc, stable);
                        try {
                            ActivityManager.getService().removeContentProvider(
                                    holder.connection, stable);
                        } catch (RemoteException e) {
                            //do nothing content provider object is dead any way
                        }
                    }
                } else {
                    ProviderClientRecord client = installProviderAuthoritiesLocked(
                            provider, localProvider, holder);
                    if (noReleaseNeeded) {
                        prc = new ProviderRefCount(holder, client, 1000, 1000);
                    } else {
                        prc = stable
                                ? new ProviderRefCount(holder, client, 1, 0)
                                : new ProviderRefCount(holder, client, 0, 1);
                    }
                    mProviderRefCountMap.put(jBinder, prc);
                }
                retHolder = prc.holder;
            }
        }
        return retHolder;
    }
在 installContentProviders 方法中調用這個方法的時候,holder 參數傳遞的值為 Null,也是因為這些 ContentProvider 是第一次安裝。是以 holder 肯定為 Null。是以此時滿足 if 的條件。在 If 語句中,首先根據條件擷取相應的 Context 上下文資訊。
然後 ClassLoader 加載對應的 ContentProvider 類,并建立該類的對象,然後調用 ContentProvider 的 attachInfo 方法。該方法作用是将新建立的 ContentProvider 和 Context,ProviderInfo 關聯起來,最後調用該 Provider 的 onCreate 方法啟動 ContentProvider。這個一個 ContentProvider 就建立完成了,下一步就是将它儲存到應用程序的中,以友善查找和管理。并釋出到 AMS 服務中,友善其他程序調用。
擷取 ContetProvider 的 IContentProvider(ICP) 指派給 provider 變量,IContentProvider 是 ContentProvider 用戶端和服務端通信的接口,getIcontentProvider 了解為得到一個 Binder 類型的對象,用于ContentProvider 用戶端和服務端之間的通信。
由于是第一次啟動 ContentProvider,是以該資訊還沒有儲存,是以變量 pr 為空,此時根據 ProviderInfo 的資訊和 Binder 類型 IContentProvider 對象,建立一個 ContentProviderHolder 對象,它裡邊封裝了這個 ContentProvider 的 ProviderInfo 和 IContentProvider 資訊。
方法最後傳回建立的這個 ContentProviderHolder 的對象。
Transport
Transport 是 ContentProvider 一個内部類,繼承自 ContentProviderNative,是一個 binder, 具有遠端通信能力。
getIcontentProvider 具體代碼可以參看下面的代碼。
//  ContentProvider.java
   /**
     * Binder object that deals with remoting.  是一個 binder ,可以遠端通信
     */
    class Transport extends ContentProviderNative {
        volatile AppOpsManager mAppOpsManager = null;
        volatile int mReadOp = AppOpsManager.OP_NONE;
        volatile int mWriteOp = AppOpsManager.OP_NONE;
        volatile ContentInterface mInterface = ContentProvider.this;
    }


  private Transport mTransport = new Transport();


    /**
     * Returns the Binder object for this provider.
     *
     * @return the Binder object for this provider
     * @hide
     */
    @UnsupportedAppUsage
    public IContentProvider getIContentProvider() {
        return mTransport;
    }
// ContentProviderNative.java abstract public class ContentProviderNative extends Binder implements IContentProvider {} IContentProvider 其實就是一個 binder 。
ContentProviderRecord
上面有個
ContentProviderRecord(CPR),
它是系統 (ActivityManagerService) 用來記錄一個
ContentProvider
相關資訊的對象。
final class ContentProviderRecord implements ComponentName.WithComponentName {
    final ActivityManagerService service;
    public final ProviderInfo info;
    final int uid;
    final ApplicationInfo appInfo;
    final ComponentName name;
    final boolean singleton;
    public IContentProvider provider;
    public boolean noReleaseNeeded;
    // All attached clients
    final ArrayList<ContentProviderConnection> connections
            = new ArrayList<ContentProviderConnection>();
    //final HashSet<ProcessRecord> clients = new HashSet<ProcessRecord>();
    // Handles for non-framework processes supported by this provider
    HashMap<IBinder, ExternalProcessHandle> externalProcessTokenToHandle;
    // Count for external process for which we have no handles.
    int externalProcessNoHandleCount;
    ProcessRecord proc; // if non-null, hosting process.
    ProcessRecord launchingApp; // if non-null, waiting for this app to be launched.
    String stringName;
    String shortStringName;
可以看到 record 裡面記錄了相當多的資訊。
ProviderInfo
用來儲存一個
ContentProvider
的資訊( manifest 中的
<provider>
), 比如
authority
、
readPermission
等。
public final class ProviderInfo extends ComponentInfo
        implements Parcelable {

    /** The name provider is published under content:// */
    public String authority = null;

    /** Optional permission required for read-only access this content
     * provider. */
    public String readPermission = null;

    /** Optional permission required for read/write access this content
     * provider. */
    public String writePermission = null;

    /** If true, additional permissions to specific Uris in this content
     * provider can be granted, as per the
     * {@link android.R.styleable#AndroidManifestProvider_grantUriPermissions
     * grantUriPermissions} attribute.
     */
    public boolean grantUriPermissions = false;

    /**
     * If non-null, these are the patterns that are allowed for granting URI
     * permissions.  Any URI that does not match one of these patterns will not
     * allowed to be granted.  If null, all URIs are allowed.  The
     * {@link PackageManager#GET_URI_PERMISSION_PATTERNS
     * PackageManager.GET_URI_PERMISSION_PATTERNS} flag must be specified for
     * this field to be filled in.
     */
    public PatternMatcher[] uriPermissionPatterns = null;

    /**
     * If non-null, these are path-specific permissions that are allowed for
     * accessing the provider.  Any permissions listed here will allow a
     * holding client to access the provider, and the provider will check
     * the URI it provides when making calls against the patterns here.
     */
    public PathPermission[] pathPermissions = null;

    /** If true, this content provider allows multiple instances of itself
     *  to run in different process.  If false, a single instances is always
     *  run in {@link #processName}. */
    public boolean multiprocess = false;
ActivityThread.installProviderAuthoritiesLocked
接着看看一下 installProviderAuthoritiesLocked 的實作
private ProviderClientRecord installProviderAuthoritiesLocked(IContentProvider provider,
            ContentProvider localProvider, ContentProviderHolder holder) {
        final String auths[] = holder.info.authority.split(";");
        final int userId = UserHandle.getUserId(holder.info.applicationInfo.uid);

        if (provider != null) {
            // If this provider is hosted by the core OS and cannot be upgraded,
            // then I guess we're okay doing blocking calls to it.
            for (String auth : auths) {
                switch (auth) {
                    case ContactsContract.AUTHORITY:
                    case CallLog.AUTHORITY:
                    case CallLog.SHADOW_AUTHORITY:
                    case BlockedNumberContract.AUTHORITY:
                    case CalendarContract.AUTHORITY:
                    case Downloads.Impl.AUTHORITY:
                    case "telephony":
                        Binder.allowBlocking(provider.asBinder());
                }
            }
        }

        final ProviderClientRecord pcr = new ProviderClientRecord(
                auths, provider, localProvider, holder);
        for (String auth : auths) {
            final ProviderKey key = new ProviderKey(auth, userId);
            final ProviderClientRecord existing = mProviderMap.get(key);
            if (existing != null) {
                Slog.w(TAG, "Content provider " + pcr.mHolder.info.name
                        + " already published as " + auth);
            } else {
                mProviderMap.put(key, pcr);
            }
        }
        return pcr;
    }
根據 Provider 的資訊建立了一個 ProviderClientRecord (PCR) 對象,authority 是一個多屬性值,變量這個 Provider 對應的所有 authority,每個 authority 屬性為 key,儲存這個 ProviderClientReocrd 到 mProviderMap 描述的 HashMap 中。
在一個應用程序中 (ActivityThread) 有三個清單來儲存本程序中的 ContentProvider 的資訊。
- ArrayMap<ProviderKey, ProviderClientRecord> mProviderMap
- 主要以 authority 為 key,儲存 providerClientRecord 資訊
- ArrayMap<IBinder, ProviderClientRecord> mLocalProviders
- 以通信的接口 Binder 對象為 key 儲存 ProviderClientRecord 對象。主要儲存了本程序的 ContentProvider 的資訊
- ArrayMap<ComponentName,ProviderClientRecord> mLocalProvidersByName
- 以 Provider 的 ComponentName 資訊為key 儲存 ProviderClientRecord 對象。主要儲存了本程序的 ContentProvider 的資訊
通過 installProvider 方法将 ContentProvider 的類加載到記憶體中來,并建立了 ContentProvider 的對象,調用了 ContentProvider的onCreate 來啟動它。然後将它按照不同的存儲類型分别儲存不同的 ContentProvider 集合中。
AMS.publishContentProviders
ContentProvider 本地建立完成并儲存後,将它封裝成立一個 ContentProviderHolder 對象傳回,然後我們調用 AMS 的 publishContentProviders 方法(實際上是通過 AMP (ActivityManagerProxy) 發送一個類型為 PUBLISH_CONTENT_PROVIDERS_TRANSACTION的程序間通信請求),将這些 Holder 對象發送給 AMS 服務将他們釋出到 AMS 服務中。
// AMS
     public final void publishContentProviders(IApplicationThread caller,
            List<ContentProviderHolder> providers) {
        if (providers == null) {
            return;
        }

        enforceNotIsolatedCaller("publishContentProviders");
        synchronized (this) {
            final ProcessRecord r = getRecordForAppLocked(caller);
            if (DEBUG_MU) Slog.v(TAG_MU, "ProcessRecord uid = " + r.uid);
            if (r == null) {
                throw new SecurityException(
                        "Unable to find app for caller " + caller
                      + " (pid=" + Binder.getCallingPid()
                      + ") when publishing content providers");
            }

            final long origId = Binder.clearCallingIdentity();

            final int N = providers.size();
            for (int i = 0; i < N; i++) {
                ContentProviderHolder src = providers.get(i);
                if (src == null || src.info == null || src.provider == null) {
                    continue;
                }
          // 擷取 cpr
                ContentProviderRecord dst = r.pubProviders.get(src.info.name);
                if (DEBUG_MU) Slog.v(TAG_MU, "ContentProviderRecord uid = " + dst.uid);
                if (dst != null) {
                    ComponentName comp = new ComponentName(dst.info.packageName, dst.info.name);
            // 元件名字為 key
                    mProviderMap.putProviderByClass(comp, dst);
                    String names[] = dst.info.authority.split(";");
                    for (int j = 0; j < names.length; j++) {
                        mProviderMap.putProviderByName(names[j], dst);
                    }

                    int launchingCount = mLaunchingProviders.size();
                    int j;
                    boolean wasInLaunchingProviders = false;
                    for (j = 0; j < launchingCount; j++) {
                        if (mLaunchingProviders.get(j) == dst) {
                            mLaunchingProviders.remove(j);
                            wasInLaunchingProviders = true;
                            j--;
                            launchingCount--;
                        }
                    }
                    if (wasInLaunchingProviders) {
              // 很多地方都是動過發送消息來判斷是否耗時
                        mHandler.removeMessages(CONTENT_PROVIDER_PUBLISH_TIMEOUT_MSG, r);
                    }
                    // Make sure the package is associated with the process.
                    // XXX We shouldn't need to do this, since we have added the package
                    // when we generated the providers in generateApplicationProvidersLocked().
                    // But for some reason in some cases we get here with the package no longer
                    // added...  for now just patch it in to make things happy.
                    r.addPackage(dst.info.applicationInfo.packageName,
                            dst.info.applicationInfo.longVersionCode, mProcessStats);
                    synchronized (dst) {
                        dst.provider = src.provider;
                        dst.setProcess(r);
                        dst.notifyAll();
                    }
                    updateOomAdjLocked(r, true, OomAdjuster.OOM_ADJ_REASON_GET_PROVIDER);
                    maybeUpdateProviderUsageStatsLocked(r, src.info.packageName,
                            src.info.authority);
                }
            }

            Binder.restoreCallingIdentity(origId);
        }
    }
參數 caller 是一個類型為 ApplicationThread 的 binder 代理對象,它引用了運作在新建立的應用程式程序中的一個 ApplicationThread 對象,第 8 行代碼通過它來獲得用來描述新建立的應用程式程序的一個 ProcessRecord 對象。
新建立的應用程式程序在啟動時,會将需要在它裡面運作的 Content Provider 元件啟動起來。Content provider 元件在 AMS 中使用一個 ContentProviderRecord 對象來描述,它們儲存在用來描述新建立的應用程式程序的一個 ProcessRecord 對象 r 成員變量 pubProviders 中。
參數 providers 包含了要釋出到 AMS 中的 Content provider 元件,每一個 content provider 元件都使用 ContentProviderHolder 對象來描述,它裡面包含了要釋出的 content provider 元件的一個 IContentProvider 接口。
代碼中的第一個大 for 循環,首先去除儲存在參數 Providers 中的每一個 ContentProviderHolder 對象 src,然後在 AMS 中找到與對應的一個CPR 對象 dst ,最後将 ContentProviderHolder 對象 src 所描述的一個 CP 元件的一個 IContentProvider 通路接口儲存在 CPR 對象 dst 的成員變量 provider 中。
關于
ContentProvider
随着應用的啟動而加載、初始化的流程到這裡就結束了。
下面就來看使用
ContentProvider
的工作流程。
資料傳輸過程
前面講了 content Provider 的啟動過程,接下來看看其資料是如何傳輸的。
通常我們擷取 ContentResolver 的代碼如下:
ContentResolver cr = context.getContentResolver(); //擷取ContentResolver Context 的所有實作都是在 ContextImpl 中,是以 context.getContentResolver() 方法的實作也是一樣。
ContextImpl.getContentResolver().query()
ContextImpl.getContentResolver().query()
我們從
ContextImpl.getContentResolver().query()
開始看:
// ContentResolver.java
public final @Nullable Cursor query(final @RequiresPermission.Read @NonNull Uri uri,
            @Nullable String[] projection, @Nullable Bundle queryArgs,
            @Nullable CancellationSignal cancellationSignal) {
        Preconditions.checkNotNull(uri, "uri");
     // 擷取通路接口
        IContentProvider unstableProvider = acquireUnstableProvider(uri);
        if (unstableProvider == null) {
            return null;
        }
        IContentProvider stableProvider = null;
        Cursor qCursor = null;
        try {
            long startTime = SystemClock.uptimeMillis();

            ICancellationSignal remoteCancellationSignal = null;
            if (cancellationSignal != null) {
                cancellationSignal.throwIfCanceled();
                remoteCancellationSignal = unstableProvider.createCancellationSignal();
                cancellationSignal.setRemote(remoteCancellationSignal);
            }
            try {
          // 調用 query 方法擷取資料
                qCursor = unstableProvider.query(mPackageName, uri, projection,
                        queryArgs, remoteCancellationSignal);
            } catch (DeadObjectException e) {
                // The remote process has died...  but we only hold an unstable
                // reference though, so we might recover!!!  Let's try!!!!
                // This is exciting!!1!!1!!!!1
                unstableProviderDied(unstableProvider);
          // 再次擷取通路接口
                stableProvider = acquireProvider(uri);
                if (stableProvider == null) {
                    return null;
                }
                qCursor = stableProvider.query(
                        mPackageName, uri, projection, queryArgs, remoteCancellationSignal);
            }
            if (qCursor == null) {
                return null;
            }

            // Force query execution.  Might fail and throw a runtime exception here.
            qCursor.getCount();
            long durationMillis = SystemClock.uptimeMillis() - startTime;
            maybeLogQueryToEventLog(durationMillis, uri, projection, queryArgs);

            // Wrap the cursor object into CursorWrapperInner object.
            final IContentProvider provider = (stableProvider != null) ? stableProvider
                    : acquireProvider(uri);
            final CursorWrapperInner wrapper = new CursorWrapperInner(qCursor, provider);
            stableProvider = null;
            qCursor = null;
            return wrapper;
        } catch (RemoteException e) {
            // Arbitrary and not worth documenting, as Activity
            // Manager will kill this process shortly anyway.
            return null;
        } finally {
            if (qCursor != null) {
                qCursor.close();
            }
            if (cancellationSignal != null) {
                cancellationSignal.setRemote(null);
            }
            if (unstableProvider != null) {
                releaseUnstableProvider(unstableProvider);
            }
            if (stableProvider != null) {
                releaseProvider(stableProvider);
            }
        }
    }
該方法主要是擷取到 IContentProvider,進而根據 uri 拿到資料。
要想了解上述過程的具體實作細節,需要先分析 ContentResolver 類的 acquireProvider 方法的調用過程,然後分析 IContentProvider 接口方法 query 的實作。
ContentResolver 的 acquireProvider 是一個抽象方法,具體實作可以看 ApplicationContentResolver:
private final ActivityThread mMainThread;

    protected IContentProvider acquireProvider(Context context, String auth) {
            return mMainThread.acquireProvider(context,
                    ContentProvider.getAuthorityWithoutUserId(auth),
                    resolveUserIdFromAuthority(auth), true);
        }
ApplicationContentResolver 成員變量 mMainThread 指向了一個 ActivityThread 對象,它是在構造函數裡面初始化的。是以,實際上是通過 ActivityThread 來擷取 contentProvider 的代理對象。
ActivityThread.acquireProvider
來看下具體的實作:
public final IContentProvider acquireProvider(
            Context c, String auth, int userId, boolean stable) {
     // 如果已經存在了,就直接傳回,這裡是從前面提到的 mProviderMap 來擷取
        final IContentProvider provider = acquireExistingProvider(c, auth, userId, stable);
        if (provider != null) {
            return provider;
        }

        // There is a possible race here.  Another thread may try to acquire
        // the same provider at the same time.  When this happens, we want to ensure
        // that the first one wins.
        // Note that we cannot hold the lock while acquiring and installing the
        // provider since it might take a long time to run and it could also potentially
        // be re-entrant in the case where the provider is in the same process.
        ContentProviderHolder holder = null;
        try {
            synchronized (getGetProviderLock(auth, userId)) {
          // 通過 ams 來擷取 holder
                holder = ActivityManager.getService().getContentProvider(
                        getApplicationThread(), auth, userId, stable);
            }
        } catch (RemoteException ex) {
            throw ex.rethrowFromSystemServer();
        }
     // 擷取失敗
        if (holder == null) {
            Slog.e(TAG, "Failed to find provider info for " + auth);
            return null;
        }

        // Install provider will increment the reference count for us, and break
        // any ties in the race.
        holder = installProvider(c, holder, holder.info,
                true /*noisy*/, holder.noReleaseNeeded, stable);
        return holder.provider;
    }
即在本地沒有獲得過
IContentProvider
時,直接向
ActivityManagerService
發起
getContentProvider
的請求,最終調用
ActivityManagerService.getContentProviderImpl()
, 這個方法就是
ContentProvider
執行個體化邏輯的核心了:
首先來看一下這個方法的聲明:
ContentProviderHolder getContentProviderImpl(IApplicationThread caller,String name, IBinder token, boolean stable, int userId) 即最終是傳回一個
ContentProviderHolder,前面已經解釋了。
繼續看
getContentProviderImpl()
,這個方法比較長,是以接下來我們分段來看這個方法, 順序是(1)、(2)、(3)... 這種 :
(1)ActivityManagerService.getContentProviderImpl()
(1)ActivityManagerService.getContentProviderImpl()
//三個關鍵對象
    ContentProviderRecord cpr;
    ContentProviderConnection conn = null;
    ProviderInfo cpi = null;
    ...
    cpr = mProviderMap.getProviderByName(name, userId); // 看看系統是否已經緩存了這個ContentProvider
這裡主要需要解釋下 ContentProviderConnection
/**
 * Represents a link between a content provider and client.
 */
public final class ContentProviderConnection extends Binder {
    public final ContentProviderRecord provider;
    public final ProcessRecord client;
    public final long createTime;
    public int stableCount;
    public int unstableCount;
    // The client of this connection is currently waiting for the provider to appear.
    // Protected by the provider lock.
    public boolean waiting;
    // The provider of this connection is now dead.
    public boolean dead;
它是一個
Binder
。連接配接服務端 (ActivityManagerService) 和用戶端 (我們的app)。裡面記錄着一個
ContentProvider
的狀态,比如是否已經死掉了等。其他幾個都已經解釋過了。
(2)ActivityManagerService.getContentProviderImpl()
cpr = mProviderMap.getProviderByName(name, userId); // 看看系統是否已經緩存了這個ContentProvider
    boolean providerRunning = cpr != null && cpr.proc != null && !cpr.proc.killed;
    if (providerRunning) {
        ...
    }

    if (!providerRunning) {
        ...
    }
即根據
ContentProvider
所在的
程序是否是活躍
這個 ContentProvider 是否被啟動過(緩存下來)
兩個狀态來進行不同的處理 :
ContentProvider 已被加載并且所在的程序正在運作
即:
if(providerRunning){ ... }
中的代碼
ProcessRecord r = getRecordForAppLocked(caller); //擷取用戶端(獲得content provider的發起者)的程序資訊
    if (r != null && cpr.canRunHere(r)) { //如果請求的ContentProvider和用戶端位于同一個程序
        ContentProviderHolder holder = cpr.newHolder(null); //ContentProviderConnection參數傳null
        holder.provider = null; //注意,這裡置空是讓用戶端自己去執行個體化!!
        return holder;
    }

    //用戶端程序正在運作,但是和ContentProvider并不在同一個程序
    conn = incProviderCountLocked(r, cpr, token, stable); // 直接根據 ContentProviderRecord和ProcessRecord 構造一個 ContentProviderConnection

    ...
即如果請求的是同程序的
ContentProvider
則直接回到程序的主線程去執行個體化
ContentProvider
。否則使用
ContentProviderRecord
和
ProcessRecord
構造一個
ContentProviderConnection。
ContentProvider所在的程序沒有運作并且服務端(ActivityManagerService)沒有加載過它
即:
if(!providerRunning){ ... }
//先解析出來一個ProviderInfo
    cpi = AppGlobals.getPackageManager().resolveContentProvider(name, STOCK_PM_FLAGS | PackageManager.GET_URI_PERMISSION_PATTERNS, userId);
    ...
    ComponentName comp = new ComponentName(cpi.packageName, cpi.name);
    cpr = mProviderMap.getProviderByClass(comp, userId); //這個content provider 沒有被加載過

    final boolean firstClass = cpr == null;
    if (firstClass) {
        ...
        cpr = new ContentProviderRecord(this, cpi, ai, comp, singleton); // 構造一個 ContentProviderRecord
    }

    ...

    final int N = mLaunchingProviders.size(); //  mLaunchingProviders它是用來緩存正在啟動的 ContentProvider的集合的
    int i;
    for (i = 0; i < N; i++) {
        if (mLaunchingProviders.get(i) == cpr) {  // 已經請求過一次了,provider正在啟動,不重複走下面的邏輯
            break;
        }
    }

    //這個 ContentProvider 不是在啟動狀态,也就是還沒啟動
    if (i >= N) {
        ProcessRecord proc = getProcessRecordLocked(cpi.processName, cpr.appInfo.uid, false);
        ...

         if (proc != null && proc.thread != null && !proc.killed) { //content provider所在的程序已經啟動
            proc.thread.scheduleInstallProvider(cpi); //安裝這個 Provider , 即用戶端執行個體化它
          } else {
            //啟動content provider 所在的程序, 并且喚起 content provider
            proc = startProcessLocked(cpi.processName,cpr.appInfo, false, 0, "content provider",new ComponentName(cpi.applicationInfo.packageName,cpi.name)...);
         }

        cpr.launchingApp = proc;
        mLaunchingProviders.add(cpr); //添加到正在啟動的隊列
    }

    //緩存 ContentProvider資訊
    if (firstClass) {
        mProviderMap.putProviderByClass(comp, cpr);
    }
    mProviderMap.putProviderByName(name, cpr);

    //構造一個 ContentProviderConnection
    conn = incProviderCountLocked(r, cpr, token, stable);
    if (conn != null) {
        conn.waiting = true; //設定這個connection
    }
(3)ActivityManagerService.getContentProviderImpl()
(3)ActivityManagerService.getContentProviderImpl()
// Wait for the provider to be published...
    synchronized (cpr) {
        while (cpr.provider == null) {
            ....
            if (conn != null) {
                conn.waiting = true;
            }
            cpr.wait();
        }
    }

    return cpr != null ? cpr.newHolder(conn) : null; //傳回給請求這個用戶端的程序
根據前面的分析,ContentProvider 所在的程序沒有運作或者不是和
擷取者
同一個程序,就建立了一個
ContentProviderConnection,
那麼服務端就會挂起,啟動 ContentProvider 所在的程序,并等待它執行個體化
ContentProvider
。ok,通過前面的分析我們知道
ContentProvider
最終是在它所在的程序執行個體化的。
接下來就看一下用戶端相關代碼,前面分析我們知道,如果
用戶端程序
和
請求的 ContentProvider
位于同一個程序,則
ActivityManager.getService().getContentProvider(...);
會傳回一個内容為空的
ContentProviderHolder
, 我們再拿剛開始用戶端向服務端請求 ContentProvider 的代碼看一下:
holder = ActivityManager.getService().getContentProvider( getApplicationThread(), auth, userId, stable);

    //在向服務端擷取holder,服務端如果發現ContentProvider的程序和目前用戶端程序是同一個程序就會讓用戶端程序來執行個體化ContentProvider,具體細節可以在下面分析中看到
    holder = installProvider(c, holder, holder.info, true /*noisy*/, holder.noReleaseNeeded, stable);
不在同一個程序中的 ContentProvider 執行個體化過程
如果
用戶端程序
請求的 ContentProvider
不在同一個程序,根據前面我們分析
ActivityManagerService
的邏輯可以知道,
ActivityManagerService
會調用
ContentProvider
所在程序的
proc.thread.scheduleInstallProvider(cpi)
, 其實最終調用到 ActivityThread.installContentProviders
private void installContentProviders(Context context, List<ProviderInfo> providers) {
        final ArrayList<ContentProviderHolder> results = new ArrayList<>();

        //ActivityManagerService 讓用戶端啟動的是一個ContentProvider清單
        for (ProviderInfo cpi : providers) {
            ContentProviderHolder cph = installProvider(context, null, cpi,false, true ,true);
            if (cph != null) {
                cph.noReleaseNeeded = true;
                results.add(cph);
            }
        }

        ActivityManager.getService().publishContentProviders(getApplicationThread(), results); //通知服務端,content provider ok啦
    }
到這裡,就跟前面的啟動邏輯基本一樣了。 那麼在擷取到接口後,又是怎麼通過 query 拿到資料的呢?
query 過程解析
從前面的分析可知,IContentProvider 是 Transport 的執行個體,是以具體 query 的邏輯需要看
@Override
        public Cursor query(String callingPkg, Uri uri, @Nullable String[] projection,
                @Nullable Bundle queryArgs, @Nullable ICancellationSignal cancellationSignal) {
            uri = validateIncomingUri(uri);
            uri = maybeGetUriWithoutUserId(uri);
            if (enforceReadPermission(callingPkg, uri, null) != AppOpsManager.MODE_ALLOWED) {
                if (projection != null) {
                    return new MatrixCursor(projection, 0);
                }

                Cursor cursor;
                final String original = setCallingPackage(callingPkg);
                try {
            // 調用的是 mInterface
                    cursor = mInterface.query(
                            uri, projection, queryArgs,
                            CancellationSignal.fromTransport(cancellationSignal));
                } catch (RemoteException e) {
                    throw e.rethrowAsRuntimeException();
                } finally {
                    setCallingPackage(original);
                }
                if (cursor == null) {
                    return null;
                }

                // Return an empty cursor for all columns.
                return new MatrixCursor(cursor.getColumnNames(), 0);
            }
            Trace.traceBegin(TRACE_TAG_DATABASE, "query");
            final String original = setCallingPackage(callingPkg);
            try {
                return mInterface.query(
                        uri, projection, queryArgs,
                        CancellationSignal.fromTransport(cancellationSignal));
            } catch (RemoteException e) {
                throw e.rethrowAsRuntimeException();
            } finally {
                setCallingPackage(original);
                Trace.traceEnd(TRACE_TAG_DATABASE);
            }
        }
這裡是通過 mInterface 來調用 query () 方法
volatile ContentInterface mInterface = ContentProvider.this; 而實際上就是調用的自己實作的 provider 方法。具體實作其實是通過 db 來查詢的。到這裡關于 CP 的資料傳輸過程也講完了。
但是對于跨程序,其實應該是通過 ContentProviderNative 的内部類 ContentProviderProxy 來進行跨程序調用,最終會回調到 ContentProviderNative 的 onTransact 方法,然後再調用 mInterface 的 query 方法來實作查詢。
class ContentProviderProxy implements IContentProvider{} ContentProviderProxy 是實作了 IContentProvider 接口的。那麼是什麼時候轉成 ContentProviderProxy 呢?
// ContentProviderHolder.java private ContentProviderHolder(Parcel source) {
info = ProviderInfo.CREATOR.createFromParcel(source);
provider = ContentProviderNative.asInterface(
source.readStrongBinder());
connection = source.readStrongBinder();
noReleaseNeeded = source.readInt() != 0;
} 到這裡才知道原來是建立 CPH 的時候,會根據是目前程序還是跨程序來傳回對應的執行個體。
// ContentProviderNative.java
  static public IContentProvider asInterface(IBinder obj)
    {
        if (obj == null) {
            return null;
        }
        IContentProvider in =
            (IContentProvider)obj.queryLocalInterface(descriptor);
        if (in != null) {
            return in;
        }

        return new ContentProviderProxy(obj);
    }
到這裡相信你應該能了解 CP 的啟動以及其跨程序通信能力了。
總結
對于 ContentProvider,有兩種啟動方式:
- 一種是啟動 App 的時候,啟動 CP;
- 另一種是需要通路其他 App 的資料,如果對應的 App 并沒有啟動,這時候也會啟動 CP;
一旦 CP 啟動之後,就會将 ContentProviderHolder(内含 ICP 接口) 釋出到 AMS 中,這樣其他 App 或自身都可以通過 AMS 擷取到 ICP 接口,進而擷取資料。
此外,ContentProvider
onCreate
Application
onCreate
之前調用。
參考文章
Android系統源碼分析之-ContentProvider
ContentProvider原理分析
Android-ContentProvider源碼解讀
ContentProvider啟動過程分析
樹林美麗、幽暗而深邃,但我有諾言尚待實作,還要奔行百裡方可沉睡。 -- 羅伯特·弗羅斯特
![與專家面對面:Android開發入門問與答[圖]](data:image/gif;base64,R0lGODlhAQABAIAAAP///wAAACwAAAAAAQABAAACAkQBADs=)