一、CAS Client 與受保護的用戶端應用部署在一起,以 Filter 方式保護受保護的資源。對于通路受保護資源的每個 Web 請求,CAS Client 會分析該請求的 Http 請求中是否包含 Service Ticket,如果沒有,則說明目前使用者尚未登入,于是将請求重定向到指定好的 CAS Server 登入位址,并傳遞 Service (也就是要通路的目的資源位址),以便登入成功過後轉回該位址。使用者在第 3 步中輸入認證資訊,如果登入成功,CAS Server 随機産生一個相當長度、唯一、不可僞造的 Service Ticket,并緩存以待将來驗證,之後系統自動重定向到 Service 所在位址,并為用戶端浏覽器設定一個 Ticket Granted Cookie(TGC),CAS Client 在拿到 Service 和新産生的 Ticket 過後,在第 5,6 步中與 CAS Server 進行身份核實,以確定 Service Ticket 的合法性。
二、在該協定中,所有與 CAS 的互動均采用 SSL 協定,確定,ST 和 TGC 的安全性。協定工作過程中會有 2 次重定向的過程,但是 CAS Client 與 CAS Server 之間進行 Ticket 驗證的過程對于使用者是透明的。
三、cas用戶端主要提供的是業務支援,我們在使用的時候更多是通過cas服務端來做認證支援。這裡主要講的是如何搭建cas用戶端,配置的東西其實是通過spring的security來進行過濾。然後達到登入的目的,認證中主要是通過Ticket的票據進行認證的,當使用者登入成功。會擷取到登入的username,然後做進一步處理。
四、服務端的部署參考:https://www.cnblogs.com/ll409546297/p/10410972.html
五、用戶端的搭建(這裡服務端采用的https的方式)
1)需要的依賴包
  <parent>
        <groupId>org.springframework.boot</groupId>
        <artifactId>spring-boot-starter-parent</artifactId>
        <version>2.0.0.RELEASE</version>
    </parent>

    <dependencies>
        <dependency>
            <groupId>org.springframework.boot</groupId>
            <artifactId>spring-boot-starter-web</artifactId>
        </dependency>
        <dependency>
            <groupId>org.springframework.boot</groupId>
            <artifactId>spring-boot-starter-security</artifactId>
        </dependency>
        <dependency>
            <groupId>org.springframework.security</groupId>
            <artifactId>spring-security-cas</artifactId>
        </dependency>
    </dependencies>
<dependencies>
<dependency>
<groupId>org.springframework.boot</groupId>
<artifactId>spring-boot-configuration-processor</artifactId>
<optional>true</optional>
</dependency>
</dependencies> 說明:下面這個依賴包主要是用于配置
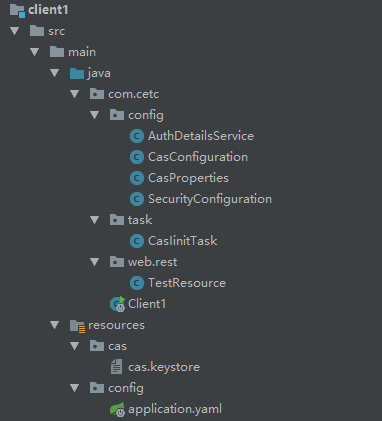
2)目錄結構

3)cas的參數配置(cas.properties、CasProperties)
cas.clientUrl=http://localhost:${server.port}
cas.clientLogin=/login
cas.clientLogout=/logout
cas.serverUrl=https://www.casserver.com:8443/cas
cas.serverLogin=/login
cas.serverLogout=/logout
cas.trustStorePath=cas/cas.keystore
cas.trustStorePassword=changeit
@PropertySource(value = "classpath:config/cas.properties")
@ConfigurationProperties(prefix = "cas")
public class CasProperties {
//用戶端url(本機)
private String clientUrl;
//登入接口
private String clientLogin;
//登出接口
private String clientLogout;
//服務端url
private String serverUrl;
//登入接口
private String serverLogin;
//登出接口
private String serverLogout;
//證書密匙路徑
private String trustStorePath;
//密碼
private String trustStorePassword;
public String getClientUrl() {
return clientUrl;
}
public void setClientUrl(String clientUrl) {
this.clientUrl = clientUrl;
}
public String getClientLogin() {
return clientLogin;
}
public void setClientLogin(String clientLogin) {
this.clientLogin = clientLogin;
}
public String getClientLogout() {
return clientLogout;
}
public void setClientLogout(String clientLogout) {
this.clientLogout = clientLogout;
}
public String getServerUrl() {
return serverUrl;
}
public void setServerUrl(String serverUrl) {
this.serverUrl = serverUrl;
}
public String getServerLogin() {
return serverLogin;
}
public void setServerLogin(String serverLogin) {
this.serverLogin = serverLogin;
}
public String getServerLogout() {
return serverLogout;
}
public void setServerLogout(String serverLogout) {
this.serverLogout = serverLogout;
}
public String getTrustStorePath() {
return trustStorePath;
}
public void setTrustStorePath(String trustStorePath) {
this.trustStorePath = trustStorePath;
}
public String getTrustStorePassword() {
return trustStorePassword;
}
public void setTrustStorePassword(String trustStorePassword) {
this.trustStorePassword = trustStorePassword;
}
} 說明:1、trustStorePath:這個主要使用的伺服器上面生成的cas.keystore密鑰、在伺服器搭建中我們生成了cas.keystore、域名改成www.casserver.com。目的不支援直接使用IP。
本地修改hosts:C:\Windows\System32\drivers\etc\hosts
2、cas.keystore:伺服器生成密鑰,tomcat進行部署,https通路時需要的私密密鑰
3、當然可以不使用cas.keystore,通過伺服器上面生成的cas.crt證書然後用戶端的jdk也是可以驗證通過的。
keytool -import -keystore "E:\Java\jdk1.8.0_192\jre\lib\security\cacerts" -file cas.crt -alias cas -storepass changeit 4)cas相關配置(CasConfiguration、SecurityConfiguration)
@Configuration
@Import(CasProperties.class)
public class CasConfiguration {

    //cas相關參數
    @Autowired
    private CasProperties casProperties;

    //用戶端的服務配置,主要用于跳轉
    @Bean
    public ServiceProperties serviceProperties() {
        ServiceProperties serviceProperties = new ServiceProperties();
        //該項目的登入位址
        serviceProperties.setService(casProperties.getClientUrl() + casProperties.getClientLogin());
        serviceProperties.setAuthenticateAllArtifacts(true);
        return serviceProperties;
    }

    //cas認證點
    @Bean
    public CasAuthenticationEntryPoint casAuthenticationEntryPoint() {
        CasAuthenticationEntryPoint casAuthenticationEntryPoint = new CasAuthenticationEntryPoint();
        //cas的登入位址
        casAuthenticationEntryPoint.setLoginUrl(casProperties.getServerUrl() + casProperties.getServerLogin());
        //入口
        casAuthenticationEntryPoint.setServiceProperties(serviceProperties());
        return casAuthenticationEntryPoint;
    }

    //票據
    @Bean
    public Cas30ServiceTicketValidator cas30ServiceTicketValidator() {
        return new Cas30ServiceTicketValidator(casProperties.getServerUrl());
    }

    //認證支援
    @Bean
    public CasAuthenticationProvider casAuthenticationProvider(AuthDetailsService authDetailsService) {
        CasAuthenticationProvider casAuthenticationProvider = new CasAuthenticationProvider();
        casAuthenticationProvider.setKey("client1");
        casAuthenticationProvider.setServiceProperties(serviceProperties());
        casAuthenticationProvider.setTicketValidator(cas30ServiceTicketValidator());
        //本地登入後的操作,走security體系
        casAuthenticationProvider.setUserDetailsService(authDetailsService);
        //這裡也可以使用setAuthenticationUserDetailsService管理
        //casAuthenticationProvider.setAuthenticationUserDetailsService();
        return casAuthenticationProvider;
    }

    //單點登入過濾
    @Bean
    public SingleSignOutFilter singleSignOutFilter() {
        SingleSignOutFilter singleSignOutFilter = new SingleSignOutFilter();
        singleSignOutFilter.setCasServerUrlPrefix(casProperties.getServerUrl());
        singleSignOutFilter.setIgnoreInitConfiguration(true);
        return singleSignOutFilter;
    }

    //登出過濾
    @Bean
    public LogoutFilter logoutFilter() {
        //重定向位址
        String logoutRedirectPath = casProperties.getServerUrl() + casProperties.getServerLogout() + "?service=" + casProperties.getClientUrl();
        LogoutFilter logoutFilter = new LogoutFilter(logoutRedirectPath, new SecurityContextLogoutHandler());
        //登出接口
        logoutFilter.setFilterProcessesUrl(casProperties.getServerLogout());
        return logoutFilter;
    }

}
@Configuration
@EnableWebSecurity
@EnableGlobalMethodSecurity(prePostEnabled = true, jsr250Enabled = true)
@Import(CasProperties.class)
public class SecurityConfiguration extends WebSecurityConfigurerAdapter {
//認證
@Autowired
private CasAuthenticationProvider authenticationProvider;
//認證點
@Autowired
private CasAuthenticationEntryPoint authenticationEntryPoint;
//登出過濾
@Autowired
private LogoutFilter logoutFilter;
//單點登出
@Autowired
private SingleSignOutFilter singleSignOutFilter;
//cas配置
@Autowired
private CasProperties casProperties;
@Override
protected void configure(HttpSecurity http) throws Exception {
http
.csrf().disable()
.exceptionHandling()
.authenticationEntryPoint(authenticationEntryPoint)
.and()
.authorizeRequests()
.anyRequest().authenticated()
.and()
//添加認證過濾(這裡我遇到一個坑,如果通過注入方式加入,會出現循環依賴問題)
.addFilter(casAuthenticationFilter())
//登出過濾
.addFilterBefore(logoutFilter, LogoutFilter.class)
//單點登出過濾
.addFilterBefore(singleSignOutFilter, CasAuthenticationFilter.class);
}
@Override
protected void configure(AuthenticationManagerBuilder auth) throws Exception {
//認證方式
auth.authenticationProvider(authenticationProvider);
}
@Bean
public CasAuthenticationFilter casAuthenticationFilter() throws Exception {
//過濾器配置
CasAuthenticationFilter casAuthenticationFilter = new CasAuthenticationFilter();
//使用security的認證管理
casAuthenticationFilter.setAuthenticationManager(authenticationManager());
//攔截登入接口
casAuthenticationFilter.setFilterProcessesUrl(casProperties.getClientLogin());
return casAuthenticationFilter;
}
} 5)登入後的username處理(AuthDetailsService)
@Service
public class AuthDetailsService implements UserDetailsService {

    @Override
    public UserDetails loadUserByUsername(String username) throws UsernameNotFoundException {
        if (username == null){
            throw new UsernameNotFoundException("使用者不存在!");
        }
        List<SimpleGrantedAuthority> simpleGrantedAuthorities = new ArrayList<>();
        simpleGrantedAuthorities.add(new SimpleGrantedAuthority("ADMIN"));
        return new org.springframework.security.core.userdetails.User(username, username, simpleGrantedAuthorities);
    }
}
說明:這裡隻是簡單處理,實際可以自己綁定使用者處理
6)https處理(CasIinitTask)
@Component
@Import(CasProperties.class)
public class CasIinitTask {

    @Autowired
    private CasProperties casProperties;

    @PostConstruct
    public void loadKeystore() throws IOException {
        //如果使用https,則必須加入密鑰
        Assert.isTrue(!(casProperties.getServerUrl().startsWith("https") && casProperties.getTrustStorePath() == null),
                "trustStorePath must not null to configuration https");
        //密鑰
        if (!StringUtils.isEmpty(casProperties.getTrustStorePath())) {
            Resource resource = new ClassPathResource(casProperties.getTrustStorePath());
            System.setProperty("javax.net.ssl.trustStore", resource.getFile().getAbsolutePath());
        }
        //有可能密碼的情況
        if (StringUtils.isEmpty(casProperties.getTrustStorePassword())) {
            System.setProperty("javax.net.ssl.trustStorePassword", casProperties.getTrustStorePassword());
        }
    }
}
7)啟動項目測試:
六、源碼:https://github.com/lilin409546297/springboot-cas
七、這裡隻是簡單的搭建過程,實際cas還需要做二次開發。相比于cas和oauth2我個人更加喜歡oauth2,個人看法。