多線程作為Java中很重要的一個知識點,在此還是有必要總結一下的。
一.線程的生命周期及五種基本狀态
關于Java中線程的生命周期,首先看一下下面這張較為經典的圖:
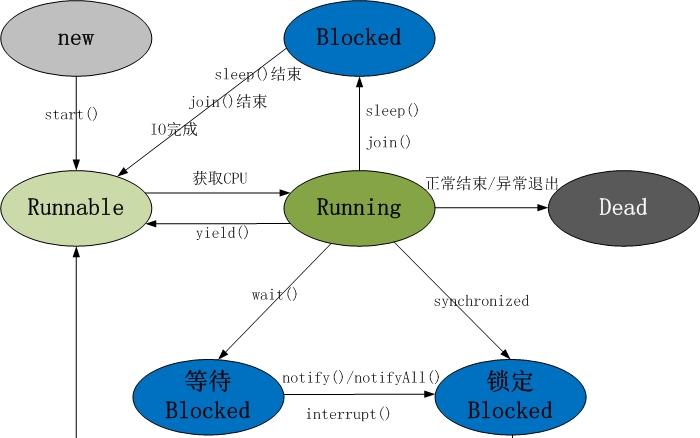
上圖中基本上囊括了Java中多線程各重要知識點。掌握了上圖中的各知識點,Java中的多線程也就基本上掌握了。主要包括:
Java線程具有五中基本狀态
建立狀态(New):當線程對象對建立後,即進入了建立狀态,如:Thread t = new MyThread();
就緒狀态(Runnable):當調用線程對象的start()方法(t.start();),線程即進入就緒狀态。處于就緒狀态的線程,隻是說明此線程已經做好了準備,随時等待CPU排程執行,并不是說執行了t.start()此線程立即就會執行;
運作狀态(Running):當CPU開始排程處于就緒狀态的線程時,此時線程才得以真正執行,即進入到運作狀态。注:就 緒狀态是進入到運作狀态的唯一入口,也就是說,線程要想進入運作狀态執行,首先必須處于就緒狀态中;
阻塞狀态(Blocked):處于運作狀态中的線程由于某種原因,暫時放棄對CPU的使用權,停止執行,此時進入阻塞狀态,直到其進入到就緒狀态,才 有機會再次被CPU調用以進入到運作狀态。根據阻塞産生的原因不同,阻塞狀态又可以分為三種:
1.等待阻塞:運作狀态中的線程執行wait()方法,使本線程進入到等待阻塞狀态;
2.同步阻塞 -- 線程在擷取synchronized同步鎖失敗(因為鎖被其它線程所占用),它會進入同步阻塞狀态;
3.其他阻塞 -- 通過調用線程的sleep()或join()或發出了I/O請求時,線程會進入到阻塞狀态。當sleep()狀态逾時、join()等待線程終止或者逾時、或者I/O處理完畢時,線程重新轉入就緒狀态。
死亡狀态(Dead):線程執行完了或者因異常退出了run()方法,該線程結束生命周期。
二. Java多線程的建立及啟動
Java中線程的建立常見有如三種基本形式
1.繼承Thread類,重寫該類的run()方法。

1 class MyThread extends Thread {
 2
 3     private int i = 0;
 4
 5     @Override
 6     public void run() {
 7         for (i = 0; i < 100; i++) {
 8             System.out.println(Thread.currentThread().getName() + " " + i);
 9         }
10     }
11 } 1 public class ThreadTest {
2
3 public static void main(String[] args) {
4 for (int i = 0; i < 100; i++) {
5 System.out.println(Thread.currentThread().getName() + " " + i);
6 if (i == 30) {
7 Thread myThread1 = new MyThread(); // 建立一個新的線程 myThread1 此線程進入建立狀态
8 Thread myThread2 = new MyThread(); // 建立一個新的線程 myThread2 此線程進入建立狀态
9 myThread1.start(); // 調用start()方法使得線程進入就緒狀态
10 myThread2.start(); // 調用start()方法使得線程進入就緒狀态
11 }
12 }
13 }
14 } 如上所示,繼承Thread類,通過重寫run()方法定義了一個新的線程類MyThread,其中run()方法的方法體代表了線程需要完成的任務,稱之為線程執行體。當建立此線程類對象時一個新的線程得以建立,并進入到線程建立狀态。通過調用線程對象引用的start()方法,使得該線程進入到就緒狀态,此時此線程并不一定會馬上得以執行,這取決于CPU排程時機。
2.實作Runnable接口,并重寫該接口的run()方法,該run()方法同樣是線程執行體,建立Runnable實作類的執行個體,并以此執行個體作為Thread類的target來建立Thread對象,該Thread對象才是真正的線程對象。
1 class MyRunnable implements Runnable {
 2     private int i = 0;
 3
 4     @Override
 5     public void run() {
 6         for (i = 0; i < 100; i++) {
 7             System.out.println(Thread.currentThread().getName() + " " + i);
 8         }
 9     }
10 } 1 public class ThreadTest {
2
3 public static void main(String[] args) {
4 for (int i = 0; i < 100; i++) {
5 System.out.println(Thread.currentThread().getName() + " " + i);
6 if (i == 30) {
7 Runnable myRunnable = new MyRunnable(); // 建立一個Runnable實作類的對象
8 Thread thread1 = new Thread(myRunnable); // 将myRunnable作為Thread target建立新的線程
9 Thread thread2 = new Thread(myRunnable);
10 thread1.start(); // 調用start()方法使得線程進入就緒狀态
11 thread2.start();
12 }
13 }
14 }
15 } 相信以上兩種建立新線程的方式大家都很熟悉了,那麼Thread和Runnable之間到底是什麼關系呢?我們首先來看一下下面這個例子。
1 public class ThreadTest {
 2
 3     public static void main(String[] args) {
 4         for (int i = 0; i < 100; i++) {
 5             System.out.println(Thread.currentThread().getName() + " " + i);
 6             if (i == 30) {
 7                 Runnable myRunnable = new MyRunnable();
 8                 Thread thread = new MyThread(myRunnable);
 9                 thread.start();
10             }
11         }
12     }
13 }
14
15 class MyRunnable implements Runnable {
16     private int i = 0;
17
18     @Override
19     public void run() {
20         System.out.println("in MyRunnable run");
21         for (i = 0; i < 100; i++) {
22             System.out.println(Thread.currentThread().getName() + " " + i);
23         }
24     }
25 }
26
27 class MyThread extends Thread {
28
29     private int i = 0;
30
31     public MyThread(Runnable runnable){
32         super(runnable);
33     }
34
35     @Override
36     public void run() {
37         System.out.println("in MyThread run");
38         for (i = 0; i < 100; i++) {
39             System.out.println(Thread.currentThread().getName() + " " + i);
40         }
41     }
42 } 同樣的,與實作Runnable接口建立線程方式相似,不同的地方在于
1 Thread thread = new MyThread(myRunnable); 那麼這種方式可以順利建立出一個新的線程麼?答案是肯定的。至于此時的線程執行體到底是MyRunnable接口中的run()方法還是MyThread類中的run()方法呢?通過輸出我們知道線程執行體是MyThread類中的run()方法。其實原因很簡單,因為Thread類本身也是實作了Runnable接口,而run()方法最先是在Runnable接口中定義的方法。
1 public interface Runnable {
2
3     public abstract void run();
4
5 }
我們看一下Thread類中對Runnable接口中run()方法的實作:
  @Override
    public void run() {
        if (target != null) {
            target.run();
        }
} 也就是說,當執行到Thread類中的run()方法時,會首先判斷target是否存在,存在則執行target中的run()方法,也就是實作了Runnable接口并重寫了run()方法的類中的run()方法。但是上述給到的列子中,由于多态的存在,根本就沒有執行到Thread類中的run()方法,而是直接先執行了運作時類型即MyThread類中的run()方法。
3.使用Callable和Future接口建立線程。具體是建立Callable接口的實作類,并實作clall()方法。并使用FutureTask類來包裝Callable實作類的對象,且以此FutureTask對象作為Thread對象的target來建立線程。
看着好像有點複雜,直接來看一個例子就清晰了。
1 public class ThreadTest {
 2
 3     public static void main(String[] args) {
 4
 5         Callable<Integer> myCallable = new MyCallable();    // 建立MyCallable對象
 6         FutureTask<Integer> ft = new FutureTask<Integer>(myCallable); //使用FutureTask來包裝MyCallable對象
 7
 8         for (int i = 0; i < 100; i++) {
 9             System.out.println(Thread.currentThread().getName() + " " + i);
10             if (i == 30) {
11                 Thread thread = new Thread(ft);   //FutureTask對象作為Thread對象的target建立新的線程
12                 thread.start();                      //線程進入到就緒狀态
13             }
14         }
15
16         System.out.println("主線程for循環執行完畢..");
17
18         try {
19             int sum = ft.get();            //取得新建立的新線程中的call()方法傳回的結果
20             System.out.println("sum = " + sum);
21         } catch (InterruptedException e) {
22             e.printStackTrace();
23         } catch (ExecutionException e) {
24             e.printStackTrace();
25         }
26
27     }
28 }
29
30
31 class MyCallable implements Callable<Integer> {
32     private int i = 0;
33
34     // 與run()方法不同的是,call()方法具有傳回值
35     @Override
36     public Integer call() {
37         int sum = 0;
38         for (; i < 100; i++) {
39             System.out.println(Thread.currentThread().getName() + " " + i);
40             sum += i;
41         }
42         return sum;
43     }
44
45 } 首先,我們發現,在實作Callable接口中,此時不再是run()方法了,而是call()方法,此call()方法作為線程執行體,同時還具有傳回值!在建立新的線程時,是通過FutureTask來包裝MyCallable對象,同時作為了Thread對象的target。那麼看下FutureTask類的定義:
1 public class FutureTask<V> implements RunnableFuture<V> {
2
3     //....
4
5 }
1 public interface RunnableFuture<V> extends Runnable, Future<V> {
2
3 void run();
4
5 } 于是,我們發現FutureTask類實際上是同時實作了Runnable和Future接口,由此才使得其具有Future和Runnable雙重特性。通過Runnable特性,可以作為Thread對象的target,而Future特性,使得其可以取得新建立線程中的call()方法的傳回值。
執行下此程式,我們發現sum = 4950永遠都是最後輸出的。而“主線程for循環執行完畢..”則很可能是在子線程循環中間輸出。由CPU的線程排程機制,我們知道,“主線程for循環執行完畢..”的輸出時機是沒有任何問題的,那麼為什麼sum =4950會永遠最後輸出呢?
原因在于通過ft.get()方法擷取子線程call()方法的傳回值時,當子線程此方法還未執行完畢,ft.get()方法會一直阻塞,直到call()方法執行完畢才能取到傳回值。
上述主要講解了三種常見的線程建立方式,對于線程的啟動而言,都是調用線程對象的start()方法,需要特别注意的是:不能對同一線程對象兩次調用start()方法。
三. Java多線程的就緒、運作和死亡狀态
就緒狀态轉換為運作狀态:當此線程得到處理器資源;
運作狀态轉換為就緒狀态:當此線程主動調用yield()方法或在運作過程中失去處理器資源。
運作狀态轉換為死亡狀态:當此線程線程執行體執行完畢或發生了異常。
此處需要特别注意的是:當調用線程的yield()方法時,線程從運作狀态轉換為就緒狀态,但接下來CPU排程就緒狀态中的哪個線程具有一定的随機性,是以,可能會出現A線程調用了yield()方法後,接下來CPU仍然排程了A線程的情況。
由于實際的業務需要,常常會遇到需要在特定時機終止某一線程的運作,使其進入到死亡狀态。目前最通用的做法是設定一boolean型的變量,當條件滿足時,使線程執行體快速執行完畢。如:
1 public class ThreadTest {
 2
 3     public static void main(String[] args) {
 4
 5         MyRunnable myRunnable = new MyRunnable();
 6         Thread thread = new Thread(myRunnable);
 7
 8         for (int i = 0; i < 100; i++) {
 9             System.out.println(Thread.currentThread().getName() + " " + i);
10             if (i == 30) {
11                 thread.start();
12             }
13             if(i == 40){
14                 myRunnable.stopThread();
15             }
16         }
17     }
18 }
19
20 class MyRunnable implements Runnable {
21
22     private boolean stop;
23
24     @Override
25     public void run() {
26         for (int i = 0; i < 100 && !stop; i++) {
27             System.out.println(Thread.currentThread().getName() + " " + i);
28         }
29     }
30
31     public void stopThread() {
32         this.stop = true;
33     }
34
35 } 1 class MyThread extends Thread {
2
3 private int i = 0;
4
5 @Override
6 public void run() {
7 for (i = 0; i < 100; i++) {
8 System.out.println(Thread.currentThread().getName() + " " + i);
9 }
10 }
11 } 1 public class ThreadTest {
2
3 public static void main(String[] args) {
4 for (int i = 0; i < 100; i++) {
5 System.out.println(Thread.currentThread().getName() + " " + i);
6 if (i == 30) {
7 Thread myThread1 = new MyThread(); // 建立一個新的線程 myThread1 此線程進入建立狀态
8 Thread myThread2 = new MyThread(); // 建立一個新的線程 myThread2 此線程進入建立狀态
9 myThread1.start(); // 調用start()方法使得線程進入就緒狀态
10 myThread2.start(); // 調用start()方法使得線程進入就緒狀态
11 }
12 }
13 }
14 } 1 class MyRunnable implements Runnable {
2 private int i = 0;
3
4 @Override
5 public void run() {
6 for (i = 0; i < 100; i++) {
7 System.out.println(Thread.currentThread().getName() + " " + i);
8 }
9 }
10 } 1 public class ThreadTest {
2
3 public static void main(String[] args) {
4 for (int i = 0; i < 100; i++) {
5 System.out.println(Thread.currentThread().getName() + " " + i);
6 if (i == 30) {
7 Runnable myRunnable = new MyRunnable(); // 建立一個Runnable實作類的對象
8 Thread thread1 = new Thread(myRunnable); // 将myRunnable作為Thread target建立新的線程
9 Thread thread2 = new Thread(myRunnable);
10 thread1.start(); // 調用start()方法使得線程進入就緒狀态
11 thread2.start();
12 }
13 }
14 }
15 } 1 public class ThreadTest {
2
3 public static void main(String[] args) {
4 for (int i = 0; i < 100; i++) {
5 System.out.println(Thread.currentThread().getName() + " " + i);
6 if (i == 30) {
7 Runnable myRunnable = new MyRunnable();
8 Thread thread = new MyThread(myRunnable);
9 thread.start();
10 }
11 }
12 }
13 }
14
15 class MyRunnable implements Runnable {
16 private int i = 0;
17
18 @Override
19 public void run() {
20 System.out.println("in MyRunnable run");
21 for (i = 0; i < 100; i++) {
22 System.out.println(Thread.currentThread().getName() + " " + i);
23 }
24 }
25 }
26
27 class MyThread extends Thread {
28
29 private int i = 0;
30
31 public MyThread(Runnable runnable){
32 super(runnable);
33 }
34
35 @Override
36 public void run() {
37 System.out.println("in MyThread run");
38 for (i = 0; i < 100; i++) {
39 System.out.println(Thread.currentThread().getName() + " " + i);
40 }
41 }
42 } 1 Thread thread = new MyThread(myRunnable); 1 public interface Runnable {
2
3 public abstract void run();
4
5 } @Override
public void run() {
if (target != null) {
target.run();
}
} 1 public class ThreadTest {
2
3 public static void main(String[] args) {
4
5 Callable<Integer> myCallable = new MyCallable(); // 建立MyCallable對象
6 FutureTask<Integer> ft = new FutureTask<Integer>(myCallable); //使用FutureTask來包裝MyCallable對象
7
8 for (int i = 0; i < 100; i++) {
9 System.out.println(Thread.currentThread().getName() + " " + i);
10 if (i == 30) {
11 Thread thread = new Thread(ft); //FutureTask對象作為Thread對象的target建立新的線程
12 thread.start(); //線程進入到就緒狀态
13 }
14 }
15
16 System.out.println("主線程for循環執行完畢..");
17
18 try {
19 int sum = ft.get(); //取得新建立的新線程中的call()方法傳回的結果
20 System.out.println("sum = " + sum);
21 } catch (InterruptedException e) {
22 e.printStackTrace();
23 } catch (ExecutionException e) {
24 e.printStackTrace();
25 }
26
27 }
28 }
29
30
31 class MyCallable implements Callable<Integer> {
32 private int i = 0;
33
34 // 與run()方法不同的是,call()方法具有傳回值
35 @Override
36 public Integer call() {
37 int sum = 0;
38 for (; i < 100; i++) {
39 System.out.println(Thread.currentThread().getName() + " " + i);
40 sum += i;
41 }
42 return sum;
43 }
44
45 } 1 public class FutureTask<V> implements RunnableFuture<V> {
2
3 //....
4
5 } 1 public interface RunnableFuture<V> extends Runnable, Future<V> {
2
3 void run();
4
5 } 1 public class ThreadTest {
2
3 public static void main(String[] args) {
4
5 MyRunnable myRunnable = new MyRunnable();
6 Thread thread = new Thread(myRunnable);
7
8 for (int i = 0; i < 100; i++) {
9 System.out.println(Thread.currentThread().getName() + " " + i);
10 if (i == 30) {
11 thread.start();
12 }
13 if(i == 40){
14 myRunnable.stopThread();
15 }
16 }
17 }
18 }
19
20 class MyRunnable implements Runnable {
21
22 private boolean stop;
23
24 @Override
25 public void run() {
26 for (int i = 0; i < 100 && !stop; i++) {
27 System.out.println(Thread.currentThread().getName() + " " + i);
28 }
29 }
30
31 public void stopThread() {
32 this.stop = true;
33 }
34
35 }