轉載自:https://blog.csdn.net/UbuntuTouch/article/details/107154165
可以将 IP過濾 應用于應用程式用戶端,節點用戶端或傳輸用戶端來限制或允許一些 IP 對于 Elasticsearch 的通路。如果節點的IP位址在黑名單中,則 Elasticsearch 安全功能允許連接配接到 Elasticsearch,但該連接配接将立即被丢棄,并且不處理任何請求。Elasticsearch 安裝并非旨在通過 Internet 公開通路。 IP過濾和 Elasticsearch 安全功能的其他功能不會改變這種情況。在使用這項功能的時候,必須注意的一點是:IP過濾 是白金許可的一部分。
使用 HTTP filter
為了使用 HTTP filter,我們來修改 Elasticsearch 的配置檔案 config/elasticsearch.yml:
config/elasticsearch.yml
xpack.security.http.filter.allow: "192.168.0.4"
xpack.security.http.filter.deny: "192.168.0.0/24"
我們在 Elasticsearch 的配置檔案中添加上面的兩行配置。重新啟動 Elasticsearch。上面的兩行表示隻允許從 IP 位址 192.168.0.4 來進行通路,但是不支援從任何其它的 IP 位址,比如 192.168.0.0/24 進行通路。
為了驗證這個,我們最如下的實驗。我們的 Elasticsearch 運作于 IP 位址 192.168.0.3 上。這個可以通過如下的指令來進行查詢:
ifconfig | grep 192
$ ifconfig | grep 192
		inet 192.168.0.3 netmask 0xffffff00 broadcast 192.168.0.255
我們在目前 Elasticsearch 運作的電腦上運作:
curl 192.168.0.3:9200 -u elastic:password
$ ifconfig | grep 192
	inet 192.168.0.3 netmask 0xffffff00 broadcast 192.168.0.255
liuxg:~ liuxg$ curl 192.168.0.3:9200 -u elastic:password
curl: (52) Empty reply from server
顯然,上面的通路是失敗的。我們接下來使用另外一個電腦,它的 IP 位址是:192.168.0.4:
$ ifconfig | grep 192
        inet 192.168.0.4  netmask 255.255.255.0  broadcast 192.168.0.255
liuxg@liuxgu:~$ curl 192.168.0.3:9200 -u elastic:password
{
  "name" : "liuxg",
  "cluster_name" : "elasticsearch",
  "cluster_uuid" : "PpiZRc6DQyin2reBiEngZg",
  "version" : {
    "number" : "7.8.0",
    "build_flavor" : "default",
    "build_type" : "tar",
    "build_hash" : "757314695644ea9a1dc2fecd26d1a43856725e65",
    "build_date" : "2020-06-14T19:35:50.234439Z",
    "build_snapshot" : false,
    "lucene_version" : "8.5.1",
    "minimum_wire_compatibility_version" : "6.8.0",
    "minimum_index_compatibility_version" : "6.0.0-beta1"
  },
  "tagline" : "You Know, for Search"
}
上面顯示在 192.168.0.4 電腦上發送的請求,我們可以得到相應的輸出,表明我們的 IP filter 是正确工作的。
在很多的情況下,我們更喜歡通過 API 來進行操作,因為這樣更容易維護。否則每次都需要重新編輯 config/elasticsearch.yml 檔案,并重新啟動 Elasticsearch。
剛才在上面,我們可以看到,在安裝 Elasticsearch 的電腦上,我們并不能通路 Elasticsearch,這是因為 192.168.0.3 這個 IP位址被禁止了。我們在下面通過 API 的方式來重新打開這個 IP 位址的通路。到目前為止,我們的 Kibana 也不能通路。
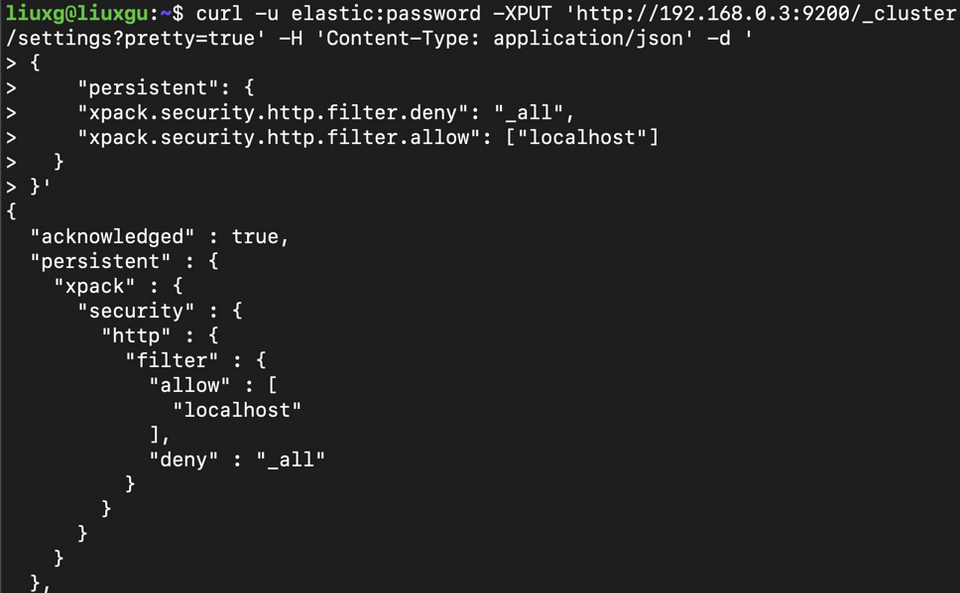
curl -u elastic:password -XPUT 'http://192.168.0.3:9200/_cluster/settings?pretty=true' -H 'Content-Type: application/json' -d '
{
    "persistent": {
    "xpack.security.http.filter.deny": "_all",
    "xpack.security.http.filter.allow": ["localhost"]
  }
}'
在上面,我們允許 localhost 這個 IP 位址的通路,并且屏蔽其他 IP 位址的通路。在上面,我們必須在目前允許的 IP 位址 192.168.0.4 的機器上運作上面的指令,因為隻有這台機器是可以被通路的。運作的結果是:
經過上面的執行後,我們重新在 IP 位址為 192.168.0.4 上的機器上重新運作如下的指令:

顯然目前的這台機器的通路已經被阻止了。
我們回到 Elasticsearch 運作的機器上,并使用 localhost 來進行通路:
上面顯示,我們針對 localhost 的通路是成功的。這正說明了我們的 API 的使用是成功的。它可以動态地為我們做 http filter.
使用 IP filter
按照同樣的道理,我們可以針對 transport 來做 IP filter,隻不過我們使用如下的一對設定:
xpack.security.transport.filter.allow: "192.168.0.1"
xpack.security.transport.filter.deny: "192.168.0.0/24"
使用這個可以有效地阻止一些不相關的節點加入我們的叢集。
參考:
【1】https://www.elastic.co/guide/en/elasticsearch/reference/current/ip-filtering.html#_enabling_ip_filtering