基于Vue和Quasar的前端SPA項目實戰之檔案上傳(十)
回顧
通過之前一篇文章
基于Vue和Quasar的前端SPA項目實戰之資料導入(九)的介紹,實作了業務資料批量導入功能,本文主要介紹檔案上傳相關内容。
簡介
crudapi支援附件字段,表字段裡面儲存的是檔案url字元串。附件可以通過其它檔案管理系統比如阿裡雲的OSS進行上傳,或者使用系統自帶的檔案管理API進行上傳,包括普通檔案上傳和大檔案切片上傳兩種方式。
UI界面
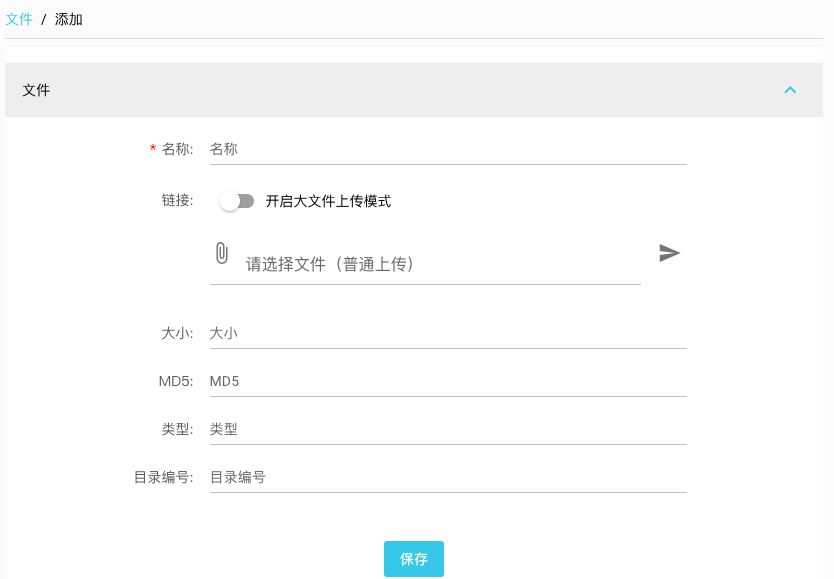
檔案上傳

大檔案上傳
API
檔案上傳API,包括普通檔案上傳和大檔案切片兩個功能,具體的通過swagger文檔可以檢視。通過axios封裝api,名稱為file
import { axiosInstance } from "boot/axios";

const HEADERS = {
  "Content-Type": "multipart/form-data"
};

const file = {
  upload: async function(data, progressCallback) {
    console.log("file->upload")
    return axiosInstance.post(`/api/file` , data,
      {
        headers: HEADERS,
        onUploadProgress:  (progressEvent) => {
          if (progressCallback) {
            progressCallback(progressEvent)
          }
        }
    });
  },
  bigUpload: async function(data, progressCallback) {
    console.log("file->bigUpload")
    return axiosInstance.post(`/api/file/big` , data,
      {
        headers: HEADERS,
        onUploadProgress:  (progressEvent) => {
          if (progressCallback) {
            progressCallback(progressEvent)
          }
        }
    });
  }
};

export { file };
核心代碼
CFile元件
<q-toggle v-model="enableBigFile" label="開啟大檔案上傳模式" />

  <div v-show="!enableBigFile" class="q-py-md">
    <q-file v-model="normalFile" label="請選擇檔案(普通上傳)">
      <template v-slot:prepend>
        <q-icon name="attach_file" />
      </template>
      <template v-slot:after>
        <q-btn round dense flat icon="send" @click="onSubmitClick" />
      </template>
    </q-file>
  </div>

  <div v-show="enableBigFile" class="q-py-md">
    <q-file v-model="bigFile" @input="bigFileAdded" label="請選擇檔案(大檔案上傳)">
      <template v-slot:prepend>
        <q-icon name="attach_file" />
      </template>
      <template v-slot:after>
        <q-btn round dense flat icon="flight_land" @click="onBigSubmitClick" />
      </template>
    </q-file>
  </div>
通過toggle切換上傳模式,如果是小檔案采用普通的方式即可。
普通上傳
async onSubmitClick() {
  console.info("CFile->onSubmitClick");

  if (!this.normalFile) {
    this.$q.notify({
      message: '請選擇檔案!',
      type: 'warning'
    });
    return;
  }

  this.$q.loading.show({
    message: "上傳中"
  });

  try {
    let form = new FormData()
    form.append('file', this.normalFile);

    this.fileInfo = await fileService.upload(form, (e)=> {
      console.info(e);
    });
    this.$q.loading.hide();
    this.$emit("input", this.fileInfo);
  } catch (error) {
    this.$q.loading.hide();
    console.error(error);
  }
}
大檔案切片上傳
bigFileAdded(f) {
  console.info("CFile->fileAdded");

  if (!f) {
    console.info("CFile->cancel");
    return;
  }

  this.$q.loading.show({
    message: "檔案準備中"
  });

  FileMd5(f, this.chunkSize, (e, md5) => {
    this.md5 = md5;
    console.info(e);
    console.info(md5);
    this.$q.loading.hide();
  });
},

async onBigSubmitClick() {
  console.info("CFile->onBigSubmitClick");

  if (!this.bigFile) {
    this.$q.notify({
      message: '請選擇檔案!',
      type: 'warning'
    });
    return;
  }


  this.$q.loading.show({
    message: "上傳中"
  });

  try {
    let chunks = this.getChunks();

    let reqs = [];
    for (let i = 0; i < chunks; ++i) {
      reqs.push(this.uploadWithBlock(i));
    }

    await Promise.all(reqs)
    .then((datas) => {
      console.info(datas);
      this.checkFinished(datas);
    });
  } catch (error) {
    this.$q.loading.hide();
    console.error(error);
  }
}
大檔案如果采用普通的上傳方式,可能由于網絡的原因速度比較慢,而且不穩定,是以采用切片的方式進行多線程上傳。具體原理如下:首先計算檔案MD5,背景會根據MD5唯一确定是同一個檔案,同一個檔案的不同block根據大小和偏移量會寫在相同檔案對應的位置,當最後一個block上傳成功後,表示上傳結束。分片大小預設為20MB,可以配置為需要的值,前端通過Promise.all的ajax調用方式可以實作多線程同時上傳。
檔案表為例
檔案表的“連結”字段設定類型為“附件ATTACHMENT”,添加業務資料頁面會自動采用CFile元件。
選擇大檔案之後,點選上傳圖示,通過chrome網絡請求發現,多線程分片上傳模式已經啟動,上傳結束之後可以檢視下載下傳。
小結
本文主要介紹了檔案上傳功能,包括普通上傳模式和大檔案切片上傳模式,大檔案切片上傳模式通過優化後很容易支援斷點續傳和秒傳,後續會根據需求優化檔案上傳功能。
demo示範
官網位址:
https://crudapi.cn測試位址:
https://demo.crudapi.cn/crudapi/login附源碼位址
GitHub位址
https://github.com/crudapi/crudapi-admin-webGitee位址
https://gitee.com/crudapi/crudapi-admin-web由于網絡原因,GitHub可能速度慢,改成通路Gitee即可,代碼同步更新。