<h1><span style="color: #3194d0;">0、目錄</span></h1> 整體架構目錄:
ASP.NET Core分布式項目實戰-目錄一、前言
在寫這篇文章之前,我看了很多關于consul的服務治理,但發現基本上都是直接在powershell或者以指令工具的方式在伺服器上面直接輸入consul agent .... 來搭建啟動consul叢集,一旦把指令工具關掉,則consul無法再背景啟動,尤其是在linux系統中。
如果在window系統中,采用bat檔案到時可以做成開機自啟,或者在linux中把指令做成一個service 服務檔案來啟動就可以實作背景運作。
是以為了社群能更好的發展技術,且能把consul應用在生産環境中,我認真回顧了在公司項目中的應用,特此把我開發及總結的分享給大家,此篇文章采用docker引擎,并且隻涉及到consul叢集部署以及結合asp.net core微服務注冊。
當然如果内容有涉及安全隐患的,大家可以積極留言,共同進步。
注:以下所涉及到部署過程全部經過樓主我反複的驗證,總結得來。大家在應用的過程中如果出現問題,可以留言咨詢。
二、部署consul叢集
1、介紹一下Consul
consul 關鍵特性
服務發現:支援服務發現。你可以通過 DNS 或 HTTP 的方式擷取服務資訊。
健康檢查:支援健康檢查。可以提供與給定服務相關聯的任何數量的健康檢查(如 web 狀态碼或 cpu 使用率)。
K/V 存儲:鍵/值對存儲。你可用通過 consul 存儲如動态配置之類的相關資訊。
多資料中心:支援多資料中心,開箱即用。
WEB UI:支援 WEB UI。點點點,你就能夠了解你的服務現在的運作情況,一目了然,對開發運維是非常友好的。
說明:
在Consul方案中,每個提供服務的節點上都要部署和運作Consul的Client Agent,所有運作Consul Agent節點的集合構成Consul Cluster。
Consul Agent有兩種運作模式:Server和Client。這裡的Server和Client隻是Consul叢集層面的區分,與搭建在Cluster之上的應用服務無關。以Server模式運作的Consul Agent節點用于維護Consul叢集的狀态,官方建議每個Consul Cluster至少有3個或以上的運作在Server Mode的Agent,Client節點不限。
Consul支援多資料中心,每個資料中心的Consul Cluster都會在運作于Server模式下的Agent節點中選出一個Leader節點,這個選舉過程通過Consul實作的raft協定保證,多個 Server節點上的Consul資料資訊是強一緻的。處于Client Mode的Consul Agent節點比較簡單,無狀态,僅僅負責将請求轉發給Server Agent節點。
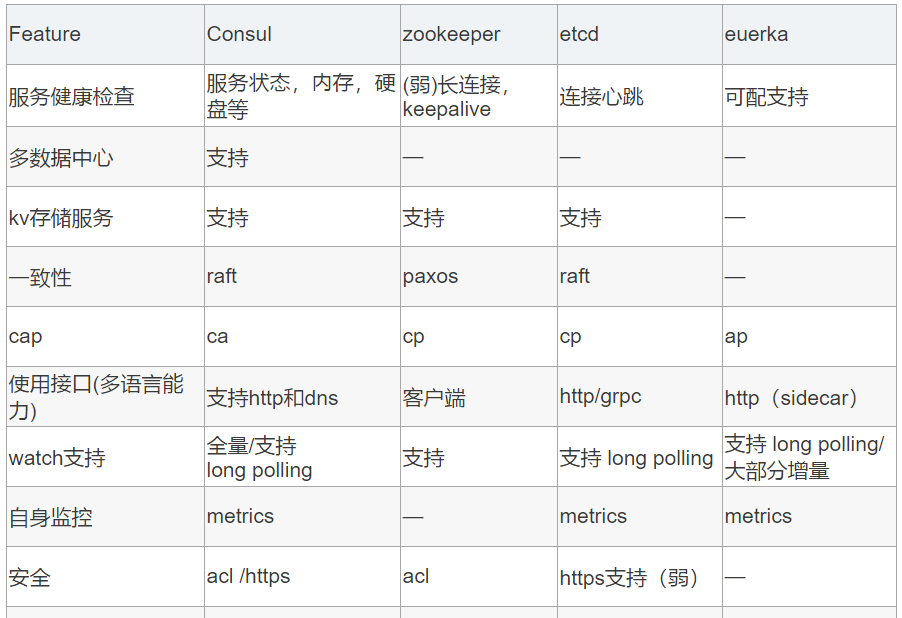
Consul與其他工具的比較
consul的端口解釋

好了,該介紹的已經介紹了,接下來就是正式部署吧
2、Docker上運作Consul
第一步:安全配置,适用授權和資料加密傳輸(生産環境是必須的)
為了consul的安全,需要進行gossip加密以及RPC加密結合TLS。
Gossip加密:主要用于節點間的接收發送叢集資訊安全。
RPC加密:主要用于Agent之間調用RPC授權的安全性。
此處大家可以參考官網或者一下資料:
https://www.jianshu.com/p/3d074ed76a68
https://www.consul.io/docs/agent/encryption.html
第二步:consul叢集部署
準備伺服器(可以采用虛拟機部署)
部署server1
docker run -d --net=host -v $PWD/data:/consul/data -v $PWD/config:/consul/config --restart always --name consulServer1 consul agent -server -bind=192.168.216.160 -node=server1 -bootstrap-expect 3 -data-dir=/consul/data -config-file=/consul/config -client 0.0.0.0 -ui
部署server2
docker run -d --net=host -v $PWD/data:/consul/data -v $PWD/config:/consul/config --restart always --name cs2 consul agent -server -bind=192.168.216.161 -node=server2 -bootstrap-expect 3 -data-dir=/consul/data -config-file=/consul/config -client 0.0.0.0 -ui -retry-join=192.168.216.160
部署server3
docker run -d --net=host -v $PWD/data:/consul/data -v $PWD/config:/consul/config --restart always --name cs3 consul agent -server -bind=192.168.216.162 -node=server3 -bootstrap-expect 3 -data-dir=/consul/data -config-file=/consul/config -client 0.0.0.0 -ui -retry-join=192.168.216.160
部署client-連接配接server
docker run -d --net=host -v $PWD/data:/consul/data -v $PWD/config:/consul/config --restart always --name cc1 consul agent -bind=192.168.216.163 -node=client1 -data-dir=/consul/data -config-file=/consul/config -client 0.0.0.0 -retry-join=192.168.216.160
注:(針對以上的參數以及配置解釋)
1、此處的資料挂載就是把容器内的data以及配置挂載到外部位址,$PWD代表目前目錄即你運作docker指令時的目錄,當然$PWD可以替換為具體的路徑。
2、-data-dir=/consul/consul -config-file=/consul/config :這兩個地方代表在consul啟動後會把資料以及配置檔案放到指定的目錄下,這個對于在伺服器模式下運作的代理尤其重要,因為它們必須能夠保持群集狀态。
3、總結,以上兩點結合就是說明 consul産生的資料然後挂載在外部位址進行持久化存儲。
4、server端 的-client 參數可以不用,官方推薦是 服務注冊到client端,由client端再把資料統一送出到server端。
參數說明
-client : 0.0.0.0 代表綁定到所有接口的選項,如果沒有此選項,則asp.net core無法進行服務注冊使用
-bind :該位址用來在叢集内部的通訊,叢集内的所有節點到位址都必須是可達的
--net=host 使得docker容器越過了net namespace的隔離,免去手動指定端口映射的步驟
-retry-join 允許你在第一次失敗後進行嘗試,加入一個已經啟動的agent的ip位址
-bootstrap-expect 提供的server節點數目
-ui 啟動自有主機的界面
-data-dir :提供一個目錄用來存放agent的狀态,所有的agent允許都需要該目錄,該目錄必須是穩定的,系統重新開機後都繼續存在
CONSUL_LOCAL_CONFIG={"skip_leave_on_interrupt": true}:在0.7版本之後預設是true,是以不是必須的。
CONSUL_LOCAL_CONFIG={"leave_on_terminate": true}:在0.7版本之後預設是true,是以不是必須的。如果啟用,當代理收到TERM信号時,它将向Leave群集的其餘部分發送消息并正常離開
打開浏覽器器檢視 consul :
看所有consul節點情況
docker exec -t cs1 consul members
檢視server的狀态,以及哪一個節點是leader
docker exec -t cs1 consul operator raft list-peers
注:
如果其中一台或者多台server端挂掉,則Consul叢集就會重新選舉新的Leader,
但是一旦挂掉阿的節點數量超過一半,則Consul叢集就無法工作了。
三、asp.net core微服務進行服務注冊
1、建立一個項目asp.net core webapi項目
引入 consul ,nuget包
2、在控制器中建立一個控制器Health,代表健康檢查
[Produces("application/json")] [Route(</span><span style="color: #800000;">"</span><span style="color: #800000;">api/Health</span><span style="color: #800000;">"</span><span style="color: #000000;">)]
</span><span style="color: #0000ff;">public</span> <span style="color: #0000ff;">class</span><span style="color: #000000;"> HealthController : Controller
{
[HttpGet]
</span><span style="color: #0000ff;">public</span> IActionResult Get() => Ok(<span style="color: #800000;">"</span><span style="color: #800000;">ok</span><span style="color: #800000;">"</span><span style="color: #000000;">);
}</span></pre> 3、然後在appsetting.json中添加配置檔案
需要手動配置一下位址和端口号。
{
"Logging": {
</span><span style="color: #800000;">"</span><span style="color: #800000;">IncludeScopes</span><span style="color: #800000;">"</span>: <span style="color: #0000ff;">false</span><span style="color: #000000;">,
</span><span style="color: #800000;">"</span><span style="color: #800000;">Debug</span><span style="color: #800000;">"</span><span style="color: #000000;">: {
</span><span style="color: #800000;">"</span><span style="color: #800000;">LogLevel</span><span style="color: #800000;">"</span><span style="color: #000000;">: {
</span><span style="color: #800000;">"</span><span style="color: #800000;">Default</span><span style="color: #800000;">"</span>: <span style="color: #800000;">"</span><span style="color: #800000;">Warning</span><span style="color: #800000;">"</span><span style="color: #000000;">
}
},
</span><span style="color: #800000;">"</span><span style="color: #800000;">Console</span><span style="color: #800000;">"</span><span style="color: #000000;">: {
</span><span style="color: #800000;">"</span><span style="color: #800000;">LogLevel</span><span style="color: #800000;">"</span><span style="color: #000000;">: {
</span><span style="color: #800000;">"</span><span style="color: #800000;">Default</span><span style="color: #800000;">"</span>: <span style="color: #800000;">"</span><span style="color: #800000;">Warning</span><span style="color: #800000;">"</span><span style="color: #000000;">
}
} },
"ServiceRegister": { //服務注冊
<span style="color: #800000;">"</span><span style="color: #800000;">IsActive</span><span style="color: #800000;">"</span>: <span style="color: #0000ff;">true</span><span style="color: #000000;">,
</span><span style="color: #800000;">"</span><span style="color: #800000;">ServiceName</span><span style="color: #800000;">"</span>: <span style="color: #800000;">"</span><span style="color: #800000;">testconsul6</span><span style="color: #800000;">"</span><span style="color: #000000;">,
</span><span style="color: #800000;">"</span><span style="color: #800000;">ServiceHost</span><span style="color: #800000;">"</span>: <span style="color: #800000;">"</span><span style="color: #800000;">192.168.216.163</span><span style="color: #800000;">"</span><span style="color: #000000;">,
</span><span style="color: #800000;">"</span><span style="color: #800000;">ServicePort</span><span style="color: #800000;">"</span>: <span style="color: #800080;">5006</span><span style="color: #000000;">,
</span><span style="color: #800000;">"</span><span style="color: #800000;">Register</span><span style="color: #800000;">"</span><span style="color: #000000;">: {
  </span><span style="color: #800000;">"</span><span style="color: #800000;">HttpEndpoint</span><span style="color: #800000;">"</span>: <span style="color: #800000;">"</span><span style="color: #800000;">http://192.168.216.163:8500</span><span style="color: #800000;">"</span><span style="color: #000000;">
}
}
4、這一步是服務注冊的類
ServiceRegisterOptions.cs
public class ServiceRegisterOptions {
</span><span style="color: #808080;">///</span> <span style="color: #808080;"><summary></span>
<span style="color: #808080;">///</span><span style="color: #008000;"> 是否啟用
</span><span style="color: #808080;">///</span> <span style="color: #808080;"></summary></span>
<span style="color: #0000ff;">public</span> <span style="color: #0000ff;">bool</span> IsActive { <span style="color: #0000ff;">get</span>; <span style="color: #0000ff;">set</span><span style="color: #000000;">; }
</span><span style="color: #808080;">///</span> <span style="color: #808080;"><summary></span>
<span style="color: #808080;">///</span><span style="color: #008000;"> 服務名稱
</span><span style="color: #808080;">///</span> <span style="color: #808080;"></summary></span>
<span style="color: #0000ff;">public</span> <span style="color: #0000ff;">string</span> ServiceName { <span style="color: #0000ff;">get</span>; <span style="color: #0000ff;">set</span><span style="color: #000000;">; }
</span><span style="color: #808080;">///</span> <span style="color: #808080;"><summary></span>
<span style="color: #808080;">///</span><span style="color: #008000;"> 服務IP或者域名
</span><span style="color: #808080;">///</span> <span style="color: #808080;"></summary></span>
<span style="color: #0000ff;">public</span> <span style="color: #0000ff;">string</span> ServiceHost { <span style="color: #0000ff;">get</span>; <span style="color: #0000ff;">set</span><span style="color: #000000;">; }
</span><span style="color: #808080;">///</span> <span style="color: #808080;"><summary></span>
<span style="color: #808080;">///</span><span style="color: #008000;"> 服務端口号
</span><span style="color: #808080;">///</span> <span style="color: #808080;"></summary></span>
<span style="color: #0000ff;">public</span> <span style="color: #0000ff;">int</span> ServicePort { <span style="color: #0000ff;">get</span>; <span style="color: #0000ff;">set</span><span style="color: #000000;">; }
</span><span style="color: #808080;">///</span> <span style="color: #808080;"><summary></span>
<span style="color: #808080;">///</span><span style="color: #008000;"> consul注冊位址
</span><span style="color: #808080;">///</span> <span style="color: #808080;"></summary></span>
<span style="color: #0000ff;">public</span> RegisterOptions Register { <span style="color: #0000ff;">get</span>; <span style="color: #0000ff;">set</span><span style="color: #000000;">; }
}</span></pre> RegisterOptions.cs
public class RegisterOptions {
</span><span style="color: #0000ff;">public</span> <span style="color: #0000ff;">string</span> HttpEndpoint { <span style="color: #0000ff;">get</span>; <span style="color: #0000ff;">set</span><span style="color: #000000;">; }
}</span></pre> 5、在startup.cs 中的服務注冊
public void ConfigureServices(IServiceCollection services) {
</span><span style="color: #0000ff;">#region</span> 服務注冊基礎資訊配置<span style="color: #000000;">
services.Configure</span><ServiceRegisterOptions>(Configuration.GetSection(<span style="color: #800000;">"</span><span style="color: #800000;">ServiceRegister</span><span style="color: #800000;">"</span><span style="color: #000000;">));
services.AddSingleton</span><IConsulClient>(p => <span style="color: #0000ff;">new</span> ConsulClient(cfg =><span style="color: #000000;">
{
</span><span style="color: #0000ff;">var</span> serviceConfiguration = p.GetRequiredService<IOptions<ServiceRegisterOptions>><span style="color: #000000;">().Value;
</span><span style="color: #0000ff;">if</span> (!<span style="color: #0000ff;">string</span><span style="color: #000000;">.IsNullOrEmpty(serviceConfiguration.Register.HttpEndpoint))
{
cfg.Address </span>= <span style="color: #0000ff;">new</span><span style="color: #000000;"> Uri(serviceConfiguration.Register.HttpEndpoint);
}
}));
</span><span style="color: #0000ff;">#endregion</span><span style="color: #000000;">
services.AddMvc();
}</span></pre> 在Configure 方法中配置代碼
private static void RegisterService(IApplicationBuilder app, IOptions</span><ServiceRegisterOptions><span style="color: #000000;"> serviceRegisterOptions,
IConsulClient consul,
IApplicationLifetime appLife)
{
</span><span style="color: #0000ff;">var</span> serviceId = $<span style="color: #800000;">"</span><span style="color: #800000;">{serviceRegisterOptions.Value.ServiceName}_{serviceRegisterOptions.Value.ServiceHost}:{serviceRegisterOptions.Value.ServicePort}</span><span style="color: #800000;">"</span><span style="color: #000000;">;
</span><span style="color: #0000ff;">var</span> httpCheck = <span style="color: #0000ff;">new</span><span style="color: #000000;"> AgentServiceCheck()
{
DeregisterCriticalServiceAfter </span>= TimeSpan.FromSeconds(<span style="color: #800080;">5</span>),<span style="color: #008000;">//</span><span style="color: #008000;">服務啟動多久後注冊</span>
Interval = TimeSpan.FromSeconds(<span style="color: #800080;">30</span>),<span style="color: #008000;">//</span><span style="color: #008000;">健康檢查時間間隔,或者稱為心跳間隔</span>
HTTP = $<span style="color: #800000;">"</span><span style="color: #800000;">http://{serviceRegisterOptions.Value.ServiceHost}:{serviceRegisterOptions.Value.ServicePort}/api/health</span><span style="color: #800000;">"</span>,<span style="color: #008000;">//</span><span style="color: #008000;">健康檢查位址</span> };
</span><span style="color: #0000ff;">var</span> registration = <span style="color: #0000ff;">new</span><span style="color: #000000;"> AgentServiceRegistration()
        {
            Checks </span>= <span style="color: #0000ff;">new</span><span style="color: #000000;">[] { httpCheck },
            Address </span>=<span style="color: #000000;"> serviceRegisterOptions.Value.ServiceHost,
            ID </span>=<span style="color: #000000;"> serviceId,
            Name </span>=<span style="color: #000000;"> serviceRegisterOptions.Value.ServiceName,
            Port </span>=<span style="color: #000000;"> serviceRegisterOptions.Value.ServicePort
            </span><span style="color: #008000;">//</span><span style="color: #008000;">Tags = new[] { $"urlprefix-/{serviceRegisterOptions.Value.ServiceName}" }</span><span style="color: #008000;">//</span><span style="color: #008000;">添加 urlprefix-/servicename 格式的 tag 标簽,以便 Fabio 識别</span>
</span><span style="color: #008000;">//</span><span style="color: #008000;">.GetAwaiter().GetResult()</span> consul.Agent.ServiceRegister(registration).GetAwaiter().GetResult();
appLife.ApplicationStopping.Register(() </span>=><span style="color: #000000;">
{
consul.Agent.ServiceDeregister(serviceId).GetAwaiter().GetResult();</span><span style="color: #008000;">//</span><span style="color: #008000;">服務停止時取消注冊</span> });
}
    </span><span style="color: #0000ff;">#endregion</span></pre>
自此,可以把我們的項目部署到163伺服器上面的docker上啦。
我們看一下效果,成功注冊到了
參考資料:
Conusl TLS配置:
consul 參數配置:
https://blog.csdn.net/zl1zl2zl3/article/details/79622476consul服務治理:
http://michaco.net/blog/ServiceDiscoveryAndHealthChecksInAspNetCoreWithConsul
https://www.cnblogs.com/myzony/p/9168851.html
https://www.cnblogs.com/edisonchou/p/9124985.html
文章轉載自阿裡雲 MVP郭聯钰,
檢視原文