一、概述和原理
Netty 的單元測試,主要是對業務邏輯的 ChannelHandler 做測試(畢竟對 Bootstrap、EventLoop 這些做測試着實沒有多大意義),模拟一次入站資料或者出站資料,檢視資料流經 ChannelHandler 變成什麼樣了,以此達到測試的目的。
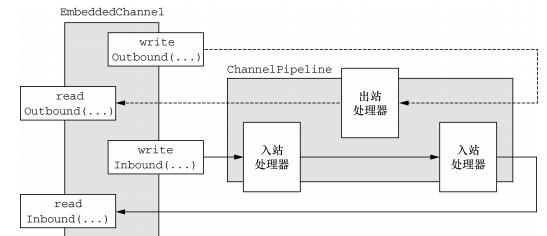
Netty 的單元測試将Junit4作為測試架構,将 EmbeddedChannel 作為測試通道。基本原理就是:将入站資料或者出站資料寫入 EmbeddedChannel 中,然後檢查是否有任何東西到達了 ChannelPipeline 的尾端。以這種方式,你便可以知道消息是否流經了 ChannelHandler 以及是否觸發了任何 ChannelHandler 的動作,如下圖:
EmbeddedChannel 提供了如下方法進行單元測試:
writeInbound(Object... msgs): 将入站消息寫到 EmbeddedChannel 中。如果可以通過 readInbound()方法從 EmbeddedChannel 中讀取資料,則傳回 true。
readInbound() :從 EmbeddedChannel 中讀取一個入站消息。任何傳回的東西都穿越了整個 ChannelPipeline。如果沒有任何可供讀取的, 則傳回 null。
writeOutbound(Object... msgs): 将出站消息寫到EmbeddedChannel中。如果現在可以通過readOutbound()方法從 EmbeddedChannel 中讀取到什麼東西,則傳回 true。
readOutbound(): 從 EmbeddedChannel 中讀取一個出站消息。任何傳回的東西都穿越了整個 ChannelPipeline。如果沒有任何可供讀取的,則傳回 null。
finish() :将 EmbeddedChannel 标記為完成,并且如果有可被讀取的入站資料或者出站資料,則傳回 true。這個方法還将會調用 EmbeddedChannel 上的close()方法。
二、測試入站資料
1、将我們要測試的 ChannelHandler 寫入 EmbeddedChannel 進行測試。
2、writeInbound(Object... msgs) 将資料寫入EmbeddedChannel(模拟接收資料)。
3、ChannelHandler 處理後如果有傳回資料,可以通過readInbound() 驗證資料結果。如果沒有傳回資料,可以在 ChannelHandler 業務邏輯中,列印日志,以達到測試目的。
public class DecoderTest {


    //1、利用Junit執行單元測試
    @Test
    public void decoderTest() throws IllegalAccessException {
        ByteBuf buf = Unpooled.buffer();
        for (int i = 0; i < 9; i++) {
            buf.writeByte(i);
        }
        ByteBuf buf1 = buf.duplicate();
        //2、建立EmbeddedChannel,并添加一個Decoder(我們的要測試 ChannelHandler) 其将以3位元組幀長度被測試
        EmbeddedChannel embeddedChannel = new EmbeddedChannel(new Decoder(3));
        //3、将資料寫入 EmbeddedChannel
        boolean writeInbound = embeddedChannel.writeInbound(buf1.retain());
        assertTrue(writeInbound);
        //4、标記 Channel 為已完成狀态
        boolean finish = embeddedChannel.finish();
        assertTrue(finish);

        //5、讀取資料
        ByteBuf readInbound =  embeddedChannel.readInbound();
        ByteBuf readSlice = buf.readSlice(3);
        assertEquals(readInbound, readSlice);
        readInbound.release();

        readInbound =  embeddedChannel.readInbound();
        readSlice = buf.readSlice(3);
        assertEquals(readInbound, readSlice);
        readInbound.release();

        readInbound =  embeddedChannel.readInbound();
        readSlice = buf.readSlice(3);
        assertEquals(readInbound, readSlice);
        readInbound.release();

        //是否讀取完資料了
        assertNull(embeddedChannel.readInbound());
        //釋放資源
        buf.release();

    }
}
三、測試出站資料
2、writeOutbound(Object... msgs) 将資料寫入EmbeddedChannel(模拟發送資料)。
3、ChannelHandler 處理後如果有傳回資料,可以通過readOutbound() 驗證資料結果。如果沒有傳回資料,可以在 ChannelHandler 業務邏輯中,列印日志,以達到測試目的。
public class EncoderTest {

    @Test
    public void encoderTest(){
        ByteBuf buf = Unpooled.buffer();
        for (int i =1; i < 10; i++){
            buf.writeInt(i * -1);
        }
        //1、建立一個EmbeddedChannel 并安裝要測試的Encoder
        EmbeddedChannel embeddedChannel = new EmbeddedChannel(new Encoder());
        //2、寫入資料
        assertTrue(embeddedChannel.writeOutbound(buf));
        assertTrue(embeddedChannel.finish());
        //3、讀取資料
        for (int i = 1; i < 10; i++){
            Object o = embeddedChannel.readOutbound();
            System.out.println(o);
        }
        assertNull(embeddedChannel.readOutbound());
    }
}
四、結語
截止到這篇文章,Netty 的基礎部分差不多就結束了。不幸的是,公司安排我去研究下 Docker 技術,想在我們項目中使用起來。是以 Netty 的學習就不得不告一段落了~~才翻完《Netty 實戰》一半的内容,後面還有編解碼器、網絡協定、案例研究三個部分,隻能先欠下了~
參考資料:《Netty IN ACTION》
示範源代碼:https://github.com/JMCuixy/NettyDemo/tree/master/src/main/java/org/netty/demo/unit