作者:楚骧
研究HTTPS的雙向認證實作與原理,踩了不少坑,終于整個流程都跑通了,現在總結出一篇文檔來,把一些心得,特别是容易踩坑的地方記錄下來。
1.原理
雙向認證,顧名思義,用戶端和伺服器端都需要驗證對方的身份,在建立Https連接配接的過程中,握手的流程比單向認證多了幾步。單向認證的過程,用戶端從伺服器端下載下傳伺服器端公鑰證書進行驗證,然後建立安全通信通道。雙向通信流程,用戶端除了需要從伺服器端下載下傳伺服器的公鑰證書進行驗證外,還需要把用戶端的公鑰證書上傳到伺服器端給伺服器端進行驗證,等雙方都認證通過了,才開始建立安全通信通道進行資料傳輸。
1.1 單向認證流程
單向認證流程中,伺服器端儲存着公鑰證書和私鑰兩個檔案,整個握手過程如下:
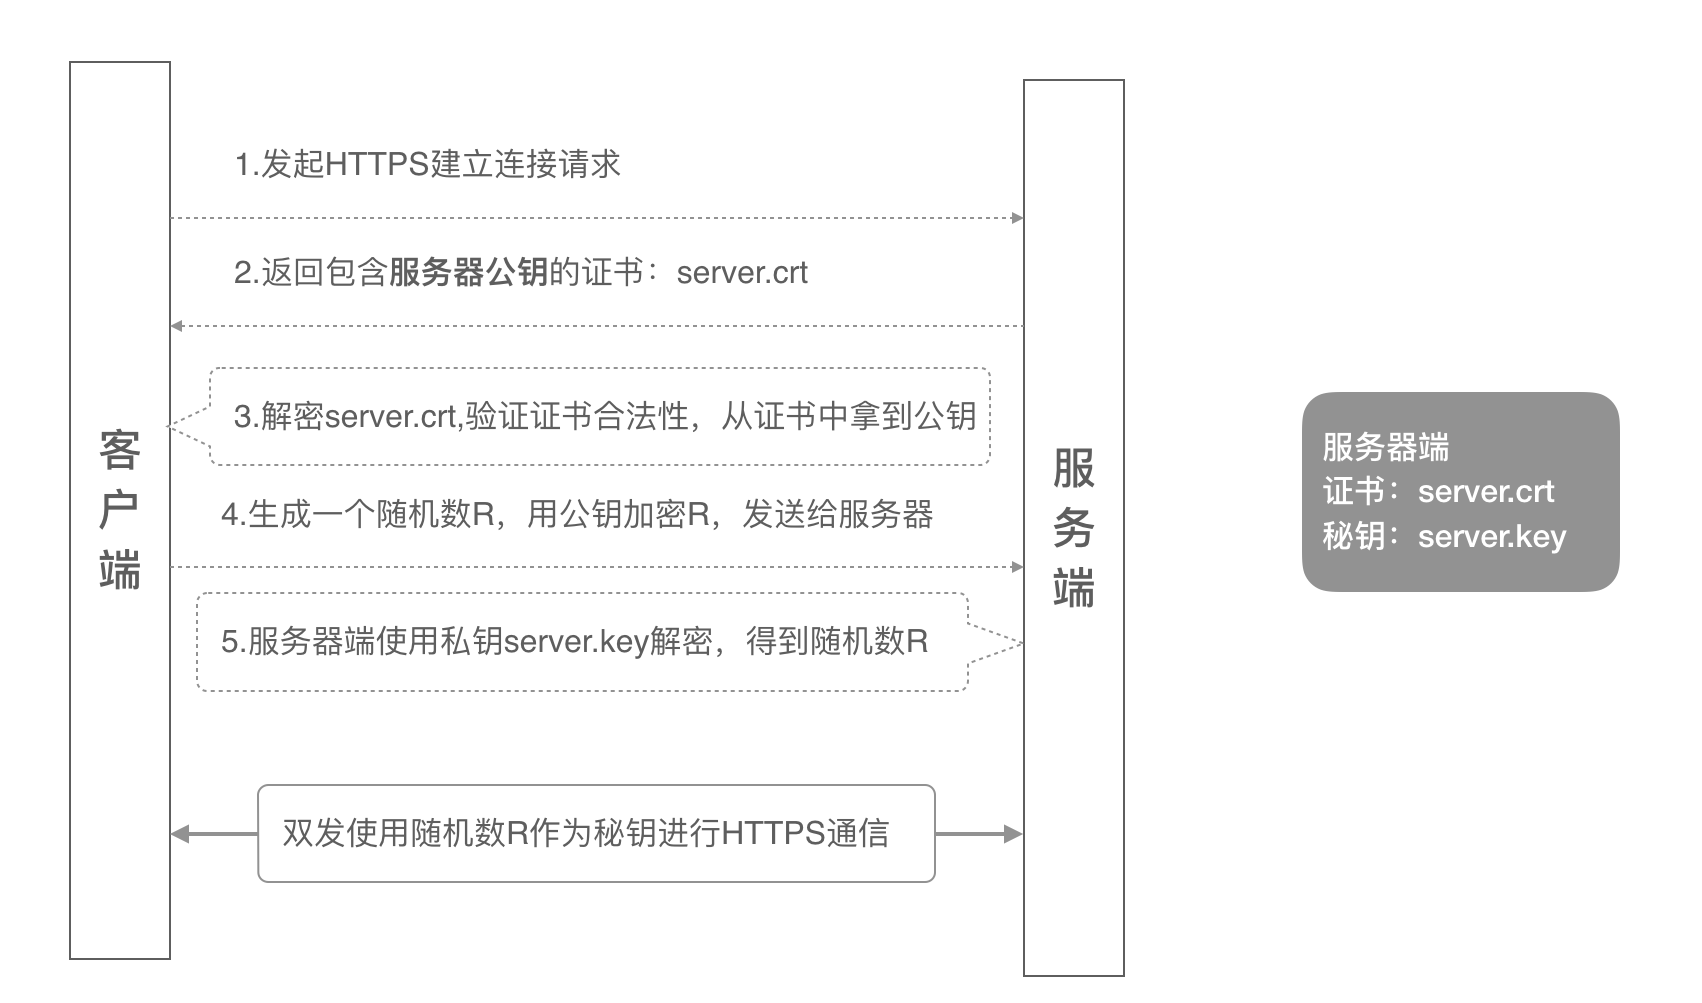
- 用戶端發起建立HTTPS連接配接請求,将SSL協定版本的資訊發送給伺服器端;
- 伺服器端将本機的公鑰證書(server.crt)發送給用戶端;
- 用戶端讀取公鑰證書(server.crt),取出了服務端公鑰;
- 用戶端生成一個随機數(密鑰R),用剛才得到的伺服器公鑰去加密這個随機數形成密文,發送給服務端;
- 服務端用自己的私鑰(server.key)去解密這個密文,得到了密鑰R
- 服務端和用戶端在後續通訊過程中就使用這個密鑰R進行通信了。
1.2 雙向認證流程

- 用戶端發起建立HTTPS連接配接請求,将SSL協定版本的資訊發送給服務端;
- 伺服器端将本機的公鑰證書(server.crt)發送給用戶端;
- 用戶端将用戶端公鑰證書(client.crt)發送給伺服器端;
- 伺服器端解密用戶端公鑰證書,拿到用戶端公鑰;
- 用戶端發送自己支援的加密方案給伺服器端;
- 伺服器端根據自己和用戶端的能力,選擇一個雙方都能接受的加密方案,使用用戶端的公鑰加密後發送給用戶端;
- 用戶端使用自己的私鑰解密加密方案,生成一個随機數R,使用伺服器公鑰加密後傳給伺服器端;
- 服務端用自己的私鑰去解密這個密文,得到了密鑰R
2. 證書生成
從上一章内容中,我們可以總結出來,如果要把整個雙向認證的流程跑通,最終需要五個證書檔案:
- 伺服器端公鑰證書:server.crt
- 伺服器端私鑰檔案:server.key
- 用戶端公鑰證書:client.crt
- 用戶端私鑰檔案:client.key
- 用戶端內建證書(包括公鑰和私鑰,用于浏覽器通路場景):client.p12
生成這一些列證書之前,我們需要先生成一個CA根證書,然後由這個CA根證書頒發伺服器公鑰證書和用戶端公鑰證書。
我們可以全程使用openssl來生成一些列的自簽名證書,自簽名證書沒有聽過證書機構的認證,很多浏覽器會認為不安全,但我們用來實驗是足夠的。需要在本機安裝了openssl後才能繼續本章的實驗。
2.1生成自簽名根證書
(1)建立根證書私鑰:
openssl genrsa -out root.key 1024

(2)建立根證書請求檔案:
openssl req -new -out root.csr -key root.key
後續參數請自行填寫,下面是一個例子:
Country Name (2 letter code) [XX]:cn
State or Province Name (full name) []:bj
Locality Name (eg, city) [Default City]:bj
Organization Name (eg, company) [Default Company Ltd]:alibaba
Organizational Unit Name (eg, section) []:test
Common Name (eg, your name or your servers hostname) []:www.yourdomain.com
Email Address []:a.alibaba.com
A challenge password []:
An optional company name []:

(3)建立根證書:
openssl x509 -req -in root.csr -out root.crt -signkey root.key -CAcreateserial -days 3650
在建立證書請求檔案的時候需要注意三點,下面生成伺服器請求檔案和用戶端請求檔案均要注意這三點:
- Common Name填寫證書對應的服務域名;
- 所有字段的填寫,根證書、伺服器端證書、用戶端證書需保持一緻
- 最後的密碼可以直接回車跳過。
經過上面三個指令行,我們最終可以得到一個簽名有效期為10年的根證書root.crt,後面我們可以用這個根證書去頒發伺服器證書和用戶端證書。
2.2 生成自簽名伺服器端證書
(1)生成伺服器端證書私鑰:
openssl genrsa -out server.key 1024

(2) 生成伺服器證書請求檔案,過程和注意事項參考根證書,本節不詳述:
openssl req -new -out server.csr -key server.key

(3) 生成伺服器端公鑰證書
openssl x509 -req -in server.csr -out server.crt -signkey server.key -CA root.crt -CAkey root.key -CAcreateserial -days 3650
經過上面的三個指令,我們得到:
- server.key:伺服器端的秘鑰檔案
- server.crt:有效期十年的伺服器端公鑰證書,使用根證書和伺服器端私鑰檔案一起生成
2.3 生成自簽名用戶端證書
(1)生成用戶端證書秘鑰:
openssl genrsa -out client.key 1024

(2) 生成用戶端證書請求檔案,過程和注意事項參考根證書,本節不詳述:
openssl req -new -out client.csr -key client.key

(3) 生用戶端證書
openssl x509 -req -in client.csr -out client.crt -signkey client.key -CA root.crt -CAkey root.key -CAcreateserial -days 3650

(3) 生用戶端p12格式證書
openssl pkcs12 -export -clcerts -in client.crt -inkey client.key -out client.p12 - client.key:用戶端的私鑰檔案
- client.crt:有效期十年的用戶端證書,使用根證書和用戶端私鑰一起生成
- client.p12:用戶端p12格式,這個證書檔案包含用戶端的公鑰和私鑰,主要用來給浏覽器通路使用
3.Nginx配置
有了上面的一些列證書,我們可以在Nginx伺服器上配置雙向認證的HTTPS服務了,具體配置方式如下:
server {
        listen       443 ssl;
        server_name  www.yourdomain.com;
        ssl                  on;
        ssl_certificate      /data/sslKey/server.crt;  #server公鑰證書
        ssl_certificate_key  /data/sslKey/server.key;  #server私鑰
        ssl_client_certificate /data/sslKey/client.crt;  #用戶端公鑰證書
        ssl_verify_client on;  #開啟用戶端證書驗證

        location / {
            root   html;
            index  index.html index.htm;
        }
    }
具體就是将伺服器端的兩個證書檔案(server.crt/server.key)和用戶端的公鑰證書檔案(client.crt)的路徑配置到nginx的server節點配置中,并且把ssl_verify_client這個參數設定為on。
有一點需要注意的就是,如果用戶端證書不是由根證書直接頒發的,配置中還需要加一個配置:ssl_verify_depth 1;
配置完成後,執行nginx -s reload重新加載下就生效了。
4.curl調用
使用curl加上證書路徑,可以直接測試Nginx的HTTPS雙向認證是否配置成功。
- 帶證書的成功調用:
#--cert指定用戶端公鑰證書的路徑
#--key指定用戶端私鑰檔案的路徑
#-k不校驗證書的合法性,因為我們用的是自簽名證書,是以需要加這個參數
#可以使用-v來觀察具體的SSL握手過程
curl --cert ./client.crt --key ./client.key https://integration-fred2.fredhuang.com -k -v
* Rebuilt URL to: https://integration-fred2.fredhuang.com/
*   Trying 47.91.39.145...
* TCP_NODELAY set
* Connected to integration-fred2.fredhuang.com (47.91.39.145) port 443 (#0)
* ALPN, offering h2
* ALPN, offering http/1.1
* Cipher selection: ALL:!EXPORT:!EXPORT40:!EXPORT56:!aNULL:!LOW:!RC4:@STRENGTH
* successfully set certificate verify locations:
*   CAfile: /etc/ssl/cert.pem
  CApath: none
* TLSv1.2 (OUT), TLS handshake, Client hello (1):
* TLSv1.2 (IN), TLS handshake, Server hello (2):
* TLSv1.2 (IN), TLS handshake, Certificate (11):
* TLSv1.2 (IN), TLS handshake, Server key exchange (12):
* TLSv1.2 (IN), TLS handshake, Request CERT (13):
* TLSv1.2 (IN), TLS handshake, Server finished (14):
* TLSv1.2 (OUT), TLS handshake, Certificate (11):
* TLSv1.2 (OUT), TLS handshake, Client key exchange (16):
* TLSv1.2 (OUT), TLS handshake, CERT verify (15):
* TLSv1.2 (OUT), TLS change cipher, Client hello (1):
* TLSv1.2 (OUT), TLS handshake, Finished (20):
* TLSv1.2 (IN), TLS change cipher, Client hello (1):
* TLSv1.2 (IN), TLS handshake, Finished (20):
* SSL connection using TLSv1.2 / ECDHE-RSA-AES128-GCM-SHA256
* ALPN, server accepted to use h2
* Server certificate:
*  subject: C=CN; ST=BeiJing; L=BeiJing; O=Alibaba; OU=Test; CN=integration-fred2.fredhuang.com; [email protected]
*  start date: Oct 30 06:43:19 2019 GMT
*  expire date: Oct 27 06:43:19 2029 GMT
*  issuer: C=CN; ST=BeiJing; L=BeiJing; O=Alibaba; OU=Test; CN=integration-fred2.fredhuang.com; [email protected]
*  SSL certificate verify result: self signed certificate (18), continuing anyway.
* Using HTTP2, server supports multi-use
* Connection state changed (HTTP/2 confirmed)
* Copying HTTP/2 data in stream buffer to connection buffer after upgrade: len=0
* Using Stream ID: 1 (easy handle 0x7f8ae1809a00)
> GET / HTTP/2
> Host: integration-fred2.fredhuang.com
> User-Agent: curl/7.54.0
> Accept: */*
>
* Connection state changed (MAX_CONCURRENT_STREAMS updated)!
< HTTP/2 200
< server: Tengine
< date: Fri, 01 Nov 2019 11:16:39 GMT
< content-type: text/plain;charset=UTF-8
< content-length: 0 - 不帶證書的失敗調用:
curl  https://integration-fred2.fredhuang.com -k -v
* Rebuilt URL to: https://integration-fred2.fredhuang.com/
*   Trying 47.91.39.145...
* TCP_NODELAY set
* Connected to integration-fred2.fredhuang.com (47.91.39.145) port 443 (#0)
* ALPN, offering h2
* ALPN, offering http/1.1
* Cipher selection: ALL:!EXPORT:!EXPORT40:!EXPORT56:!aNULL:!LOW:!RC4:@STRENGTH
* successfully set certificate verify locations:
*   CAfile: /etc/ssl/cert.pem
  CApath: none
* TLSv1.2 (OUT), TLS handshake, Client hello (1):
* TLSv1.2 (IN), TLS handshake, Server hello (2):
* TLSv1.2 (IN), TLS handshake, Certificate (11):
* TLSv1.2 (IN), TLS handshake, Server key exchange (12):
* TLSv1.2 (IN), TLS handshake, Request CERT (13):
* TLSv1.2 (IN), TLS handshake, Server finished (14):
* TLSv1.2 (OUT), TLS handshake, Certificate (11):
* TLSv1.2 (OUT), TLS handshake, Client key exchange (16):
* TLSv1.2 (OUT), TLS change cipher, Client hello (1):
* TLSv1.2 (OUT), TLS handshake, Finished (20):
* TLSv1.2 (IN), TLS change cipher, Client hello (1):
* TLSv1.2 (IN), TLS handshake, Finished (20):
* SSL connection using TLSv1.2 / ECDHE-RSA-AES128-GCM-SHA256
* ALPN, server accepted to use h2
* Server certificate:
*  subject: C=CN; ST=BeiJing; L=BeiJing; O=Alibaba; OU=Test; CN=integration-fred2.fredhuang.com; [email protected]
*  start date: Oct 30 06:43:19 2019 GMT
*  expire date: Oct 27 06:43:19 2029 GMT
*  issuer: C=CN; ST=BeiJing; L=BeiJing; O=Alibaba; OU=Test; CN=integration-fred2.fredhuang.com; [email protected]
*  SSL certificate verify result: self signed certificate (18), continuing anyway.
* Using HTTP2, server supports multi-use
* Connection state changed (HTTP/2 confirmed)
* Copying HTTP/2 data in stream buffer to connection buffer after upgrade: len=0
* Using Stream ID: 1 (easy handle 0x7fcc52805e00)
> GET / HTTP/2
> Host: integration-fred2.fredhuang.com
> User-Agent: curl/7.54.0
> Accept: */*
>
* Connection state changed (MAX_CONCURRENT_STREAMS updated)!
< HTTP/2 400
< server: Tengine
< date: Fri, 01 Nov 2019 11:25:28 GMT
< content-type: text/html
< content-length: 685
<
<!DOCTYPE HTML PUBLIC "-//IETF//DTD HTML 2.0//EN">
<html>
<head><title>400 No required SSL certificate was sent</title></head>
<body>
<center><h1>400 Bad Request</h1></center>
<center>No required SSL certificate was sent</center>
 Sorry for the inconvenience.<br/>
Please report this message and include the following information to us.<br/>
Thank you very much!</p>
<table>
<tr>
<td>URL:</td>
<td>https://integration-fred2.fredhuang.com:444/</td>
</tr>
<tr>
<td>Server:</td>
<td>cag-access-tengine011192099198.au49</td>
</tr>
<tr>
<td>Date:</td>
<td>2019/11/01 19:25:28</td>
</tr>
</table>
<hr/>Powered by Tengine<hr><center>tengine</center>
</body>
</html>
5.Java調用
由于使用的是自簽名證書,使用ApacheHttpClient去調用的話,需要将伺服器證書加入可信任證書庫中,才能成功調用,也可以在代碼中簡單忽略證書。
cd $JAVA_HOME
sudo ./bin/keytool -import -alias ttt -keystore cacerts -file /Users/fred/temp/cert5/server.crt
将伺服器端公鑰證書設定為可信證書後,使用以下代碼可以直接發起帶用戶端證書的HTTPS請求:
import org.apache.http.HttpEntity;
import org.apache.http.client.methods.CloseableHttpResponse;
import org.apache.http.client.methods.HttpGet;
import org.apache.http.conn.ssl.SSLConnectionSocketFactory;
import org.apache.http.impl.client.CloseableHttpClient;
import org.apache.http.impl.client.HttpClients;
import org.apache.http.ssl.SSLContexts;
import org.apache.http.util.EntityUtils;

import javax.net.ssl.SSLContext;
import java.io.File;
import java.io.FileInputStream;
import java.io.InputStream;
import java.security.KeyStore;

public class HttpClientWithClientCert {

    private final static String PFX_PATH = "/Users/fred/temp/cert5/client.p12";    //用戶端證書路徑
    private final static String PFX_PWD = "123456";    //用戶端證書密碼

    public static String sslRequestGet(String url) throws Exception {
        KeyStore keyStore = KeyStore.getInstance("PKCS12");
        InputStream instream = new FileInputStream(new File(PFX_PATH));
        try {
            keyStore.load(instream, PFX_PWD.toCharArray());
        } finally {
            instream.close();
        }
        SSLContext sslcontext = SSLContexts.custom().loadKeyMaterial(keyStore, PFX_PWD.toCharArray()).build();
        SSLConnectionSocketFactory sslsf = new SSLConnectionSocketFactory(sslcontext
                , new String[] { "TLSv1" }    // supportedProtocols ,這裡可以按需要設定
                , null    // supportedCipherSuites
                , SSLConnectionSocketFactory.getDefaultHostnameVerifier());

        CloseableHttpClient httpclient = HttpClients.custom().setSSLSocketFactory(sslsf).build();
        try {
            HttpGet httpget = new HttpGet(url);
            //httpget.addHeader("host", "integration-fred2.fredhuang.com");// 設定一些heander等
            CloseableHttpResponse response = httpclient.execute(httpget);
            try {
                HttpEntity entity = response.getEntity();
                String jsonStr = EntityUtils.toString(response.getEntity(), "UTF-8");//傳回結果
                EntityUtils.consume(entity);
                return jsonStr;
            } finally {
                response.close();
            }
        } finally {
            httpclient.close();
        }
    }

    public static void main(String[] args) throws Exception {
        System.out.println(System.getProperty("java.home"));
        System.out.println(sslRequestGet("https://integration-fred2.fredhuang.com/test"));
    }

}
6. 存疑
網上很多文章都描述到Nginx配置中的用戶端證書(ssl_client_certificate)可以配置根證書root.crt,然後就可以适配所有這個根證書辦法的用戶端公鑰證書了。我試了,使用root.crt作為ssl_client_certificate的值,然後使用client.crt來通路,發現不行,nginx會報這個錯誤:
<html>
<head><title>400 The SSL certificate error</title></head>
<body>
<center><h1>400 Bad Request</h1></center>
<center>The SSL certificate error</center>
<hr><center>nginx/1.17.5</center>
</body>
</html> 這個特性一直沒有配置成功,有可能是我配置有問題,也有可能是網上文章不靠譜,寫錯了。如果是我配置有問題,麻煩看到本文的同學聯系我一起探讨下:[email protected]
7.廣告
API網關産品近期雙向認證功能将上線,敬請期待。