Bitmap Index Scan
資料庫裡面的表的掃描方式主要是以下幾種方式:sequential scans, index scans, and bitmap index scans,當然還有index only scan,這種算是index scans中比較特殊的一種,需要的資訊在索引中都能找到,掃描索引即可,不需要去掃描表。
這篇文章主要談談Bitmap Index Scan的原理及适用的場景。
定義
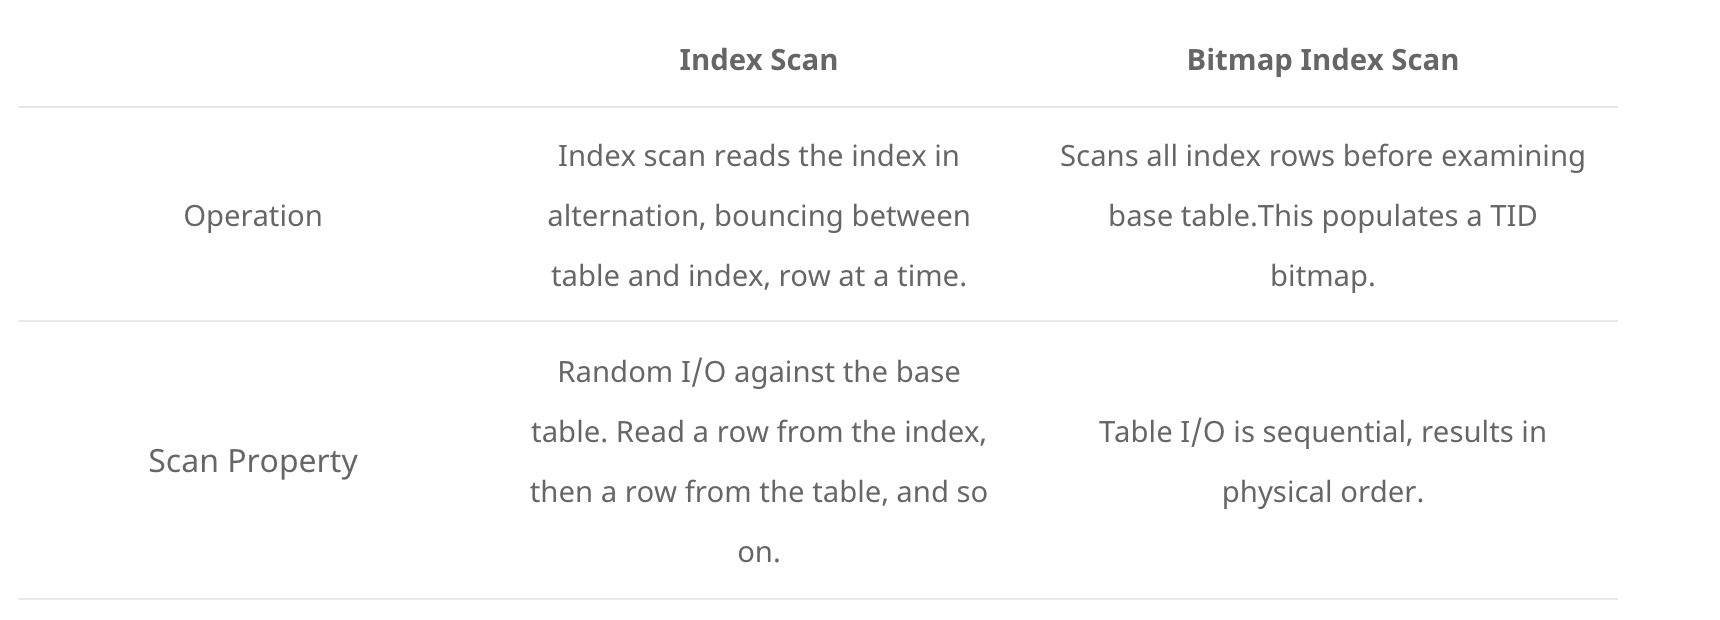
A plain indexscan fetches one tuple-pointer at a time from the index,and immediately visits that tuple in the table. A bitmap scan fetches all the tuple-pointers from the index in one go, sorts them using an in-memory "bitmap" data structure, and then visits the table tuples in physical tuple-location order. The bitmap scan improves locality of reference to the table at the cost of more bookkeeping overhead to manage the "bitmap" data structure --- and at the cost that the data is no longer retrieved in index order, which doesn't matter for your query but would matter if you said ORDER BY.
A bitmapped index scan works in two stages. First the index or indexes are scanned to create a bitmap representing matching tuple.
這段解釋是tom lane在postgres郵件組中的回答,我覺得是比較權威而且通俗易懂的解釋。
核心是傳統的index scan每次從索引中去取一個tuple的指針,然後立馬去表中取資料,每一次會造成一次随機io。如果資料量較多的情況下,會比較低效。而bitmap scan一次性将符合條件的tuple-pointers全部取出來,然後在記憶體中進行位址排序,然後去取出資料,這時的讀取資料由于進行的位址排序,讀取時就變成了順序的讀。其實就是一個随機讀轉化為順序讀取的過程,但是取出的資料由于進行了位址的排序,就沒有順序。同時,對于limit這種sql,bitmap index scan這種就不适合,因為它一次會取出所有資料。
和傳統索引掃描對比:
在讀取資料量比較小時,index scan比較合适,在讀取資料量比較大的情況下,bitmap index scan會更有優勢。
下面通過實驗驗證
建立測試表
建立測試表
CREATE TABLE sampletable (x numeric);

插入資料
INSERT INTO sampletable SELECT random() * 10000 FROM generate_series(1, 10000000);
全表掃描
postgres=# explain (analyze,buffers) select * from sampletable where x = 12;
                                                           QUERY PLAN
--------------------------------------------------------------------------------------------------------------------------------
 Seq Scan on sampletable  (cost=10000000000.00..10000179055.00 rows=1 width=11) (actual time=1144.790..1144.790 rows=0 loops=1)
   Filter: (x = '12'::numeric)
   Rows Removed by Filter: 10000000
   Buffers: shared hit=54055
 Planning time: 0.190 ms
 Execution time: 1144.811 ms
(6 rows)
從執行計劃看到整體的讀取page的數量(一般在磁盤中我們叫block,如果資料已經加載至記憶體我們叫page)是54055。有沒有同學會質疑以下這個大小是不是真正的表大小?
我們檢視pg_class表:
postgres=# SELECT relpages, reltuples FROM pg_class WHERE relname = 'sampletable';
 relpages | reltuples
----------+-----------
    54055 |     1e+07
postgres=# select pg_relation_size('sampletable')/8/1024;
?column?
----------
54055
(1 row) 上面兩種方法都可以計算中實際表的大小。
添加索引
建立索引:
CREATE INDEX  ON sampletable(x);
再來運作語句
postgres=# explain (analyze,buffers) select * from sampletable where x = 12;
                                                             QUERY PLAN
-------------------------------------------------------------------------------------------------------------------------------------
 Index Only Scan using sampletable_x_idx on sampletable  (cost=0.43..8.45 rows=1 width=11) (actual time=0.034..0.034 rows=0 loops=1)
   Index Cond: (x = '12'::numeric)
   Heap Fetches: 0
   Buffers: shared read=3
 Planning time: 0.220 ms
 Execution time: 0.054 ms
由于取的資料比較少,是以不會使用bitmap index scan,這時我們讀取一個範圍内的資料:
postgres=# explain (analyze,buffers) select * from sampletable where x >0 and x <100;
                                                              QUERY PLAN
---------------------------------------------------------------------------------------------------------------------------------------
 Bitmap Heap Scan on sampletable  (cost=2536.93..59167.58 rows=98780 width=11) (actual time=26.456..100.278 rows=99979 loops=1)
   Recheck Cond: ((x > '0'::numeric) AND (x < '100'::numeric))
   Heap Blocks: exact=45642
   Buffers: shared hit=46028
   ->  Bitmap Index Scan on sampletable_x_idx  (cost=0.00..2512.24 rows=98780 width=0) (actual time=19.426..19.426 rows=99979 loops=1)
         Index Cond: ((x > '0'::numeric) AND (x < '100'::numeric))
         Buffers: shared hit=386
 Planning time: 0.172 ms
 Execution time: 105.153 ms
如果我們希望走傳統index scan,有兩種方法,一種是修改enable_bitmapscan(預設是on),還有一種是修改random_page_cost,後面一種修改随機掃描的cost方法其實就是利用我們前面所講的原理,讓執行計劃認為随機掃描的代價很低,雖然實際中并不是這樣。
這裡我們采用第一種方法:
postgres=# explain (analyze,buffers) select * from sampletable where x >0 and x <100;
                                                                    QUERY PLAN
---------------------------------------------------------------------------------------------------------------------------------------------------
 Index Only Scan using sampletable_x_idx on sampletable  (cost=0.43..209968.64 rows=98780 width=11) (actual time=0.033..91.571 rows=99979 loops=1)
   Index Cond: ((x > '0'::numeric) AND (x < '100'::numeric))
   Heap Fetches: 99979
   Buffers: shared hit=100364
 Planning time: 0.095 ms
 Execution time: 96.648 ms
可以看到,兩種掃描方式時間其實差不多。我們繼續擴大掃描的範圍看看效果:
postgres=# explain (analyze,buffers) select * from sampletable where x >0 and x <2000;
                                                                       QUERY PLAN
---------------------------------------------------------------------------------------------------------------------------------------------------------
 Index Only Scan using sampletable_x_idx on sampletable  (cost=0.43..287155.15 rows=2003705 width=11) (actual time=0.033..1681.522 rows=2000273 loops=1)
   Index Cond: ((x > '0'::numeric) AND (x < '2000'::numeric))
   Heap Fetches: 2000273
   Buffers: shared hit=2007910
 Planning time: 0.105 ms
 Execution time: 1782.037 ms
(6 rows)
postgres=# set enable_bitmapscan = on;
SET postgres=# explain (analyze,buffers) select * from sampletable where x >0 and x <2000;
QUERY PLAN
----------------------------------------------------------------------------------------------------------------------------------------------
Bitmap Heap Scan on sampletable (cost=51402.41..135512.99 rows=2003705 width=11) (actual time=247.258..589.842 rows=2000273 loops=1)
Recheck Cond: ((x > '0'::numeric) AND (x < '2000'::numeric))
Heap Blocks: exact=54055
Buffers: shared hit=61721
-> Bitmap Index Scan on sampletable_x_idx (cost=0.00..50901.49 rows=2003705 width=0) (actual time=238.489..238.489 rows=2000273 loops=1)
Index Cond: ((x > '0'::numeric) AND (x < '2000'::numeric))
Buffers: shared hit=7666
Planning time: 0.109 ms
Execution time: 677.900 ms 可以看到,當範圍擴大0~2000時,bitmap index scan 明顯更優。
還有在and or 這種條件下,bitmap index scan 優勢也是很明顯
postgres=# explain (analyze,buffers) select * from sampletable where x >0 and x <2000 or x >9999;
                                                                     QUERY PLAN
----------------------------------------------------------------------------------------------------------------------------------------------------
 Bitmap Heap Scan on sampletable  (cost=51927.12..141063.23 rows=2004448 width=11) (actual time=257.583..611.480 rows=2001278 loops=1)
   Recheck Cond: (((x > '0'::numeric) AND (x < '2000'::numeric)) OR (x > '9999'::numeric))
   Heap Blocks: exact=54055
   Buffers: shared hit=61728
   ->  BitmapOr  (cost=51927.12..51927.12 rows=2004635 width=0) (actual time=248.819..248.819 rows=0 loops=1)
         Buffers: shared hit=7673
         ->  Bitmap Index Scan on sampletable_x_idx  (cost=0.00..50901.49 rows=2003705 width=0) (actual time=248.723..248.723 rows=2000273 loops=1)
               Index Cond: ((x > '0'::numeric) AND (x < '2000'::numeric))
               Buffers: shared hit=7666
         ->  Bitmap Index Scan on sampletable_x_idx  (cost=0.00..23.41 rows=930 width=0) (actual time=0.093..0.093 rows=1005 loops=1)
               Index Cond: (x > '9999'::numeric)
               Buffers: shared hit=7
 Planning time: 0.236 ms
 Execution time: 699.203 ms
(14 rows)
postgres=# set enable_bitmapscan = off;
SET postgres=# explain (analyze,buffers) select * from sampletable where x >0 and x <2000 or x >9999;
QUERY PLAN
---------------------------------------------------------------------------------------------------------------------------------------------------------
Index Only Scan using sampletable_x_idx on sampletable (cost=0.43..595241.76 rows=2004448 width=11) (actual time=0.016..8253.516 rows=2001278 loops=1)
Filter: (((x > '0'::numeric) AND (x < '2000'::numeric)) OR (x > '9999'::numeric))
Rows Removed by Filter: 7998722
Heap Fetches: 10000000
Buffers: shared hit=10038131
Planning time: 0.199 ms
Execution time: 8346.357 ms
(7 rows) 可以看到bitmap index scan比普通的index scan快了一個數量級,同時我們在執行計劃中有bitmapor,通過對兩個bitmap做或運算,篩選資料。
其他
不知道同學沒有沒有注意執行計劃中有一個recheck cond的過程,這個意思是在取出的資料比較多時,記憶體中就不會單獨存儲每行的指針,而是直接存儲對應的page的指針,這種就是有損的(lossy),是以做Bitmap Heap Scan時需要double check一下page中滿足條件的行。我們這裡的Heap Blocks都是exact,意思是無損的,精确的,其實并不需要recheck的過程,隻是這裡會顯示出來。如果我們遇到了Heap Blocks lossy的情況,可以适當提高work_mem.
![主流浏覽器四大綜合性能測試[圖]](data:image/gif;base64,R0lGODlhAQABAIAAAP///wAAACwAAAAAAQABAAACAkQBADs=)