最近公司的一個項目因為是WPF的,而自己已經很長一段時間沒有接觸過WPF了,再加上之前沒有做過wpf的動畫效果,是以在學習的過程中也順便記錄一下,說不定以後還會用上,同時也算是總結一下吧!剛開始寫部落格,寫得不好的地方大家多多見諒!不喜勿噴!
這個效果主要是通過各種圖形的組合進行繪圖,然後通過貝塞爾曲線繪制主要的動畫圖形,進而實作幀動畫!
先上效果圖:
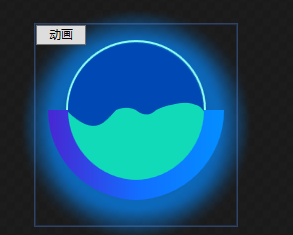

動态圖效果不好,是以也放了一張靜态圖檔。
首先是繪制圖形部分,圖形主要是五部分組成:背景的虛化效果、圓弧(由兩部分組成,分别設定漸變色)、圓形邊框、圓形内部顔色以及動畫部分,代碼如下:
<Viewbox>
        <DockPanel>
            <Grid>
                <ed:Arc x:Name="shadowArc" StartAngle="0" EndAngle="360" Height="200" Width="200" ArcThickness="40" Opacity="0.7">
                    <ed:Arc.Fill>
                        <SolidColorBrush x:Name="shadowColor" Color="#0689FF"></SolidColorBrush>
                    </ed:Arc.Fill>
                    <ed:Arc.Effect>
                        <BlurEffect Radius="15" KernelType="Box"  RenderingBias="Quality"/>
                    </ed:Arc.Effect>
                </ed:Arc>
                <ed:Arc StartAngle="0" EndAngle="360" ArcThickness="2" Height="140" Width="140" Fill="#8BFCF4" Margin="0 0 0 30"></ed:Arc>
                <ed:Arc StartAngle="0" EndAngle="360" ArcThickness="122" Height="135" Width="135" Fill="#0048B4" Margin="0 0 0 30"></ed:Arc>
                <ed:Arc Height="140" Width="140" Margin="0 0 0 30" StartAngle="90" EndAngle="180"></ed:Arc>
                <Path Height="140" Width="140" Margin="0 0 0 30" Fill="#11DAB9">
                    <Path.Data>
                        <PathGeometry>
                            <PathFigure x:Name="pf_main" StartPoint="0,70">
                                <BezierSegment x:Name="bs_main0" Point1="30,100" Point2="40,80" Point3="50,70"></BezierSegment>
                                <BezierSegment x:Name="bs_main1" Point1="50,70" Point2="60,65" Point3="70,70"></BezierSegment>
                                <BezierSegment x:Name="bs_main2" Point1="70,70" Point2="80,80" Point3="90,70"></BezierSegment>
                                <BezierSegment x:Name="bs_main3" Point1="90,70" Point2="100,65" Point3="105,65"></BezierSegment>
                                <BezierSegment x:Name="bs_main4" Point1="105,65" Point2="120,60" Point3="130,65"></BezierSegment>
                                <BezierSegment x:Name="bs_main5" Point1="130,65" Point2="135,65" Point3="140,75"></BezierSegment>
                                <PolyLineSegment Points="140,120 70,150 0,120"></PolyLineSegment>
                            </PathFigure>
                        </PathGeometry>
                    </Path.Data>
                </Path>
                <ed:Arc StartAngle="90" EndAngle="180" Height="90" Width="90" ArcThickness="10" Margin="85 60 0 0">
                    <ed:Arc.Fill>
                        <LinearGradientBrush StartPoint="1,0" EndPoint="0,0">
                            <GradientStop Color="#038EFF" Offset="0"></GradientStop>
                            <GradientStop Color="#126DFF" Offset="1"></GradientStop>
                        </LinearGradientBrush>
                    </ed:Arc.Fill>
                </ed:Arc>
                <ed:Arc StartAngle="180" EndAngle="270" Height="90" Width="90" ArcThickness="10" Margin="-85 60 0 0">
                    <ed:Arc.Fill>
                        <LinearGradientBrush StartPoint="1,0" EndPoint="0,0">
                            <GradientStop Color="#126DFF" Offset="0"></GradientStop>
                            <GradientStop Color="#4826D2" Offset="1"></GradientStop>
                        </LinearGradientBrush>
                    </ed:Arc.Fill>
                </ed:Arc>
                <Button x:Name="button" Width="50" Height="20" VerticalAlignment="Top" HorizontalAlignment="Left">動畫</Button>
            </Grid>
        </DockPanel>
    </Viewbox>
随後設定内部動畫效果,設定的點位越多,動畫效果也好,這裡就由大家自己的琢磨了(幀動畫):
<UserControl.Resources>
        <ResourceDictionary>
            <Storyboard x:Key="stb">
                <PointAnimationUsingKeyFrames Storyboard.TargetName="bs_main0" Storyboard.TargetProperty="Point2" BeginTime="0:0:0.7" AutoReverse="True" RepeatBehavior="4x" FillBehavior="Stop">
                    <EasingPointKeyFrame Value="45,70" KeyTime="0:0:0.8"></EasingPointKeyFrame>
                </PointAnimationUsingKeyFrames>
                <PointAnimationUsingKeyFrames Storyboard.TargetName="bs_main2" Storyboard.TargetProperty="Point3" BeginTime="0:0:0.7" AutoReverse="True" RepeatBehavior="4x" FillBehavior="Stop">
                    <EasingPointKeyFrame Value="90,75" KeyTime="0:0:1.2"></EasingPointKeyFrame>
                </PointAnimationUsingKeyFrames>
                <PointAnimationUsingKeyFrames Storyboard.TargetName="bs_main3" Storyboard.TargetProperty="Point1" BeginTime="0:0:0.7" AutoReverse="True" RepeatBehavior="4x" FillBehavior="Stop">
                    <EasingPointKeyFrame Value="90,75" KeyTime="0:0:1.2"></EasingPointKeyFrame>
                </PointAnimationUsingKeyFrames>
                <PointAnimationUsingKeyFrames Storyboard.TargetName="bs_main3" Storyboard.TargetProperty="Point2" BeginTime="0:0:0.7" AutoReverse="True" RepeatBehavior="4x" FillBehavior="Stop">
                    <EasingPointKeyFrame Value="100,70" KeyTime="0:0:1.2"></EasingPointKeyFrame>
                </PointAnimationUsingKeyFrames>
                <PointAnimationUsingKeyFrames Storyboard.TargetName="bs_main3" Storyboard.TargetProperty="Point3" BeginTime="0:0:0.7" AutoReverse="True" RepeatBehavior="5x" FillBehavior="Stop">
                    <EasingPointKeyFrame Value="105,68" KeyTime="0:0:1.2"></EasingPointKeyFrame>
                </PointAnimationUsingKeyFrames>
                <PointAnimationUsingKeyFrames Storyboard.TargetName="bs_main4" Storyboard.TargetProperty="Point1" BeginTime="0:0:0.7" AutoReverse="True" RepeatBehavior="5x" FillBehavior="Stop">
                    <EasingPointKeyFrame Value="105,68" KeyTime="0:0:0.8"></EasingPointKeyFrame>
                </PointAnimationUsingKeyFrames>
                <PointAnimationUsingKeyFrames Storyboard.TargetName="bs_main4" Storyboard.TargetProperty="Point2" BeginTime="0:0:0.7" AutoReverse="True" RepeatBehavior="5x" FillBehavior="Stop">
                    <EasingPointKeyFrame Value="120,65" KeyTime="0:0:0.8"></EasingPointKeyFrame>
                </PointAnimationUsingKeyFrames>
            </Storyboard>
        </ResourceDictionary>
    </UserControl.Resources>
    <UserControl.Triggers>
        <EventTrigger RoutedEvent="FrameworkElement.Loaded">
            <BeginStoryboard Storyboard="{StaticResource stb}"></BeginStoryboard>
        </EventTrigger>
        <EventTrigger SourceName="button" RoutedEvent="Button.Click">
            <BeginStoryboard Storyboard="{StaticResource stb}"></BeginStoryboard>
        </EventTrigger>
    </UserControl.Triggers>
參考連結:https://www.cnblogs.com/tsliwei/p/5770546.html