Source和BindingContext
BindingContext屬性實際上是連結源和目标對象的兩種方法之一。 您也可以省去BindingContext并在綁定表達式本身中包含對源對象的引用。
BindingSourceCode項目的頁面類與OpacityBindingCode中的頁面類相同,隻是綁定是在兩個不涉及BindingContext屬性的語句中定義的:
public class BindingSourceCodePage : ContentPage
{
    public BindingSourceCodePage()
    {
        Label label = new Label
        {
            Text = "Opacity Binding Demo",
            FontSize = Device.GetNamedSize(NamedSize.Large, typeof(Label)),
            VerticalOptions = LayoutOptions.CenterAndExpand,
            HorizontalOptions = LayoutOptions.Center
        };
        Slider slider = new Slider
        {
            VerticalOptions = LayoutOptions.CenterAndExpand
        };
        // Define Binding object with source object and property.
        Binding binding = new Binding
        {
            Source = slider,
            Path = "Value"
        };
        // Bind the Opacity property of the Label to the source.
        label.SetBinding(Label.OpacityProperty, binding);
        // Construct the page.
        Padding = new Thickness(10, 0);
        Content = new StackLayout
        {
            Children = { label, slider }
        };
    }
}
目标對象和屬性仍然在對SetBinding方法的調用中指定:
label.SetBinding(Label.OpacityProperty, binding); 但是,第二個參數引用一個Binding對象,該對象指定源對象和屬性:
Binding binding = new Binding
{
    Source = slider,
    Path = "Value"
};
這不是執行個體化和初始化Binding對象的唯一方法。 廣泛的Binding構造函數允許指定許多Binding屬性。 以下是它如何在BindingSourceCode程式中使用:
Binding binding = new Binding("Value", BindingMode.Default, null, null, null, slider); 或者您可以使用命名參數來引用滑塊對象:
Binding binding = new Binding("Value", source: slider); 綁定還有一個通用的Create方法,它允許您将Path屬性指定為Func對象而不是字元串,這樣它就可以更好地抵禦錯誤拼寫或屬性名稱的更改。 但是,此Create方法不包含Source屬性的參數,是以您需要單獨設定它:
Binding binding = Binding.Create<Slider>(src => src.Value);
binding.Source = slider;
BindableObjectExtensions類定義了SetBinding的兩個重載,允許您避免顯式執行個體化Binding對象。 但是,這些重載都不包含Source屬性,是以它們僅限于使用BindingContext的情況。
BindingSourceXaml程式示範了如何在Binding标記擴充中指定源對象和源屬性:
<ContentPage xmlns="http://xamarin.com/schemas/2014/forms"
             xmlns:x="http://schemas.microsoft.com/winfx/2009/xaml"
             x:Class="BindingSourceXaml.BindingSourceXamlPage"
             Padding="10, 0">
    <StackLayout>
        <Label Text="Binding Source Demo"
               FontSize="Large"
               VerticalOptions="CenterAndExpand"
               HorizontalOptions="Center"
               Opacity="{Binding Source={x:Reference Name=slider},
               Path=Value}" />
        <Slider x:Name="slider"
                VerticalOptions="CenterAndExpand" />
    </StackLayout>
</ContentPage>
Binding标記擴充現在有兩個參數,其中一個是x:Reference的另一個标記擴充,是以一對花括号嵌套在主花括号中:
Opacity="{Binding Source={x:Reference Name=slider},
                  Path=Value}" />
為了清晰起見,兩個Binding參數在标記擴充中垂直對齊,但這不是必需的。 參數必須用逗号分隔(此處在第一行的末尾),并且大括号内不得出現引号。 您沒有在标記擴充中處理XML屬性。 這些是标記擴充參數。
您可以通過消除名稱參數名稱和等号x:引用來簡化嵌套标記擴充名,因為Name是ReferenceExtension類的content屬性:
Opacity="{Binding Source={x:Reference slider},
                  Path=Value}" />
但是,您不能同樣删除Path參數名稱和等号。 盡管BindingExtension将Path定義為其content屬性,但隻有當該參數是多個參數中的第一個參數時,才能消除參數名稱。 你需要像這樣切換參數:
Opacity="{Binding Path=Value,
                  Source={x:Reference slider}}" />
然後你可以消除Path參數名稱,也許可以将所有内容移動到一行:
Opacity="{Binding Value, Source={x:Reference slider}}" /> 但是,因為第一個參數缺少一個參數名稱而第二個參數有一個參數名稱,是以整個表達式看起來有點特殊,并且可能很難在初看時搞定Binding參數。 此外,在Path之前指定Source是有意義的,因為Path指定的特定屬性僅對特定類型的對象有意義,并且由Source指定。
在本書中,每當Binding标記擴充包含Source參數時,它将首先出現,然後是Path。 否則,Path将是第一個參數,并且通常會消除Path參數名稱。
您可以通過以元素形式表達Binding來完全避免此問題:
<Label Text="Binding Source Demo"
       FontSize="Large"
       VerticalOptions="CenterAndExpand"
       HorizontalOptions="Center">
    <Label.Opacity>
        <Binding Source="{x:Reference slider}"
                 Path="Value" />
    </Label.Opacity>
</Label>
x:Reference标記擴充仍然存在,但您也可以以元素形式表示:
<Label Text="Binding Source Demo"
       FontSize="Large"
       VerticalOptions="CenterAndExpand"
       HorizontalOptions="Center">
    <Label.Opacity>
        <Binding Path="Value">
            <Binding.Source>
                <x:Reference Name="slider" />
            </Binding.Source>
        </Binding>
    </Label.Opacity>
</Label>
您現在已經看到兩種方法來指定源對象與目标對象之間的連結:
- 使用BindingContext引用源對象。
- 使用Binding類的Source屬性或Binding标記擴充。
如果同時指定兩者,則Source屬性優先于BindingContext。
在你到目前為止看到的例子中,這兩種技術幾乎可以互換。但是,它們有一些顯着的差異。例如,假設您有一個具有兩個屬性的對象,這兩個屬性是涉及兩個不同源對象的兩個不同資料綁定的目标 - 例如,具有綁定到Slider的Opacity屬性的Label和綁定到Switch的IsVisible屬性。您不能對兩個綁定使用BindingContext,因為BindingContext适用于整個目标對象,并且隻能指定單個源。必須為這些綁定中的至少一個使用Binding的Source屬性。
BindingContext本身由可綁定屬性支援。這意味着可以從Binding标記擴充中設定BindingContext。相反,您不能将Binding的Source屬性設定為另一個Binding,因為Binding不是從BindableObject派生的,這意味着Source不受可綁定屬性的支援,是以不能成為資料綁定的目标。
在BindingSourceXaml标記的此變體中,Label的BindingContext屬性設定為包含Source和Path的Binding标記擴充。
<Label Text="Binding Source Demo"
       FontSize="Large"
       VerticalOptions="CenterAndExpand"
       HorizontalOptions="Center"
       BindingContext="{Binding Source={x:Reference Name=slider},
                                Path=Value}"
       Opacity="{Binding}" />
這意味着此Label的BindingContext不是前面示例中的滑塊對象,而是Double,它是Slider的Value屬性。要将Opacity屬性綁定到此double,所需的隻是一個空的Binding标記擴充,基本上是“對整個資料綁定源使用BindingContext”。
也許BindingContext和Source之間最重要的差別是一個非常特殊的特性,它使得BindingContext不同于所有Xamarin.Forms中的任何其他屬性:
綁定上下文通過可視樹傳播。
換句話說,如果在StackLayout上設定BindingContext,它也适用于該StackLayout的所有子項及其子項。 StackLayout中的資料綁定不必為Binding指定BindingContext或Source參數。它們從StackLayout繼承BindingContext。或者StackLayout的子節點可以使用自己的BindingContext設定或綁定中的Source設定覆寫繼承的BindingContext。
這個功能非常有用。 假設StackLayout包含一組視覺效果,其資料綁定設定為特定類的各種屬性。 設定該StackLayout的BindingContext屬性。 然後,StackLayout的子項上的各個資料綁定不需要Source規範或BindingContext設定。 然後,您可以将StackLayout的BindingContext設定為該類的不同執行個體,以顯示每個執行個體的屬性。 您将在前面的章節中看到這種技術的示例和其他資料綁定奇迹,特别是在第19章中。
同時,讓我們看一下通過可視樹傳播BindingContext的更簡單的例子。
WebView旨在在您的應用程式中嵌入Web浏覽器。或者,您可以将WebView與HtmlWebViewSource類結合使用,以顯示一大塊HTML,可能儲存為PCL中的嵌入式資源。
要顯示網頁,請使用帶有UrlWebViewSource類的WebView指定初始URL。但是,UrlWebViewSource和HtmlWebViewSource都派生自抽象類WebViewSource,并且該類定義了字元串和Uri到其自身的隐式轉換,是以您真正需要做的就是将帶有Web位址的字元串設定為WebView的Source屬性以訓示WebView呈現該網頁。
WebView還定義了兩個名為GoBack和GoForward的方法,這兩個方法在内部實作Web浏覽器上常見的後退和前進按鈕。你的zrogram需要知道什麼時候可以啟用這些按鈕,是以WebView還定義了兩個get-only布爾屬性,名為CanGoBack和CanGoForward。這兩個屬性由可綁定屬性支援,這意味着對這些屬性的任何更改都會導緻觸發PropertyChanged事件,這進一步意味着它們可以用作資料綁定源來啟用和禁用兩個按鈕。
這是WebViewDemo的XAML檔案。請注意,包含兩個Button元素的嵌套StackLayout将其BindingContext屬性設定為WebView。 StackLayout中的兩個Button子項繼承了BindingContext,是以按鈕可以在其IsEnabled屬性上具有非常簡單的Binding表達式,這些屬性僅引用CanGoBack和CanGoForward屬性:
<ContentPage xmlns="http://xamarin.com/schemas/2014/forms"
xmlns:x="http://schemas.microsoft.com/winfx/2009/xaml"
x:Class="WebViewDemo.WebViewDemoPage">
<ContentPage.Padding>
<OnPlatform x:TypeArguments="Thickness"
iOS="10, 20, 10, 0"
Android="10, 0"
WinPhone="10, 0" />
</ContentPage.Padding>
<StackLayout>
<Entry Keyboard="Url"
Placeholder="web address"
Completed="OnEntryCompleted" />
<StackLayout Orientation="Horizontal"
BindingContext="{x:Reference webView}">
<Button Text="⇐"
FontSize="Large"
HorizontalOptions="FillAndExpand"
IsEnabled="{Binding CanGoBack}"
Clicked="OnGoBackClicked" />
<Button Text="⇒"
FontSize="Large"
HorizontalOptions="FillAndExpand"
IsEnabled="{Binding CanGoForward}"
Clicked="OnGoForwardClicked" />
</StackLayout>
<WebView x:Name="webView"
VerticalOptions="FillAndExpand"
Source="https://xamarin.com" />
</StackLayout>
</ContentPage> 代碼隐藏檔案需要處理Back和Forward按鈕的Clicked事件以及Entry的Completed事件,它允許您輸入自己的Web位址:
public partial class WebViewDemoPage : ContentPage
{
    public WebViewDemoPage()
    {
        InitializeComponent();
    }
    void OnEntryCompleted(object sender, EventArgs args)
    {
        webView.Source = ((Entry)sender).Text;
    }
    void OnGoBackClicked(object sender, EventArgs args)
    {
        webView.GoBack();
    }
    void OnGoForwardClicked(object sender, EventArgs args)
    {
        webView.GoForward();
    }
}
程式啟動時您無需輸入網址,因為XAML檔案已寫死以轉到您喜歡的網站,您可以從那裡導航:
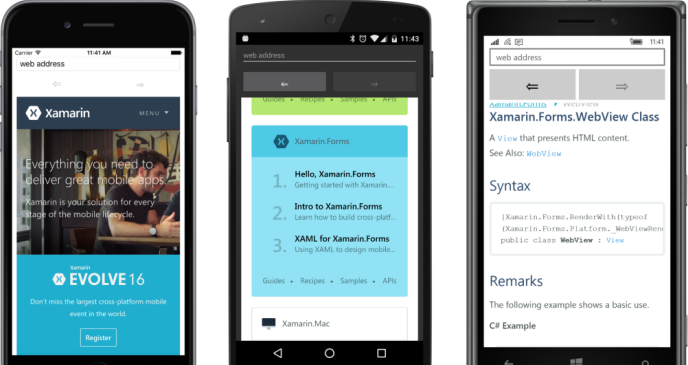
![JavaScript自學筆記【4】函數的聲明與調用目錄二、函數的聲明 三、函數的調用[圖]](data:image/gif;base64,R0lGODlhAQABAIAAAP///wAAACwAAAAAAQABAAACAkQBADs=)