互動回報
wx.showToast(OBJECT)
顯示消息提示框
OBJECT參數說明:
| 參數 | 類型 | 必填 | 說明 | 最低版本 |
|---|---|---|---|---|
| title | String | 是 | 提示的内容 | |
| icon | 否 | 圖示,有效值 "success", "loading", "none" | ||
| image | 自定義圖示的本地路徑,image 的優先級高于 icon | 1.1.0 | ||
| duration | Number | 提示的延遲時間,機關毫秒,預設:1500 | ||
| mask | Boolean | 是否顯示透明蒙層,防止觸摸穿透,預設:false | ||
| success | Function | 接口調用成功的回調函數 | ||
| fail | 接口調用失敗的回調函數 | |||
| complete | 接口調用結束的回調函數(調用成功,失敗都會執行) |
icon有效值
| 有效值 | ||
|---|---|---|
| 顯示成功圖示,此時 title 文本最多顯示 7 個漢字長度。預設值 | ||
| loading | 顯示加載圖示,此時 title 文本最多顯示 7 個漢字長度 | |
| none | 不顯示圖示,此時 title 文本最多可顯示兩行 | 1.9.0 |
wx.showToast({
  title: '成功',
  icon: 'success',
  duration: 2000
})
wx.showLoading(OBJECT)
顯示 loading 提示框, 需主動調用 wx.hideLoading 才能關閉提示框。基礎庫 1.1.0 開始支援,低版本需做相容處理
wx.hideToast()
隐藏消息提示框
wx.hideLoading()
隐藏 loading 提示框。基礎庫 1.1.0 開始支援,低版本需做相容處理
wx.showLoading({
  title: '加載中',
})
setTimeout(function(){
  wx.hideLoading()
},2000)
wx.showModal(OBJECT)
顯示模态彈窗
| 提示的标題 | |||
| content | |||
| showCancel | 是否顯示取消按鈕,預設為 true | ||
| cancelText | 取消按鈕的文字,預設為"取消",最多 4 個字元 | ||
| cancelColor | HexColor | 取消按鈕的文字顔色,預設為"#000000" | |
| confirmText | 确定按鈕的文字,預設為"确定",最多 4 個字元 | ||
| confirmColor | 确定按鈕的文字顔色,預設為"#3CC51F" | ||
success傳回參數說明:
| confirm | 為 true 時,表示使用者點選了确定按鈕 | ||
| cancel | 為 true 時,表示使用者點選了取消(用于 Android 系統區分點選蒙層關閉還是點選取消按鈕關閉) |
wx.showModal({
  title: '提示',
  content: '這是一個模态彈窗',
  success: function(res) {
    if (res.confirm) {
      console.log('使用者點選确定')
    } else if (res.cancel) {
      console.log('使用者點選取消')
    }
  }
})
wx.showActionSheet(OBJECT)
顯示操作菜單
| itemList | String Array | 按鈕的文字數組,數組長度最大為6個 | |
| itemColor | 按鈕的文字顔色,預設為"#000000" | ||
| 接口調用成功的回調函數,詳見傳回參數說明 | |||
| tapIndex | 使用者點選的按鈕,從上到下的順序,從0開始 |
wx.showActionSheet({
  itemList: ['A', 'B', 'C'],
  success: function(res) {
    console.log(res.tapIndex)
  },
  fail: function(res) {
    console.log(res.errMsg)
  }
})
Bug & Tip
1.wx.showLoading 和 wx.showToast 同時隻能顯示一個,但 wx.hideToast/wx.hideLoading 也應當配對使用;
2.Android 6.3.30,wx.showModal 的傳回的 confirm 一直為 true;
3.wx.showActionSheet wx.showModal 點選取消或蒙層時,回調 fail, errMsg 為 "fail cancel";
4.Android 6.7.2 及以上版本 和 iOS wx.showActionSheet wx.showModal 點選蒙層不會關閉模态彈窗,是以盡量避免使用“取消”分支中實作業務邏輯
設定導覽列
wx.setNavigationBarTitle(OBJECT)
動态設定目前頁面的标題
| 頁面标題 | |||
wx.setNavigationBarTitle({
  title: '目前頁面'
})
wx.showNavigationBarLoading()
在目前頁面顯示導覽列加載動畫
wx.hideNavigationBarLoading()
隐藏導覽列加載動畫
wx.setNavigationBarColor(OBJECT)
基礎庫 1.4.0 開始支援,低版本需做相容處理
| frontColor | 前景顔色值,包括按鈕、标題、狀态欄的顔色,僅支援 #ffffff 和 #000000 | ||
| backgroundColor | 背景顔色值,有效值為十六進制顔色 | ||
| animation | Object | 動畫效果 | |
| animation.duration | 動畫變化時間,預設0,機關:毫秒 | ||
| animation.timingFunc | 動畫變化方式,預設 linear | ||
animation.timingFunc 有效值:
| 值 | |
|---|---|
| linear | 動畫從頭到尾的速度是相同的 |
| easeIn | 動畫以低速開始 |
| easeOut | 動畫以低速結束 |
| easeInOut | 動畫以低速開始和結束 |
| errMsg | 調用結果 |
wx.setNavigationBarColor({
    frontColor: '#ffffff',
    backgroundColor: '#ff0000',
    animation: {
        duration: 400,
        timingFunc: 'easeIn'
    }
})
設定tabBar
wx.setTabBarBadge(OBJECT)
為 tabBar 某一項的右上角添加文本。基礎庫 1.9.0 開始支援,低版本需做相容處理
| index | tabBar的哪一項,從左邊算起 | ||
| text | 顯示的文本,超過 3 個字元則顯示成“…” | ||
wx.setTabBarBadge({
  index: 0,
  text: '1'
})
wx.removeTabBarBadge(OBJECT)
移除 tabBar 某一項右上角的文本。基礎庫 1.9.0 開始支援,低版本需做相容處理
wx.showTabBarRedDot(OBJECT)
顯示 tabBar 某一項的右上角的紅點。基礎庫 1.9.0 開始支援,低版本需做相容處理
wx.hideTabBarRedDot(OBJECT)
隐藏 tabBar 某一項的右上角的紅點。基礎庫 1.9.0 開始支援,低版本需做相容處理
onTabItemTap
點選 tab 時觸發。基礎庫 1.9.0 開始支援,低版本需做相容處理
Page({
  onTabItemTap(item) {
    console.log(item.index)
    console.log(item.pagePath)
    console.log(item.text)
  }
})
wx.setTabBarStyle(OBJECT)
動态設定 tabBar 的整體樣式。
| color | tab 上的文字預設顔色 | |
| selectedColor | tab 上的文字選中時的顔色 | |
| tab 的背景色 | ||
| borderStyle | tabbar上邊框的顔色, 僅支援 black/white | |
wx.setTabBarStyle({
    color: '#FF0000',
    selectedColor: '#00FF00',
    backgroundColor: '#0000FF',
    borderStyle: 'white'
})
wx.setTabBarItem(OBJECT)
動态設定 tabBar 某一項的内容。基礎庫 1.9.0 開始支援,低版本需做相容處理
| tab 上按鈕文字 | |||
| iconPath | 圖檔路徑,icon 大小限制為40kb,建議尺寸為 81px * 81px,當 postion 為 top 時,此參數無效,不支援網絡圖檔 | ||
| selectedIconPath | 選中時的圖檔路徑,icon 大小限制為40kb,建議尺寸為 81px * 81px ,當 postion 為 top 時,此參數無效 | ||
wx.setTabBarItem({
    index: 0,
    text: 'text',
    iconPath: '/path/to/iconPath',
    selectedIconPath: '/path/to/selectedIconPath'
})
wx.showTabBar(OBJECT)
顯示 tabBar。基礎庫 1.9.0 開始支援,低版本需做相容處理
| 是否需要動畫效果,預設無 | |||
wx.hideTabBar(OBJECT)
隐藏 tabBar。基礎庫 1.9.0 開始支援,低版本需做相容處理
設定視窗背景
wx.setBackgroundColor(OBJECT)
動态設定視窗的背景色。基礎庫 2.1.0 開始支援,低版本需做相容處理
| 視窗的背景色 | ||
| backgroundColorTop | 頂部視窗的背景色,僅 iOS 支援 | |
| backgroundColorBottom | 底部視窗的背景色,僅 iOS 支援 |
wx.setBackgroundColor({
    backgroundColor: '#ffffff', // 視窗的背景色為白色
})
wx.setBackgroundColor({
    backgroundColorTop: '#ffffff', // 頂部視窗的背景色為白色
    backgroundColorBottom: '#ffffff', // 底部視窗的背景色為白色
})
wx.setBackgroundTextStyle(OBJECT)
動态設定下拉背景字型、loading 圖的樣式。基礎庫 2.1.0 開始支援,低版本需做相容處理
| textStyle | 下拉背景字型、loading 圖的樣式,僅支援 'dark', 'light' |
wx.setBackgroundTextStyle({
    textStyle: 'dark', // 下拉背景字型、loading 圖的樣式為dark
})
設定置頂資訊
wx.setTopBarText(OBJECT)
動态設定置頂欄文字内容,隻有目前小程式被置頂時能生效,如果目前小程式沒有被置頂,也能調用成功,但是不會立即生效,隻有在使用者将這個小程式置頂後才換上設定的文字内容。注意:調用成功後,需間隔 5s 才能再次調用此接口,如果在 5s 内再次調用此接口,會回調 fail,errMsg:"setTopBarText: fail invoke too frequently"
| 置頂欄文字内容 | |||
wx.setTopBarText({
  text: 'hello, world!'
})
導航
wx.navigateTo(OBJECT)
保留目前頁面,跳轉到應用内的某個頁面,使用wx.navigateBack可以傳回到原頁面
| url | 需要跳轉的應用内非 tabBar 的頁面的路徑 , 路徑後可以帶參數。參數與路徑之間使用?分隔,參數鍵與參數值用=相連,不同參數用&分隔;如 'path?key=value&key2=value2' | ||
wx.navigateTo({
  url: 'test?id=1'
})
//test.js
Page({
  onLoad: function(option){
    console.log(option.query)
  }
})
注意:目前頁面路徑最多隻能十層
wx.redirectTo(OBJECT)
關閉目前頁面,跳轉到應用内的某個頁面
wx.redirectTo({
  url: 'test?id=1'
})
wx.reLaunch(OBJECT)
關閉所有頁面,打開到應用内的某個頁面。基礎庫 1.1.0 開始支援,低版本需做相容處理
| 需要跳轉的應用内頁面的路徑,路徑後可以帶參數,參數與路徑之間使用?分隔,參數鍵與參數值用=相連,不同參數用&分隔,如'path?key=value&key2=value2',如果跳轉的頁面路徑是tabBar頁面則不能帶參數 | |||
wx.reLaunch({
  url: 'test?id=1'
})
//test.js
Page({
  onLoad: function(option){
    console.log(option.query)
  }
})
wx.switchTab(OBJECT)
跳轉到 tabBar 頁面,并關閉其他所有非 tabBar 頁面
| 需要跳轉的 tabBar 頁面的路徑(需在 app.json 的 tabBar 字段定義的頁面),路徑後不能帶參數 | |||
{
  "tabBar": {
    "list": [{
      "pagePath": "index",
      "text": "首頁"
    },{
      "pagePath": "other",
      "text": "其他"
    }]
  }
}
wx.switchTab({
  url: '/index'
})
wx.navigateBack(OBJECT)
關閉目前頁面,傳回上一頁面或多級頁面。可通過 getCurrentPages() 擷取目前的頁面棧,決定需要傳回幾層
| 預設值 | |||
|---|---|---|---|
| delta | 1 | 傳回的頁面數,如果 delta 大于現有頁面數,則傳回到首頁 |
// 注意:調用 navigateTo 跳轉時,調用該方法的頁面會被加入堆棧,而 redirectTo 方法則不會。見下方示例代碼
// 此處是A頁面
wx.navigateTo({
  url: 'B?id=1'
})
// 此處是B頁面
wx.navigateTo({
  url: 'C?id=1'
})
// 在C頁面内 navigateBack,将傳回A頁面
wx.navigateBack({
  delta: 2
})
tip: wx.navigateTo 和 wx.redirectTo 不允許跳轉到 tabbar 頁面,隻能用 wx.switchTab 跳轉到 tabbar 頁面
動畫
wx.createAnimation(OBJECT)
建立一個動畫執行個體animation。調用執行個體的方法來描述動畫。最後通過動畫執行個體的export方法導出動畫資料傳遞給元件的animation屬性。
注意: export 方法每次調用後會清掉之前的動畫操作
| Integer | 動畫持續時間,機關ms | ||
| timingFunction | 定義動畫的效果 | ||
| delay | 動畫延遲時間,機關 ms | ||
| transformOrigin | 設定transform-origin |
timingFunction 有效值:
| ease | 動畫以低速開始,然後加快,在結束前變慢 |
| ease-in | |
| ease-in-out | |
| ease-out | |
| step-start | 動畫第一幀就跳至結束狀态直到結束 |
| step-end | 動畫一直保持開始狀态,最後一幀跳到結束狀态 |
var animation = wx.createAnimation({
  transformOrigin: "50% 50%",
  duration: 1000,
  timingFunction: "ease",
  delay: 0
})
動畫執行個體可以調用以下方法來描述動畫,調用結束後會傳回自身,支援鍊式調用的寫法
animation 對象的方法清單:
樣式:
| 方法 | ||
|---|---|---|
| opacity | value | 透明度,參數範圍 0~1 |
| 顔色值 | ||
| width | length | 長度值,如果傳入 Number 則預設使用 px,可傳入其他自定義機關的長度值 |
| height | ||
| top | ||
| left | ||
| bottom | ||
| right |
旋轉:
| rotate | deg | deg的範圍-180~180,從原點順時針旋轉一個deg角度 |
| rotateX | deg的範圍-180~180,在X軸旋轉一個deg角度 | |
| rotateY | deg的範圍-180~180,在Y軸旋轉一個deg角度 | |
| rotateZ | deg的範圍-180~180,在Z軸旋轉一個deg角度 | |
| rotate3d | (x,y,z,deg) | x/y/z分别表示旋轉軸X/Y/Z坐标方向的矢量,deg表示旋轉角度,正的角度值表示順時針旋轉,負值表示逆時針旋轉 |
縮放:
| scale | sx,[sy] | 一個參數時,表示在X軸、Y軸同時縮放sx倍數;兩個參數時表示在X軸縮放sx倍數,在Y軸縮放sy倍數 |
| scaleX | sx | 在X軸縮放sx倍數 |
| scaleY | sy | 在Y軸縮放sy倍數 |
| scaleZ | sz | 在Z軸縮放sy倍數 |
| scale3d | (sx,sy,sz) | 在X軸縮放sx倍數,在Y軸縮放sy倍數,在Z軸縮放sz倍數 |
偏移:
| translate | tx,[ty] | 一個參數時,表示在X軸偏移tx,機關px;兩個參數時,表示在X軸偏移tx,在Y軸偏移ty,機關px |
| translateX | tx | 在X軸偏移tx,機關px |
| translateY | ty | 在Y軸偏移tx,機關px |
| translateZ | tz | 在Z軸偏移tx,機關px |
| translate3d | (tx,ty,tz) | 在X軸偏移tx,在Y軸偏移ty,在Z軸偏移tz,機關px |
傾斜:
| skew | ax,[ay] | 參數範圍-180~180;一個參數時,Y軸坐标不變,X軸坐标延順時針傾斜ax度;兩個參數時,分别在X軸傾斜ax度,在Y軸傾斜ay度 |
| skewX | ax | 參數範圍-180~180;Y軸坐标不變,X軸坐标延順時針傾斜ax度 |
| skewY | ay | 參數範圍-180~180;X軸坐标不變,Y軸坐标延順時針傾斜ay度 |
矩陣變形:
| matrix | (a,b,c,d,tx,ty) | |
| matrix3d |
動畫隊列
調用動畫操作方法後要調用 step() 來表示一組動畫完成,可以在一組動畫中調用任意多個動畫方法,一組動畫中的所有動畫會同時開始,一組動畫完成後才會進行下一組動畫。step 可以傳入一個跟 wx.createAnimation() 一樣的配置參數用于指定目前組動畫的配置
<view animation="{{animationData}}" style="background:red;height:100rpx;width:100rpx"></view>
<script>
Page({
  data: {
    animationData: {}
  },
  onShow: function(){
    var animation = wx.createAnimation({
      duration: 1000,
      timingFunction: 'ease',
    })
    this.animation = animation
    animation.scale(2,2).rotate(45).step()
    this.setData({
      animationData:animation.export()
    })
    setTimeout(function() {
      animation.translate(30).step()
      this.setData({
        animationData:animation.export()
      })
    }.bind(this), 1000)
  },
  rotateAndScale: function () {// 旋轉同時放大
    this.animation.rotate(45).scale(2, 2).step()
    this.setData({
      animationData: this.animation.export()
    })
  },
  rotateThenScale: function () { // 先旋轉後放大
    this.animation.rotate(45).step()
    this.animation.scale(2, 2).step()
    this.setData({
      animationData: this.animation.export()
    })
  },
  rotateAndScaleThenTranslate: function () {// 先旋轉同時放大,然後平移
    this.animation.rotate(45).scale(2, 2).step()
    this.animation.translate(100, 100).step({ duration: 1000 })
    this.setData({
      animationData: this.animation.export()
    })
  }
})
</script>
bug: iOS/Android 6.3.30 通過 step() 分隔動畫,隻有第一步動畫能生效
位置
wx.pageScrollTo(OBJECT):将頁面滾動到目标位置。基礎庫 1.4.0 開始支援,低版本需做相容處理
| 參數名 | |||
|---|---|---|---|
| scrollTop | 滾動到頁面的目标位置(機關px) | ||
| 滾動動畫的時長,預設300ms,機關 ms |
wx.pageScrollTo({
  scrollTop: 0,
  duration: 300
})
繪圖
在Canvas上畫圖
所有在 中的畫圖必須用 JavaScript 完成
WXML:(我們在接下來的例子中如無特殊聲明都會用這個 WXML 為模闆,不再重複)
<canvas canvas-id="myCanvas" style="border: 1px solid;"/> JS:(我們在接下來的例子中會将 JS 放在 onLoad 中)
const ctx = wx.createCanvasContext('myCanvas')
ctx.setFillStyle('red')
ctx.fillRect(10, 10, 150, 75)
ctx.draw()
第一步:建立一個 Canvas 繪圖上下文
首先,我們需要建立一個 Canvas 繪圖上下文 CanvasContext。
CanvasContext 是小程式内建的一個對象,有一些繪圖的方法:
const ctx = wx.createCanvasContext('myCanvas') 第二步:使用 Canvas 繪圖上下文進行繪圖描述
接着,我們來描述要在 Canvas 中繪制什麼内容。設定繪圖上下文的填充色為紅色:
ctx.setFillStyle('red') 用 fillRect(x, y, width, height) 方法畫一個矩形,填充為剛剛設定的紅色:
ctx.fillRect(10, 10, 150, 75) 第三步:畫圖
告訴 元件你要将剛剛的描述繪制上去:
ctx.draw() Canvas 坐标系
canvas 是在一個二維的網格當中。左上角的坐标為(0, 0)。
之前我們用了這個方法 fillRect(0, 0, 150, 75),它的含義為:從左上角(0, 0)開始,畫一個150 x 75px 的矩形
坐标系例子:
我們可以在 中加上一些事件,來觀測它的坐标系
<canvas canvas-id="myCanvas" style="margin: 5px; border:1px solid #d3d3d3;" bindtouchstart="start" bindtouchmove="move" bindtouchend="end"/>
<view hidden="{{hidden}}">
  Coordinates: ({{x}}, {{y}})
</view>
<script>
Page({
  data: {
    x: 0,
    y: 0,
    hidden: true
  },
  start: function(e) {
    this.setData({
      hidden: false,
      x: e.touches[0].x,
      y: e.touches[0].y
    })
  },
  move: function(e) {
    this.setData({
      x: e.touches[0].x,
      y: e.touches[0].y
    })
  },
  end: function(e) {
    this.setData({
      hidden: true
    })
  }
})
</script>
當你把手指放到 canvas 中,就會在下邊顯示出觸碰點的坐标
漸變
漸變能用于填充一個矩形,圓,線,文字等。填充色可以不固定為一種顔色。我們提供了兩種顔色漸變的方式:
createLinearGradient(x, y, x1, y1) - 建立一個線性的漸變
createCircularGradient(x, y, r) - 建立一個從圓心開始的漸變
一旦我們建立了一個漸變對象,我們必須添加兩個顔色漸變點。
addColorStop(position, color) 方法用于指定顔色漸變點的位置和顔色,位置必須位于0到1之間。
可以用setFillStyle() 和 setStrokeStyle() 方法設定漸變,然後進行畫圖描述
使用 createLinearGradient()
const ctx = wx.createCanvasContext('myCanvas')
// Create linear gradient
const grd = ctx.createLinearGradient(0, 0, 200, 0)
grd.addColorStop(0, 'red')
grd.addColorStop(1, 'white')
// Fill with gradient
ctx.setFillStyle(grd)
ctx.fillRect(10, 10, 150, 80)
ctx.draw()
使用 createCircularGradient()
const ctx = wx.createCanvasContext('myCanvas')
// Create circular gradient
const grd = ctx.createCircularGradient(75, 50, 50)
grd.addColorStop(0, 'red')
grd.addColorStop(1, 'white')
// Fill with gradient
ctx.setFillStyle(grd)
ctx.fillRect(10, 10, 150, 80)
ctx.draw()
api接口
| createCanvasContext | 建立 canvas 繪圖上下文(指定 canvasId) |
| createContext(不推薦使用) | 建立 canvas 繪圖上下文 |
| drawCanvas(不推薦使用) | 進行繪圖 |
| canvasToTempFilePath | 導出圖檔 |
context 對象的方法清單
顔色,樣式,陰影
| setFillStyle | 設定填充樣式 |
| setStrokeStyle | 設定線條樣式 |
| setShadow | 設定陰影 |
| createLinearGradient | 建立一個線性漸變 |
| createCircularGradient | 建立一個圓形漸變 |
| addColorStop | 在漸變中的某一點添加一個顔色變化 |
線條樣式
| setLineWidth | 設定線條寬度 |
| setLineCap | 設定線條端點的樣式 |
| setLineJoin | 設定兩線相交處的樣式 |
| setMiterLimit | 設定最大傾斜 |
矩形
| fill | 對目前路徑進行填充 |
| stroke | 對目前路徑進行描邊 |
| beginPath | 開始一個路徑 |
| closePath | 關閉一個路徑 |
| moveTo | 把路徑移動到畫布中的指定點,但不建立線條 |
| lineTo | 添加一個新點,然後在畫布中建立從該點到最後指定點的線條 |
| arc | 添加一個弧形路徑到目前路徑,順時針繪制 |
| quadraticCurveTo | 建立二次方貝塞爾曲線 |
| bezierCurveTo |
變形
| 對橫縱坐标進行縮放 | |
| 對坐标軸進行順時針旋轉 | |
| 對坐标原點進行縮放 |
文字
| fillText | 在畫布上繪制被填充的文本 |
| setFontSize | 設定字型大小 |
| setTextBaseline | 設定字型基準線 |
| setTextAlign | 設定字型對齊方式 |
圖檔
| drawImage | 在畫布上繪制圖像 |
混合
| setGlobalAlpha | 設定全局畫筆透明度 |
其他
| save | 儲存目前繪圖上下文 |
| restore | 恢複之前儲存過的繪圖上下文 |
| draw | |
| getActions(不推薦使用) | 擷取目前context上存儲的繪圖動作 |
| clearActions(不推薦使用) | 清空目前的存儲繪圖動作 |
可以用以下幾種方式來表示 canvas 中使用的顔色:
1.RGB 顔色: 如 'rgb(255, 0, 0)'
2.RGBA 顔色:如 'rgba(255, 0, 0, 0.3)'
3.16 進制顔色: 如 '#FF0000'
4.預定義的顔色: 如 'red'
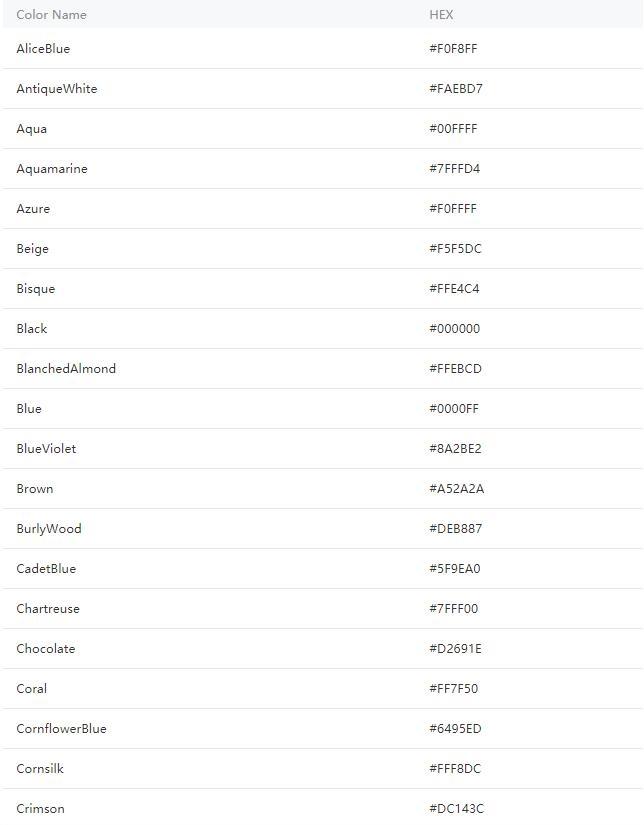
其中預定義顔色有以下148個:
Note: Color Name 大小寫不敏感

wx.createCanvasContext(canvasId, this)
定義:建立 canvas 繪圖上下文(指定 canvasId)。在自定義元件下,第二個參數傳入元件執行個體this,以操作元件内 元件
Tip: 需要指定 canvasId,該繪圖上下文隻作用于對應的
| canvasId | 畫布辨別,傳入定義在 的 canvas-id | |
| componentInstance | 自定義元件執行個體 this ,表示在這個自定義元件下查找擁有 canvas-id 的 ,如果省略,則不在任何自定義元件内查找 |
wx.createContext
建立并傳回繪圖上下文(不推薦使用)
drawCanvas
定義:用所提供的 actions 在所給的 canvas-id 對應的 canvas 上進行繪圖(不推薦使用)
| actions | Array | 繪圖動作數組,由 wx.createContext 建立的 context,調用 getActions 方法導出繪圖動作數組 |
| reserve | (可選)本次繪制是否接着上一次繪制,即reserve參數為false,則在本次調用drawCanvas繪制之前native層應先清空畫布再繼續繪制;若reserver參數為true,則保留目前畫布上的内容,本次調用drawCanvas繪制的内容覆寫在上面,預設 false |
wx.canvasToTempFilePath(OBJECT, this)
把目前畫布指定區域的内容導出生成指定大小的圖檔,并傳回檔案路徑。在自定義元件下,第二個參數傳入元件執行個體this,以操作元件内 元件
| x | 畫布x軸起點(預設0) | 1.2.0 | ||
| y | 畫布y軸起點(預設0) | |||
| 畫布寬度(預設為canvas寬度-x) | ||||
| 畫布高度(預設為canvas高度-y) | ||||
| destWidth | 輸出圖檔寬度(預設為 width * 螢幕像素密度) | |||
| destHeight | 輸出圖檔高度(預設為 height * 螢幕像素密度) | |||
| 畫布辨別,傳入 的 canvas-id | ||||
| fileType | 目标檔案的類型,隻支援 'jpg' 或 'png'。預設為 'png' | 1.7.0 | ||
| quality | 圖檔的品質,目前僅對jpg有效。取值範圍為 (0, 1],不在範圍内時當作1.0處理 | |||
| 接口調用結束的回調函數(調用成功、失敗都會執行) |
tip: 在 draw 回調裡調用該方法才能保證圖檔導出成功
wx.canvasToTempFilePath({
  x: 100,
  y: 200,
  width: 50,
  height: 50,
  destWidth: 100,
  destHeight: 100,
  canvasId: 'myCanvas',
  success: function(res) {
    console.log(res.tempFilePath)
  }
})
wx.canvasGetImageData(OBJECT, this)
傳回一個數組,用來描述 canvas 區域隐含的像素資料。在自定義元件下,第二個參數傳入元件執行個體this,以操作元件内 元件。基礎庫 1.9.0 開始支援,低版本需做相容處理
| 将要被提取的圖像資料矩形區域的左上角 x 坐标 | ||||
| 将要被提取的圖像資料矩形區域的左上角 y 坐标 | ||||
| 将要被提取的圖像資料矩形區域的寬度 | ||||
| 将要被提取的圖像資料矩形區域的高度 | ||||
success回調傳回參數:
| 圖像資料矩形的寬度 | ||
| 圖像資料矩形的高度 | ||
| data | Uint8ClampedArray | 圖像像素點資料,一維數組,每四項表示一個像素點的rgba |
wx.canvasGetImageData({
  canvasId: 'myCanvas',
  x: 0,
  y: 0,
  width: 100,
  height: 100,
  success(res) {
    console.log(res.width) // 100
    console.log(res.height) // 100
    console.log(res.data instanceof Uint8ClampedArray) // true
    console.log(res.data.length) // 100 * 100 * 4
  }
})
wx.canvasPutImageData(OBJECT, this)
将像素資料繪制到畫布的方法。在自定義元件下,第二個參數傳入元件執行個體this,以操作元件内 元件。基礎庫 1.9.0 開始支援,低版本需做相容處理
| 源圖像資料在目标畫布中的位置偏移量(x 軸方向的偏移量) | ||||
| 源圖像資料在目标畫布中的位置偏移量(y 軸方向的偏移量) | ||||
| 源圖像資料矩形區域的寬度 | ||||
| 源圖像資料矩形區域的高度 | ||||
const data = new Uint8ClampedArray([255, 0, 0, 1])
wx.canvasPutImageData({
  canvasId: 'myCanvas',
  x: 0,
  y: 0,
  width: 1,
  data: data,
  success(res) {}
})
canvasContext.setFillStyle
設定填充色。
Tip: 如果沒有設定 fillStyle,預設顔色為 black
文法
canvasContext.setFillStyle(color)
canvasContext.fillStyle = color // 基礎庫 1.9.90 起支援 | 定義 | ||
|---|---|---|
| Gradient Object |
const ctx = wx.createCanvasContext('myCanvas')
ctx.setFillStyle('red')
ctx.fillRect(10, 10, 150, 75)
ctx.draw()
canvasContext.setStrokeStyle
設定邊框顔色
canvasContext.setStrokeStyle(color)
canvasContext.strokeStyle = color // 基礎庫 1.9.90 起支援
const ctx = wx.createCanvasContext('myCanvas')
ctx.setStrokeStyle('red')
ctx.strokeRect(10, 10, 150, 75)
ctx.draw() canvasContext.setShadow
設定陰影樣式。
Tip: 如果沒有設定,offsetX 預設值為0, offsetY 預設值為0, blur 預設值為0,color 預設值為 black
| 範圍 | |||
|---|---|---|---|
| offset | 陰影相對于形狀在水準方向的偏移 | ||
| 陰影相對于形狀在豎直方向的偏移 | |||
| blur | 0~100 | 陰影的模糊級别,數值越大越模糊 | |
| 陰影的顔色 |
const ctx = wx.createCanvasContext('myCanvas')
ctx.setFillStyle('red')
ctx.setShadow(10, 50, 50, 'blue')
ctx.fillRect(10, 10, 150, 75)
ctx.draw() canvasContext.shadowBlur
設定陰影的模糊級别。基礎庫 1.9.90 開始支援,低版本需做相容處理
canvasContext.shadowBlur = value canvasContext.shadowColor
設定陰影的顔色。基礎庫 1.9.90 開始支援,低版本需做相容處理
canvasContext.shadowColor = value canvasContext.shadowOffsetX
設定陰影相對于形狀在水準方向的偏移。基礎庫 1.9.90 開始支援,低版本需做相容處理
canvasContext.shadowOffsetX = value canvasContext.shadowOffsetY
設定陰影相對于形狀在豎直方向的偏移。基礎庫 1.9.90 開始支援,低版本需做相容處理
canvasContext.shadowOffsetY = value canvasContext.createLinearGradient
建立一個線性的漸變顔色
Tip: 需要使用 addColorStop() 來指定漸變點,至少要兩個
| X0 | 起點的x坐标 | |
| Y0 | 起點的y坐标 | |
| X1 | 終點的x坐标 | |
| Y1 | 終點的y坐标 |
const ctx = wx.createCanvasContext('myCanvas')
// Create linear gradient
const grd = ctx.createLinearGradient(0, 0, 200, 0)
grd.addColorStop(0, 'red')
grd.addColorStop(1, 'white')
// Fill with gradient
ctx.setFillStyle(grd)
ctx.fillRect(10, 10, 150, 80)
ctx.draw() canvasContext.createCircularGradient
建立一個圓形的漸變顔色。
Tip:
1.起點在圓心,終點在圓環。
2.需要使用 addColorStop() 來指定漸變點,至少要兩個
| X | 圓心的x坐标 | |
| Y | 圓心的y坐标 | |
| r | 圓的半徑 |
const ctx = wx.createCanvasContext('myCanvas')
// Create circular gradient
const grd = ctx.createCircularGradient(75, 50, 50)
grd.addColorStop(0, 'red')
grd.addColorStop(1, 'white')
// Fill with gradient
ctx.setFillStyle(grd)
ctx.fillRect(10, 10, 150, 80)
ctx.draw() canvasContext.addColorStop
建立一個顔色的漸變點。
1.小于最小 stop 的部分會按最小 stop 的 color 來渲染,大于最大 stop 的部分會按最大 stop 的 color 來渲染。
| stop | Number(0-1) | 表示漸變點在起點和終點中的位置 |
| 漸變點的顔色 |
const ctx = wx.createCanvasContext('myCanvas')
// Create circular gradient
const grd = ctx.createLinearGradient(30, 10, 120, 10)
grd.addColorStop(0, 'red')
grd.addColorStop(0.16, 'orange')
grd.addColorStop(0.33, 'yellow')
grd.addColorStop(0.5, 'green')
grd.addColorStop(0.66, 'cyan')
grd.addColorStop(0.83, 'blue')
grd.addColorStop(1, 'purple')
// Fill with gradient
ctx.setFillStyle(grd)
ctx.fillRect(10, 10, 150, 80)
ctx.draw() canvasContext.setLineWidth
設定線條的寬度
canvasContext.setLineWidth(lineWidth)
canvasContext.lineWidth = lineWidth // 基礎庫 1.9.90 起支援 | lineWidth | 線條的寬度(機關是px) |
const ctx = wx.createCanvasContext('myCanvas')
ctx.beginPath()
ctx.moveTo(10, 10)
ctx.lineTo(150, 10)
ctx.stroke()
ctx.beginPath()
ctx.setLineWidth(5)
ctx.moveTo(10, 30)
ctx.lineTo(150, 30)
ctx.stroke()
ctx.beginPath()
ctx.setLineWidth(10)
ctx.moveTo(10, 50)
ctx.lineTo(150, 50)
ctx.stroke()
ctx.beginPath()
ctx.setLineWidth(15)
ctx.moveTo(10, 70)
ctx.lineTo(150, 70)
ctx.stroke()
ctx.draw() canvasContext.setLineCap
設定線條的端點樣式
canvasContext.setLineCap(lineCap)
canvasContext.lineCap = lineCap // 基礎庫 1.9.90 起支援 | lineCap | 'butt'、'round'、'square' | 線條的結束端點樣式 |
const ctx = wx.createCanvasContext('myCanvas')
ctx.beginPath()
ctx.moveTo(10, 10)
ctx.lineTo(150, 10)
ctx.stroke()
ctx.beginPath()
ctx.setLineCap('butt')
ctx.setLineWidth(10)
ctx.moveTo(10, 30)
ctx.lineTo(150, 30)
ctx.stroke()
ctx.beginPath()
ctx.setLineCap('round')
ctx.setLineWidth(10)
ctx.moveTo(10, 50)
ctx.lineTo(150, 50)
ctx.stroke()
ctx.beginPath()
ctx.setLineCap('square')
ctx.setLineWidth(10)
ctx.moveTo(10, 70)
ctx.lineTo(150, 70)
ctx.stroke()
ctx.draw() canvasContext.setLineJoin
設定線條的交點樣式
canvasContext.setLineJoin(lineJoin)
canvasContext.lineJoin = lineJoin // 基礎庫 1.9.90 起支援 | lineJoin | 'bevel'、'round'、'miter' | 線條的結束交點樣式 |
const ctx = wx.createCanvasContext('myCanvas')
ctx.beginPath()
ctx.moveTo(10, 10)
ctx.lineTo(100, 50)
ctx.lineTo(10, 90)
ctx.stroke()
ctx.beginPath()
ctx.setLineJoin('bevel')
ctx.setLineWidth(10)
ctx.moveTo(50, 10)
ctx.lineTo(140, 50)
ctx.lineTo(50, 90)
ctx.stroke()
ctx.beginPath()
ctx.setLineJoin('round')
ctx.setLineWidth(10)
ctx.moveTo(90, 10)
ctx.lineTo(180, 50)
ctx.lineTo(90, 90)
ctx.stroke()
ctx.beginPath()
ctx.setLineJoin('miter')
ctx.setLineWidth(10)
ctx.moveTo(130, 10)
ctx.lineTo(220, 50)
ctx.lineTo(130, 90)
ctx.stroke()
ctx.draw() canvasContext.setLineDash
設定虛線樣式的方法。基礎庫 1.6.0 開始支援,低版本需做相容處理
| pattern | 一組描述交替繪制線段和間距(坐标空間機關)長度的數字 | |
| 虛線偏移量 |
const ctx = wx.createCanvasContext('myCanvas')
ctx.setLineDash([10, 20], 5);
ctx.beginPath();
ctx.moveTo(0,100);
ctx.lineTo(400, 100);
ctx.stroke();
ctx.draw() canvasContext.setMiterLimit
設定最大斜接長度,斜接長度指的是在兩條線交彙處内角和外角之間的距離。 當 setLineJoin() 為 miter 時才有效。超過最大傾斜長度的,連接配接處将以 lineJoin 為 bevel 來顯示
canvasContext.setMiterLimit(miterLimit)
canvasContext.miterLimit = miterLimit // 基礎庫 1.9.90 起支援 | miterLimit | 最大斜接長度 |
const ctx = wx.createCanvasContext('myCanvas')
ctx.beginPath()
ctx.setLineWidth(10)
ctx.setLineJoin('miter')
ctx.setMiterLimit(1)
ctx.moveTo(10, 10)
ctx.lineTo(100, 50)
ctx.lineTo(10, 90)
ctx.stroke()
ctx.beginPath()
ctx.setLineWidth(10)
ctx.setLineJoin('miter')
ctx.setMiterLimit(2)
ctx.moveTo(50, 10)
ctx.lineTo(140, 50)
ctx.lineTo(50, 90)
ctx.stroke()
ctx.beginPath()
ctx.setLineWidth(10)
ctx.setLineJoin('miter')
ctx.setMiterLimit(3)
ctx.moveTo(90, 10)
ctx.lineTo(180, 50)
ctx.lineTo(90, 90)
ctx.stroke()
ctx.beginPath()
ctx.setLineWidth(10)
ctx.setLineJoin('miter')
ctx.setMiterLimit(4)
ctx.moveTo(130, 10)
ctx.lineTo(220, 50)
ctx.lineTo(130, 90)
ctx.stroke()
ctx.draw() canvasContext.rect
建立一個矩形
Tip: 用 fill() 或者 stroke() 方法将矩形真正的畫到 canvas 中
| 矩形路徑左上角的x坐标 | ||
| 矩形路徑左上角的y坐标 | ||
| 矩形路徑的寬度 | ||
| 矩形路徑的高度 |
const ctx = wx.createCanvasContext('myCanvas')
ctx.rect(10, 10, 150, 75)
ctx.setFillStyle('red')
ctx.fill()
ctx.draw() canvasContext.fillRect
填充一個矩形
Tip: 用 setFillStyle() 設定矩形的填充色,如果沒設定預設是黑色
const ctx = wx.createCanvasContext('myCanvas')
ctx.setFillStyle('red')
ctx.fillRect(10, 10, 150, 75)
ctx.draw() canvasContext.strokeRect
畫一個矩形(非填充)
Tip: 用 setFillStroke() 設定矩形線條的顔色,如果沒設定預設是黑色
const ctx = wx.createCanvasContext('myCanvas')
ctx.setStrokeStyle('red')
ctx.strokeRect(10, 10, 150, 75)
ctx.draw() canvasContext.clearRect
清除畫布上在該矩形區域内的内容
Tip: clearRect 并非畫一個白色的矩形在位址區域,而是清空,為了有直覺感受,對 canvas 加了一層背景色
<canvas canvas-id="myCanvas" style="border: 1px solid; background: #123456;"/> | 矩形區域左上角的x坐标 | ||
| 矩形區域左上角的y坐标 | ||
| 矩形區域的寬度 | ||
| 矩形區域的高度 |
const ctx = wx.createCanvasContext('myCanvas')
ctx.setFillStyle('red')
ctx.fillRect(0, 0, 150, 200)
ctx.setFillStyle('blue')
ctx.fillRect(150, 0, 150, 200)
ctx.clearRect(10, 10, 150, 75)
ctx.draw()
canvasContext.fill
對目前路徑中的内容進行填充。預設的填充色為黑色。
1.如果目前路徑沒有閉合,fill() 方法會将起點和終點進行連接配接,然後填充
2.fill() 填充的的路徑是從 beginPath() 開始計算,但是不會将 fillRect() 包含進去
const ctx = wx.createCanvasContext('myCanvas')
ctx.moveTo(10, 10)
ctx.lineTo(100, 10)
ctx.lineTo(100, 100)
ctx.fill()
ctx.draw()
const ctx = wx.createCanvasContext('myCanvas')
// begin path
ctx.rect(10, 10, 100, 30)
ctx.setFillStyle('yellow')
ctx.fill()
// begin another path
ctx.beginPath()
ctx.rect(10, 40, 100, 30)
// only fill this rect, not in current path
ctx.setFillStyle('blue')
ctx.fillRect(10, 70, 100, 30)
ctx.rect(10, 100, 100, 30)
// it will fill current path
ctx.setFillStyle('red')
ctx.fill()
ctx.draw() canvasContext.stroke
畫出目前路徑的邊框。預設顔色色為黑色。
Tip: stroke() 描繪的的路徑是從 beginPath() 開始計算,但是不會将 strokeRect() 包含進去
const ctx = wx.createCanvasContext('myCanvas')
ctx.moveTo(10, 10)
ctx.lineTo(100, 10)
ctx.lineTo(100, 100)
ctx.stroke()
ctx.draw() const ctx = wx.createCanvasContext('myCanvas')
// begin path
ctx.rect(10, 10, 100, 30)
ctx.setStrokeStyle('yellow')
ctx.stroke()
// begin another path
ctx.beginPath()
ctx.rect(10, 40, 100, 30)
// only stoke this rect, not in current path
ctx.setStrokeStyle('blue')
ctx.strokeRect(10, 70, 100, 30)
ctx.rect(10, 100, 100, 30)
// it will stroke current path
ctx.setStrokeStyle('red')
ctx.stroke()
ctx.draw() canvasContext.beginPath
開始建立一個路徑,需要調用fill或者stroke才會使用路徑進行填充或描邊。
1.在最開始的時候相當于調用了一次 beginPath()。
2.同一個路徑内的多次setFillStyle()、setStrokeStyle()、setLineWidth()等設定,以最後一次設定為準
const ctx = wx.createCanvasContext('myCanvas')
// begin path
ctx.rect(10, 10, 100, 30)
ctx.setFillStyle('yellow')
ctx.fill()
// begin another path
ctx.beginPath()
ctx.rect(10, 40, 100, 30)
// only fill this rect, not in current path
ctx.setFillStyle('blue')
ctx.fillRect(10, 70, 100, 30)
ctx.rect(10, 100, 100, 30)
// it will fill current path
ctx.setFillStyle('red')
ctx.fill()
ctx.draw() canvasContext.closePath
1.關閉路徑會連接配接起點和終點。
2.如果關閉路徑後沒有調用 fill() 或者 stroke() 并開啟了新的路徑,那之前的路徑将不會被渲染
const ctx = wx.createCanvasContext('myCanvas')
ctx.moveTo(10, 10)
ctx.lineTo(100, 10)
ctx.lineTo(100, 100)
ctx.closePath()
ctx.stroke()
ctx.draw()
const ctx = wx.createCanvasContext('myCanvas')
// begin path
ctx.rect(10, 10, 100, 30)
ctx.closePath()
// begin another path
ctx.beginPath()
ctx.rect(10, 40, 100, 30)
// only fill this rect, not in current path
ctx.setFillStyle('blue')
ctx.fillRect(10, 70, 100, 30)
ctx.rect(10, 100, 100, 30)
// it will fill current path
ctx.setFillStyle('red')
ctx.fill()
ctx.draw() canvasContext.moveTo
把路徑移動到畫布中的指定點,不建立線條。
Tip: 用 stroke() 方法來畫線條
| 目标位置的x坐标 | ||
| 目标位置的y坐标 |
const ctx = wx.createCanvasContext('myCanvas')
ctx.moveTo(10, 10)
ctx.lineTo(100, 10)
ctx.moveTo(10, 50)
ctx.lineTo(100, 50)
ctx.stroke()
ctx.draw()
canvasContext.lineTo
lineTo 方法增加一個新點,然後建立一條從上次指定點到目标點的線。
const ctx = wx.createCanvasContext('myCanvas')
ctx.moveTo(10, 10)
ctx.rect(10, 10, 100, 50)
ctx.lineTo(110, 60)
ctx.stroke()
ctx.draw()
canvasContext.arc
畫一條弧線。
1.建立一個圓可以用 arc() 方法指定起始弧度為0,終止弧度為 2 * Math.PI。
2.用 stroke() 或者 fill() 方法來在 canvas 中畫弧線
| 圓的x坐标 | ||
| 圓的y坐标 | ||
| sAngle | 起始弧度,機關弧度(在3點鐘方向) | |
| eAngle | 終止弧度 | |
| counterclockwise | 可選。指定弧度的方向是逆時針還是順時針。預設是false,即順時針 |
const ctx = wx.createCanvasContext('myCanvas')
// Draw coordinates
ctx.arc(100, 75, 50, 0, 2 * Math.PI)
ctx.setFillStyle('#EEEEEE')
ctx.fill()
ctx.beginPath()
ctx.moveTo(40, 75)
ctx.lineTo(160, 75)
ctx.moveTo(100, 15)
ctx.lineTo(100, 135)
ctx.setStrokeStyle('#AAAAAA')
ctx.stroke()
ctx.setFontSize(12)
ctx.setFillStyle('black')
ctx.fillText('0', 165, 78)
ctx.fillText('0.5*PI', 83, 145)
ctx.fillText('1*PI', 15, 78)
ctx.fillText('1.5*PI', 83, 10)
// Draw points
ctx.beginPath()
ctx.arc(100, 75, 2, 0, 2 * Math.PI)
ctx.setFillStyle('lightgreen')
ctx.fill()
ctx.beginPath()
ctx.arc(100, 25, 2, 0, 2 * Math.PI)
ctx.setFillStyle('blue')
ctx.fill()
ctx.beginPath()
ctx.arc(150, 75, 2, 0, 2 * Math.PI)
ctx.setFillStyle('red')
ctx.fill()
// Draw arc
ctx.beginPath()
ctx.arc(100, 75, 50, 0, 1.5 * Math.PI)
ctx.setStrokeStyle('#333333')
ctx.stroke()
ctx.draw()
針對 arc(100, 75, 50, 0, 1.5 * Math.PI)的三個關鍵坐标如下:
圓心 (100, 75) 起始弧度 (0) 終止弧度 (1.5 * Math.PI)
canvasContext.bezierCurveTo
建立三次方貝塞爾曲線路徑
Tip: 曲線的起始點為路徑中前一個點
| cp1x | 第一個貝塞爾控制點的 x 坐标 | |
| cp1y | 第一個貝塞爾控制點的 y 坐标 | |
| cp2x | 第二個貝塞爾控制點的 x 坐标 | |
| cp2y | 第二個貝塞爾控制點的 y 坐标 | |
| 結束點的 x 坐标 | ||
| 結束點的 y 坐标 |
const ctx = wx.createCanvasContext('myCanvas')
// Draw points
ctx.beginPath()
ctx.arc(20, 20, 2, 0, 2 * Math.PI)
ctx.setFillStyle('red')
ctx.fill()
ctx.beginPath()
ctx.arc(200, 20, 2, 0, 2 * Math.PI)
ctx.setFillStyle('lightgreen')
ctx.fill()
ctx.beginPath()
ctx.arc(20, 100, 2, 0, 2 * Math.PI)
ctx.arc(200, 100, 2, 0, 2 * Math.PI)
ctx.setFillStyle('blue')
ctx.fill()
ctx.setFillStyle('black')
ctx.setFontSize(12)
// Draw guides
ctx.beginPath()
ctx.moveTo(20, 20)
ctx.lineTo(20, 100)
ctx.lineTo(150, 75)
ctx.moveTo(200, 20)
ctx.lineTo(200, 100)
ctx.lineTo(70, 75)
ctx.setStrokeStyle('#AAAAAA')
ctx.stroke()
// Draw quadratic curve
ctx.beginPath()
ctx.moveTo(20, 20)
ctx.bezierCurveTo(20, 100, 200, 100, 200, 20)
ctx.setStrokeStyle('black')
ctx.stroke()
ctx.draw()
針對 moveTo(20, 20) bezierCurveTo(20, 100, 200, 100, 200, 20) 的三個關鍵坐标如下:
起始點(20, 20) 兩個控制點(20, 100) (200, 100) 終止點(200, 20)
canvasContext.quadraticCurveTo
建立二次貝塞爾曲線路徑。
| cpx | 貝塞爾控制點的 x 坐标 | |
| cpy | 貝塞爾控制點的 y 坐标 | |
const ctx = wx.createCanvasContext('myCanvas')
// Draw points
ctx.beginPath()
ctx.arc(20, 20, 2, 0, 2 * Math.PI)
ctx.setFillStyle('red')
ctx.fill()
ctx.beginPath()
ctx.arc(200, 20, 2, 0, 2 * Math.PI)
ctx.setFillStyle('lightgreen')
ctx.fill()
ctx.beginPath()
ctx.arc(20, 100, 2, 0, 2 * Math.PI)
ctx.setFillStyle('blue')
ctx.fill()
ctx.setFillStyle('black')
ctx.setFontSize(12)
// Draw guides
ctx.beginPath()
ctx.moveTo(20, 20)
ctx.lineTo(20, 100)
ctx.lineTo(200, 20)
ctx.setStrokeStyle('#AAAAAA')
ctx.stroke()
// Draw quadratic curve
ctx.beginPath()
ctx.moveTo(20, 20)
ctx.quadraticCurveTo(20, 100, 200, 20)
ctx.setStrokeStyle('black')
ctx.stroke()
ctx.draw()
針對 moveTo(20, 20) quadraticCurveTo(20, 100, 200, 20) 的三個關鍵坐标如下:
起始點(20, 20) 控制點(20, 100) 終止點(200, 20)
canvasContext.scale
在調用scale方法後,之後建立的路徑其橫縱坐标會被縮放。多次調用scale,倍數會相乘
| scaleWidth | 橫坐标縮放的倍數 (1 = 100%,0.5 = 50%,2 = 200%) | |
| scaleHeight | 縱坐标軸縮放的倍數 (1 = 100%,0.5 = 50%,2 = 200%) |
const ctx = wx.createCanvasContext('myCanvas')
ctx.strokeRect(10, 10, 25, 15)
ctx.scale(2, 2)
ctx.strokeRect(10, 10, 25, 15)
ctx.scale(2, 2)
ctx.strokeRect(10, 10, 25, 15)
ctx.draw()
canvasContext.rotate
以原點為中心,原點可以用 translate方法修改。順時針旋轉目前坐标軸。多次調用rotate,旋轉的角度會疊加
| 旋轉角度,以弧度計(degrees * Math.PI/180;degrees範圍為0~360) |
const ctx = wx.createCanvasContext('myCanvas')
ctx.strokeRect(100, 10, 150, 100)
ctx.rotate(20 * Math.PI / 180)
ctx.strokeRect(100, 10, 150, 100)
ctx.rotate(20 * Math.PI / 180)
ctx.strokeRect(100, 10, 150, 100)
ctx.draw()
canvasContext.translate
對目前坐标系的原點(0, 0)進行變換,預設的坐标系原點為頁面左上角
| 水準坐标平移量 | ||
| 豎直坐标平移量 |
const ctx = wx.createCanvasContext('myCanvas')
ctx.strokeRect(10, 10, 150, 100)
ctx.translate(20, 20)
ctx.strokeRect(10, 10, 150, 100)
ctx.translate(20, 20)
ctx.strokeRect(10, 10, 150, 100)
ctx.draw()
canvasContext.clip
clip() 方法從原始畫布中剪切任意形狀和尺寸。一旦剪切了某個區域,則所有之後的繪圖都會被限制在被剪切的區域内(不能通路畫布上的其他區域)。可以在使用 clip() 方法前通過使用 save() 方法對目前畫布區域進行儲存,并在以後的任意時間對其進行恢複(通過 restore() 方法)。
基礎庫 1.6.0 開始支援,低版本需做相容處理
const ctx = wx.createCanvasContext('myCanvas')
wx.downloadFile({
  url: 'http://is5.mzstatic.com/image/thumb/Purple128/v4/75/3b/90/753b907c-b7fb-5877-215a-759bd73691a4/source/50x50bb.jpg',
  success: function(res) {
    ctx.save()
    ctx.beginPath()
    ctx.arc(50, 50, 25, 0, 2*Math.PI)
    ctx.clip()
    ctx.drawImage(res.tempFilePath, 25, 25)
    ctx.restore()
    ctx.draw()
  }
})
canvasContext.setFontSize
設定字型的字号
| fontSize | 字型的字号 |
const ctx = wx.createCanvasContext('myCanvas')
ctx.setFontSize(20)
ctx.fillText('20', 20, 20)
ctx.setFontSize(30)
ctx.fillText('30', 40, 40)
ctx.setFontSize(40)
ctx.fillText('40', 60, 60)
ctx.setFontSize(50)
ctx.fillText('50', 90, 90)
ctx.draw()
canvasContext.fillText
| 在畫布上輸出的文本 | ||
| 繪制文本的左上角x坐标位置 | ||
| 繪制文本的左上角y坐标位置 | ||
| maxWidth | 需要繪制的最大寬度,可選 |
const ctx = wx.createCanvasContext('myCanvas')
ctx.setFontSize(20)
ctx.fillText('Hello', 20, 20)
ctx.fillText('MINA', 100, 100)
ctx.draw()
canvasContext.setTextAlign
用于設定文字的對齊
基礎庫 1.1.0 開始支援,低版本需做相容處理
canvasContext.setTextAlign(align)
canvasContext.textAlign = align // 基礎庫 1.9.90 起支援 | align | 可選值 'left'、'center'、'right' |
const ctx = wx.createCanvasContext('myCanvas')
ctx.setStrokeStyle('red')
ctx.moveTo(150, 20)
ctx.lineTo(150, 170)
ctx.stroke()
ctx.setFontSize(15)
ctx.setTextAlign('left')
ctx.fillText('textAlign=left', 150, 60)
ctx.setTextAlign('center')
ctx.fillText('textAlign=center', 150, 80)
ctx.setTextAlign('right')
ctx.fillText('textAlign=right', 150, 100)
ctx.draw()
canvasContext.setTextBaseline
用于設定文字的水準對齊
canvasContext.setTextBaseline(textBaseline)
canvasContext.textBaseline = textBaseline // 基礎庫 1.9.90 起支援 | textBaseline | 可選值 'top'、'bottom'、'middle'、'normal' |
const ctx = wx.createCanvasContext('myCanvas')
ctx.setStrokeStyle('red')
ctx.moveTo(5, 75)
ctx.lineTo(295, 75)
ctx.stroke()
ctx.setFontSize(20)
ctx.setTextBaseline('top')
ctx.fillText('top', 5, 75)
ctx.setTextBaseline('middle')
ctx.fillText('middle', 50, 75)
ctx.setTextBaseline('bottom')
ctx.fillText('bottom', 120, 75)
ctx.setTextBaseline('normal')
ctx.fillText('normal', 200, 75)
ctx.draw()
canvasContext.drawImage
繪制圖像到畫布
| imageResource | 所要繪制的圖檔資源 | |
| dx | 圖像的左上角在目标canvas上 X 軸的位置 | |
| dy | 圖像的左上角在目标canvas上 Y 軸的位置 | |
| dWidth | 在目标畫布上繪制圖像的寬度,允許對繪制的圖像進行縮放 | |
| dHeight | 在目标畫布上繪制圖像的高度,允許對繪制的圖像進行縮放 | |
| 源圖像的矩形選擇框的左上角 X 坐标 | ||
| 源圖像的矩形選擇框的左上角 Y 坐标 | ||
| sWidth | 源圖像的矩形選擇框的寬度 | |
| sHeight | 源圖像的矩形選擇框的高度 |
有三個版本的寫法:
drawImage(dx, dy)
drawImage(dx, dy, dWidth, dHeight)
drawImage(sx, sy, sWidth, sHeight, dx, dy, dWidth, dHeight) 從 1.9.0 起支援
例子
const ctx = wx.createCanvasContext('myCanvas')
wx.chooseImage({
  success: function(res){
    ctx.drawImage(res.tempFilePaths[0], 0, 0, 150, 100)
    ctx.draw()
  }
})
canvasContext.setGlobalAlpha
設定全局畫筆透明度。
canvasContext.setGlobalAlpha(alpha)
canvasContext.globalAlpha = alpha // 基礎庫 1.9.90 起支援 | alpha | 0~1 | 透明度,0 表示完全透明,1 表示完全不透明 |
const ctx = wx.createCanvasContext('myCanvas')
ctx.setFillStyle('red')
ctx.fillRect(10, 10, 150, 100)
ctx.setGlobalAlpha(0.2)
ctx.setFillStyle('blue')
ctx.fillRect(50, 50, 150, 100)
ctx.setFillStyle('yellow')
ctx.fillRect(100, 100, 150, 100)
ctx.draw()
canvasContext.save
儲存目前的繪圖上下文
恢複之前儲存的繪圖上下文
const ctx = wx.createCanvasContext('myCanvas')
// save the default fill style
ctx.save()
ctx.setFillStyle('red')
ctx.fillRect(10, 10, 150, 100)
// restore to the previous saved state
ctx.restore()
ctx.fillRect(50, 50, 150, 100)
ctx.draw()
canvasContext.draw
将之前在繪圖上下文中的描述(路徑、變形、樣式)畫到 canvas 中
Tip: 繪圖上下文需要由 wx.createCanvasContext(canvasId) 來建立
| 非必填。本次繪制是否接着上一次繪制,即reserve參數為false,則在本次調用drawCanvas繪制之前native層應先清空畫布再繼續繪制;若reserver參數為true,則保留目前畫布上的内容,本次調用drawCanvas繪制的内容覆寫在上面,預設 false | |||
| callback | 繪制完成後回調 |
const ctx = wx.createCanvasContext('myCanvas')
ctx.setFillStyle('red')
ctx.fillRect(10, 10, 150, 100)
ctx.draw()
ctx.fillRect(50, 50, 150, 100)
ctx.draw()
const ctx = wx.createCanvasContext('myCanvas')
ctx.setFillStyle('red')
ctx.fillRect(10, 10, 150, 100)
ctx.draw()
ctx.fillRect(50, 50, 150, 100)
ctx.draw(true) getActions
傳回繪圖上下文的繪圖動作。不推薦使用
canvasContext.clearActions
清空繪圖上下文的繪圖動作。不推薦使用
canvasContext.measureText
測量文本尺寸資訊,目前僅傳回文本寬度。同步接口。基礎庫 1.9.90 開始支援,低版本需做相容處理
| 要測量的文本 |
傳回 TextMetrics 對象,結構如下:
| Numbe | 文本的寬度 |
const ctx = wx.createCanvasContext('myCanvas')
ctx.font = 'italic bold 20px cursive'
const metrics = ctx.measureText('Hello World')
console.log(metrics.width)
canvasContext.globalCompositeOperation
該屬性是設定要在繪制新形狀時應用的合成操作的類型。基礎庫 1.9.90 開始支援,低版本需做相容處理
canvasContext.globalCompositeOperation = type | type | 辨別要使用哪種合成或混合模式操作 |
type 支援的操作有:
| 平台 | 操作 |
|---|---|
| 安卓 | xor, source-over, source-atop, destination-out, lighter, overlay, darken, lighten, hard-light |
| iOS | xor, source-over, source-atop, destination-over, destination-out, lighter, multiply, overlay, darken, lighten, color-dodge, color-burn, hard-light, soft-light, difference, exclusion, saturation, luminosity |
Bug: 目前安卓版本隻适用于 fill 填充塊的合成,用于 stroke 線段的合成效果都是 source-over
canvasContext.arcTo
根據控制點和半徑繪制圓弧路徑。基礎庫 1.9.90 開始支援,低版本需做相容處理
canvasContext.arcTo(x1, y1, x2, y2, radius) | x1 | 第一個控制點的 x 軸坐标 | |
| y1 | 第一個控制點的 y 軸坐标 | |
| x2 | 第二個控制點的 x 軸坐标 | |
| y2 | 第二個控制點的 y 軸坐标 | |
| radius | 圓弧的半徑 |
canvasContext.strokeText
給定的 (x, y) 位置繪制文本描邊的方法。基礎庫 1.9.90 開始支援,低版本需做相容處理
canvasContext.strokeText(text, x, y, maxWidth) | 要繪制的文本 | ||
| 文本起始點的 x 軸坐标 | ||
| 文本起始點的 y 軸坐标 | ||
canvasContext.lineDashOffset
設定虛線偏移量的屬性。基礎庫 1.9.90 開始支援,低版本需做相容處理
canvasContext.lineDashOffset = value | 偏移量,初始值為 0 |
canvasContext.createPattern
對指定的圖像建立模式的方法,可在指定的方向上重複元圖像。基礎庫 1.9.90 開始支援,低版本需做相容處理
canvasContext.createPattern(image, repetition) | 重複的圖像源,僅支援包内路徑和臨時路徑 | ||
| repetition | 指定如何重複圖像,有效值有: repeat, repeat-x, repeat-y, no-repeat |
const ctx = wx.createCanvasContext('myCanvas')
const pattern = ctx.createPattern('/path/to/image', 'repeat-x')
ctx.fillStyle = pattern
ctx.fillRect(0, 0, 300, 150)
ctx.draw()
canvasContext.font
設定目前字型樣式的屬性。基礎庫 1.9.90 開始支援,低版本需做相容處理
canvasContext.font = value | 屬性值 | ||
|---|---|---|
| 符合 CSS font 文法的 DOMString 字元串,至少需要提供字型大小和字型族名。預設值為 10px sans-serif |
value 支援的屬性有:
| 屬性 | |
|---|---|
| style | 字型樣式。僅支援 italic, oblique, normal |
| weight | 字型粗細。僅支援 normal, bold |
| size | 字型大小 |
| family | 字型族名。注意确認各平台所支援的字型 |
canvasContext.transform
使用矩陣多次疊加目前變換的方法。基礎庫 1.9.90 開始支援,低版本需做相容處理
canvasContext.transform(scaleX, skewX, skewY, scaleY, translateX, translateY) | 水準縮放 | ||
| 垂直縮放 | ||
| 水準傾斜 | ||
| 垂直傾斜 | ||
| 水準移動 | ||
| 垂直移動 |
canvasContext.setTransform
使用矩陣重新設定(覆寫)目前變換的方法。基礎庫 1.9.90 開始支援,低版本需做相容處理
canvasContext.setTransform(scaleX, skewX, skewY, scaleY, translateX, translateY) 下拉重新整理
Page.onPullDownRefresh()
在 Page 中定義 onPullDownRefresh 處理函數,監聽該頁面使用者下拉重新整理事件
wx.startPullDownRefresh(OBJECT)
開始下拉重新整理,調用後觸發下拉重新整理動畫,效果與使用者手動下拉重新整理一緻。基礎庫 1.5.0 開始支援,低版本需做相容處理
Object參數說明:
| 接口調用結果 |
wx.startPullDownRefresh() wx.stopPullDownRefresh()
停止目前頁面下拉重新整理
Page({
  onPullDownRefresh: function(){
    wx.stopPullDownRefresh()
  }
})
WXML節點資訊API
wx.createSelectorQuery()
傳回一個SelectorQuery對象執行個體。可以在這個執行個體上使用select等方法選擇節點,并使用boundingClientRect等方法選擇需要查詢的資訊。
Page({
  queryMultipleNodes: function(){
    var query = wx.createSelectorQuery()
    query.select('#the-id').boundingClientRect()
    query.selectViewport().scrollOffset()
    query.exec(function(res){
      res[0].top       // #the-id節點的上邊界坐标
      res[1].scrollTop // 顯示區域的豎直滾動位置
    })
  }
})
selectorQuery
selectorQuery 對象的方法清單:
| in | object Component | 參考下面詳細介紹 |
| select | selector | |
| selectAll | ||
| selectViewport | ||
| exec | [callback] |
selectorQuery.in(component)
将選擇器的選取範圍更改為自定義元件component内。(初始時,選擇器僅選取頁面範圍的節點,不會選取任何自定義元件中的節點。)
Component({
  queryMultipleNodes: function(){
    var query = wx.createSelectorQuery().in(this)
    query.select('#the-id').boundingClientRect(function(res){
      res.top // 這個元件内 #the-id 節點的上邊界坐标
    }).exec()
  }
})
selectorQuery.select(selector)
在目前頁面下選擇第一個比對選擇器selector的節點,傳回一個NodesRef對象執行個體,可以用于擷取節點資訊。
selector類似于CSS的選擇器,但僅支援下列文法。
1.ID選擇器:#the-id
2.class選擇器(可以連續指定多個):.a-class.another-class
3.子元素選擇器:.the-parent > .the-child
4.後代選擇器:.the-ancestor .the-descendant
5.跨自定義元件的後代選擇器:.the-ancestor >>> .the-descendant
6.多選擇器的并集:#a-node, .some-other-nodes
selectorQuery.selectAll(selector)
在目前頁面下選擇比對選擇器selector的節點,傳回一個NodesRef對象執行個體
與selectorQuery.select(selector)不同的是,它選擇所有比對選擇器的節點
selectorQuery.selectViewport()
選擇顯示區域,可用于擷取顯示區域的尺寸、滾動位置等資訊,傳回一個NodesRef對象執行個體
nodesRef.boundingClientRect([callback])
添加節點的布局位置的查詢請求,相對于顯示區域,以像素為機關。其功能類似于DOM的getBoundingClientRect。傳回值是nodesRef對應的selectorQuery。
傳回的節點資訊中,每個節點的位置用left、right、top、bottom、width、height字段描述。如果提供了callback回調函數,在執行selectQuery的exec方法後,節點資訊會在callback中傳回
Page({
  getRect: function(){
    wx.createSelectorQuery().select('#the-id').boundingClientRect(function(rect){
      rect.id      // 節點的ID
      rect.dataset // 節點的dataset
      rect.left    // 節點的左邊界坐标
      rect.right   // 節點的右邊界坐标
      rect.top     // 節點的上邊界坐标
      rect.bottom  // 節點的下邊界坐标
      rect.width   // 節點的寬度
      rect.height  // 節點的高度
    }).exec()
  },
  getAllRects: function(){
    wx.createSelectorQuery().selectAll('.a-class').boundingClientRect(function(rects){
      rects.forEach(function(rect){
        rect.id      // 節點的ID
        rect.dataset // 節點的dataset
        rect.left    // 節點的左邊界坐标
        rect.right   // 節點的右邊界坐标
        rect.top     // 節點的上邊界坐标
        rect.bottom  // 節點的下邊界坐标
        rect.width   // 節點的寬度
        rect.height  // 節點的高度
      })
    }).exec()
  }
})
nodesRef.scrollOffset([callback])
添加節點的滾動位置查詢請求,以像素為機關。節點必須是scroll-view或者viewport。傳回值是nodesRef對應的selectorQuery。
傳回的節點資訊中,每個節點的滾動位置用scrollLeft、scrollTop字段描述。如果提供了callback回調函數,在執行selectQuery的exec方法後,節點資訊會在callback中傳回
Page({
  getScrollOffset: function(){
    wx.createSelectorQuery().selectViewport().scrollOffset(function(res){
      res.id      // 節點的ID
      res.dataset // 節點的dataset
      res.scrollLeft // 節點的水準滾動位置
      res.scrollTop  // 節點的豎直滾動位置
    }).exec()
  }
})
nodesRef.fields(fields, [callback])
擷取節點的相關資訊,需要擷取的字段在fields中指定。傳回值是nodesRef對應的selectorQuery。可指定擷取的字段包括:
| 字段名 | |||
|---|---|---|---|
| id | 是否傳回節點id | ||
| dataset | 是否傳回節點dataset | ||
| rect | 是否傳回節點布局位置(left right top bottom) | ||
| 是否傳回節點尺寸(width height) | |||
| scrollOffset | 是否傳回節點的 scrollLeft scrollTop ,節點必須是scroll-view或者viewport | ||
| properties | [] | 指定屬性名清單,傳回節點對應屬性名的目前屬性值(隻能獲得元件文檔中标注的正常屬性值, id class style 和事件綁定的屬性值不可擷取) | |
| computedStyle | 指定樣式名清單,傳回節點對應樣式名的目前值 | 2.1.0 |
注意: computedStyle 的優先級高于 size,當同時在 computedStyle 裡指定了 width/height 和傳入了 size: true,則優先傳回 computedStyle 擷取到的 width/height
Page({
  getFields: function(){
    wx.createSelectorQuery().select('#the-id').fields({
      dataset: true,
      size: true,
      scrollOffset: true,
      properties: ['scrollX', 'scrollY'],
      computedStyle: ['margin', 'backgroundColor']
    }, function(res){
      res.dataset    // 節點的dataset
      res.width      // 節點的寬度
      res.height     // 節點的高度
      res.scrollLeft // 節點的水準滾動位置
      res.scrollTop  // 節點的豎直滾動位置
      res.scrollX    // 節點 scroll-x 屬性的目前值
      res.scrollY    // 節點 scroll-y 屬性的目前值
      // 此處傳回指定要傳回的樣式名
      res.margin
      res.backgroundColor
    }).exec()
  }
})
selectorQuery.exec([callback])
執行所有的請求,請求結果按請求次序構成數組,在callback的第一個參數中傳回
WXML節點布局相交狀态
節點布局交叉狀态API可用于監聽兩個或多個元件節點在布局位置上的相交狀态。這一組API常常可以用于推斷某些節點是否可以被使用者看見、有多大比例可以被使用者看見。
這一組API涉及的主要概念如下。
1.參照節點:監聽的參照節點,取它的布局區域作為參照區域。如果有多個參照節點,則會取它們布局區域的 交集 作為參照區域。頁面顯示區域也可作為參照區域之一。
2.目标節點:監聽的目标,預設隻能是一個節點(使用 selectAll 選項時,可以同時監聽多個節點)。
3.相交區域:目标節點的布局區域與參照區域的相交區域。
4.相交比例:相交區域占參照區域的比例。
5.門檻值:相交比例如果達到門檻值,則會觸發監聽器的回調函數。門檻值可以有多個
以下示例代碼可以在目标節點(用選擇器 .target-class 指定)每次進入或離開頁面顯示區域時,觸發回調函數
Page({
  onLoad: function(){
    wx.createIntersectionObserver().relativeToViewport().observe('.target-class', (res) => {
      res.id // 目标節點 id
      res.dataset // 目标節點 dataset
      res.intersectionRatio // 相交區域占目标節點的布局區域的比例
      res.intersectionRect // 相交區域
      res.intersectionRect.left // 相交區域的左邊界坐标
      res.intersectionRect.top // 相交區域的上邊界坐标
      res.intersectionRect.width // 相交區域的寬度
      res.intersectionRect.height // 相交區域的高度
    })
  }
})
以下示例代碼可以在目标節點(用選擇器 .target-class 指定)與參照節點(用選擇器 .relative-class 指定)在頁面顯示區域内相交或相離,且相交或相離程度達到目标節點布局區域的20%和50%時,觸發回調函數
Page({
  onLoad: function(){
    wx.createIntersectionObserver(this, {
      thresholds: [0.2, 0.5]
    }).relativeTo('.relative-class').relativeToViewport().observe('.target-class', (res) => {
      res.intersectionRatio // 相交區域占目标節點的布局區域的比例
      res.intersectionRect // 相交區域
      res.intersectionRect.left // 相交區域的左邊界坐标
      res.intersectionRect.top // 相交區域的上邊界坐标
      res.intersectionRect.width // 相交區域的寬度
      res.intersectionRect.height // 相交區域的高度
    })
  }
})
wx.createIntersectionObserver([this], [options])
建立并傳回一個 IntersectionObserver 對象執行個體。在自定義元件中,可以使用 this.createIntersectionObserver([options]) 來代替。基礎庫 1.9.3 開始支援,低版本需做相容處理
可選的 options :
| thresholds | 一個數值數組,包含所有門檻值。預設為 [0] | ||
| initialRatio | 初始的相交比例,如果調用時檢測到的相交比例與這個值不相等且達到門檻值,則會觸發一次監聽器的回調函數。預設為 0 | ||
| 是否同時觀測多個目标節點(而非一個),如果設為 true , observe 的 targetSelector 将選中多個節點(注意:同時選中過多節點将影響渲染性能) | 2.0.0 |
intersectionObserver.relativeTo(selector, [margins])
使用選擇器指定一個節點,作為參照區域之一。 margins 可以用來擴充(或收縮)參照節點布局區域的邊界,可包含 left 、 right 、 top 、 bottom 四項
intersectionObserver.relativeToViewport([margins])
指定頁面顯示區域作為參照區域之一。 margins 可以用來擴充(或收縮)參照節點布局區域的邊界,可包含 left 、 right 、 top 、 bottom 四項
下面的示例代碼中,如果目标節點(用選擇器 .target-class 指定)進入顯示區域以下 100px 時,就會觸發回調函數
Page({
  onLoad: function(){
    wx.createIntersectionObserver().relativeToViewport({bottom: 100}).observe('.target-class', (res) => {
      res.intersectionRatio // 相交區域占目标節點的布局區域的比例
      res.intersectionRect // 相交區域
      res.intersectionRect.left // 相交區域的左邊界坐标
      res.intersectionRect.top // 相交區域的上邊界坐标
      res.intersectionRect.width // 相交區域的寬度
      res.intersectionRect.height // 相交區域的高度
    })
  }
})
intersectionObserver.observe(targetSelector, callback)
指定目标節點并開始監聽相交狀态變化情況。回調函數 callback 包含一個參數 result
回調函數 result 包含的字段:
| intersectionRatio | 相交比例 | |
| intersectionRect | 相交區域的邊界,包含 left 、 right 、 top 、 bottom 四項 | |
| boundingClientRect | 目标節點布局區域的邊界,包含 left 、 right 、 top 、 bottom 四項 | |
| relativeRect | 參照區域的邊界,包含 left 、 right 、 top 、 bottom 四項 | |
| time | 相交檢測時的時間戳 |
intersectionObserver.disconnect()
停止監聽。回調函數将不再觸發。
Tips:與頁面顯示區域的相交區域并不準确代表使用者可見的區域,因為參與計算的區域是“布局區域”,布局區域可能會在繪制時被其他節點裁剪隐藏(如遇祖先節點中 overflow 樣式為 hidden 的節點)或遮蓋(如遇 fixed 定位的節點)
自定義元件
wx.nextTick(FUNCTION)
用于延遲一部分操作到下一個時間片再執行(類似于 setTimeout)。基礎庫 2.2.3 開始支援,低版本需做相容處理
PS:因為自定義元件中的 setData 和 triggerEvent 等接口本身是同步的操作,當這幾個接口被連續調用時,都是在一個同步流程中執行完的,是以若邏輯不當可能會導緻出錯。
一個極端的案例:當父元件的 setData 引發了子元件的 triggerEvent,進而使得父元件又進行了一次 setData,期間有通過 wx:if 語句對子元件進行解除安裝,就有可能引發奇怪的錯誤,是以對于不需要在一個同步流程内完成的邏輯,可以使用此接口延遲到下一個時間片再執行
Component({
  doSth() {
    this.setData({ number: 1 }) // 直接在目前同步流程中執行

    wx.nextTick(() => {
      this.setData({ number: 3 }) // 在目前同步流程結束後,下一個時間片執行
    })

    this.setData({ number: 2 }) // 直接在目前同步流程中執行
  }
})