前言
這篇博文接
【前端】react and redux教程學習實踐,淺顯易懂的實踐學習方法。,上一篇簡略的做了一個redux的初級demo,今天深入的學習了一些新的、有用的,可以在生産項目中使用的前端架構,我将盡量以最簡單的語言描述,如果有童鞋看不懂,也可以私下問我。
複習
前一節我們已經知道,一個redux應用,主要有幾個概念,它們的共同作用都是管理一個全局state,使react元件的state集中處理,想一下你在寫react元件的時候,元件的state總是或多或少與父級元件有關聯,一般情況下我們都是用props處理的 —— 即在父級元件傳入state,子元件使用props管理狀态state。然而經過redux的處理,state被提升到最高等級的元件,它被具體化成一個對象,變得更加容易管理,可以直接在後端讀取state改變前端互動。複習一下兩個概念:
1.store
Store 就是儲存狀态資料對象的地方,你可以把它看成一個容器。整個應用隻能有一個 Store。這個對象通過createStore建立,它的第一個參數傳入一個函數,這個函數就是唯一能處理改變state的地方。
import { createStore } from 'redux';
const store = createStore(fn);
2、action
action是一個通知,例如我有一個元件,裡面有一個click事件改變了目前的狀态,那麼就要通過這個click事件的回調,向store發出要更改state的action,store傳入的那個函數接到通知以後,改變state,最後更新視圖。發出action的方法是,一般action是一個對象,官方規定它必須有一個type屬性,用來規定現在這個action是誰發出的。
store.dispatch(action); 好,就複習這兩個概念,這幾個流程可以概括為:
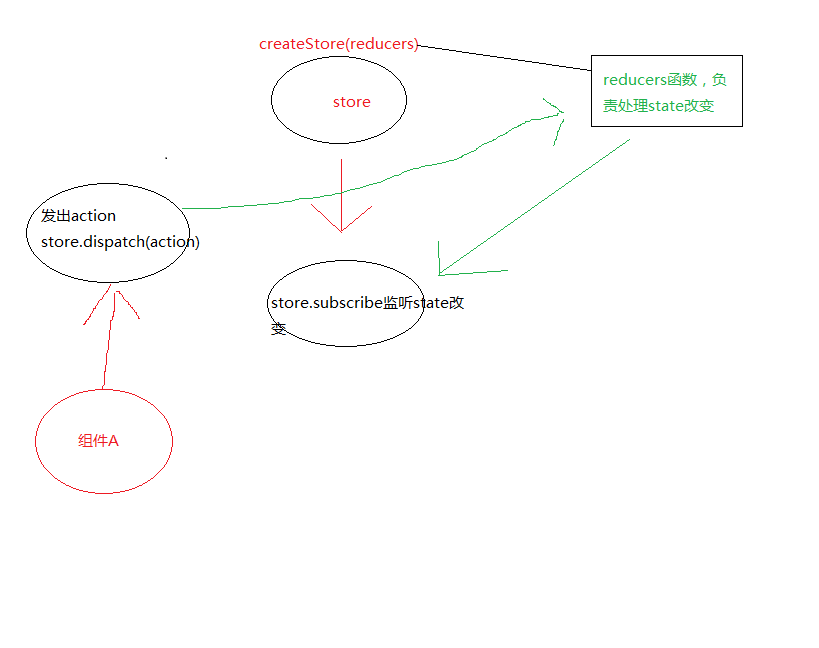
首先元件A通過回調發出action,然後reducers接受到這個action,處理完之後傳回state對象更改,最後觸發視圖更新。一個redux互動的流程大概就是這樣。
要看得懂下面的東西,你需要懂上一節寫過的代碼。
先實踐
還是實踐那個案例,一個number的加減:

目标是點選對應的按鈕,數字加減,輸入時值也随state變化。github位址:https://github.com/294678380/redux_demo (demo2)
先來看看上次我們是怎麼發送action的:
我們通過直接在元件上挂props實作的向store發出action
const render = ()=> ReactDOM.render(
    <div>
        <Number
            value={store.getState()}
            add={(action)=>store.dispatch(action)}  //傳入一個函數,傳入發送過來的action,由reducers處理之後傳回state,
            less={(action)=>store.dispatch(action)}
        />
    </div>,
    content
);
class Number extends Component{
    add(){
        this.props.add({type:"NUMBER_ADD"}) //調用app.js中傳過來的箭頭函數,傳入了type為NUMBER_ADD的action
    }
  //.....省略
}
通過傳過來的add箭頭函數,發出了type是NUMBER_ADD的action,然後reducers接受到了這個action,更改了state引發視圖更新。
現在我們要改造這份代碼
為什麼這樣的方式有問題?
現在這樣的代碼能看到的至少有三點問題:
1.發出的那個action是元件内确定的,結果就是,我需要在元件内寫一個type,比如那個“NUMBER_ADD”,在reducers處理函數中還要再判斷type等于“NUMBER_ADD”,如果需要更改,增加了應用耦合。
2.監聽是全局的,也就是說每次更新都是全局的。這影響效率。
3.代碼也不夠優雅,要填寫很多重複的props。
讓我們來看代碼:
app.js
import React from "react";
import ReactDOM from "react-dom";
import {InitReducers} from "./reducers";
import {createStore} from "redux";
//這個是react-redux提供的管理state的元件,把它放在最高層就可以實作統一管理state。
import {Provider} from "react-redux";
import Number from "./number";
//createStore生成store,InitReducers在收到action時調用的函數
const store = createStore(InitReducers);
const content = document.querySelector(".content");
//直接render
ReactDOM.render(
    <Provider store={store}>
        <Number />
    </Provider>,
    content
);
入口做了更改吧監聽函數store.subscribe()移除,使用Provider包裹的方式釋出state,注意 createStore(InitReducers); 傳入的這個函數是從reducers.js導出的InitReducers函數。
現在我們看reduces.js
import * as Actions from "./actions";
const ReducersActions = {
    [Actions.NUMBER_ADD]:(state,action)=>{
        state.number++;
        return state;
    },
    [Actions.NUMBER_LESS]:(state,action)=>{
        state.number--;
        return state;
    },
    [Actions.NUMBER_VALUE]:(state,action)=>{
        state.number = action.value;
        return state;
    }

}
function InitReducers(state={},action){
    state.number == undefined?state.number=0:state.number;
    if(action.type === "@@redux/INIT"){
        return state;
    }
    state = ReducersActions[action.type](state,action);
    return Object.assign({},state);
}
export {InitReducers}
引入了actions.js檔案,這裡就是要解決前面說的,action需要一個統一入口的問題。這個actions.js定義了所有action.type,函數 InitReducers被觸發時,ReducersActions[action.type](state,action);會被調用,這個action.type是元件發過來的action。
現在我們看actions.js
export const NUMBER_ADD = "NUMBER_ADD";
export const NUMBER_LESS = "NUMBER_LESS";
export const NUMBER_VALUE = "NUMBER_VALUE";
export function setNumber(type,value=false){
    switch(type){
        case "add":
        return {type:NUMBER_ADD}
        case "less":
        return {type:NUMBER_LESS}
        case "value":
        return {type:NUMBER_VALUE,value:value}
    }
}
我在這裡定義了三個action,
NUMBER_ADD     增加

NUMBER_LESS  減少
NUMBER_VALUE 輸入
一個函數 setNumber 這個函數是給number元件調用的。
然後number.js
import React,{Component} from "react";
import {connect} from "react-redux";
//bindActionCreators
import {bindActionCreators} from "redux";
//引入actions
import * as Actions from "./actions";

const propTypes = {
    actions:React.PropTypes.object.isRequired,
    number:React.PropTypes.number.isRequired
}
class Number extends Component{
    setNumber(event){
        let {target} = event;
        let    type = target.getAttribute("data-type");
        if(type != "value"){
            this.props.actions.setNumber(type);
        }else{
            this.props.actions.setNumber(type,target.value);
        }
    }
    render(){
        let props = this.props,
        setNumber = this.setNumber.bind(this);
        return <div>
                    <input type="text" onChange={setNumber} data-type="value" value={props.number}/>
                    <button data-type="add" onClick={setNumber}>+</button>
                    <button data-type="less" onClick={setNumber}>-</button>
                </div>
    }
}
Number.propTypes = propTypes;
//定義元件内需要使用的state某個值
function mapStateToProps(state){
    return {
        number:state.number
    }
}
//定義元件内需要調用回調改變state的props參數
function mapDispatchToProps(dispatch){
    return {
        //這就是合并actions.js中定義的函數,在元件内this.props.actions.xxx調用bindActionCreators生成的dispatch函數
        actions:bindActionCreators(Actions,dispatch)
    }
}
export default connect(mapStateToProps,mapDispatchToProps)(Number);
先把視線轉到button的click:
調用了setNumber方法
setNumber調用了 this.props.actions.setNumber(type,target.value); 傳入type,如果是輸入則傳入value,這裡調用的就是actions.js中export出來的setNumber函數,那麼它是怎麼傳進來的呢?
//定義元件内需要使用的state某個值
function mapStateToProps(state){
    return {
        number:state.number
    }
}
//定義元件内需要調用回調改變state的props參數
function mapDispatchToProps(dispatch){
    return {
        //這就是合并actions.js中定義的函數,在元件内this.props.actions.xxx調用bindActionCreators生成的dispatch函數
        actions:bindActionCreators(Actions,dispatch)
    }
}
export default connect(mapStateToProps,mapDispatchToProps)(Number);
就是這一段,
第一個函數,mapStateToProps 這個是定義元件内需要擷取的,state的值,就是你全局的狀态會被傳入這個函數,你需要指定哪一個屬性你需要放到元件的props裡面。
第二個函數,mapDispatchToProps 這個是定義元件内需要擷取的,能調用到 dispatch函數的回調。它也是放到props裡面,和第一個state的差別是,這裡放進去的是函數,是能夠調用actions.js裡定義的函數。
這裡的
return {
        //這就是合并actions.js中定義的函數,在元件内this.props.actions.xxx調用bindActionCreators生成的dispatch函數
        actions:bindActionCreators(Actions,dispatch)
    }
這個actions就是那句 this.props.actions對象,它的值是 bindActionCreators(Actions,dispatch)。這個函數把actions.js中所有導出的函數轉換成能夠觸發dispatch的函數,在元件裡調用this.props.actions.setNumber時,實際上在setNumber處理完action之後,又會自動調用store.dispatch這個方法發出action。
然後總結要點
要點一:Provider元件包裹整個應用,這樣就能通過這一個超級父元件管理所有子元件的state。
要點二:bindActionCreators函數,綁定action,建立dispatch。傳回一個actions對象,然後傳入元件中,最後元件調用actions裡面定義的方法,方法處理action調用store.dispatch,這是整個架構的關鍵點
看一點别人的項目實踐
最近在看一個項目:superset。 這是一個大資料可視化內建軟體,它的前端架構是基于react+redux的,裡面的整體架構,可以看到如圖:
app.jsx:
看看它的做法,它将actions對象分發到需要全局state的所有元件中,然後在這些元件中就不需要定義任何與redux相關的代碼了:
最後總結
打字到這裡,手有點酸,先不總結啦。
demo代碼github:https://github.com/294678380/redux_demo
=============================
轉載需在明顯處注明作者與出處連結。
========================================================
轉載請注明出處。